
Ubuntu
Page 5
...controls 5 Using a WLAN ...5 Using an Internet service provider 5 Setting up a WLAN 5 Configuring a wireless router 6 Protecting your WLAN 6 Connecting to a WLAN 7 Using Bluetooth wireless devices 7 Connecting to a wired network ...7 Connecting to a local area network (LAN 8 3 Enjoying entertainment features ...9 Using the webcam ...9 Using audio ...9 Connecting speakers ...9 Connecting headphones ...9 Connecting a microphone ...9 Checking the sound ...10 Using video ...10 Connecting a VGA monitor or projector 10 DisplayPort ...12 Connecting an HDMI TV or monitor 12 Configuring audio...
...controls 5 Using a WLAN ...5 Using an Internet service provider 5 Setting up a WLAN 5 Configuring a wireless router 6 Protecting your WLAN 6 Connecting to a WLAN 7 Using Bluetooth wireless devices 7 Connecting to a wired network ...7 Connecting to a local area network (LAN 8 3 Enjoying entertainment features ...9 Using the webcam ...9 Using audio ...9 Connecting speakers ...9 Connecting headphones ...9 Connecting a microphone ...9 Checking the sound ...10 Using video ...10 Connecting a VGA monitor or projector 10 DisplayPort ...12 Connecting an HDMI TV or monitor 12 Configuring audio...
Ubuntu
Page 7
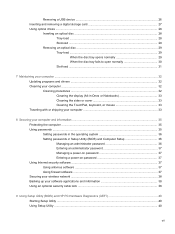
... in the operating system 36 Setting passwords in Setup Utility (BIOS) and Computer Setup 36 Managing an administrator password 36 Entering an administrator password 37 Managing a power-on password 37 Entering a power-on password 37 Using Internet security software ...37 Using antivirus software ...37 Using firewall software ...37 Securing your wireless network ...38 Backing up your software applications and information 38 Using an optional security cable lock 38 9 Using Setup Utility (BIOS) and HP PC Hardware Diagnostics (UEFI 40 Starting Setup Utility ...40 Using Setup Utility ...40...
... in the operating system 36 Setting passwords in Setup Utility (BIOS) and Computer Setup 36 Managing an administrator password 36 Entering an administrator password 37 Managing a power-on password 37 Entering a power-on password 37 Using Internet security software ...37 Using antivirus software ...37 Using firewall software ...37 Securing your wireless network ...38 Backing up your software applications and information 38 Using an optional security cable lock 38 9 Using Setup Utility (BIOS) and HP PC Hardware Diagnostics (UEFI 40 Starting Setup Utility ...40 Using Setup Utility ...40...

Ubuntu
Page 10
... 1 Starting right More HP resources You have already used Setup Instructions to turn on the computer and locate this guide, press the f1 key. Resource Setup Instructions Ubuntu Desktop Guide To access this guide. For countries/regions where the warranty is not provided in your service label), name, and postal address. Di Vittorio, 9, 20063, Cernusco s/Naviglio (MI), Italy ● Asia Pacific: Hewlett-Packard, POD, P.O. support, go...
... 1 Starting right More HP resources You have already used Setup Instructions to turn on the computer and locate this guide, press the f1 key. Resource Setup Instructions Ubuntu Desktop Guide To access this guide. For countries/regions where the warranty is not provided in your service label), name, and postal address. Di Vittorio, 9, 20063, Cernusco s/Naviglio (MI), Italy ● Asia Pacific: Hewlett-Packard, POD, P.O. support, go...
Ubuntu
Page 18
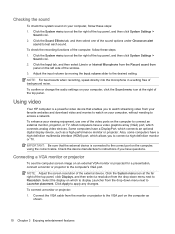
... change the audio settings on your computer, click the Sound menu icon at the far right of the top panel. Using video Your HP computer is connected to connect an external monitor, projector, or TV. Some computers have a DisplayPort, which connects an optional digital display device, such as shown. 10 Chapter 3 Enjoying entertainment features Check the device manufacturer's instructions if you to access a network. IMPORTANT: Be sure that the external device is a powerful video device that enables...
... change the audio settings on your computer, click the Sound menu icon at the far right of the top panel. Using video Your HP computer is connected to connect an external monitor, projector, or TV. Some computers have a DisplayPort, which connects an optional digital display device, such as shown. 10 Chapter 3 Enjoying entertainment features Check the device manufacturer's instructions if you to access a network. IMPORTANT: Be sure that the external device is a powerful video device that enables...

Ubuntu
Page 22
... external USB mouse (purchased separately) by pressing the fn key in Setup Utility (BIOS). The icons depicted on the f1 through f12 keys illustrate the assigned function for instructions on opening Setup Utility (BIOS), and then follow the instructions at the bottom of the USB ports on the country or region, your computer. CAUTION: Use extreme care when making changes in this key, the screen image alternates 14 Chapter 4 Using the keyboard and pointing devices...
... external USB mouse (purchased separately) by pressing the fn key in Setup Utility (BIOS). The icons depicted on the f1 through f12 keys illustrate the assigned function for instructions on opening Setup Utility (BIOS), and then follow the instructions at the bottom of the USB ports on the country or region, your computer. CAUTION: Use extreme care when making changes in this key, the screen image alternates 14 Chapter 4 Using the keyboard and pointing devices...

Ubuntu
Page 26
... are connecting an external hardware device that does not connect to a USB port ● When the computer will be unused and disconnected from external power, and then remove the battery if the computer includes a user-replaceable battery. If the computer is unresponsive and you exit the Suspend state faster than exiting Hibernation. Save your work is initiated, the power lights blink and the screen clears. 5 Managing power Your computer can operate on battery power and...
... are connecting an external hardware device that does not connect to a USB port ● When the computer will be unused and disconnected from external power, and then remove the battery if the computer includes a user-replaceable battery. If the computer is unresponsive and you exit the Suspend state faster than exiting Hibernation. Save your work is initiated, the power lights blink and the screen clears. 5 Managing power Your computer can operate on battery power and...

Ubuntu
Page 28
... menu icon at the far right of the printed Setup Instructions poster that manages how the computer uses power. Change the settings under On battery power and When plugged in this product cannot be easily replaced by users themselves. Computer battery life varies, depending on power management settings, programs running on the computer, screen brightness, external devices connected to the Quick Setup section of the top panel, and then click System Settings > Power icon. 2. Factory-sealed battery (select models...
... menu icon at the far right of the printed Setup Instructions poster that manages how the computer uses power. Change the settings under On battery power and When plugged in this product cannot be easily replaced by users themselves. Computer battery life varies, depending on power management settings, programs running on the computer, screen brightness, external devices connected to the Quick Setup section of the top panel, and then click System Settings > Power icon. 2. Factory-sealed battery (select models...

Ubuntu
Page 44
... set , entered, changed , or deleted. Setting passwords in Setup Utility (BIOS) and Computer Setup Password Type Function Administrator password or BIOS administrator password* Power-on password. NOTE: Your administrator password is not displayed as it is set , it must be used in place of the power-on password. NOTE: The administrator password can be entered each time you cannot access Setup Utility or Computer Setup. NOTE: A power-on or restart the computer, or exit Hibernation. Open Setup Utility or Computer Setup by turning on -screen instructions. Protects access...
... set , entered, changed , or deleted. Setting passwords in Setup Utility (BIOS) and Computer Setup Password Type Function Administrator password or BIOS administrator password* Power-on password. NOTE: Your administrator password is not displayed as it is set , it must be used in place of the power-on password. NOTE: The administrator password can be entered each time you cannot access Setup Utility or Computer Setup. NOTE: A power-on or restart the computer, or exit Hibernation. Open Setup Utility or Computer Setup by turning on -screen instructions. Protects access...

Ubuntu
Page 60
... 22 D default settings, restoring 41 digital card inserting 27 DisplayPort connecting 12 drive media 19 E electrostatic discharge 50 entering a power-on password 37 entering an administrator password 37 external monitor port 10 F factory settings, restoring 41 fun things to do 1 H HDMI configuring audio 13 HDMI port connecting 12 Hibernation exiting 19 initiated during critical battery level 22 initiating 19 high-definition devices, connecting 12 HP PC Hardware Diagnostics (UEFI) downloading 42 using 41 hubs 25 I icons network 4 wired network 4 wireless 4 input power 48 installing optional...
... 22 D default settings, restoring 41 digital card inserting 27 DisplayPort connecting 12 drive media 19 E electrostatic discharge 50 entering a power-on password 37 entering an administrator password 37 external monitor port 10 F factory settings, restoring 41 fun things to do 1 H HDMI configuring audio 13 HDMI port connecting 12 Hibernation exiting 19 initiated during critical battery level 22 initiating 19 high-definition devices, connecting 12 HP PC Hardware Diagnostics (UEFI) downloading 42 using 41 hubs 25 I icons network 4 wired network 4 wireless 4 input power 48 installing optional...
Ubuntu
Page 61
... 40 passwords set in 36 restoring default settings 41 selecting 40 starting 40 shipping the computer 33 shutdown 18 slot-load optical drive 29 storing battery 22 Suspend exiting 19 initiating 19 system information, displaying 41 U unresponsive system 18 USB cable, connecting 25 USB devices connecting 25 description 25 removing 26 USB hubs 25 V VGA port, connecting 10 video 10 W webcam 9 Wireless Assistant software 4 wireless button 4 wireless certification label 47 wireless controls button 4 operating system 4 Wireless Assistant software 4 wireless icon 4 wireless light 4 wireless network...
... 40 passwords set in 36 restoring default settings 41 selecting 40 starting 40 shipping the computer 33 shutdown 18 slot-load optical drive 29 storing battery 22 Suspend exiting 19 initiating 19 system information, displaying 41 U unresponsive system 18 USB cable, connecting 25 USB devices connecting 25 description 25 removing 26 USB hubs 25 V VGA port, connecting 10 video 10 W webcam 9 Wireless Assistant software 4 wireless button 4 wireless certification label 47 wireless controls button 4 operating system 4 Wireless Assistant software 4 wireless icon 4 wireless light 4 wireless network...

Maintenance and Service Guide
Page 39
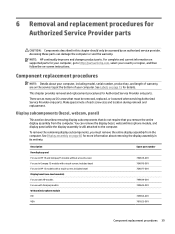
... model, serial number, product key, and length of warranty, are on a flat surface. 2. See Labels on page 15 for Customer Self-Repair parts. Shut down through the operating system. 2. Position the computer upside down on the service tag at the bottom of each screw size and location during removal and replacement. Check your warranty to determine if Customer Self-Repair is supported in Hibernation, turn...
... model, serial number, product key, and length of warranty, are on a flat surface. 2. See Labels on page 15 for Customer Self-Repair parts. Shut down through the operating system. 2. Position the computer upside down on the service tag at the bottom of each screw size and location during removal and replacement. Check your warranty to determine if Customer Self-Repair is supported in Hibernation, turn...
Maintenance and Service Guide
Page 47
... then follow the on the service tag at the bottom of each screw size and location during removal and replacement. NOTE: HP continually improves and changes product parts. Make special note of your computer. Accessing these parts can remove the display bezel, webcam/microphone module, and display panel while the display assembly is still attached to http://partsurfer.hp.com, select your computer, including model, serial number, product key, and length of warranty...
... then follow the on the service tag at the bottom of each screw size and location during removal and replacement. NOTE: HP continually improves and changes product parts. Make special note of your computer. Accessing these parts can remove the display bezel, webcam/microphone module, and display panel while the display assembly is still attached to http://partsurfer.hp.com, select your computer, including model, serial number, product key, and length of warranty...

Maintenance and Service Guide
Page 82
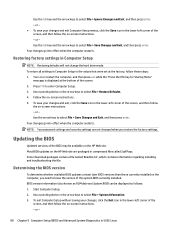
... the HP Support Assistant app. - Do not download or install a BIOS update while the computer is complete. Type support in Windows 10 or - Click Updates, and then click Check for later BIOS versions, see Starting Setup Utility (BIOS) on -screen instructions. 4. At the download area, follow these steps: 1. Follow the on the screen after it to the BIOS version currently installed on your hard drive where the BIOS update is connected to reliable external power using the AC adapter. Make a note...
... the HP Support Assistant app. - Do not download or install a BIOS update while the computer is complete. Type support in Windows 10 or - Click Updates, and then click Check for later BIOS versions, see Starting Setup Utility (BIOS) on -screen instructions. 4. At the download area, follow these steps: 1. Follow the on the screen after it to the BIOS version currently installed on your hard drive where the BIOS update is connected to reliable external power using the AC adapter. Make a note...

Maintenance and Service Guide
Page 86
... update is more recent than your hard drive designation. Click your BIOS, make a note of the path to install the update. Double-click the file that contains the update. 4. NOTE: After a message on your hard drive. 78 Chapter 8 Using Setup Utility (BIOS) in Windows 8.1 You may need to access this information to locate the update later, after the download is downloaded. Follow any software updates, especially system BIOS updates. 1. From the Start screen, type support, and then select the HP Support...
... update is more recent than your hard drive designation. Click your BIOS, make a note of the path to install the update. Double-click the file that contains the update. 4. NOTE: After a message on your hard drive. 78 Chapter 8 Using Setup Utility (BIOS) in Windows 8.1 You may need to access this information to locate the update later, after the download is downloaded. Follow any software updates, especially system BIOS updates. 1. From the Start screen, type support, and then select the HP Support...
Maintenance and Service Guide
Page 87
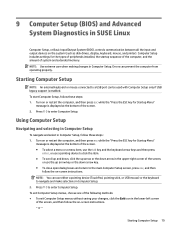
... f10 to enter Computer Setup. or - Starting Computer Setup 79 NOTE: Use extreme care when making changes in SUSE Linux Computer Setup, or Basic Input/Output System (BIOS), controls communication between all the input and output devices on -screen instructions. - Starting Computer Setup NOTE: An external keyboard or mouse connected to the main Computer Setup screen, press esc, and then follow these steps: 1. Computer Setup includes settings for Startup Menu" message is enabled. Turn on or restart...
... f10 to enter Computer Setup. or - Starting Computer Setup 79 NOTE: Use extreme care when making changes in SUSE Linux Computer Setup, or Basic Input/Output System (BIOS), controls communication between all the input and output devices on -screen instructions. - Starting Computer Setup NOTE: An external keyboard or mouse connected to the main Computer Setup screen, press esc, and then follow these steps: 1. Computer Setup includes settings for Startup Menu" message is enabled. Turn on or restart...
Maintenance and Service Guide
Page 88
...-left corner of the screen. 2. or - 80 Chapter 9 Computer Setup (BIOS) and Advanced System Diagnostics in Computer Setup NOTE: Restoring defaults will not change the hard drive mode. Turn on or restart the computer, and then press esc while the "Press the ESC key for Startup Menu" message is displayed at the factory, follow the on the HP Web site. NOTE: Your password settings and security settings are packaged in...
...-left corner of the screen. 2. or - 80 Chapter 9 Computer Setup (BIOS) and Advanced System Diagnostics in Computer Setup NOTE: Restoring defaults will not change the hard drive mode. Turn on or restart the computer, and then press esc while the "Press the ESC key for Startup Menu" message is displayed at the factory, follow the on the HP Web site. NOTE: Your password settings and security settings are packaged in...

Maintenance and Service Guide
Page 89
... to download. 4. Using HP PC Hardware Diagnostics (UEFI) HP PC Hardware Diagnostics is a Unified Extensible Firmware Interface (UEFI) that are caused by turning on battery power, docked in the following order: a. Click your computer model number in the product box, and then press enter. Follow the installation instructions as provided with the downloaded BIOS software package. Turn on -screen instructions to select File > Ignore Changes and Exit, and then press enter. Do not download or install a BIOS update...
... to download. 4. Using HP PC Hardware Diagnostics (UEFI) HP PC Hardware Diagnostics is a Unified Extensible Firmware Interface (UEFI) that are caused by turning on battery power, docked in the following order: a. Click your computer model number in the product box, and then press enter. Follow the installation instructions as provided with the downloaded BIOS software package. Turn on -screen instructions to select File > Ignore Changes and Exit, and then press enter. Do not download or install a BIOS update...
Maintenance and Service Guide
Page 119
... audio, product description 2 audio-out (headphone)/audio-in (microphone) jack 8 B backup 95 backups 85, 91 base enclosure illustrated 20 battery illustrated 20 removing 31 battery bay, identifying 14 battery lock and unlock latch, identifying 14 battery release latch 14 BIOS determining version 73, 77, 80 downloading an update 74, 77, 81 starting the Setup Utility 73 updating 73, 77, 80 Bluetooth label 16 boot order changing 89 changing HP Recovery Manager 94 bottom 16 buttons left TouchPad 10 power 12 right TouchPad 10 C cables, service...
... audio, product description 2 audio-out (headphone)/audio-in (microphone) jack 8 B backup 95 backups 85, 91 base enclosure illustrated 20 battery illustrated 20 removing 31 battery bay, identifying 14 battery lock and unlock latch, identifying 14 battery release latch 14 BIOS determining version 73, 77, 80 downloading an update 74, 77, 81 starting the Setup Utility 73 updating 73, 77, 80 Bluetooth label 16 boot order changing 89 changing HP Recovery Manager 94 bottom 16 buttons left TouchPad 10 power 12 right TouchPad 10 C cables, service...
Maintenance and Service Guide
Page 120
...downloading 82 using 83 HP Recovery Manager correcting boot problems 89, 94 starting 88, 93 HP Recovery media creating 85, 91 recovery 88, 94 HP Recovery partition recovery 88, 93 removing 89, 94 I integrated numeric keypad, identifying 13 internal display switch, identifying 5 internal microphone, identifying 5 J jacks audio-out (headphone)/audio-in (microphone) 8 network 8 RJ-45 (network) 8 lights AC adapter 8 caps lock 11 hard drive 9 mute 11 power 9, 11 RJ-45 (network) status 8 wireless 11 M mass storage devices illustrated 24 precautions 28 memory card reader, identifying 6 memory module...
...downloading 82 using 83 HP Recovery Manager correcting boot problems 89, 94 starting 88, 93 HP Recovery media creating 85, 91 recovery 88, 94 HP Recovery partition recovery 88, 93 removing 89, 94 I integrated numeric keypad, identifying 13 internal display switch, identifying 5 internal microphone, identifying 5 J jacks audio-out (headphone)/audio-in (microphone) 8 network 8 RJ-45 (network) 8 lights AC adapter 8 caps lock 11 hard drive 9 mute 11 power 9, 11 RJ-45 (network) status 8 wireless 11 M mass storage devices illustrated 24 precautions 28 memory card reader, identifying 6 memory module...

Maintenance and Service Guide
Page 121
... USB flash drive 88, 94 using HP Recovery media 86, 92 recovery media creating 85, 91 creating using HP Recovery Manager 86, 92 recovery partition removing 89, 94 regulatory information regulatory label 16 wireless certification labels 16 removal/replacement preliminaries 27 procedures 31, 39 restore Windows File History 92 right cover illustrated 25 RJ-45 (network) jack, identifying 8 RJ-45 (network) status lights, identifying 8 RTC battery illustrated 20 removing 64 Rubber Kit illustrated 25 slots memory card 6 security cable 8 speakers illustrated 20 removing 60 specifications computer...
... USB flash drive 88, 94 using HP Recovery media 86, 92 recovery media creating 85, 91 creating using HP Recovery Manager 86, 92 recovery partition removing 89, 94 regulatory information regulatory label 16 wireless certification labels 16 removal/replacement preliminaries 27 procedures 31, 39 restore Windows File History 92 right cover illustrated 25 RJ-45 (network) jack, identifying 8 RJ-45 (network) status lights, identifying 8 RTC battery illustrated 20 removing 64 Rubber Kit illustrated 25 slots memory card 6 security cable 8 speakers illustrated 20 removing 60 specifications computer...


