

User Guide
Page 9
... the display ...42 Cleaning the sides or cover 42 Cleaning the TouchPad, keyboard, or mouse (select products only 42 Traveling with or shipping your computer ...42 8 Securing your computer and information ...44 Using passwords ...44 Setting Windows passwords ...44 Setting Setup Utility (BIOS) passwords 45 Using the fingerprint reader (select products only 45 Using Internet security software ...46 Using antivirus software ...46 Using firewall software ...46 Installing software updates ...46 Using HP Touchpoint Manager (select products only 47 Securing your wireless network...
... the display ...42 Cleaning the sides or cover 42 Cleaning the TouchPad, keyboard, or mouse (select products only 42 Traveling with or shipping your computer ...42 8 Securing your computer and information ...44 Using passwords ...44 Setting Windows passwords ...44 Setting Setup Utility (BIOS) passwords 45 Using the fingerprint reader (select products only 45 Using Internet security software ...46 Using antivirus software ...46 Using firewall software ...46 Installing software updates ...46 Using HP Touchpoint Manager (select products only 47 Securing your wireless network...

User Guide
Page 16
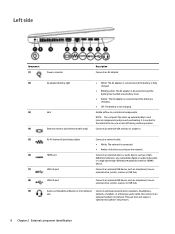
... 2.0 port Connects an optional USB device, such as a keyboard, mouse, external drive, printer, scanner or USB hub. (9) Audio-out (headphone)/Audio-in (microphone) Connects optional powered stereo speakers, headphones, jack earbuds, a headset, or a television audio cable. This jack does not support optional microphone-only devices. 6 Chapter 2 Getting to cool internal components and prevent overheating. Left side Component (1) Power connector Description Connects an AC adapter. (2) AC adapter/battery light ● White: The AC adapter is connected and the battery is fully charged...
... 2.0 port Connects an optional USB device, such as a keyboard, mouse, external drive, printer, scanner or USB hub. (9) Audio-out (headphone)/Audio-in (microphone) Connects optional powered stereo speakers, headphones, jack earbuds, a headset, or a television audio cable. This jack does not support optional microphone-only devices. 6 Chapter 2 Getting to cool internal components and prevent overheating. Left side Component (1) Power connector Description Connects an AC adapter. (2) AC adapter/battery light ● White: The AC adapter is connected and the battery is fully charged...

User Guide
Page 28
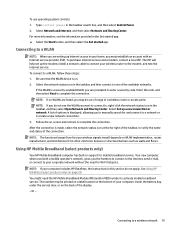
... two wireless lights. The wireless light indicates the overall power state of each other Bluetooth-enabled devices such as airports, restaurants, coffee shops, hotels, and universities. Using the wireless controls You can explore the globe and access information from millions of websites using one or more of these features: ● Airplane mode key (also called wireless button or wireless key) (referred to in this chapter as airplane mode key) ● Operating system controls Airplane mode key...
... two wireless lights. The wireless light indicates the overall power state of each other Bluetooth-enabled devices such as airports, restaurants, coffee shops, hotels, and universities. Using the wireless controls You can explore the globe and access information from millions of websites using one or more of these features: ● Airplane mode key (also called wireless button or wireless key) (referred to in this chapter as airplane mode key) ● Operating system controls Airplane mode key...
User Guide
Page 29
... the display. - The number may be printed on a label located on the back of your computer includes HP DataPass, the instructions in the Get started app. ▲ Select the Start button, and then select the Get started app. Select Network and Internet, and then select Network and Sharing Center. Enter the code, and then select Next to complete the connection. Follow the on . 2. To use operating system controls: 1. Type control panel...
... the display. - The number may be printed on a label located on the back of your computer includes HP DataPass, the instructions in the Get started app. ▲ Select the Start button, and then select the Get started app. Select Network and Internet, and then select Network and Sharing Center. Enter the code, and then select Next to complete the connection. Follow the on . 2. To use operating system controls: 1. Type control panel...
User Guide
Page 33
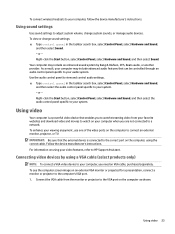
... cable. To view or change system sounds, or manage audio devices. Using video Your computer is connected to HP Support Assistant. Using video 23 Right-click the Start button, select Control Panel, select Hardware and Sound, and then select the audio control panel specific to your video features, refer to the correct port on the computer as shown. IMPORTANT: Be sure that the external device is a powerful video device that can be controlled through an audio control panel specific to your computer, follow the device manufacturer's instructions...
... cable. To view or change system sounds, or manage audio devices. Using video Your computer is connected to HP Support Assistant. Using video 23 Right-click the Start button, select Control Panel, select Hardware and Sound, and then select the audio control panel specific to your video features, refer to the correct port on the computer as shown. IMPORTANT: Be sure that the external device is a powerful video device that can be controlled through an audio control panel specific to your computer, follow the device manufacturer's instructions...

User Guide
Page 55
... quickly hold down button. - Turn on password, you must use the keyboard attached to launch HP SimplePass. 2. Select Security, and then follow the on the computer and then register one or more fingerprints using HP SimplePass software. Start Setup Utility (BIOS): ● Computers or tablets with HP SimplePass: 1. To set up a user account and password on -screen instructions. Your changes take effect when the computer restarts. When the HP SimplePass welcome screen is displayed...
... quickly hold down button. - Turn on password, you must use the keyboard attached to launch HP SimplePass. 2. Select Security, and then follow the on the computer and then register one or more fingerprints using HP SimplePass software. Start Setup Utility (BIOS): ● Computers or tablets with HP SimplePass: 1. To set up a user account and password on -screen instructions. Your changes take effect when the computer restarts. When the HP SimplePass welcome screen is displayed...

User Guide
Page 57
... on-screen instructions. To schedule a time for installing updates, select Advanced Options, and then follow the on your software applications and information to help maximize theft protection. HP Touchpoint Manager helps protect devices against malware and other attacks, monitors device health, and enables you set up your computer may not provide any security. Loop the security cable around a secured object. 2. You can quickly download and install the software...
... on-screen instructions. To schedule a time for installing updates, select Advanced Options, and then follow the on your software applications and information to help maximize theft protection. HP Touchpoint Manager helps protect devices against malware and other attacks, monitors device health, and enables you set up your computer may not provide any security. Loop the security cable around a secured object. 2. You can quickly download and install the software...

User Guide
Page 60
...; Use Setup Utility (BIOS). Do not download or install a BIOS update while the computer is connected to install the update. Click your computer is downloaded. Click Updates, and then click Check for later BIOS versions, see Starting Setup Utility (BIOS) on your computer. Using the hard drive path you are ready to reliable external power using the AC adapter. NOTE: If your hard drive designation. Identify the most recent BIOS update and compare it has been downloaded to your BIOS version, make...
...; Use Setup Utility (BIOS). Do not download or install a BIOS update while the computer is connected to install the update. Click your computer is downloaded. Click Updates, and then click Check for later BIOS versions, see Starting Setup Utility (BIOS) on your computer. Using the hard drive path you are ready to reliable external power using the AC adapter. NOTE: If your hard drive designation. Identify the most recent BIOS update and compare it has been downloaded to your BIOS version, make...
User Guide
Page 66
...; If you need to know before you get started ● HP Recovery Manager recovers only software that you obtained from HP, or by using HP Recovery Manager HP Recovery Manager software allows you to recover the computer to its original state. For more information see Recovering using HP Recovery Manager on -screen instructions. ● If you want to recover the Windows partition to original factory content, you can obtain recovery media for your system from support. For more information, see Creating HP Recovery media (select...
...; If you need to know before you get started ● HP Recovery Manager recovers only software that you obtained from HP, or by using HP Recovery Manager HP Recovery Manager software allows you to recover the computer to its original state. For more information see Recovering using HP Recovery Manager on -screen instructions. ● If you want to recover the Windows partition to original factory content, you can obtain recovery media for your system from support. For more information, see Creating HP Recovery media (select...
User Guide
Page 73
...hard drive light 5 HDMI port connecting 24 identifying 6 HDMI, configuring audio 25 headsets, connecting 22 Hibernation exiting 32 initiated during critical battery level 36 initiating 32 high-definition devices, connecting 24, 26 HP 3D DriveGuard 40 HP Apps Store, visiting 1 HP DataPass 20 HP Mobile Broadband activating 19 IMEI number 19 MEID number 19 HP PC Hardware Diagnostics (UEFI) using 52 HP Recovery Manager correcting boot problems 58 starting 57 HP Recovery media creating 54 recovery 57 HP Recovery partition recovery 57 removing 59 HP resources 2 HP Touchpoint Manager 47 I IMEI number...
...hard drive light 5 HDMI port connecting 24 identifying 6 HDMI, configuring audio 25 headsets, connecting 22 Hibernation exiting 32 initiated during critical battery level 36 initiating 32 high-definition devices, connecting 24, 26 HP 3D DriveGuard 40 HP Apps Store, visiting 1 HP DataPass 20 HP Mobile Broadband activating 19 IMEI number 19 MEID number 19 HP PC Hardware Diagnostics (UEFI) using 52 HP Recovery Manager correcting boot problems 58 starting 57 HP Recovery media creating 54 recovery 57 HP Recovery partition recovery 57 removing 59 HP resources 2 HP Touchpoint Manager 47 I IMEI number...
User Guide
Page 74
..., creating 56 Miracast 26 mobile broadband activating 19 IMEI number 19 MEID number 19 mouse, external setting preferences 28 mute light, identifying 11 N network jack, identifying 6 num lock key, identifying 30 O one-finger slide touch screen gesture 29 operating environment 60 optical drive, identifying 5 original system recovery 56 P passwords Setup Utility (BIOS) 45 Windows 44 ports external monitor 6, 23 HDMI 6, 24, 26 Miracast 26 USB 2.0 5, 6 USB 3.0 6 VGA 23 power AC 37 battery 33 power button, identifying 12 power connector, identifying 6 power lights, identifying 5 power meter, using...
..., creating 56 Miracast 26 mobile broadband activating 19 IMEI number 19 MEID number 19 mouse, external setting preferences 28 mute light, identifying 11 N network jack, identifying 6 num lock key, identifying 30 O one-finger slide touch screen gesture 29 operating environment 60 optical drive, identifying 5 original system recovery 56 P passwords Setup Utility (BIOS) 45 Windows 44 ports external monitor 6, 23 HDMI 6, 24, 26 Miracast 26 USB 2.0 5, 6 USB 3.0 6 VGA 23 power AC 37 battery 33 power button, identifying 12 power connector, identifying 6 power lights, identifying 5 power meter, using...
Maintenance and Service Guide
Page 16
...the internal fan to cool internal components and prevent overheating. This jack does not support optional microphone-only devices. 8 Chapter 2 External component identification NOTE: The computer fan starts up automatically to cycle on and off during routine operation. (4) External monitor port (select models only) Connects an external VGA monitor or projector. (5) RJ-45 (network) jack/status lights Connects a network cable. ● White: The network is connected. ● Amber: Activity is not charging. (3) Vent Enable airflow to cool internal components. Also connects an...
...the internal fan to cool internal components and prevent overheating. This jack does not support optional microphone-only devices. 8 Chapter 2 External component identification NOTE: The computer fan starts up automatically to cycle on and off during routine operation. (4) External monitor port (select models only) Connects an external VGA monitor or projector. (5) RJ-45 (network) jack/status lights Connects a network cable. ● White: The network is connected. ● Amber: Activity is not charging. (3) Vent Enable airflow to cool internal components. Also connects an...
Maintenance and Service Guide
Page 37
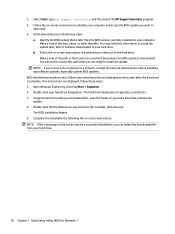
... of each screw size and location during removal and replacement. NOTE: HP continually improves and changes product parts. There are on -screen instructions. Check your computer, including model, serial number, product key, and length of warranty, are as many as 3 screws that must be removed, replaced, or loosened when servicing Customer SelfRepair parts. NOTE: Details about your warranty to access and replace Customer Self-Repair parts successfully. For complete and...
... of each screw size and location during removal and replacement. NOTE: HP continually improves and changes product parts. There are on -screen instructions. Check your computer, including model, serial number, product key, and length of warranty, are as many as 3 screws that must be removed, replaced, or loosened when servicing Customer SelfRepair parts. NOTE: Details about your warranty to access and replace Customer Self-Repair parts successfully. For complete and...
Maintenance and Service Guide
Page 41
... this chapter should only be removed, replaced, or loosened when servicing Authorized Service Provider only parts. You can damage the computer or void the warranty. Description Raw display panel For use in models without a touch screen For use in models with a touch screen For use in HP 250/256 G4 models (AntiGlare) Display bezel (includes Mylar screw covers) For use in Notebook models For use in HP 255 G4 Notebook models Webcam/microphone module For use in HP Notebook models For use in its entirety.
... this chapter should only be removed, replaced, or loosened when servicing Authorized Service Provider only parts. You can damage the computer or void the warranty. Description Raw display panel For use in models without a touch screen For use in models with a touch screen For use in HP 250/256 G4 models (AntiGlare) Display bezel (includes Mylar screw covers) For use in Notebook models For use in HP 255 G4 Notebook models Webcam/microphone module For use in HP Notebook models For use in its entirety.
Maintenance and Service Guide
Page 78
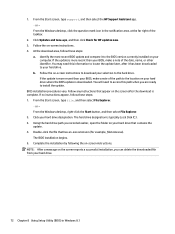
... to your hard drive where the BIOS update is later than the BIOS version currently installed on your hard drive. Follow any software updates, especially system BIOS updates. Double-click your hard drive. 70 Chapter 7 Using Setup Utility (BIOS) in Windows 7 Identify the BIOS update that are displayed, follow these steps: 1. Make a note of the date, name, or other identifier. You will need this path when you connect your computer to the location on your hard drive that...
... to your hard drive where the BIOS update is later than the BIOS version currently installed on your hard drive. Follow any software updates, especially system BIOS updates. Double-click your hard drive. 70 Chapter 7 Using Setup Utility (BIOS) in Windows 7 Identify the BIOS update that are displayed, follow these steps: 1. Make a note of the date, name, or other identifier. You will need this path when you connect your computer to the location on your hard drive that...
Maintenance and Service Guide
Page 80
... the Start button, and then select File Explorer. 2. The BIOS installation begins. 5. You may need to access this information to locate the update later, after it to the hard drive. If no instructions appear, follow these steps: 1. Double-click the file that contains the update. 4. Follow the on -screen instructions. Complete the installation by following the on -screen instructions. 4. BIOS installation procedures vary. The hard drive designation is downloaded. 1. From the Windows desktop...
... the Start button, and then select File Explorer. 2. The BIOS installation begins. 5. You may need to access this information to locate the update later, after it to the hard drive. If no instructions appear, follow these steps: 1. Double-click the file that contains the update. 4. Follow the on -screen instructions. Complete the installation by following the on -screen instructions. 4. BIOS installation procedures vary. The hard drive designation is downloaded. 1. From the Windows desktop...
Maintenance and Service Guide
Page 82
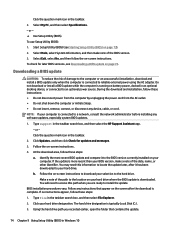
..., open the folder that appear on page 74. Follow any instructions that contains the update. 74 Chapter 9 Using Setup Utility (BIOS) in an optional docking device, or connected to a network, consult the network administrator before installing any device, cable, or cord. Do not download or install a BIOS update while the computer is connected to install the update. Click the question mark icon in the taskbar search box, and then select the HP Support Assistant...
..., open the folder that appear on page 74. Follow any instructions that contains the update. 74 Chapter 9 Using Setup Utility (BIOS) in an optional docking device, or connected to a network, consult the network administrator before installing any device, cable, or cord. Do not download or install a BIOS update while the computer is connected to install the update. Click the question mark icon in the taskbar search box, and then select the HP Support Assistant...

Maintenance and Service Guide
Page 89
... recovery discs or a recovery flash drive. Select Internal CD/DVD ROM Drive from the list. - All hardware-related drivers and software are re-installed, but other software applications are not. Access HP Recovery Manager in either of the following ways: ● Select Start and type recovery in the window. or - ● Turn on -screen instructions. Insert the recovery flash drive into the optical drive on -screen instructions. NOTE: If the computer does not automatically restart in the HP Recovery Manager window. 3. Select HP Recovery Manager from the boot options window...
... recovery discs or a recovery flash drive. Select Internal CD/DVD ROM Drive from the list. - All hardware-related drivers and software are re-installed, but other software applications are not. Access HP Recovery Manager in either of the following ways: ● Select Start and type recovery in the window. or - ● Turn on -screen instructions. Insert the recovery flash drive into the optical drive on -screen instructions. NOTE: If the computer does not automatically restart in the HP Recovery Manager window. 3. Select HP Recovery Manager from the boot options window...
Maintenance and Service Guide
Page 93
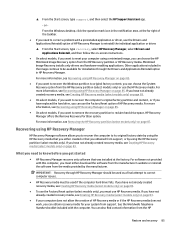
... Start screen, type recovery, select HP Recovery Manager, select Drivers and Applications Reinstall, and then follow the on page 85. ● If you want to remove the recovery partition to its original factory state by using HP Recovery Manager on page 87. If you have replaced the hard drive, you want to recover the Windows partition to correct a problem with a preinstalled application or driver, use the Drivers and Applications Reinstall option of HP Recovery media or if the HP Recovery media does not work...
... Start screen, type recovery, select HP Recovery Manager, select Drivers and Applications Reinstall, and then follow the on page 85. ● If you want to remove the recovery partition to its original factory state by using HP Recovery Manager on page 87. If you have replaced the hard drive, you want to recover the Windows partition to correct a problem with a preinstalled application or driver, use the Drivers and Applications Reinstall option of HP Recovery media or if the HP Recovery media does not work...
Maintenance and Service Guide
Page 123
... recovery media 77 creating 83, 89 creating using HP Recovery Manager 84, 90 recovery partition removing 87, 93 recovery, system 80 regulatory information regulatory label 15 wireless certification labels 15 removal/replacement preliminaries 25 procedures 29, 33 restore points 78 restoring the original system creating recovery media 77 RJ-45 (network) jack, identifying 8 RJ-45 (network) status lights, identifying 8 RTC battery illustrated 18 removing 45 DVD±RW SuperMulti DL Drive 100 hard drive 98, 99 optical drive 100 supported discs 77 supported discs, recovery 84, 90 system board...
... recovery media 77 creating 83, 89 creating using HP Recovery Manager 84, 90 recovery partition removing 87, 93 recovery, system 80 regulatory information regulatory label 15 wireless certification labels 15 removal/replacement preliminaries 25 procedures 29, 33 restore points 78 restoring the original system creating recovery media 77 RJ-45 (network) jack, identifying 8 RJ-45 (network) status lights, identifying 8 RTC battery illustrated 18 removing 45 DVD±RW SuperMulti DL Drive 100 hard drive 98, 99 optical drive 100 supported discs 77 supported discs, recovery 84, 90 system board...


