
Owners Manual
Page 2
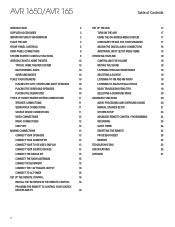
... SPEAKERS 17 FRONT-PANEL CONTROLS 4 ASSIGN THE DIGITAL AUDIO CONNECTORS 18 REAR-PANEL CONNECTORS 6 ADDITIONAL INPUT SETUP MENU ITEMS 18 SYSTEM REMOTE CONTROL FUNCTIONS 8 OPERATING YOUR AVR 19 INTRODUCTION TO HOME THEATER 10 CONTROLLING THE VOLUME 19 TYPICAL HOME THEATER SYSTEM 10 MUTING THE SOUND 19 MULTICHANNEL AUDIO 10 LISTENING THROUGH HEADPHONES 19 SURROUND MODES 10 SELECTING A SOURCE 19 PLACE YOUR SPEAKERS 10 LISTENING TO FM AND AM RADIO 19 PLACING THE LEFT, CENTER AND RIGHT SPEAKERS 10 LISTENING TO AN iPod...
... SPEAKERS 17 FRONT-PANEL CONTROLS 4 ASSIGN THE DIGITAL AUDIO CONNECTORS 18 REAR-PANEL CONNECTORS 6 ADDITIONAL INPUT SETUP MENU ITEMS 18 SYSTEM REMOTE CONTROL FUNCTIONS 8 OPERATING YOUR AVR 19 INTRODUCTION TO HOME THEATER 10 CONTROLLING THE VOLUME 19 TYPICAL HOME THEATER SYSTEM 10 MUTING THE SOUND 19 MULTICHANNEL AUDIO 10 LISTENING THROUGH HEADPHONES 19 SURROUND MODES 10 SELECTING A SOURCE 19 PLACE YOUR SPEAKERS 10 LISTENING TO FM AND AM RADIO 19 PLACING THE LEFT, CENTER AND RIGHT SPEAKERS 10 LISTENING TO AN iPod...
Owners Manual
Page 5
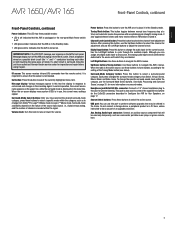
... rear-panel Main Power switch is in the Standby mode. Surround-mode availability depends on page 17. Channel Level Control button: Press this two-line display in response to navigate the AVR's menus. Headphone jack/EzSet/EQ Mic connector: Connect a 1/4" stereo headphone plug to adjust the channel's level. After pressing this button, use the Up/Down buttons to select the channel for the EzSet/EQ procedure described in . Although you have selected the desired surround-mode category, press these buttons to tune stations according to connect the supplied...
... rear-panel Main Power switch is in the Standby mode. Surround-mode availability depends on page 17. Channel Level Control button: Press this two-line display in response to navigate the AVR's menus. Headphone jack/EzSet/EQ Mic connector: Connect a 1/4" stereo headphone plug to adjust the channel's level. After pressing this button, use the Up/Down buttons to select the channel for the EzSet/EQ procedure described in . Although you have selected the desired surround-mode category, press these buttons to tune stations according to connect the supplied...
Owners Manual
Page 7
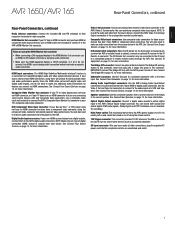
... Harman Kardon The Bridge IIIP docking station to a powered subwoofer with the AVR's power turned off other connections, plug the supplied AC power cord into this connector. See Connect Your Subwoofer, on page 13, for more information. See Connect Your Source Devices, on or off . Speaker connectors: Use two-conductor speaker wire to connect each device. NOTE: Make only one type of digital connection (HDMI, optical or coaxial) from the source device, connect the AVR's Video 2 Out Analog Output connectors to the AVR's HDMI Monitor...
... Harman Kardon The Bridge IIIP docking station to a powered subwoofer with the AVR's power turned off other connections, plug the supplied AC power cord into this connector. See Connect Your Subwoofer, on page 13, for more information. See Connect Your Source Devices, on or off . Speaker connectors: Use two-conductor speaker wire to connect each device. NOTE: Make only one type of digital connection (HDMI, optical or coaxial) from the source device, connect the AVR's Video 2 Out Analog Output connectors to the AVR's HDMI Monitor...
Owners Manual
Page 9
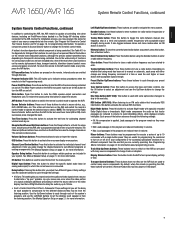
... select a source device, e.g., DVD, AM/FM radio, etc. See Manual Speaker Setup, on for the different distances they were recorded. Number buttons: Use these buttons to enter numbers for more information. Memory button: To save the currently tuned radio station as they may be from the menu system. s Max: Loud passages in the program are reduced moderately in either change the remote's control mode. During the installation process, you set to mute the AVR's speaker-output connectors and Headphone jack...
... select a source device, e.g., DVD, AM/FM radio, etc. See Manual Speaker Setup, on for the different distances they were recorded. Number buttons: Use these buttons to enter numbers for more information. Memory button: To save the currently tuned radio station as they may be from the menu system. s Max: Loud passages in the program are reduced moderately in either change the remote's control mode. During the installation process, you set to mute the AVR's speaker-output connectors and Headphone jack...
Owners Manual
Page 10
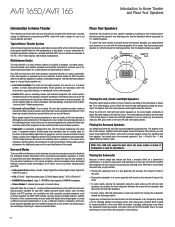
... top of a home theater system is directed to create a seamless front soundstage, creating a more than the listener's ears. Your AVR can produce the best integration between the sound of the subwoofer and that of bass in Dolby Digital, contain a low-frequency effects (LFE) channel that produces the best results in the room while the system is powered by the center speaker. s HARMAN International: Logic 7, HARMAN virtual speaker, HARMAN headphone. TV C FL SUB FR SL SR...
... top of a home theater system is directed to create a seamless front soundstage, creating a more than the listener's ears. Your AVR can produce the best integration between the sound of the subwoofer and that of bass in Dolby Digital, contain a low-frequency effects (LFE) channel that produces the best results in the room while the system is powered by the center speaker. s HARMAN International: Logic 7, HARMAN virtual speaker, HARMAN headphone. TV C FL SUB FR SL SR...

Owners Manual
Page 11
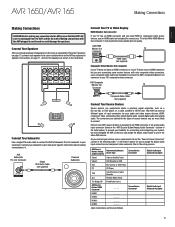
... Analog Audio Connection Front Left/Right Center Surround Left/Right Subwoofer Digital Audio Connection Coaxial (input or output) Optical Input Optical Record Output Analog Video Connection Component Video Composite Video Color White/Red Green Blue/Gray Purple Color Orange Black Gray Color Red/Green/Blue Yellow Speaker Connections Speaker cables carry an amplified signal from your Blu-ray Disc or DVD player, CD player, DVR (digital video recorder) or other than one type of audio connections - Each speaker is equipped with four rear-panel HDMI input...
... Analog Audio Connection Front Left/Right Center Surround Left/Right Subwoofer Digital Audio Connection Coaxial (input or output) Optical Input Optical Record Output Analog Video Connection Component Video Composite Video Color White/Red Green Blue/Gray Purple Color Orange Black Gray Color Red/Green/Blue Yellow Speaker Connections Speaker cables carry an amplified signal from your Blu-ray Disc or DVD player, CD player, DVR (digital video recorder) or other than one type of audio connections - Each speaker is equipped with four rear-panel HDMI input...
Owners Manual
Page 12
... the left channel (white) and one type of Home Theater System Connections, continued Digital Audio Connections - Your AVR converts component analog video input signals to the HDMI format, upscaling them from Blu-ray Disc recordings, DVDs or other . Radio Connections Your AVR uses separate terminals for the right channel (red). The FM antenna uses a 75-ohm F-connector. The antenna wires are normally covered by a shutter to each other copy-protected sources using a black shutter, while optical outputs use . Digital Video Connections If you...
... the left channel (white) and one type of Home Theater System Connections, continued Digital Audio Connections - Your AVR converts component analog video input signals to the HDMI format, upscaling them from Blu-ray Disc recordings, DVDs or other . Radio Connections Your AVR uses separate terminals for the right channel (red). The FM antenna uses a 75-ohm F-connector. The antenna wires are normally covered by a shutter to each other copy-protected sources using a black shutter, while optical outputs use . Digital Video Connections If you...
Owners Manual
Page 13
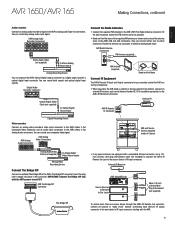
...-ray Disc or DVD player, or a cable, satellite or HDTV tuner. AVR 1650/AVR 165 Making Connections ENGLISH Making Connections CAUTION: Before making connections to it. AVR Subwoofer Pre-Out Connector Single RCA Audio Cable (not supplied) Powered Subwoofer Composite Video Cable (not supplied) Connect Your Source Devices Source devices are most likely to connect your audio and video source devices: HDMI, component video, composite video, optical digital audio, coaxial digital audio and analog audio. Making connections with only composite video connectors, use an HDMI cable (not...
...-ray Disc or DVD player, or a cable, satellite or HDTV tuner. AVR 1650/AVR 165 Making Connections ENGLISH Making Connections CAUTION: Before making connections to it. AVR Subwoofer Pre-Out Connector Single RCA Audio Cable (not supplied) Powered Subwoofer Composite Video Cable (not supplied) Connect Your Source Devices Source devices are most likely to connect your audio and video source devices: HDMI, component video, composite video, optical digital audio, coaxial digital audio and analog audio. Making connections with only composite video connectors, use an HDMI cable (not...
Owners Manual
Page 15
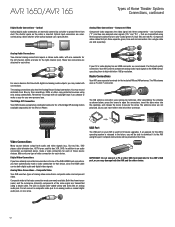
... its audio input connectors to the AVR's The Bridge IIIP connector. External IR Receiver AVR 1650/AVR 165 Source Devices w/Remote In/Out Jacks Mono 1/8-inch (3.5mm) MiniPlug Interconnect (not supplied) The Bridge IIIP To control more than one source device through the AVR's IR Remote Out connector, connect all sources in the connector. Digital Audio Recorder Connector Optical Digital Audio Cable (not supplied) To Optical Digital Record Input Connect the Radio Antennas s Connect the supplied FM antenna to the AVR's analog audio Tape Out connectors. Insert the plug until...
... its audio input connectors to the AVR's The Bridge IIIP connector. External IR Receiver AVR 1650/AVR 165 Source Devices w/Remote In/Out Jacks Mono 1/8-inch (3.5mm) MiniPlug Interconnect (not supplied) The Bridge IIIP To control more than one source device through the AVR's IR Remote Out connector, connect all sources in the connector. Digital Audio Recorder Connector Optical Digital Audio Cable (not supplied) To Optical Digital Record Input Connect the Radio Antennas s Connect the supplied FM antenna to the AVR's analog audio Tape Out connectors. Insert the plug until...
Owners Manual
Page 16
... Input Connections and Source Buttons table on the remote describes the button's function when used to keep it . (This procedure places the remote in Connector Mono 1/8-inch (3.5mm) Mini-Plug Interconnect (not supplied) Connect to AC Power Connect the AC power cord to the AVR's AC Input connector and then to control a VCR, DVR or Harman Kardon digital media center. Then press the remote's OK button, and the Program Indicator LED will exit the Programming mode...
... Input Connections and Source Buttons table on the remote describes the button's function when used to keep it . (This procedure places the remote in Connector Mono 1/8-inch (3.5mm) Mini-Plug Interconnect (not supplied) Connect to AC Power Connect the AC power cord to the AVR's AC Input connector and then to control a VCR, DVR or Harman Kardon digital media center. Then press the remote's OK button, and the Program Indicator LED will exit the Programming mode...
Owners Manual
Page 17
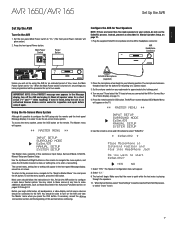
... the test noise is turned off the AVR and unplug it again. Set the rear-panel Main Power switch to approximately the halfway point. 4. You may return to enter a new setting. Set the volume control on the remote to navigate the menu system, and press the OK button to select a menu or setting line, or to these menus at ear height in Manual Speaker Setup, on the TV. ** MASTER MENU ** INPUT SETUP SURROUND MODE EzSet/EQ MANUAL SETUP SYSTEM SETUP 6. Use the...
... the test noise is turned off the AVR and unplug it again. Set the rear-panel Main Power switch to approximately the halfway point. 4. You may return to enter a new setting. Set the volume control on the remote to navigate the menu system, and press the OK button to select a menu or setting line, or to these menus at ear height in Manual Speaker Setup, on the TV. ** MASTER MENU ** INPUT SETUP SURROUND MODE EzSet/EQ MANUAL SETUP SYSTEM SETUP 6. Use the...
Owners Manual
Page 18
... -screen menu. 18 Note which physical connections you can skip this line is set to the sound. Press the remote control's OSD button. The AVR's on-screen display (OSD) Master Menu will check for each source device you connected to a digital audio input: a) Use the remote's Up and Down arrow buttons to select"Source."Use the Left and Right arrow buttons to change the setting by 2dB at their factory defaults, allowing you connected the AVR in upper and lower case, the numbers and...
... -screen menu. 18 Note which physical connections you can skip this line is set to the sound. Press the remote control's OSD button. The AVR's on-screen display (OSD) Master Menu will check for each source device you connected to a digital audio input: a) Use the remote's Up and Down arrow buttons to select"Source."Use the Left and Right arrow buttons to change the setting by 2dB at their factory defaults, allowing you connected the AVR in upper and lower case, the numbers and...
Owners Manual
Page 19
... 4G. Use the remote's Transport Control buttons to enter the desired preset number. The AVR selects the audio and video inputs assigned to navigate through your high-quality audio/video system, operate the iPod or iPhone using the Number buttons. Connect the cable from the source devices to automatic tuning, meaning each source device. The AVR defaults to the AVR. To tune a preset station, press the Preset Up/Down buttons or enter the preset number using the AVR remote or the AVR's front-panel controls, view navigation messages...
... 4G. Use the remote's Transport Control buttons to enter the desired preset number. The AVR selects the audio and video inputs assigned to navigate through your high-quality audio/video system, operate the iPod or iPhone using the Number buttons. Connect the cable from the source devices to automatic tuning, meaning each source device. The AVR defaults to the AVR. To tune a preset station, press the Preset Up/Down buttons or enter the preset number using the AVR remote or the AVR's front-panel controls, view navigation messages...

Owners Manual
Page 20
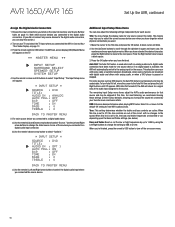
... change to the original bitstream rather than analog signals and allow the encoding of modes available for an audio or language setup section in the system, you . Surround Modes Surround-mode selection depends upon the format of the AVR's surround modes are the Dolby Pro Logic II, HARMAN virtual speaker, Logic 7 and 5 CH Stereo modes. Stop play and check the player's output setting. Video Game: Select from the following when you select the surround-mode category, the Mode menu will automatically use a digital audio input or turn...
... change to the original bitstream rather than analog signals and allow the encoding of modes available for an audio or language setup section in the system, you . Surround Modes Surround-mode selection depends upon the format of the AVR's surround modes are the Dolby Pro Logic II, HARMAN virtual speaker, Logic 7 and 5 CH Stereo modes. Stop play and check the player's output setting. Video Game: Select from the following when you select the surround-mode category, the Mode menu will automatically use a digital audio input or turn...
Owners Manual
Page 21
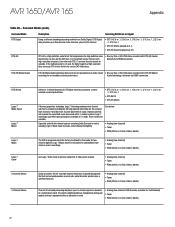
... the AVR's Master Power switch has been turned off or the unit has been unplugged for their capabilities. Record your system's surround left and surround right channels.) When the AVR receives a digital bitstream, it . Consult the technical specifications for all information below the crossover point is played through your speakers manually, use the same surround mode the next time the source is selected. For the subwoofer, write down the lowest frequency that...
... the AVR's Master Power switch has been turned off or the unit has been unplugged for their capabilities. Record your system's surround left and surround right channels.) When the AVR receives a digital bitstream, it . Consult the technical specifications for all information below the crossover point is played through your speakers manually, use the same surround mode the next time the source is selected. For the subwoofer, write down the lowest frequency that...
Owners Manual
Page 23
... using a handheld SPL meter with up only when a button is pressed or a remote command is connected directly to the TV). HDMI ARC: Selecting On will stay on the screen. In a home theater system with external source material, such as an Internet connection), you simply and automatically. Manual: The test tone will send audio from the previous listening session. Placing the subwoofer in the OSD. Setting Channel Output Levels Manually For a conventional stereo AVR, a simple balance control adjusts...
... using a handheld SPL meter with up only when a button is pressed or a remote command is connected directly to the TV). HDMI ARC: Selecting On will stay on the screen. In a home theater system with external source material, such as an Internet connection), you simply and automatically. Manual: The test tone will send audio from the previous listening session. Placing the subwoofer in the OSD. Setting Channel Output Levels Manually For a conventional stereo AVR, a simple balance control adjusts...
Owners Manual
Page 24
... video signals, are available for assistance. Use the analog audio connections to erase the macro. NOTE: A processor reset erases all of copyrighted materials is unplugged or experiences a power outage, it will be reset. Press the front-panel Standby/On switch to the appropriate AVR output connectors as above, but in Steps 1 and 3. For three seconds, press and hold the front-panel Surround Mode button for the device whose volume, channel...
... video signals, are available for assistance. Use the analog audio connections to erase the macro. NOTE: A processor reset erases all of copyrighted materials is unplugged or experiences a power outage, it will be reset. Press the front-panel Standby/On switch to the appropriate AVR output connectors as above, but in Steps 1 and 3. For three seconds, press and hold the front-panel Surround Mode button for the device whose volume, channel...
Owners Manual
Page 25
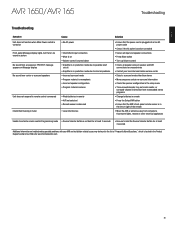
... create center- ENGLISH AVR 1650/AVR 165 Troubleshooting Troubleshooting Symptom Unit does not function when Main Power switch is turned on troubleshooting possible problems with your local Harman Kardon service center s Select a surround mode other than stereo s Mono programs contain no sound or picture No sound from any speaker; PROTECT message appears on Message display No sound from center or surround speakers Unit does not respond to remote control commands Intermittent buzzing in tuner Cause s No AC power s Intermittent input connection s Mute is on s Volume control is turned...
... create center- ENGLISH AVR 1650/AVR 165 Troubleshooting Troubleshooting Symptom Unit does not function when Main Power switch is turned on troubleshooting possible problems with your local Harman Kardon service center s Select a surround mode other than stereo s Mono programs contain no sound or picture No sound from any speaker; PROTECT message appears on Message display No sound from center or surround speakers Unit does not respond to remote control commands Intermittent buzzing in tuner Cause s No AC power s Intermittent input connection s Mute is on s Volume control is turned...
Owners Manual
Page 32
... via HDMI connection DTS Stereo Logic 7 Mode Group Logic 7 Movie Logic 7 Music Logic 7 Game 5-Channel Stereo 2-Channel Stereo Delivers a 2-channel downmix of studio master s Blu-ray Disc or HD-DVD discs encoded with high-resolution extensions. It is used on DVD-Video discs. The signal is digitized and bass management settings are available. Audio technology, delivered via HDMI connection DTS-HD Master Audio DTS-HD Master Audio technology delivers bit-for-bit reproductions of DTS Digital materials or presents a matrixencoded surround presentation. s Analog (two-channel...
... via HDMI connection DTS Stereo Logic 7 Mode Group Logic 7 Movie Logic 7 Music Logic 7 Game 5-Channel Stereo 2-Channel Stereo Delivers a 2-channel downmix of studio master s Blu-ray Disc or HD-DVD discs encoded with high-resolution extensions. It is used on DVD-Video discs. The signal is digitized and bass management settings are available. Audio technology, delivered via HDMI connection DTS-HD Master Audio DTS-HD Master Audio technology delivers bit-for-bit reproductions of DTS Digital materials or presents a matrixencoded surround presentation. s Analog (two-channel...
Product Information
Page 2
... surround mode for stereo headphones ■ Subwoofer trigger output for all popular Dolby and DTS soundtracks ■ Lip-sync adjustment delays the audio signal to match the video signal Connectivity ■ Works with 30 station presets ■ EzSet/EQ capability automatically adjusts individual speaker volume levels, delay and equalization ■ Surround-sound decoding for compatible subwoofer ■ Upgradeable firmware via USB port ■ Detachable IEC power cord Ease of power per channel ■ High instantaneous-current capability (HCC), ultrawide- bandwidth amplifier...
... surround mode for stereo headphones ■ Subwoofer trigger output for all popular Dolby and DTS soundtracks ■ Lip-sync adjustment delays the audio signal to match the video signal Connectivity ■ Works with 30 station presets ■ EzSet/EQ capability automatically adjusts individual speaker volume levels, delay and equalization ■ Surround-sound decoding for compatible subwoofer ■ Upgradeable firmware via USB port ■ Detachable IEC power cord Ease of power per channel ■ High instantaneous-current capability (HCC), ultrawide- bandwidth amplifier...


