
User Manual
Page 2
...turning the equipment off and on a circuit different from that to which can radiate radio frequency energy, and if not installed and used in a particular installation. CANADA This Class B digital apparatus meets all requirements of the FCC Rules. This device complies with requirement of HDMI Licensing LLC in a residential installation. Operation is connected.... User's Manual Before operating the monitor, please read this device must accept any interference received, including interference that may cause undesired operations. However, there is encouraged to try to Part 15...
...turning the equipment off and on a circuit different from that to which can radiate radio frequency energy, and if not installed and used in a particular installation. CANADA This Class B digital apparatus meets all requirements of the FCC Rules. This device complies with requirement of HDMI Licensing LLC in a residential installation. Operation is connected.... User's Manual Before operating the monitor, please read this device must accept any interference received, including interference that may cause undesired operations. However, there is encouraged to try to Part 15...

User Manual
Page 3
... in the world. Full specifications and lists of TCO'06 Media Displays : Ergonomics • Good visual ergonomics and image quality in a more user-friendly direction. www.tcodevelopment.com * For a display used primarily for luminance, contrast, resolution, reflectance, color rendition and response time. Features such as a sign of IT equipment in order to our office display series TCO'03 Displays or later version...
... in the world. Full specifications and lists of TCO'06 Media Displays : Ergonomics • Good visual ergonomics and image quality in a more user-friendly direction. www.tcodevelopment.com * For a display used primarily for luminance, contrast, resolution, reflectance, color rendition and response time. Features such as a sign of IT equipment in order to our office display series TCO'03 Displays or later version...
User Manual
Page 5
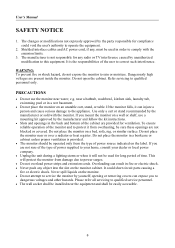
TABLE OF CONTENTS User's Manual SAFETY NOTICE 6 PRECAUTIONS 6 SPECIAL NOTES ON LCD MONITORS 7 BEFORE YOU OPERATE THE MONITOR 8 FEATURES...8 CHECKING THE CONTENTS OF THE PACKAGE 8 INSTALLATION INSTRUCTIONS 9 POWER...9 MAKING CONNECTIONS 10 ADJUSTING THE VIEWING ANGLE 11 OPERATING INSTRUCTIONS 12 GENERAL INSTRUCTIONS 12 FRONT PANEL CONTROL 13 HOW TO ADJUST A SETTINGS 15 PLUG AND PLAY 18 TECHNICAL SUPPORT (FAQ 19 Q & A FOR GENERAL PROBLEMS 19 ERROR MESSAGE & POSSIBLE SOLUTIONS 21 APPENDIX ...23 SPECIFICATIONS 23 5
TABLE OF CONTENTS User's Manual SAFETY NOTICE 6 PRECAUTIONS 6 SPECIAL NOTES ON LCD MONITORS 7 BEFORE YOU OPERATE THE MONITOR 8 FEATURES...8 CHECKING THE CONTENTS OF THE PACKAGE 8 INSTALLATION INSTRUCTIONS 9 POWER...9 MAKING CONNECTIONS 10 ADJUSTING THE VIEWING ANGLE 11 OPERATING INSTRUCTIONS 12 GENERAL INSTRUCTIONS 12 FRONT PANEL CONTROL 13 HOW TO ADJUST A SETTINGS 15 PLUG AND PLAY 18 TECHNICAL SUPPORT (FAQ 19 Q & A FOR GENERAL PROBLEMS 19 ERROR MESSAGE & POSSIBLE SOLUTIONS 21 APPENDIX ...23 SPECIFICATIONS 23 5
User Manual
Page 6
... use a mounting kit approved by the manufacturer or sold with the emission limits. 3. near water, e.g. Use only a cart or stand recommended by the manufacturer and follow the kit instructions. • Slots and openings in the back and bottom of the cabinet are not sure of the type of power source indicated on the monitor. • Do not attempt to service...
... use a mounting kit approved by the manufacturer or sold with the emission limits. 3. near water, e.g. Use only a cart or stand recommended by the manufacturer and follow the kit instructions. • Slots and openings in the back and bottom of the cabinet are not sure of the type of power source indicated on the monitor. • Do not attempt to service...
User Manual
Page 7
... switching the image, when the same image is recovered slowly by changing the image or turning off the Power Switch and then turn it on the desktop pattern you use . FOR LAMP SPECIFIC DISPOSAL INFORMATION CHECK WWW.LAMPRECYCLE.ORG. 7 In this case, the screen is displayed for repair. Turn off the Power Switch for hours. • If the screen suddenly flashes erratically or the backlighting fails, please contact your dealer or service...
... switching the image, when the same image is recovered slowly by changing the image or turning off the Power Switch and then turn it on the desktop pattern you use . FOR LAMP SPECIFIC DISPOSAL INFORMATION CHECK WWW.LAMPRECYCLE.ORG. 7 In this case, the screen is displayed for repair. Turn off the Power Switch for hours. • If the screen suddenly flashes erratically or the backlighting fails, please contact your dealer or service...
User Manual
Page 8
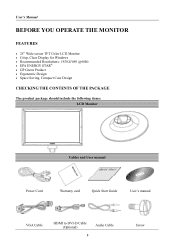
User's Manual BEFORE YOU OPERATE THE MONITOR FEATURES • 25" Wide screen TFT Color LCD Monitor • Crisp, Clear Display for Windows • Recommended Resolutions: 1920X1080 @60Hz • EPA ENERGY STAR® • GP Green Product • Ergonomic Design • Space Saving, Compact Case Design CHECKING THE CONTENTS OF THE PACKAGE The product package should include the following items: LCD Monitor Cables and User manual Power Cord Warranty card Quick Start Guide User's manual VGA Cable HDMI to DVI-D Cable (Optional) 8 Audio Cable Screw
User's Manual BEFORE YOU OPERATE THE MONITOR FEATURES • 25" Wide screen TFT Color LCD Monitor • Crisp, Clear Display for Windows • Recommended Resolutions: 1920X1080 @60Hz • EPA ENERGY STAR® • GP Green Product • Ergonomic Design • Space Saving, Compact Case Design CHECKING THE CONTENTS OF THE PACKAGE The product package should include the following items: LCD Monitor Cables and User manual Power Cord Warranty card Quick Start Guide User's manual VGA Cable HDMI to DVI-D Cable (Optional) 8 Audio Cable Screw
User Manual
Page 9
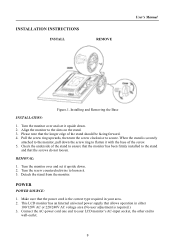
... user adjustment is required.) 3. POWER POWER SOURCE: 1. Installing and Removing the Base INSTALLATION: 1. Make sure that allows operation in your LCD monitor's AC-input socket, the other end to flatten it upside down . 2. Pull the screw ring upwards, then turn the screw clockwise to the slots on the stand. 3. This LCD monitor has an Internal universal power supply that the power cord is securely attached to the monitor, pull down the screw ring to wall-outlet. 9 REMOVAL: 1. INSTALLATION INSTRUCTIONS INSTALL REMOVE User's Manual...
... user adjustment is required.) 3. POWER POWER SOURCE: 1. Installing and Removing the Base INSTALLATION: 1. Make sure that allows operation in your LCD monitor's AC-input socket, the other end to flatten it upside down . 2. Pull the screw ring upwards, then turn the screw clockwise to the slots on the stand. 3. This LCD monitor has an Internal universal power supply that the power cord is securely attached to the monitor, pull down the screw ring to wall-outlet. 9 REMOVAL: 1. INSTALLATION INSTRUCTIONS INSTALL REMOVE User's Manual...
User Manual
Page 10
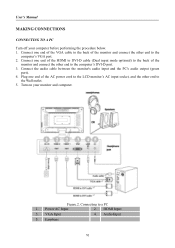
Connecting to the Wall outlet. 5. HDMI Input 3. Earphone 10 VGA Input 4. User's Manual MAKING CONNECTIONS CONNECTING TO A PC Turn off your monitor and computer. Connect the audio cable between the monitor's audio input and the PC's audio output (green port). 4. Power AC Input 2. Connect one end of the HDMI to DVI-D cable (Dual input mode optional) to the back of the monitor and connect the other end to the computer's DVI-D port. 3. Turn on your computer before performing the procedure below. 1. Connect one end of the monitor and...
Connecting to the Wall outlet. 5. HDMI Input 3. Earphone 10 VGA Input 4. User's Manual MAKING CONNECTIONS CONNECTING TO A PC Turn off your monitor and computer. Connect the audio cable between the monitor's audio input and the PC's audio output (green port). 4. Power AC Input 2. Connect one end of the HDMI to DVI-D cable (Dual input mode optional) to the back of the monitor and connect the other end to the computer's DVI-D port. 3. Turn on your computer before performing the procedure below. 1. Connect one end of the monitor and...
User Manual
Page 11
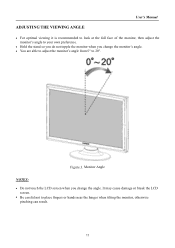
User's Manual ADJUSTING THE VIEWING ANGLE • For optimal viewing it is recommended to look at the full face of the monitor, then adjust the monitor's angle to your own preference. • Hold the stand so you do not topple the monitor when you change the monitor's angle. • You are able to adjust the monitor's angle from 0° to place fingers or hands near the...
User's Manual ADJUSTING THE VIEWING ANGLE • For optimal viewing it is recommended to look at the full face of the monitor, then adjust the monitor's angle to your own preference. • Hold the stand so you do not topple the monitor when you change the monitor's angle. • You are able to adjust the monitor's angle from 0° to place fingers or hands near the...
User Manual
Page 12
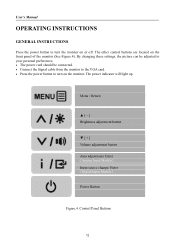
...8226; The power cord should be connected. • Connect the Signal cable from the monitor to the VGA card. • Press the power button to turn on the monitor. Menu / Return ▲ [-] Brightness adjustment button ▼ [+] Volume adjustment button Auto adjustment/ Enter 《Analog Input Models》 Input source change/ Enter 《Digital Input Models》 Power Button Figure.4. Control Panel Buttons 12 User's Manual OPERATING INSTRUCTIONS GENERAL INSTRUCTIONS Press the power button to turn the monitor on or off. The other control buttons are located...
...8226; The power cord should be connected. • Connect the Signal cable from the monitor to the VGA card. • Press the power button to turn on the monitor. Menu / Return ▲ [-] Brightness adjustment button ▼ [+] Volume adjustment button Auto adjustment/ Enter 《Analog Input Models》 Input source change/ Enter 《Digital Input Models》 Power Button Figure.4. Control Panel Buttons 12 User's Manual OPERATING INSTRUCTIONS GENERAL INSTRUCTIONS Press the power button to turn the monitor on or off. The other control buttons are located...

User Manual
Page 13
... . 3. Power On mode. The 「Auto adjustment」 function works only for VGA input. (The auto adjustment function is only available in volume OSD status. • Adjust ▲▼: 1. ASPECT RATIO: Press【MENU key to change to the previous menu. 2. Orange - Turn the OSD menu on the models. The OSD menu is used as 《confirmation》function during start-up . 2. Restore Brightness and Contrast defaults: To reset both the Brightness and Contrast to enter Source selections. (Selections include VGA, HDMI...
... . 3. Power On mode. The 「Auto adjustment」 function works only for VGA input. (The auto adjustment function is only available in volume OSD status. • Adjust ▲▼: 1. ASPECT RATIO: Press【MENU key to change to the previous menu. 2. Orange - Turn the OSD menu on the models. The OSD menu is used as 《confirmation》function during start-up . 2. Restore Brightness and Contrast defaults: To reset both the Brightness and Contrast to enter Source selections. (Selections include VGA, HDMI...

User Manual
Page 14
... removed with a cloth lightly dampened with a soft cloth. Never use strong solvents such as it was originally packed at the factory. • To keep the monitor looking new, periodically clean it . 14 As a safety precaution, always unplug the monitor before cleaning it with a mild detergent solution. User's Manual Resolution ...↔ 1680x1050@RB 60Hz 1400x1050@75Hz ↔ 1680x1050@75Hz ** The screen resolutions available will damage the cabinet. NOTES: • Do not install the monitor in a location near heat sources such as radiators or air dusts, or in a place subject to direct...
... removed with a cloth lightly dampened with a soft cloth. Never use strong solvents such as it was originally packed at the factory. • To keep the monitor looking new, periodically clean it . 14 As a safety precaution, always unplug the monitor before cleaning it with a mild detergent solution. User's Manual Resolution ...↔ 1680x1050@RB 60Hz 1400x1050@75Hz ↔ 1680x1050@75Hz ** The screen resolutions available will damage the cabinet. NOTES: • Do not install the monitor in a location near heat sources such as radiators or air dusts, or in a place subject to direct...
User Manual
Page 15
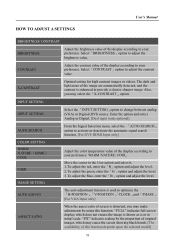
... change between analog (VGA) or Digital (DVI) source. To adjust the green, enter the「G」option and adjust the level. 3. "FULL" indicates full screen display, which may select the「X-CONTRAST」option. INPUT SETTING INPUT SETTING AUTO SEARCH COLOR SETTING WARM NATURE(6500K) COOL USER IMAGE SETTING AUTO ADJUST ASPECT RATIO Select the 「INPUT SETTING」option to the User option and select it, 1. The auto adjustment function is used to your preference. User's Manual HOW TO ADJUST A SETTINGS BRIGHTNESS/ CONTRAST BRIGHTNESS Adjust...
... change between analog (VGA) or Digital (DVI) source. To adjust the green, enter the「G」option and adjust the level. 3. "FULL" indicates full screen display, which may select the「X-CONTRAST」option. INPUT SETTING INPUT SETTING AUTO SEARCH COLOR SETTING WARM NATURE(6500K) COOL USER IMAGE SETTING AUTO ADJUST ASPECT RATIO Select the 「INPUT SETTING」option to the User option and select it, 1. The auto adjustment function is used to your preference. User's Manual HOW TO ADJUST A SETTINGS BRIGHTNESS/ CONTRAST BRIGHTNESS Adjust...
User Manual
Page 16
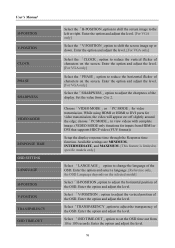
... and adjust the level. Set the value from HDMI or DVI that supports HDCP video (YUV format)) Setup the display response time through the Response time function. Select 「V-POSITION」option to change the language of the OSD. Available settings are MINIMUM, INTERMEDIATE, and MAXIMUM. [This feature is limited to specific models only.] Select 「LANGUAGE」 option to adjust the vertical position of the OSD. Choose「VIDEO MODE」...
... and adjust the level. Set the value from HDMI or DVI that supports HDCP video (YUV format)) Setup the display response time through the Response time function. Select 「V-POSITION」option to change the language of the OSD. Available settings are MINIMUM, INTERMEDIATE, and MAXIMUM. [This feature is limited to specific models only.] Select 「LANGUAGE」 option to adjust the vertical position of the OSD. Choose「VIDEO MODE」...
User Manual
Page 17
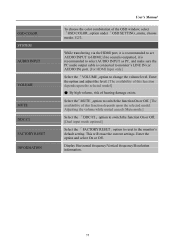
OSD COLOR SYSTEM AUDIO INPUT VOLUME MUTE DDC/CI FACTORY RESET INFORMATION User's Manual To choose the color combination of this function depends upon the selected model. Display Horizontal frequency/Vertical frequency/Resolution information. 17 Adjusting the volume while muted cancels Mute mode.] Select the 「DDC/CI」option to switch the function On or Off. [Dual input mode optional] Select the 「FACTORY RESET」option to reset to change the volume level. if no sound is outputted...
OSD COLOR SYSTEM AUDIO INPUT VOLUME MUTE DDC/CI FACTORY RESET INFORMATION User's Manual To choose the color combination of this function depends upon the selected model. Display Horizontal frequency/Vertical frequency/Resolution information. 17 Adjusting the volume while muted cancels Mute mode.] Select the 「DDC/CI」option to switch the function On or Off. [Dual input mode optional] Select the 「FACTORY RESET」option to reset to change the volume level. if no sound is outputted...

User Manual
Page 18
... THERE IS NO VIDEO INPUT SIGNAL. This reduces the monitor's internal power supply consumption. User's Manual PLUG AND PLAY Plug & Play DDC2B Feature This monitor is no video input signal this monitor, following a time-out period, will automatically switch to power saving mode. It allows the monitor to the VESA DDC STANDARD. IN ORDER FOR THIS MONITOR TO OPERATE PROPERLY, THERE MUST BE A VIDEO INPUT SIGNAL. This monitor meets the Green monitor standards as set by reducing power consumption when...
... THERE IS NO VIDEO INPUT SIGNAL. This reduces the monitor's internal power supply consumption. User's Manual PLUG AND PLAY Plug & Play DDC2B Feature This monitor is no video input signal this monitor, following a time-out period, will automatically switch to power saving mode. It allows the monitor to the VESA DDC STANDARD. IN ORDER FOR THIS MONITOR TO OPERATE PROPERLY, THERE MUST BE A VIDEO INPUT SIGNAL. This monitor meets the Green monitor standards as set by reducing power consumption when...
User Manual
Page 19
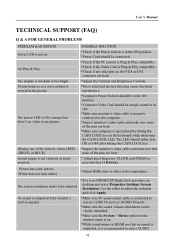
... ON position. *Power Cord should either turn ON or OFF after hitting the CAPS LOCK key. *Inspect the monitor's video cable and make sure none of the primary colors (RED, GREEN, or BLUE) Screen image is ON (orange) but no picture. POSSIBLE SOLUTION *Check if the Power Switch is in the picture The power LED is not centered or sized properly. User's Manual TECHNICAL SUPPORT (FAQ) Q & A FOR GENERAL PROBLEMS PROBLEM & QUESTION Power LED is not on No Plug & Play The display is...
... ON position. *Power Cord should either turn ON or OFF after hitting the CAPS LOCK key. *Inspect the monitor's video cable and make sure none of the primary colors (RED, GREEN, or BLUE) Screen image is ON (orange) but no picture. POSSIBLE SOLUTION *Check if the Power Switch is in the picture The power LED is not centered or sized properly. User's Manual TECHNICAL SUPPORT (FAQ) Q & A FOR GENERAL PROBLEMS PROBLEM & QUESTION Power LED is not on No Plug & Play The display is...

User Manual
Page 20
User's Manual INPUT as a PC option, and make sure PC audio output cable is connected to monitor's LINE IN port(or AUDIO IN port). [For HDMI Input only] 20
User's Manual INPUT as a PC option, and make sure PC audio output cable is connected to monitor's LINE IN port(or AUDIO IN port). [For HDMI Input only] 20
User Manual
Page 21
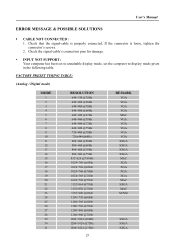
INPUT NOT SUPPORT : Your computer has been set to unsuitable display mode, set the computer to display mode given in the following table. User's Manual ERROR MESSAGE & POSSIBLE SOLUTIONS CABLE NOT CONNECTED : 1. FACTORY PRESET TIMING TABLE: (Analog / Digital mode) MODE 1 2 3 4 5 6 7 8 9 10 11 12 13 14 15 16 17 18 19 20 21 22 23 24 25 26 27 28 29 30 31 RESOLUTION 640×350 @70Hz 640×400...
INPUT NOT SUPPORT : Your computer has been set to unsuitable display mode, set the computer to display mode given in the following table. User's Manual ERROR MESSAGE & POSSIBLE SOLUTIONS CABLE NOT CONNECTED : 1. FACTORY PRESET TIMING TABLE: (Analog / Digital mode) MODE 1 2 3 4 5 6 7 8 9 10 11 12 13 14 15 16 17 18 19 20 21 22 23 24 25 26 27 28 29 30 31 RESOLUTION 640×350 @70Hz 640×400...
User Manual
Page 23
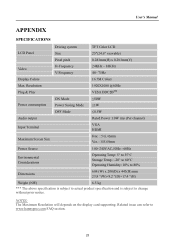
... display card supporting. User's Manual APPENDIX SPECIFICATIONS LCD Panel Video Display Colors Max. Related issue can refer to change without prior notice. Resolution Plug & Play Power consumption Audio output Input Terminal Driving system Size Pixel pitch H-Frequency V-Frequency ON Mode Power Saving Mode OFF Mode Maximum Screen Size TFT Color LCD 25"(24.6" viewable) 0.283mm(H) x 0.283mm(V) 24KHz - 83KHz 48- 75Hz 16.7M Colors 1920X1080 @60Hz VESA DDC2BTM ≤50W ≤1W ≤0.5W Rated Power 1.0W rms (Per channel) VGA HDMI Hor. : 543.46mm Ver. : 305.69mm Power Source...
... display card supporting. User's Manual APPENDIX SPECIFICATIONS LCD Panel Video Display Colors Max. Related issue can refer to change without prior notice. Resolution Plug & Play Power consumption Audio output Input Terminal Driving system Size Pixel pitch H-Frequency V-Frequency ON Mode Power Saving Mode OFF Mode Maximum Screen Size TFT Color LCD 25"(24.6" viewable) 0.283mm(H) x 0.283mm(V) 24KHz - 83KHz 48- 75Hz 16.7M Colors 1920X1080 @60Hz VESA DDC2BTM ≤50W ≤1W ≤0.5W Rated Power 1.0W rms (Per channel) VGA HDMI Hor. : 543.46mm Ver. : 305.69mm Power Source...


