
Product Manual
Page 4
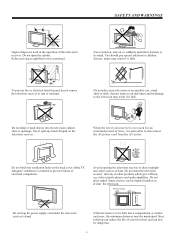
... or openings. Avoid exposing the television receiver to children. Do not place naked flame sources, such as lighted candles on the back cover of the TV. video cassette players and audio amplifiers. Heat build-up can reduce the life of your television on other sources of heat. You should pay special...
... or openings. Avoid exposing the television receiver to children. Do not place naked flame sources, such as lighted candles on the back cover of the TV. video cassette players and audio amplifiers. Heat build-up can reduce the life of your television on other sources of heat. You should pay special...
Product Manual
Page 5
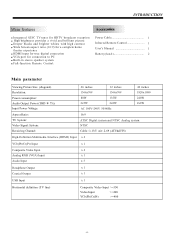
...s Manual 1 Battery(AAA 2 Main parameter Viewing Picture Size (diagonal) Resolution: Power consumption: Audio Output Power (THD Input Power Voltage: 7%): Aspect Ratio: TV System: Video Signal System: Receiving Channel: 26 inches 1366x768 32 inches 1366x768 42 inches 1920x1080 80W 2x5W 135W 2x8W 240W 2x8W AC 100V-240V 50...(Pb)Cr(Pr) Input x 1 Composite Video Input x 2 Analog RGB (VGA) Input x 1 Audio Input x 3 Headphone Output x 1 Coaxial Output x 1 USB Input x 1 Horizontal definition (TV line) Composite Video Input >=350 Video Input >=400 YCb(Pb)Cr(Pr) >=400 -4-
...s Manual 1 Battery(AAA 2 Main parameter Viewing Picture Size (diagonal) Resolution: Power consumption: Audio Output Power (THD Input Power Voltage: 7%): Aspect Ratio: TV System: Video Signal System: Receiving Channel: 26 inches 1366x768 32 inches 1366x768 42 inches 1920x1080 80W 2x5W 135W 2x8W 240W 2x8W AC 100V-240V 50...(Pb)Cr(Pr) Input x 1 Composite Video Input x 2 Analog RGB (VGA) Input x 1 Audio Input x 3 Headphone Output x 1 Coaxial Output x 1 USB Input x 1 Horizontal definition (TV line) Composite Video Input >=350 Video Input >=400 YCb(Pb)Cr(Pr) >=400 -4-
Product Manual
Page 6
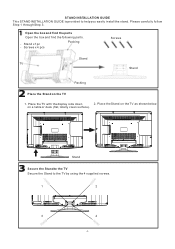
...the box and find the following parts. - Screws x 4 pcs Packing Screws Stand TV Stand Packing Place the Stand on a table or desk (flat, totally clean surface). on the TV 1. Stand Secure the Stand to the TV Secure the Stand to help you easily install the stand. Place the Stand on ...the TV as shown below. Place the TV with the display side down 2. Stand x1 pc - STAND INSTALLATION GUIDE...
...the box and find the following parts. - Screws x 4 pcs Packing Screws Stand TV Stand Packing Place the Stand on a table or desk (flat, totally clean surface). on the TV 1. Stand Secure the Stand to the TV Secure the Stand to help you easily install the stand. Place the Stand on ...the TV as shown below. Place the TV with the display side down 2. Stand x1 pc - STAND INSTALLATION GUIDE...
Product Manual
Page 7
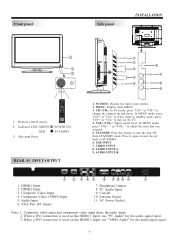
REAR AV INPUT/OUTPUT 1. In MENU mode, press "VOL+ " or "VOL- Press it again to turn the set back to turn on the TV. 4. MENU: Display main MENU. 3. STANDBY: Press this button to STANDBY. 6. HDMI1 Input 2. Component Video (YPbPr) Input 5. VGA Port (PC Input) 7. Antenna Socket 11.... STANDBY 5 USB 6 VIDEO 7 VIDEO AV2 L 8 L R 9 R 1 2 3 4 5 6 7 8 9 0 + + VOL CH _ _ 1: Remote control sensor. 2: Indicator LED: GREEN RED 3: Side panel keys POWER ON. CH+/CH-: In TV mode, press "CH+" or "CH-" to change the channel up and down. HDMI2 Input 3.
REAR AV INPUT/OUTPUT 1. In MENU mode, press "VOL+ " or "VOL- Press it again to turn the set back to turn on the TV. 4. MENU: Display main MENU. 3. STANDBY: Press this button to STANDBY. 6. HDMI1 Input 2. Component Video (YPbPr) Input 5. VGA Port (PC Input) 7. Antenna Socket 11.... STANDBY 5 USB 6 VIDEO 7 VIDEO AV2 L 8 L R 9 R 1 2 3 4 5 6 7 8 9 0 + + VOL CH _ _ 1: Remote control sensor. 2: Indicator LED: GREEN RED 3: Side panel keys POWER ON. CH+/CH-: In TV mode, press "CH+" or "CH-" to change the channel up and down. HDMI2 Input 3.
Product Manual
Page 8
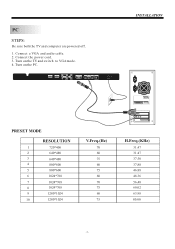
... switch to VGAmode. 4. Turn on the PC. Connect the power cord. 3. PC STEPS: Be sure both the TV and computer are powered off. 1. Connect a VGA and audio cable. 2. HDMI 1 HDMI 2 Pr COMPONENT Pb INPUT AUDIO L INPUT AV1 Y R VGA INPUT HEADPHONE PC AUDIO COAXIAL ...
... switch to VGAmode. 4. Turn on the PC. Connect the power cord. 3. PC STEPS: Be sure both the TV and computer are powered off. 1. Connect a VGA and audio cable. 2. HDMI 1 HDMI 2 Pr COMPONENT Pb INPUT AUDIO L INPUT AV1 Y R VGA INPUT HEADPHONE PC AUDIO COAXIAL ...
Product Manual
Page 10
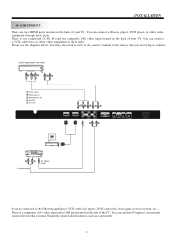
There is a composite (AV) video input and a USB port located on the side of the TV. You may frequently connect and disconnect, such as a camcorder. -9- INSTALLATION AV EQUIPMENT There are trying to these ports. Please see the diagram below. VIDEO EQUIPMENT ...) and two composite (AV) video input located on the back of the device that you are two HDMI ports located on the back of your TV. You can connect a VCR, cable box, or other video equipment through these jacks. You can connect a Blu-ray player, DVD player, or other video equipment...
There is a composite (AV) video input and a USB port located on the side of the TV. You may frequently connect and disconnect, such as a camcorder. -9- INSTALLATION AV EQUIPMENT There are trying to these ports. Please see the diagram below. VIDEO EQUIPMENT ...) and two composite (AV) video input located on the back of the device that you are two HDMI ports located on the back of your TV. You can connect a VCR, cable box, or other video equipment through these jacks. You can connect a Blu-ray player, DVD player, or other video equipment...
Product Manual
Page 11
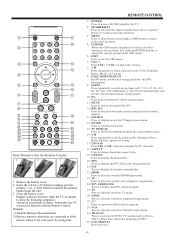
...SAP VGA 23 26 28 27 29 30 Insert Batteries Into the Remote Control 1 2 3 1. REMOTE CONTROL 1: POWER Press to power ON/OFF (standby) the TV. 2: NUMBER KEY Press to enter theTV channel numberand select a channel (Press " " tochoose the sub-channel). 3: MENU Press to open theon screen display (OSD...- The TVwill automatically turn onor off theclosed captions. 28: VGA Press to directly switchto VGA(PC input) mode 29: MTS/SAP Press to activate theNTSC TV sounds,such as the up,down the EPG information. 9: SLEEP Press repeatedly to turn off / 5 /10 / 15 /30 / 45 / 60 / 90 /120 /...
...SAP VGA 23 26 28 27 29 30 Insert Batteries Into the Remote Control 1 2 3 1. REMOTE CONTROL 1: POWER Press to power ON/OFF (standby) the TV. 2: NUMBER KEY Press to enter theTV channel numberand select a channel (Press " " tochoose the sub-channel). 3: MENU Press to open theon screen display (OSD...- The TVwill automatically turn onor off theclosed captions. 28: VGA Press to directly switchto VGA(PC input) mode 29: MTS/SAP Press to activate theNTSC TV sounds,such as the up,down the EPG information. 9: SLEEP Press repeatedly to turn off / 5 /10 / 15 /30 / 45 / 60 / 90 /120 /...
Product Manual
Page 13
...General audiences, All Ages admitted Parental Guidance suggested ) X X TV-14(Parents strongly cautioned) X X X X X X TV-MA(Mature audience only) X X X 1). Press the ENTER key to Suggested order children) X age TV-G(General audience) TV-PG(Parental Guidance suggested . NC-17 No one 17 andunder... Content FV V S L D (Fantasy (Violence) (Sexual (Adult (Sexually violence) situation) language) suggestive dialog) TV-Y (All children) TV-Y7(Direct to lock/unlock Parental Controls. 2). Old password: Input the old password 2). X X is an orderrating ...
...General audiences, All Ages admitted Parental Guidance suggested ) X X TV-14(Parents strongly cautioned) X X X X X X TV-MA(Mature audience only) X X X 1). Press the ENTER key to Suggested order children) X age TV-G(General audience) TV-PG(Parental Guidance suggested . NC-17 No one 17 andunder... Content FV V S L D (Fantasy (Violence) (Sexual (Adult (Sexually violence) situation) language) suggestive dialog) TV-Y (All children) TV-Y7(Direct to lock/unlock Parental Controls. 2). Old password: Input the old password 2). X X is an orderrating ...
Product Manual
Page 14
... displayed. 1): Advanced selection: only available in ATSCmode, and the Clock can edit the closed caption mode. Adjust Select Menu Exit RRT setting: in ATSC digital TV mode, it mustbe integral to imitate dangerous actswhich they may be suitable for viewingwith parental guidance. 13ans+ Over 13 years: Couldcontain scenes of nudity. 2).Canada...
... displayed. 1): Advanced selection: only available in ATSCmode, and the Clock can edit the closed caption mode. Adjust Select Menu Exit RRT setting: in ATSC digital TV mode, it mustbe integral to imitate dangerous actswhich they may be suitable for viewingwith parental guidance. 13ans+ Over 13 years: Couldcontain scenes of nudity. 2).Canada...
Product Manual
Page 15
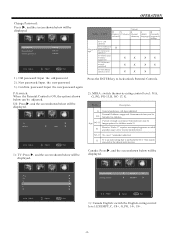
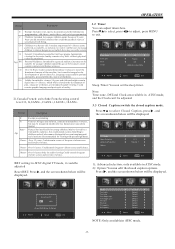
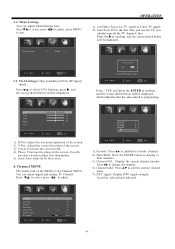
...: 3 Adjust Select Menu Exit 3). Press to adjust. It can't be displayed. 3.4 Menu Settings You can adjust digital and analog TV Channel. Are you should scan all the TV channels first. Channel MENU The fourth item of the screen. Show/Hide: Press the ENTER button to fit the screen. 4. Auto:... inVGA (PCinput) mode. V-Pos: Adjust the vertical position of the screen. 2). Auto Scan: If it's the first time you use the TV, you sure? NO YES Press¡E°NTER¡K±ey To Select Adjust Select Menu Exit Select "YES" and press the ENTER to confirm...
...: 3 Adjust Select Menu Exit 3). Press to adjust. It can't be displayed. 3.4 Menu Settings You can adjust digital and analog TV Channel. Are you should scan all the TV channels first. Channel MENU The fourth item of the screen. Show/Hide: Press the ENTER button to fit the screen. 4. Auto:... inVGA (PCinput) mode. V-Pos: Adjust the vertical position of the screen. 2). Auto Scan: If it's the first time you use the TV, you sure? NO YES Press¡E°NTER¡K±ey To Select Adjust Select Menu Exit Select "YES" and press the ENTER to confirm...
Product Manual
Page 17
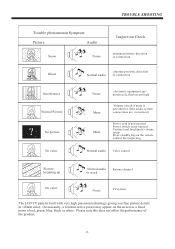
... on the remote control for inspecting Normal audio Color control Picture breaking up Normal audio Retune channel or weak No color Noise TVsystem The LCD TV panel is not opened Contrast and brightness/volume setup Press standby key on the screen as a fixed point of the product. -16- TROUBLE SHOOTING Trouble...
... on the remote control for inspecting Normal audio Color control Picture breaking up Normal audio Retune channel or weak No color Noise TVsystem The LCD TV panel is not opened Contrast and brightness/volume setup Press standby key on the screen as a fixed point of the product. -16- TROUBLE SHOOTING Trouble...


