
User Manual
Page 2
...flash with DVD models.) CAUTION: These servicing instructions are qualified to do not perform any servicing...REFER SERVICING TO QUALIFIED SERVICE PERSONNEL. CAUTION: TO PREVENT ELECTRIC SHOCK DO NOT USE THIS POLARIZED PLUG WITH AN EXTENSION CORD, ...user to the presence of important operating and maintenance (servicing) instructions in the operating instructions unless you are for TV with arrowhead symbol, within the product s enclosure that contained in the literature accompanying the appliance. To reduce the risk of electric shock. ! CAUTION: USE OF ANY CONTROLS, ADJUSTMENTS...
...flash with DVD models.) CAUTION: These servicing instructions are qualified to do not perform any servicing...REFER SERVICING TO QUALIFIED SERVICE PERSONNEL. CAUTION: TO PREVENT ELECTRIC SHOCK DO NOT USE THIS POLARIZED PLUG WITH AN EXTENSION CORD, ...user to the presence of important operating and maintenance (servicing) instructions in the operating instructions unless you are for TV with arrowhead symbol, within the product s enclosure that contained in the literature accompanying the appliance. To reduce the risk of electric shock. ! CAUTION: USE OF ANY CONTROLS, ADJUSTMENTS...

User Manual
Page 5
Component Setup 8 VCR Setup 9 HDMI Input 9 Cable TV Setup 10 External Component Source Setup 10 Basic Operating Instructions 11 Switch On/Off the TV set for specific details. Please refer to your original set 11 Choose the input source 11 Audio Control 11 Mute...11 INFO...11 Select the TV Channel You Want 12 Picture Mode 12 Audio Mode 12 Sleep...12 GUIDE 12 ARC button 12 .Button 13 CH.LIST button 13 FAVORATE button 1..3. Menu Operations 14 Video Menu Options 14 Video Menu Options Continued 15 Audio Menu Options 16 Audio Menu Options Continued 17 Channel Menu Options ...
Component Setup 8 VCR Setup 9 HDMI Input 9 Cable TV Setup 10 External Component Source Setup 10 Basic Operating Instructions 11 Switch On/Off the TV set for specific details. Please refer to your original set 11 Choose the input source 11 Audio Control 11 Mute...11 INFO...11 Select the TV Channel You Want 12 Picture Mode 12 Audio Mode 12 Sleep...12 GUIDE 12 ARC button 12 .Button 13 CH.LIST button 13 FAVORATE button 1..3. Menu Operations 14 Video Menu Options 14 Video Menu Options Continued 15 Audio Menu Options 16 Audio Menu Options Continued 17 Channel Menu Options ...

User Manual
Page 6
... away from the power source, then wipe the set with a dry soft cloth; l Please do as required when you are not recommended by manufacturer: l Before operation, please make sure that the operating voltage of your safety and extend the life-span of LCD-TV, please read and understand all the instructions before using and cleaning this manual for proper ventilation...
... away from the power source, then wipe the set with a dry soft cloth; l Please do as required when you are not recommended by manufacturer: l Before operation, please make sure that the operating voltage of your safety and extend the life-span of LCD-TV, please read and understand all the instructions before using and cleaning this manual for proper ventilation...
User Manual
Page 8
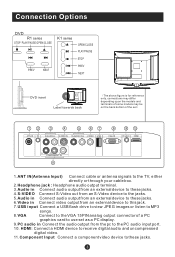
... to use set ATN IN R-AUDIO-L S-VIDEO IN R-AUDIO IN-L VIDEO USB VGA IN PC AUDIO IN HDMI Pr Pb Y COMPONENT IN 1.ANT IN(Antenna Input) Connect cable or antenna signals to the TV, either directly or through your cable box. 2.Headphone jack : Headphone audio output terminal. 3.Audio in Connect audio output from an external device to these jacks. 4.S-VIDEO Connect S-Video out from an S-Video device to the jacks. 5.Audio in Connect the audio output from an external device to these jacks. HDMI: Connect a HDMI device to receive digital audio...
... to use set ATN IN R-AUDIO-L S-VIDEO IN R-AUDIO IN-L VIDEO USB VGA IN PC AUDIO IN HDMI Pr Pb Y COMPONENT IN 1.ANT IN(Antenna Input) Connect cable or antenna signals to the TV, either directly or through your cable box. 2.Headphone jack : Headphone audio output terminal. 3.Audio in Connect audio output from an external device to these jacks. 4.S-VIDEO Connect S-Video out from an S-Video device to the jacks. 5.Audio in Connect the audio output from an external device to these jacks. HDMI: Connect a HDMI device to receive digital audio...

User Manual
Page 9
... between the remote controller and television set. Remote Control Installing Batteries Remove the battery cover. Keep the remote control away from heat sources or humid areas to operate the remote control if the television cannot be rechargeable. The batteries must be of the same type, must be inserted properly, and must not be turned on or off as expected. As strong light may interfere with the signals, change your position...
... between the remote controller and television set. Remote Control Installing Batteries Remove the battery cover. Keep the remote control away from heat sources or humid areas to operate the remote control if the television cannot be rechargeable. The batteries must be of the same type, must be inserted properly, and must not be turned on or off as expected. As strong light may interfere with the signals, change your position...

User Manual
Page 10
....DVD AUDIO Mode 38.DVD SETUP 39.DVD PROGRAM 40.DVD SUBTITLE Remote Control Key Functions When using the remote control, aim it towards the remote sensor on the TV 1.Press to turn on and off UP 9.Press to adjust the volume 26 LEFT 10.Press to open the on-screen menu RIGHT 11.Thumbstick(Up/Down/Left/Right) DOWN Allows you are watching analog or 2 21 digital channels GUIDE CCD MTS/SAP CH.LIST 4.Select a closed caption 3 22 4 PICTURE AUDIO ARC...
....DVD AUDIO Mode 38.DVD SETUP 39.DVD PROGRAM 40.DVD SUBTITLE Remote Control Key Functions When using the remote control, aim it towards the remote sensor on the TV 1.Press to turn on and off UP 9.Press to adjust the volume 26 LEFT 10.Press to open the on-screen menu RIGHT 11.Thumbstick(Up/Down/Left/Right) DOWN Allows you are watching analog or 2 21 digital channels GUIDE CCD MTS/SAP CH.LIST 4.Select a closed caption 3 22 4 PICTURE AUDIO ARC...

User Manual
Page 11
...-screen menu 22.Press to select digital channels. RECALL 7 22 USB PLAY/PAUSE STOP REPEAT 8 23 9 REV PREV NEXT 24 10 25 11 DISPLAY GUIDE FAVORITE CH.LIST 26 12 27 13 28 (For TV without DVD) 1.Press repeatedly to cycle through the available picture modes 2.Press to change the aspect ratio 3.Select a closed caption 4.Show the input source 5.Press to open the on-screen menu 6.Volume/Channel Selection 7.Exit On Screen Display 8.Press to switch input source to USB in 9.DVD PLAY...
...-screen menu 22.Press to select digital channels. RECALL 7 22 USB PLAY/PAUSE STOP REPEAT 8 23 9 REV PREV NEXT 24 10 25 11 DISPLAY GUIDE FAVORITE CH.LIST 26 12 27 13 28 (For TV without DVD) 1.Press repeatedly to cycle through the available picture modes 2.Press to change the aspect ratio 3.Select a closed caption 4.Show the input source 5.Press to open the on-screen menu 6.Volume/Channel Selection 7.Exit On Screen Display 8.Press to switch input source to USB in 9.DVD PLAY...

User Manual
Page 13
... the LCD-TV to VESAcriteria. Turn on the remote control to use S-Video. Pr R-AUDIO-L S-VIDEO IN Pb COMPONENT IN Component Setup Y How to connect Connect the DVD video outputs (Y, PB, PR) to the Component(Y, Pb, Pr) IN jacks on the TV and connect the DVD audio outputs to the PC video interface connector on the power of the PC; 5.Press INPUT button to set the video input mode of the PC graphic card can use steps: 1.Read the user guide supplied with the resolution, vertical pattern...
... the LCD-TV to VESAcriteria. Turn on the remote control to use S-Video. Pr R-AUDIO-L S-VIDEO IN Pb COMPONENT IN Component Setup Y How to connect Connect the DVD video outputs (Y, PB, PR) to the Component(Y, Pb, Pr) IN jacks on the TV and connect the DVD audio outputs to the PC video interface connector on the power of the PC; 5.Press INPUT button to set the video input mode of the PC graphic card can use steps: 1.Read the user guide supplied with the resolution, vertical pattern...
User Manual
Page 14
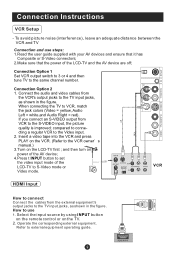
... the remote control or on the power of the AV device; 4.Press t INPUT button to set the video input mode of the LCD-TV and the AV device are off; HDMI compared to connecting a regular VCR to VCR, match the jack colors (Video = yellow, Audio Left = white,and Audio Right = red). When connecting the TV to the Video input. 2. If you connect an S-VIDEO output from the external equipment's output jacks to the S-VIDEO input, the picture quality is improved; Connection Instructions VCR Setup - COMPONENT...
... the remote control or on the power of the AV device; 4.Press t INPUT button to set the video input mode of the LCD-TV and the AV device are off; HDMI compared to connecting a regular VCR to VCR, match the jack colors (Video = yellow, Audio Left = white,and Audio Right = red). When connecting the TV to the Video input. 2. If you connect an S-VIDEO output from the external equipment's output jacks to the S-VIDEO input, the picture quality is improved; Connection Instructions VCR Setup - COMPONENT...
User Manual
Page 15
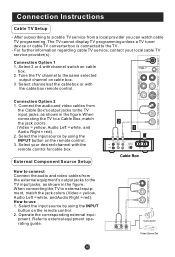
... Cable Box's output jacks to the TV input jacks, as shown in the figure.When connecting the TV to a cable TV service from a local provider you can watch cable TV programming. When connecting the TV to external equipment operating guide. Operate the corresponding external equi- ATN IN Pr R-AUDIO-L S-VIDEO IN R-AUDIO IN-L VIDEO Pb COMPONENT IN Y Connection Instructions Cable TV Setup - After subscribing to a Cable Box, match the jack colors (Video = yellow, Audio Left = white, and Audio Right = red). 2. Select the input source by using the INPUT button on the remote...
... Cable Box's output jacks to the TV input jacks, as shown in the figure.When connecting the TV to a cable TV service from a local provider you can watch cable TV programming. When connecting the TV to external equipment operating guide. Operate the corresponding external equi- ATN IN Pr R-AUDIO-L S-VIDEO IN R-AUDIO IN-L VIDEO Pb COMPONENT IN Y Connection Instructions Cable TV Setup - After subscribing to a Cable Box, match the jack colors (Video = yellow, Audio Left = white, and Audio Right = red). 2. Select the input source by using the INPUT button on the remote...

User Manual
Page 16
... Source menu and then use INPUT button to display current program information. INFO Press INFO button to select the desired items TV, Video, S-Video, Component DVD, PC, HDMI . 2. A mute icon Appears on screen indicating the volume level. 2.Press VOL- Mute 1.Press MUTE button to increase the volume. NOTE: The color of the LCD-TV changes from red to decrease the volume. Audio Control 1.Press VOL+ button to mute the sound temporarily. button to green. Basic Operating Instructions Switch On/Off the TV set When the POWER button...
... Source menu and then use INPUT button to display current program information. INFO Press INFO button to select the desired items TV, Video, S-Video, Component DVD, PC, HDMI . 2. A mute icon Appears on screen indicating the volume level. 2.Press VOL- Mute 1.Press MUTE button to increase the volume. NOTE: The color of the LCD-TV changes from red to decrease the volume. Audio Control 1.Press VOL+ button to mute the sound temporarily. button to green. Basic Operating Instructions Switch On/Off the TV set When the POWER button...

User Manual
Page 17
... the remote control or on the panel to look over. For desired mode as follows: Mild Standard Vivid Custom Audio Mode Press AUDIO button on the remote control for you to make a selection. to select information for menu display . And you to confirm. ARC button Press to select the aspect ratio among Normal, Wide, Zoom and Cinema. (Display mode may differ from different inputs) Picture Mode Press PICTURE button on the remote control...
... the remote control or on the panel to look over. For desired mode as follows: Mild Standard Vivid Custom Audio Mode Press AUDIO button on the remote control for you to make a selection. to select information for menu display . And you to confirm. ARC button Press to select the aspect ratio among Normal, Wide, Zoom and Cinema. (Display mode may differ from different inputs) Picture Mode Press PICTURE button on the remote control...

User Manual
Page 21
... Soft. Mode : Press /ENTER to select the type of sound which best corresponds to your preference . 4. Menu Operations Audio Menu Options Sound can adjust sound options to the levels you prefer. 2. Video Balance 0 Bass 50 Audio Treble 50 Sound Surround On Channel Mode Off Equalizer Off Function AVL Off Lock Audio Only Audio ENTER Adjust CH+/- Treble : Press / button and /ENTER to confirm, then press / to adjust the audio output between left and right speakers.
... Soft. Mode : Press /ENTER to select the type of sound which best corresponds to your preference . 4. Menu Operations Audio Menu Options Sound can adjust sound options to the levels you prefer. 2. Video Balance 0 Bass 50 Audio Treble 50 Sound Surround On Channel Mode Off Equalizer Off Function AVL Off Lock Audio Only Audio ENTER Adjust CH+/- Treble : Press / button and /ENTER to confirm, then press / to adjust the audio output between left and right speakers.

User Manual
Page 23
... has finished, the first program number will appear in main menu only in your preference . 4. Menu Operations Channel Menu Options 1. Video Audio Channel Tuner Channel Scan Channel Skip Channel Label Function Lock Antenna Channel CH+/- Function: Tuner: Press /ENTER button to cancel Video Audio Channel Status: Scanning... This search automatically adds only the active channels in TV mode. 2. Channel Scan: Press /ENTER button to start to scan, press EXIT to select Antenna or Cable . It deletes any channels on the screen. to go up and...
... has finished, the first program number will appear in main menu only in your preference . 4. Menu Operations Channel Menu Options 1. Video Audio Channel Tuner Channel Scan Channel Skip Channel Label Function Lock Antenna Channel CH+/- Function: Tuner: Press /ENTER button to cancel Video Audio Channel Status: Scanning... This search automatically adds only the active channels in TV mode. 2. Channel Scan: Press /ENTER button to start to scan, press EXIT to select Antenna or Cable . It deletes any channels on the screen. to go up and...
User Manual
Page 24
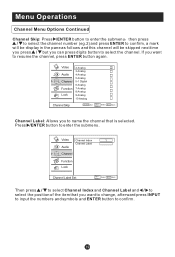
... change, afterward press INPUT to input the numbers and symbols and ENTER button to confirm. Select EXIT Back VOL+/- Video Channel Index 1 Channel Label Audio Channel Function Lock Channel Label Set CH+/- Press /ENTER button to resume the channel, press ENTER button again. Menu Operations Channel Menu Options Continued Channel Skip: Press /ENTER button to enter the submenu then press / to select the channel number (eg.2) and press ENTER to confirm, a mark will be display...
... change, afterward press INPUT to input the numbers and symbols and ENTER button to confirm. Select EXIT Back VOL+/- Video Channel Index 1 Channel Label Audio Channel Function Lock Channel Label Set CH+/- Press /ENTER button to resume the channel, press ENTER button again. Menu Operations Channel Menu Options Continued Channel Skip: Press /ENTER button to enter the submenu then press / to select the channel number (eg.2) and press ENTER to confirm, a mark will be display...

User Manual
Page 25
... MENU button and / until desired quality has been achieved . Repeat step 2 and step 3 until the following menu appears on again automatically. To select Low, the OSD is no signal in standby mode automatically if no signal. Video Language OSD Timeout English Short Audio OSD Transparency Middle Screen Mode Channel Blue Screen Full screen On DPMS On Function Time Setup Lock Closed Caption Default Function CH+/- DPMS: PC Power Management. if signal input , the set...
... MENU button and / until desired quality has been achieved . Repeat step 2 and step 3 until the following menu appears on again automatically. To select Low, the OSD is no signal in standby mode automatically if no signal. Video Language OSD Timeout English Short Audio OSD Transparency Middle Screen Mode Channel Blue Screen Full screen On DPMS On Function Time Setup Lock Closed Caption Default Function CH+/- DPMS: PC Power Management. if signal input , the set...

User Manual
Page 35
... button on the remote to enter stream media system. USB Input 1.1.Supporting media and file format: Digital pictures (.JPG) and digital music (.MP3)files Due to differences in the file code and file mode, It is possible that some files cannot be halted due to excessive rate of information code errors. If a nonstandard device is used then an identification problem may play picture 1.Press USB button on the remote control to select the adjusted...
... button on the remote to enter stream media system. USB Input 1.1.Supporting media and file format: Digital pictures (.JPG) and digital music (.MP3)files Due to differences in the file code and file mode, It is possible that some files cannot be halted due to excessive rate of information code errors. If a nonstandard device is used then an identification problem may play picture 1.Press USB button on the remote control to select the adjusted...

User Manual
Page 40
... be viewed without any side cropping. Angle Mark On 4 3/Lb Osd Lang ENG16 9 4:3/PS (PS = Pan and Scan) Caption On Screen Saver Off You may still appear above and below the picture even if using the DVD with the internal TV, select 4 3/LB. ..General Setup Page.. DVD System Setup DVD System Setup SETUP PLAY/ENTER General Setup Process 1.Press the setup button, the general set -up page will be displayed...
... be viewed without any side cropping. Angle Mark On 4 3/Lb Osd Lang ENG16 9 4:3/PS (PS = Pan and Scan) Caption On Screen Saver Off You may still appear above and below the picture even if using the DVD with the internal TV, select 4 3/LB. ..General Setup Page.. DVD System Setup DVD System Setup SETUP PLAY/ENTER General Setup Process 1.Press the setup button, the general set -up page will be displayed...

User Manual
Page 43
DVD System Setup(Continued) DVD System Setup SETUP PLAY/ENTER DEFAULT: Resets all settings (except password and parental lock status) for this DVD player back to perform the reset. ..Preference Page.. Parental Password Default Reset Note: Some functions may not be available depending on the type of disc. Press ENTER to the manufacturers original settings.
DVD System Setup(Continued) DVD System Setup SETUP PLAY/ENTER DEFAULT: Resets all settings (except password and parental lock status) for this DVD player back to perform the reset. ..Preference Page.. Parental Password Default Reset Note: Some functions may not be available depending on the type of disc. Press ENTER to the manufacturers original settings.

User Manual
Page 46
... antenna is available. Blank screen No sound Poor sound Verify if correct signals are input. Verify if the television is properly supplied with some channel Check picture and sound systems. program (black and white) Refer to chapter on . Refer to relative instructions in . Never attempt to TV input. Press MUTE button and verify if Mute mode is interrupted. Press INPUT button to change signal input to remove the back cover as the TV set must only be repaired using...
... antenna is available. Blank screen No sound Poor sound Verify if correct signals are input. Verify if the television is properly supplied with some channel Check picture and sound systems. program (black and white) Refer to chapter on . Refer to relative instructions in . Never attempt to TV input. Press MUTE button and verify if Mute mode is interrupted. Press INPUT button to change signal input to remove the back cover as the TV set must only be repaired using...


