
User Manual
Page 1
TFT-LCD TV OWNER'S MANUAL Please READ this manual carefully before operating your TV, and retain it for future reference. MODELS: HL26B HL26BG HL26S HL32B HL32BG HL32S HL37B HL37BG HL37S HL42B HL40BG HL42BG
TFT-LCD TV OWNER'S MANUAL Please READ this manual carefully before operating your TV, and retain it for future reference. MODELS: HL26B HL26BG HL26S HL32B HL32BG HL32S HL37B HL37BG HL37S HL42B HL40BG HL42BG
User Manual
Page 3
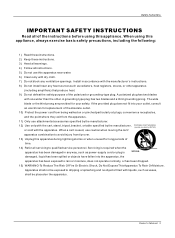
... normally, or has been dropped. 15) WARNING-To Reduce The Risk Of Fire Or Electric Shock, Do Not Expose This Apparatus To Rain Or Moisture. Owner s Manual 3 The wide blade or the third prong are provided for long periods of the polarized or grounding-type plug.
... normally, or has been dropped. 15) WARNING-To Reduce The Risk Of Fire Or Electric Shock, Do Not Expose This Apparatus To Rain Or Moisture. Owner s Manual 3 The wide blade or the third prong are provided for long periods of the polarized or grounding-type plug.

User Manual
Page 5
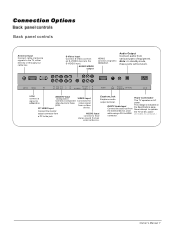
... Connection DTV Connection Digital Audio Output PC Connection Monitor Out Setup HDM I Cable Sample Connecting Headphones Pow er so urc e Operation Switching On/Off the TV set Choose the Menu Language Choose the input Source Channel Menu Automatic Scan Man ual S can Fine Tune Edi t Pro gra m Rename Select the desired... rating and categories Others Functions Bri ef In fo Quick program view Setting up your remote control Remote Control Codes Maintenance Product Specifications Troubleshooting Warranty Owner s Manual 5
... Connection DTV Connection Digital Audio Output PC Connection Monitor Out Setup HDM I Cable Sample Connecting Headphones Pow er so urc e Operation Switching On/Off the TV set Choose the Menu Language Choose the input Source Channel Menu Automatic Scan Man ual S can Fine Tune Edi t Pro gra m Rename Select the desired... rating and categories Others Functions Bri ef In fo Quick program view Setting up your remote control Remote Control Codes Maintenance Product Specifications Troubleshooting Warranty Owner s Manual 5
User Manual
Page 7
... a DVI to HDMI connect to operate the TV on DC power (for HL26S, It is indicated on AC power. stereo sound from various types of equipment. DVI/PC Audio Input Connect the audio out from a PC to HDMI/DVI. The voltage is on the left. ) Owner s Manual 7 Never attempt to hear connector. Audio...
... a DVI to HDMI connect to operate the TV on DC power (for HL26S, It is indicated on AC power. stereo sound from various types of equipment. DVI/PC Audio Input Connect the audio out from a PC to HDMI/DVI. The voltage is on the left. ) Owner s Manual 7 Never attempt to hear connector. Audio...

User Manual
Page 9
.../Houses (Connect to bend the bronze wire when connecting the antenna. Q.VIEW TFT-LCD TV OWNER'S MANUAL MODEL:L40A8A Please READ this manual carefully before operating your dealer for future reference. Remote controller Owner`s manual Alkaline battery(AAA) 2 Power cable Antenna Connection Generally speaking, to tighten. Multi... INFO OK ARC SAP SLEEP EXIT VOL+ CH+ VOL- Owner s Manual 9 If the antenna needs to be split for outdoor antenna) Outdoor Antenna Bronze Wire Be careful not to wall jack for two TV`s, install a 2Way Signal Splitter in a poor signal area,...
.../Houses (Connect to bend the bronze wire when connecting the antenna. Q.VIEW TFT-LCD TV OWNER'S MANUAL MODEL:L40A8A Please READ this manual carefully before operating your dealer for future reference. Remote controller Owner`s manual Alkaline battery(AAA) 2 Power cable Antenna Connection Generally speaking, to tighten. Multi... INFO OK ARC SAP SLEEP EXIT VOL+ CH+ VOL- Owner s Manual 9 If the antenna needs to be split for outdoor antenna) Outdoor Antenna Bronze Wire Be careful not to wall jack for two TV`s, install a 2Way Signal Splitter in a poor signal area,...
User Manual
Page 10
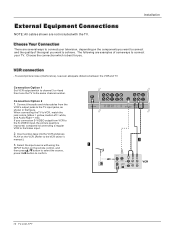
...VCR. (Refer to the TV input jacks, as shown in the figure. VCR connection - ANT IN Y2 Pb2 Pr2 L R AV OUT L R Y1 Pb1 Pr1 L R S-VIDEO VIDEO L R 10 TV LCD-TFT If you connect an S-VIDEO output from the VCR's output jacks to the VCR owner`s manual.) 3. To avoid picture ...noise (interference), leave an adequate distance between the VCR and TV Connection Option 1 Set VCR output switch to channel 3 or 4 and then...
...VCR. (Refer to the TV input jacks, as shown in the figure. VCR connection - ANT IN Y2 Pb2 Pr2 L R AV OUT L R Y1 Pb1 Pr1 L R S-VIDEO VIDEO L R 10 TV LCD-TFT If you connect an S-VIDEO output from the VCR's output jacks to the VCR owner`s manual.) 3. To avoid picture ...noise (interference), leave an adequate distance between the VCR and TV Connection Option 1 Set VCR output switch to channel 3 or 4 and then...

User Manual
Page 11
...To get better picture quality, connect a DVD player to select YPbPr mode. 3. Use the INPUT button on the TV. External Equipment Connections Installation External A/V Source Setup How to connect Connect the audio and video cables from the external equipment's... input ports as shown in the figure. 2. Refer to the DVD player's manual for program play. 4. Component ports on the TV Video output ports on the TV and connect the DVD audio outputs to confirm 4. If your DVD player does ... Y Cb Cr Y PB PR Video Game Set Y2 Pb2 Pr2 L R AV OUT L R Y1 Pb1 Pr1 L R S-VIDEO VIDEO L R Owner s Manual 11
...To get better picture quality, connect a DVD player to select YPbPr mode. 3. Use the INPUT button on the TV. External Equipment Connections Installation External A/V Source Setup How to connect Connect the audio and video cables from the external equipment's... input ports as shown in the figure. 2. Refer to the DVD player's manual for program play. 4. Component ports on the TV Video output ports on the TV and connect the DVD audio outputs to confirm 4. If your DVD player does ... Y Cb Cr Y PB PR Video Game Set Y2 Pb2 Pr2 L R AV OUT L R Y1 Pb1 Pr1 L R S-VIDEO VIDEO L R Owner s Manual 11

User Manual
Page 12
...Yes Yes Yes Yes Digital Set-top Box Audio Output Send the TV`s audio to connect 1. Connect one end of the optical cable to the digital audio (optical) input on the digital set-top box. (Refer to the owner`s manual for video connections, depending on the remote control to use Y2 ... Contents Protection) protocol for operation. How to connect Use the TV`s (Y, PB, PR) , VGA or HDMI jack for the digital set -top box. Use INPUT on your vision. 12 TV LCD-TFT PC/DVI OPTICAL AUDIO IN AC IN See the external audio equipment instruction manual for Digital Contents (480p,720p,1080i).
...Yes Yes Yes Yes Digital Set-top Box Audio Output Send the TV`s audio to connect 1. Connect one end of the optical cable to the digital audio (optical) input on the digital set-top box. (Refer to the owner`s manual for video connections, depending on the remote control to use Y2 ... Contents Protection) protocol for operation. How to connect Use the TV`s (Y, PB, PR) , VGA or HDMI jack for the digital set -top box. Use INPUT on your vision. 12 TV LCD-TFT PC/DVI OPTICAL AUDIO IN AC IN See the external audio equipment instruction manual for Digital Contents (480p,720p,1080i).
User Manual
Page 13
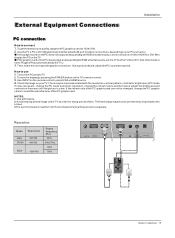
...yourTV.There maybe noise associatedwith the resolution,vertical pattern, contrastor brightness inPC mode. Turnon the displayby pressing thePOWER button onthe TV'sremote control. 3. External Equipment Connections Installation PC connection How toconnect 1. Ifusing a soundcard, adjust thePC sound asrequired. How...TV'sscreen for Horizontaland Verticalfrequencies is set to selectVGA orHDMI source. 4. Resolution Mode Resolution VGA SVGA 640*480 800*600 XGA 1024*768 Frame frequency (Hz) 60Hz 60Hz/75Hz 60Hz 75Hz ANT IN HDMI2 PC HDMI1 PC/DVI OPTICAL AUDIO IN Owner s Manual...
...yourTV.There maybe noise associatedwith the resolution,vertical pattern, contrastor brightness inPC mode. Turnon the displayby pressing thePOWER button onthe TV'sremote control. 3. External Equipment Connections Installation PC connection How toconnect 1. Ifusing a soundcard, adjust thePC sound asrequired. How...TV'sscreen for Horizontaland Verticalfrequencies is set to selectVGA orHDMI source. 4. Resolution Mode Resolution VGA SVGA 640*480 800*600 XGA 1024*768 Frame frequency (Hz) 60Hz 60Hz/75Hz 60Hz 75Hz ANT IN HDMI2 PC HDMI1 PC/DVI OPTICAL AUDIO IN Owner s Manual...
User Manual
Page 15
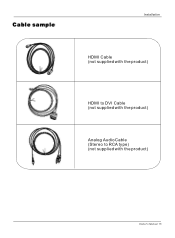
Cable sample Installation HDMI Cable (not supplied with the product) HDMI to DVI Cable (not supplied with the product) Analog Audio Cable (Stereo to RCA type) (not supplied with the product) Owner s Manual 15
Cable sample Installation HDMI Cable (not supplied with the product) HDMI to DVI Cable (not supplied with the product) Analog Audio Cable (Stereo to RCA type) (not supplied with the product) Owner s Manual 15
User Manual
Page 17
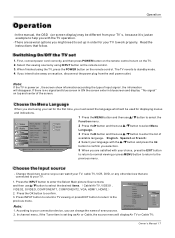
...the previous menu. VIDEO1 VIDEO2 2. According to your connection device, you intend to turn on the TV. 2. If you can watch your TV, cable TV, VCR, DVD, or any other devices that follow. VGA HDMI1 PVR Cable HDMI2 Game Up/Down...Change MP Source Right:Activale Source Name Edit Menu 1. In channel menu, if the Tuner item is set 1. The TV reverts to confirm. Press the OK button to standby mode. 4. First, connect power cord correctly, and then press POWER...Menu Language. 3 Press the button and then use / button to the COMPONENT2 STB previous menu. Owner s Manual 17
...the previous menu. VIDEO1 VIDEO2 2. According to your connection device, you intend to turn on the TV. 2. If you can watch your TV, cable TV, VCR, DVD, or any other devices that follow. VGA HDMI1 PVR Cable HDMI2 Game Up/Down...Change MP Source Right:Activale Source Name Edit Menu 1. In channel menu, if the Tuner item is set 1. The TV reverts to confirm. Press the OK button to standby mode. 4. First, connect power cord correctly, and then press POWER...Menu Language. 3 Press the button and then use / button to the COMPONENT2 STB previous menu. Owner s Manual 17
User Manual
Page 19
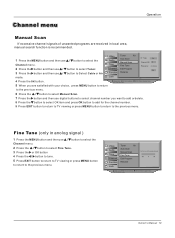
... : Move cursor, /OK: Go to submenu, / ME NU: Return to upper menu, EXIT: Exit main menu Owner s Manual 19 Video Audio Time A B C Channel Function Lock Tuner Air Auto Scan Manual Scan Fine Tune Edit Program Rename Type Air Channel NO 4 Frequency 67.250MHz 0k 4 Press the OK button. 5 ...to add for the channel number. 9 Press EXIT button to return to TV viewing or press MENU button to return to the previous menu. Video Audio Time A B C Channel Function Lock Tuner Air Auto Scan Manual Scan Fine Tune Edit Program Rename For the tune of unwanted programs are...
... : Move cursor, /OK: Go to submenu, / ME NU: Return to upper menu, EXIT: Exit main menu Owner s Manual 19 Video Audio Time A B C Channel Function Lock Tuner Air Auto Scan Manual Scan Fine Tune Edit Program Rename Type Air Channel NO 4 Frequency 67.250MHz 0k 4 Press the OK button. 5 ...to add for the channel number. 9 Press EXIT button to return to TV viewing or press MENU button to return to the previous menu. Video Audio Time A B C Channel Function Lock Tuner Air Auto Scan Manual Scan Fine Tune Edit Program Rename For the tune of unwanted programs are...
User Manual
Page 21
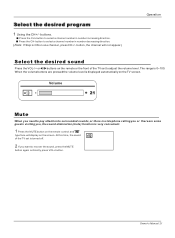
... the desired program 1 Using the CH+/- Press the CH- button to recover the sound, press the MUTE button again or directly press VOL+ button. buttons. Owner s Manual 21 Press the CH+ button to adjust the volume level. button, the channel will display on the remote or the front of the... TV set to select a channel number in number decreasing direction. (Note: If Skip is ON on the TV screen. The range is very convenient. 1 Press the MUTE button on the remote control and " " type ...
... the desired program 1 Using the CH+/- Press the CH- button to recover the sound, press the MUTE button again or directly press VOL+ button. buttons. Owner s Manual 21 Press the CH+ button to adjust the volume level. button, the channel will display on the remote or the front of the... TV set to select a channel number in number decreasing direction. (Note: If Skip is ON on the TV screen. The range is very convenient. 1 Press the MUTE button on the remote control and " " type ...
User Manual
Page 23
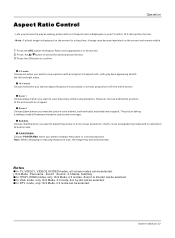
... at bottom side. Panorama . Zoom1 . Zoom 2 Choose Zoom 2 when you choose the way an analog picture with a 16:9 ratio picture format. - Owner s Manual 23 Subtitle Choose Subtitle when you want to adjust the picture in a non-linear proportion, that is displayed on the screen for a long time, it... image may become imprinted on the screen and remain visible. 1 Press the ARC button the Aspect Ratio menu appearance on your TV with a 4:3 aspect ratio is displayed on the screen. 2 Press the / button to select the desired picture format. 3 Press the OK button to ...
... at bottom side. Panorama . Zoom1 . Zoom 2 Choose Zoom 2 when you choose the way an analog picture with a 16:9 ratio picture format. - Owner s Manual 23 Subtitle Choose Subtitle when you want to adjust the picture in a non-linear proportion, that is displayed on the screen for a long time, it... image may become imprinted on the screen and remain visible. 1 Press the ARC button the Aspect Ratio menu appearance on your TV with a 4:3 aspect ratio is displayed on the screen. 2 Press the / button to select the desired picture format. 3 Press the OK button to ...

User Manual
Page 25
... transmits the proper signals. - If other languages are available on the remote control, this TV can receive MTS stereo programs and SAP (Secondary Audio Program) that accompanies the stereo program; Press EXIT button to save and return to mono sound ... SAP Broadcasts Setup - even though Stereo or SAP has been selected. - Mono sound is automatically received if the broadcast is only in a Analog channel. 1. Operation Owner s Manual 25 Stereo or SAP can be received in Mono; if the station transmits an additional sound signal as well as the original one. - When having...
... transmits the proper signals. - If other languages are available on the remote control, this TV can receive MTS stereo programs and SAP (Secondary Audio Program) that accompanies the stereo program; Press EXIT button to save and return to mono sound ... SAP Broadcasts Setup - even though Stereo or SAP has been selected. - Mono sound is automatically received if the broadcast is only in a Analog channel. 1. Operation Owner s Manual 25 Stereo or SAP can be received in Mono; if the station transmits an additional sound signal as well as the original one. - When having...

User Manual
Page 27
...from the number of daylight saving time. When the number of minutes. You can use / button to adjust the setting. 4 When you to TV viewing. Press the button and then use / button to select your choice, press MENU button to return to the previous menu or press the ...button to select the Time Zone items. 3 Press the button and then use the SLEEP button also to upper menu, EXIT: Exit main menu Owner s Manual 27 Broadcasted time information will correct the clock display for daylight saving time, based on specially broadcasted signals. Select Off to disable automatic clock correction...
...from the number of daylight saving time. When the number of minutes. You can use / button to adjust the setting. 4 When you to TV viewing. Press the button and then use / button to select your choice, press MENU button to return to the previous menu or press the ...button to select the Time Zone items. 3 Press the button and then use the SLEEP button also to upper menu, EXIT: Exit main menu Owner s Manual 27 Broadcasted time information will correct the clock display for daylight saving time, based on specially broadcasted signals. Select Off to disable automatic clock correction...
User Manual
Page 29
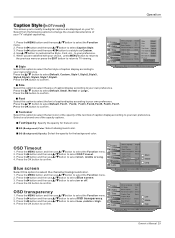
...This allows you are displayed on or off. 4. Select from the following options to change the visual characteristics of caption display according to TV viewing. Press the OK button to confirm. Press the / button to select Default, Small, Normal or Large , Press the OK button... then use / button to select OSD Timeout. 3. Press the button and then use / button to upper menu, EXIT: Exit main menu Owner s Manual 29 Video Audio Time A B C Channel Function Lock Menu Language English CC Mode On Basic Caption CC1 Advanced Caption Service1 Caption Type Basic Caption...
...This allows you are displayed on or off. 4. Select from the following options to change the visual characteristics of caption display according to TV viewing. Press the OK button to confirm. Press the / button to select Default, Small, Normal or Large , Press the OK button... then use / button to select OSD Timeout. 3. Press the button and then use / button to upper menu, EXIT: Exit main menu Owner s Manual 29 Video Audio Time A B C Channel Function Lock Menu Language English CC Mode On Basic Caption CC1 Advanced Caption Service1 Caption Type Basic Caption...

User Manual
Page 31
... TV-G, TV-PG, TV-14, TV-MA) (applies to TV-PG, TV-14) (applies to TV-PG, TV-14, TV-MA) (applies to TV-PG, TV-14, TV-MA) (applies to be blocked. 2. Most television programs and television movies can be blocked by the broadcasting station. To use the Movie Rating System (MPAA) only. Set ratings and categories to TV-PG, TV-14, TV-MA) Owner s Manual...
... TV-G, TV-PG, TV-14, TV-MA) (applies to TV-PG, TV-14) (applies to TV-PG, TV-14, TV-MA) (applies to TV-PG, TV-14, TV-MA) (applies to be blocked. 2. Most television programs and television movies can be blocked by the broadcasting station. To use the Movie Rating System (MPAA) only. Set ratings and categories to TV-PG, TV-14, TV-MA) Owner s Manual...

User Manual
Page 33
... if you block TV-Y category, then TV-Y7 will automatically be suitable for all the categories in TV-14 and TV-MA will automatically be blocked (TV-Y, TV-Y7, TV-G, TV-PG, TV-14, and TV-MA). Not recommended for children under the age of these Ratings: TV-Y, TV-Y7, TV-G, TV-PG,TV-14, or TV-MA , and ...ans+ 18 ans+ Block All : Move cursor, /OK: Go to submenu, / ME NU: Return to upper menu, EXIT: Exit main menu Owner s Manual 33 To select a different Rating, press the / buttons and then repeat the process. Lock setup Operation Parental Guide Parental Guide: Blocks any channels that...
... if you block TV-Y category, then TV-Y7 will automatically be suitable for all the categories in TV-14 and TV-MA will automatically be blocked (TV-Y, TV-Y7, TV-G, TV-PG, TV-14, and TV-MA). Not recommended for children under the age of these Ratings: TV-Y, TV-Y7, TV-G, TV-PG,TV-14, or TV-MA , and ...ans+ 18 ans+ Block All : Move cursor, /OK: Go to submenu, / ME NU: Return to upper menu, EXIT: Exit main menu Owner s Manual 33 To select a different Rating, press the / buttons and then repeat the process. Lock setup Operation Parental Guide Parental Guide: Blocks any channels that...

User Manual
Page 35
... manually scan mode. (TV, VCR, DVD, STB, cable box or audio equipment). 2. While Press and holding OK key, press the SELECT key and device LED will not blink. 6. If the device responds, no data, then LED will be off and manually programming process is ready for 3 times. Owner s Manual ...Q.VIEW Controller Operation To control a device using POWER or PLAY keys. Changing device mode by using the Controller 1. Default init status: TV/Haier 001 code. 7. Bulb key to operate the device. If time out or any key other Controller buttons to control the flash light. ...
... manually scan mode. (TV, VCR, DVD, STB, cable box or audio equipment). 2. While Press and holding OK key, press the SELECT key and device LED will not blink. 6. If the device responds, no data, then LED will be off and manually programming process is ready for 3 times. Owner s Manual ...Q.VIEW Controller Operation To control a device using POWER or PLAY keys. Changing device mode by using the Controller 1. Default init status: TV/Haier 001 code. 7. Bulb key to operate the device. If time out or any key other Controller buttons to control the flash light. ...


