
User Manual
Page 5
...prevent possible damage to your product from that this apparatus to rain or cords. -4- CAUTION Never tamper with any components inside the TV, or any other adjustment controls not mentioned in this unit not expressly by the part responsible for help. Earthing connection--- This ...equipment generates, uses, and can cause eyestrain. Increase the separation between the TV and the wall to Part 15 of fire or electric shock, do not expose this productincorporates double insulation between hazardous mains voltage ...
...prevent possible damage to your product from that this apparatus to rain or cords. -4- CAUTION Never tamper with any components inside the TV, or any other adjustment controls not mentioned in this unit not expressly by the part responsible for help. Earthing connection--- This ...equipment generates, uses, and can cause eyestrain. Increase the separation between the TV and the wall to Part 15 of fire or electric shock, do not expose this productincorporates double insulation between hazardous mains voltage ...
User Manual
Page 6
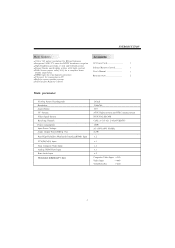
...AAA 2 ■ Built-in stereo speaker system ■ Full-function Remote Control Main parameter Viewing Picture Size(diagonal) Resolution: Aspect Ratio: TV System: Video Signal System: Receiving Channel: Power consumption: Input Power Voltage: Audio Output Power(THD 7%): Rear High-Definition Multimedia Interface(HDMI) ...Input YCb(Pb)Cr(Pr) Input Rear Composte Video Input Analog RGB(VGA) Input Rear Audio Input Horizontal definition(TV line) 26 inch 1366x768 16:9 ATSC Digital system and NTSC Analog system NTSC/PAL/SECAM Cable :1-135/ Air: 2-69(ATV&DTV...
...AAA 2 ■ Built-in stereo speaker system ■ Full-function Remote Control Main parameter Viewing Picture Size(diagonal) Resolution: Aspect Ratio: TV System: Video Signal System: Receiving Channel: Power consumption: Input Power Voltage: Audio Output Power(THD 7%): Rear High-Definition Multimedia Interface(HDMI) ...Input YCb(Pb)Cr(Pr) Input Rear Composte Video Input Analog RGB(VGA) Input Rear Audio Input Horizontal definition(TV line) 26 inch 1366x768 16:9 ATSC Digital system and NTSC Analog system NTSC/PAL/SECAM Cable :1-135/ Air: 2-69(ATV&DTV...
User Manual
Page 7
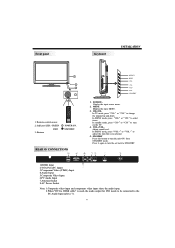
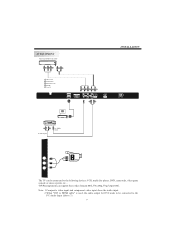
... LED: GREEN RED 3: Buttons POWER ON. STANDBY. 1.SOURCE: Display the input source menu. 2.MENU: Display the main MENU. 3.CH+/CHIn TV mode, press"CH+"or"CH-"to the PC Audio Input (above 7). -6- REAR AV CONNECTIONS ① ② ③ ④⑥ ⑦ ⑧ HDMI2 INPUT HDMI1 ...MENU mode, press "CH+"or"CH-"to select items. In standby mode, press"CH+"or"CH-"to turn the set back to turn on the TV. 4.VOL+/VOLAdjust sound level. In MENU mode, press"VOL+"or"VOL-"to turn the unit ON from STANDBY mode. Press it again to ...
... LED: GREEN RED 3: Buttons POWER ON. STANDBY. 1.SOURCE: Display the input source menu. 2.MENU: Display the main MENU. 3.CH+/CHIn TV mode, press"CH+"or"CH-"to the PC Audio Input (above 7). -6- REAR AV CONNECTIONS ① ② ③ ④⑥ ⑦ ⑧ HDMI2 INPUT HDMI1 ...MENU mode, press "CH+"or"CH-"to select items. In standby mode, press"CH+"or"CH-"to turn the set back to turn on the TV. 4.VOL+/VOLAdjust sound level. In MENU mode, press"VOL+"or"VOL-"to turn the unit ON from STANDBY mode. Press it again to ...
User Manual
Page 8
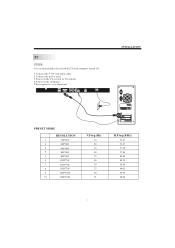
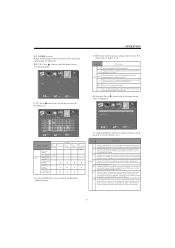
PC STEPS: It is very important. This sequence is recommended to have both the TV and computer turned off. 1.Connect the VGA and audio cable. 2.Connect the power cord. 3.Power on the TV, switch to VGA mode. 4.Power on the computer. HDMI2 INPUT HDMI1 INPUT Pr Pb AV1 Y L PC AUDIO INPUT R RF INPUT INSTALLATION PRESET MODE RESOLUTION 1 720*400 2 640*480 3 640*480 4 800*600 5 800*600 6 1024*768 7 1024*768 8 1024*768 9 1280*1024 10 1280*1024 V.Freq.(Hz) 70 60 75 60 75 60 70 75 60 75 H.Freq.(KHz) 31.47 31.47 37.50 37.88 46.88 48.36 56.48 60.02 63.98 80.00 -7-
PC STEPS: It is very important. This sequence is recommended to have both the TV and computer turned off. 1.Connect the VGA and audio cable. 2.Connect the power cord. 3.Power on the TV, switch to VGA mode. 4.Power on the computer. HDMI2 INPUT HDMI1 INPUT Pr Pb AV1 Y L PC AUDIO INPUT R RF INPUT INSTALLATION PRESET MODE RESOLUTION 1 720*400 2 640*480 3 640*480 4 800*600 5 800*600 6 1024*768 7 1024*768 8 1024*768 9 1280*1024 10 1280*1024 V.Freq.(Hz) 70 60 75 60 75 60 70 75 60 75 H.Freq.(KHz) 31.47 31.47 37.50 37.88 46.88 48.36 56.48 60.02 63.98 80.00 -7-
User Manual
Page 10
...(Y) HDMI2 INPUT HDMI1 INPUT HDMI VIDEO EQUIPMENT W R TO VIDEO output To audio outputs G B R W R Pr AV1 Pb L PC AUDIO INPUT Y R W R RF INPUT INSTALLATION AV2 VIDEO L R The TV can support these video formats:480i,576i,480p,576p,720p,1080i. Note: 1.Composite video input and component video input share the audio input. 2.When "DVI...
...(Y) HDMI2 INPUT HDMI1 INPUT HDMI VIDEO EQUIPMENT W R TO VIDEO output To audio outputs G B R W R Pr AV1 Pb L PC AUDIO INPUT Y R W R RF INPUT INSTALLATION AV2 VIDEO L R The TV can support these video formats:480i,576i,480p,576p,720p,1080i. Note: 1.Composite video input and component video input share the audio input. 2.When "DVI...
User Manual
Page 11
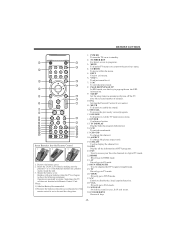
... to AV mode. 24: DTV STRENGTH Used to display the DTV signal strength menu. 25: TV Directly go to TV mode. 26: YPbPr Directly go to YPbPr mode. 27: CC Enable or disable the closed... CONTROL POWER 1 MUTE 11 RECALL 123 12 2 456 7890 MENU 3 SOURCE 13 14 4 ENTER 5 15 EXIT TV DISPLAY 16 + S.M + 6 17 VOL CH _ _ P.M 7 PAGE UP PAGE DOWN 8 SLEEP EPG P.G ASPECT 9 18...to page up/down the EPG information. 9: SLEEP Set the sleep timer to automatically turn off the TV after the selected number of minutes. 10: P.G Setting the Parental Control level control. 11: MUTE To...
... to AV mode. 24: DTV STRENGTH Used to display the DTV signal strength menu. 25: TV Directly go to TV mode. 26: YPbPr Directly go to YPbPr mode. 27: CC Enable or disable the closed... CONTROL POWER 1 MUTE 11 RECALL 123 12 2 456 7890 MENU 3 SOURCE 13 14 4 ENTER 5 15 EXIT TV DISPLAY 16 + S.M + 6 17 VOL CH _ _ P.M 7 PAGE UP PAGE DOWN 8 SLEEP EPG P.G ASPECT 9 18...to page up/down the EPG information. 9: SLEEP Set the sleep timer to automatically turn off the TV after the selected number of minutes. 10: P.G Setting the Parental Control level control. 11: MUTE To...
User Manual
Page 12
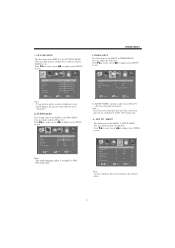
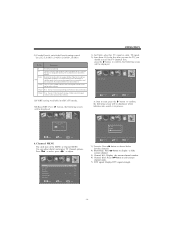
...zone Daylight Saving Time Clock Off Pacific Off 1999/12/31 04:03PM Channel Select Adjust Menu Exit 1).SLEEP TIMER: automatically shuts off the TV after the selected time period. You can adjust sound settings here. Picture Audio Menu language Transparency Aspect Noise Reduction Advanced Closed caption XVS ... The second item of the MENU is AUDIO MENU. Note: The Time zone, Daylight Saving Time, and clock options are available in ATSC (TV) mode only. SETUP MENU The forth item of the MENU is the PICTURE MENU. PICTURE MENU The first item of the MENU is available ...
...zone Daylight Saving Time Clock Off Pacific Off 1999/12/31 04:03PM Channel Select Adjust Menu Exit 1).SLEEP TIMER: automatically shuts off the TV after the selected time period. You can adjust sound settings here. Picture Audio Menu language Transparency Aspect Noise Reduction Advanced Closed caption XVS ... The second item of the MENU is AUDIO MENU. Note: The Time zone, Daylight Saving Time, and clock options are available in ATSC (TV) mode only. SETUP MENU The forth item of the MENU is the PICTURE MENU. PICTURE MENU The first item of the MENU is available ...
User Manual
Page 13
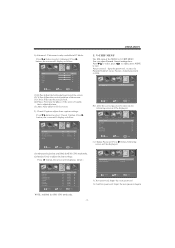
... the screen. (3).Clock: Fine tune the screen clock. (4).Phase: Fine tune the phase of the MENU is only available in ATSC (TV) mode only. Change Password: Press button, following screen will display as follow : Picture Audio Timer CC Mode Basic Selection Advanced Selection Option...PC Mode. Parent control: input the password, to select Advanced ,Press button, the screen will be displayed. (1):Advanced selection: available in ATSC (TV) mode only. (2):Option:Used to fit the screen. 2). OPERATION 1). Press button to enter the Parental Control menu. V-CHIP MENU The fifth ...
... the screen. (3).Clock: Fine tune the screen clock. (4).Phase: Fine tune the phase of the MENU is only available in ATSC (TV) mode only. Change Password: Press button, following screen will display as follow : Picture Audio Timer CC Mode Basic Selection Advanced Selection Option...PC Mode. Parent control: input the password, to select Advanced ,Press button, the screen will be displayed. (1):Advanced selection: available in ATSC (TV) mode only. (2):Option:Used to fit the screen. 2). OPERATION 1). Press button to enter the Parental Control menu. V-CHIP MENU The fifth ...
User Manual
Page 14
...(Fantasy (Violence) violence) S (Sexual situation) L (Adult language) D (Sexually suggestive dialog) TV-Y (All children) TV-Y7(Direct to Suggested order children) X age TV-G(General audience) TV-PG(Parental Guidance suggested . Age G PG General: Considered acceptable for all age groups, Appropriate viewing ... 18+ Adults: Intended for children. Some material .may be displayed Picture Audio Timer Setup P.G TV rating ALL FV V S L D TV-Y TV-Y7 TV-G TV-PG TV-14 TV-MA Block Press ENTER to lock/ unlock the Parental Control feature. Pays careful attention to the ...
...(Fantasy (Violence) violence) S (Sexual situation) L (Adult language) D (Sexually suggestive dialog) TV-Y (All children) TV-Y7(Direct to Suggested order children) X age TV-G(General audience) TV-PG(Parental Guidance suggested . Age G PG General: Considered acceptable for all age groups, Appropriate viewing ... 18+ Adults: Intended for children. Some material .may be displayed Picture Audio Timer Setup P.G TV rating ALL FV V S L D TV-Y TV-Y7 TV-G TV-PG TV-14 TV-MA Block Press ENTER to lock/ unlock the Parental Control feature. Pays careful attention to the ...
User Manual
Page 15
... violence. 18ans+ Over 18 years: Only for adult viewing. Picture Audio Timer Setup V-CHIP Channel Are you should scan all the TV channels first, press the button to confirm, the following screen will be displayed Picture Audio Start to children under 8 who cannot distinguish...Channel RF CH: 4 FOUND: 0 Select Adjust Menu Exit 6. DTV signal: Display DTV signal strength. -14- You can adjust digital and analog TV Channel options. Press to move, press to edit current channel name. 7). Channel label: Press button to adjust. Picture Audio Timer Air/cable Auto ...
... violence. 18ans+ Over 18 years: Only for adult viewing. Picture Audio Timer Setup V-CHIP Channel Are you should scan all the TV channels first, press the button to confirm, the following screen will be displayed Picture Audio Start to children under 8 who cannot distinguish...Channel RF CH: 4 FOUND: 0 Select Adjust Menu Exit 6. DTV signal: Display DTV signal strength. -14- You can adjust digital and analog TV Channel options. Press to move, press to edit current channel name. 7). Channel label: Press button to adjust. Picture Audio Timer Air/cable Auto ...


