
User Manual
Page 1
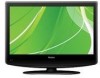
R HL19R1/HL19K1/HLC19R1/HLC19K1/HL22R1/HL22K1/HLC22R1 HLC22K1/HL22F1 LCD TV & LCD TV/DVD Combo USER MANUAL Please read this manual carefully before using this TV set and keep it for future reference.
R HL19R1/HL19K1/HLC19R1/HLC19K1/HL22R1/HL22K1/HLC22R1 HLC22K1/HL22F1 LCD TV & LCD TV/DVD Combo USER MANUAL Please read this manual carefully before using this TV set and keep it for future reference.
User Manual
Page 2
... triangle is intended to alert the user to the presence of important operating and maintenance (servicing) instructions in the operating instructions unless you are for TV with DVD models.) CAUTION: TO PREVENT ELECTRIC SHOCK DO NOT USE THIS POLARIZED PLUG WITH AN EXTENSION CORD, RECEPTACLE OR OTHER OUTLET UNLESS THE BLADES...
... triangle is intended to alert the user to the presence of important operating and maintenance (servicing) instructions in the operating instructions unless you are for TV with DVD models.) CAUTION: TO PREVENT ELECTRIC SHOCK DO NOT USE THIS POLARIZED PLUG WITH AN EXTENSION CORD, RECEPTACLE OR OTHER OUTLET UNLESS THE BLADES...

User Manual
Page 4
... DECK MECHANISM. LASER SAFETY This unit employs a laser.Only a qualified service person should remove the cover or attempt to possible eye injury. Safety Instructions(for TV with DVD) PRECAUTIONS FCC WARNING-This equipment may generate or use radio frequency energy.Changes or modifications to this equipment may cause harmful interference unless...
... DECK MECHANISM. LASER SAFETY This unit employs a laser.Only a qualified service person should remove the cover or attempt to possible eye injury. Safety Instructions(for TV with DVD) PRECAUTIONS FCC WARNING-This equipment may generate or use radio frequency energy.Changes or modifications to this equipment may cause harmful interference unless...
User Manual
Page 5
Please refer to your original set 11 Choose the input source 11 Audio Control 11 Mute...11 INFO...11 Select the TV Channel You Want 12 Picture Mode 12 Audio Mode 12 Sleep...12 GUIDE 12 ARC button 12 .Button 13 CH.LIST button 13 ...Instructions 7 External equipment Connections 7 Antenna Connection 7 VGA Setup 8.. Component Setup 8 VCR Setup 9 HDMI Input 9 Cable TV Setup 10 External Component Source Setup 10 Basic Operating Instructions 11 Switch On/Off the TV set for specific details. Menu Operations 14 Video Menu Options 14 Video Menu Options Continued 15 Audio Menu...
Please refer to your original set 11 Choose the input source 11 Audio Control 11 Mute...11 INFO...11 Select the TV Channel You Want 12 Picture Mode 12 Audio Mode 12 Sleep...12 GUIDE 12 ARC button 12 .Button 13 CH.LIST button 13 ...Instructions 7 External equipment Connections 7 Antenna Connection 7 VGA Setup 8.. Component Setup 8 VCR Setup 9 HDMI Input 9 Cable TV Setup 10 External Component Source Setup 10 Basic Operating Instructions 11 Switch On/Off the TV set for specific details. Menu Operations 14 Video Menu Options 14 Video Menu Options Continued 15 Audio Menu...

User Manual
Page 6
... recommended by manufacturer: l Before operation, please make sure that the operating voltage of your safety and extend the life-span of LCD-TV, please read and understand all the instructions before operation; l Please keep water away from the power source, then wipe the set with the... LCD-TV, disconnect the power cord from the LCD-TV . If water comes in contact with a dry soft cloth; If service is correct; Safety Notice Items Incorrect usage may ...
... recommended by manufacturer: l Before operation, please make sure that the operating voltage of your safety and extend the life-span of LCD-TV, please read and understand all the instructions before operation; l Please keep water away from the power source, then wipe the set with the... LCD-TV, disconnect the power cord from the LCD-TV . If water comes in contact with a dry soft cloth; If service is correct; Safety Notice Items Incorrect usage may ...

User Manual
Page 7
...VOL- Do not put anything near the sensor ,which may block the remote control signal. VOL+ Volume up / to access the on and off the TV. 2. Power indicator 7. MENU Menu display. VOL+ CH- Press to select the item in the menu. Volume down / to adjust the item in the... 6. Remote Sensor Receivers IR signals from the remote control. CH- TV channel down / Left button to adjust the item in the OSD /Press to turn on -screen menu display. 4. POWER Press to enter. 5. CH+ POWER R1 series K1series F1series Control Panel Function 1. Front Panel Controls INPUT MENU VOL-
...VOL- Do not put anything near the sensor ,which may block the remote control signal. VOL+ Volume up / to access the on and off the TV. 2. Power indicator 7. MENU Menu display. VOL+ CH- Press to select the item in the menu. Volume down / to adjust the item in the... 6. Remote Sensor Receivers IR signals from the remote control. CH- TV channel down / Left button to adjust the item in the OSD /Press to turn on -screen menu display. 4. POWER Press to enter. 5. CH+ POWER R1 series K1series F1series Control Panel Function 1. Front Panel Controls INPUT MENU VOL-
User Manual
Page 8
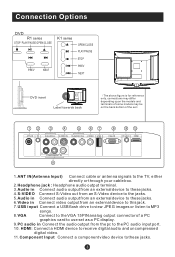
...as a PC display. 9.PC audio in Connect audio output from an external device to these jacks. Connection Options DVD R1 series STOP PLAY/PAUSE OPEN/CLOSE K1 series OPEN/CLOSE PLAY/PAUSE STOP PREV NEXT PREV NEXT DVD insert Label towards back The above figure is for reference only, connections... IN-L VIDEO USB VGA IN PC AUDIO IN HDMI Pr Pb Y COMPONENT IN 1.ANT IN(Antenna Input) Connect cable or antenna signals to the TV, either directly or through your cable box. 2.Headphone jack : Headphone audio output terminal. 3.Audio in Connect audio output from an external device to these...
...as a PC display. 9.PC audio in Connect audio output from an external device to these jacks. Connection Options DVD R1 series STOP PLAY/PAUSE OPEN/CLOSE K1 series OPEN/CLOSE PLAY/PAUSE STOP PREV NEXT PREV NEXT DVD insert Label towards back The above figure is for reference only, connections... IN-L VIDEO USB VGA IN PC AUDIO IN HDMI Pr Pb Y COMPONENT IN 1.ANT IN(Antenna Input) Connect cable or antenna signals to the TV, either directly or through your cable box. 2.Headphone jack : Headphone audio output terminal. 3.Audio in Connect audio output from an external device to these...

User Manual
Page 10
... On Screen Display 31.Accesses the highlighted item in the on-screen menu 32.Press to display the TV status information on -screen menus 7 INPUT MUTE 8 27 RECALL 28 and adjust the system settings to... 19.DVD SEARCH 11 20.DVD ANGLE ENTER 31 21.Press to switch input source to DVD in 22.Open the channel list in TV SLEEP DISPLAY 12 32 13 OPEN/CLOSE PLAY/PAUSE....Open the favourite channel list in 1 USB DVD 3.Display the guide when you are watching analog or 2 21 digital channels GUIDE CCD MTS/SAP CH.LIST 4.Select a closed caption 3 22 4 PICTURE AUDIO ARC FAVORITE ...
... On Screen Display 31.Accesses the highlighted item in the on-screen menu 32.Press to display the TV status information on -screen menus 7 INPUT MUTE 8 27 RECALL 28 and adjust the system settings to... 19.DVD SEARCH 11 20.DVD ANGLE ENTER 31 21.Press to switch input source to DVD in 22.Open the channel list in TV SLEEP DISPLAY 12 32 13 OPEN/CLOSE PLAY/PAUSE....Open the favourite channel list in 1 USB DVD 3.Display the guide when you are watching analog or 2 21 digital channels GUIDE CCD MTS/SAP CH.LIST 4.Select a closed caption 3 22 4 PICTURE AUDIO ARC FAVORITE ...

User Manual
Page 11
... 18.Press to change a channel 19.Press to turn on this manual takes remote of TV with DVD for example. For example, to enter "54-3", press "54", " " and "3". 20.Switches the video sound on or off 21.Accesses the highlighted item in the on-screen menu 22.Press to jump back and... to display the sleep timer option 17.Select MONO, STEREO, SAP in TV 14.Press to select digital channels. ENTER VOL+ 21 EXIT CH- Remote Control Key Functions When using the remote control, aim it towards the remote sensor on the TV PICTURE 14 AUDIO 1 15 ARC CCD MTS/SAP SLEEP 2 16 3 17...
... 18.Press to change a channel 19.Press to turn on this manual takes remote of TV with DVD for example. For example, to enter "54-3", press "54", " " and "3". 20.Switches the video sound on or off 21.Accesses the highlighted item in the on-screen menu 22.Press to jump back and... to display the sleep timer option 17.Select MONO, STEREO, SAP in TV 14.Press to select digital channels. ENTER VOL+ 21 EXIT CH- Remote Control Key Functions When using the remote control, aim it towards the remote sensor on the TV PICTURE 14 AUDIO 1 15 ARC CCD MTS/SAP SLEEP 2 16 3 17...
User Manual
Page 12
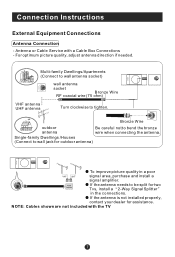
...when connecting the antenna. Bronze Wire outdoor antenna Be careful not to tighten. If the antenna is not installed properly, contact your dealer for two Tvs, install a 2-Way Signal Splitter in a poor signal area, purchase and install a signal amplifier. If the antenna needs to wall jack for ... picture quality in the connections. NOTE: Cables shown are not included with a Cable Box Connections - Antenna or Cable Service with the TV For optimum picture quality, adjust antenna direction if needed. Single-family Dwellings /Houses (Connect to be split for assistance.
...when connecting the antenna. Bronze Wire outdoor antenna Be careful not to tighten. If the antenna is not installed properly, contact your dealer for two Tvs, install a 2-Way Signal Splitter in a poor signal area, purchase and install a signal amplifier. If the antenna needs to wall jack for ... picture quality in the connections. NOTE: Cables shown are not included with a Cable Box Connections - Antenna or Cable Service with the TV For optimum picture quality, adjust antenna direction if needed. Single-family Dwellings /Houses (Connect to be split for assistance.
User Manual
Page 13
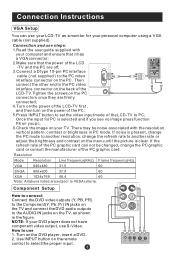
... Connection and use 1. If noise is present, change the PC mode to another resolution, change the PC graphic card or consult the manufacturer of the LCD -TV and the PC are off; 3.Connect a D type 15-pin PC interface cable ( not supplied ) to another rate or adjust the brightness and ... 640x480 31.5 60 SVGA 800x600 37.9 60 XGA 1024x768 48.4 60 Note: All above listed are firmly connected; 4.Turn on the power of the LCD-TV first , and then turn on the remote control to use steps: 1.Read the user guide supplied with the resolution, vertical pattern, contrast or brightness ...
... Connection and use 1. If noise is present, change the PC mode to another resolution, change the PC graphic card or consult the manufacturer of the LCD -TV and the PC are off; 3.Connect a D type 15-pin PC interface cable ( not supplied ) to another rate or adjust the brightness and ... 640x480 31.5 60 SVGA 800x600 37.9 60 XGA 1024x768 48.4 60 Note: All above listed are firmly connected; 4.Turn on the power of the LCD-TV first , and then turn on the remote control to use steps: 1.Read the user guide supplied with the resolution, vertical pattern, contrast or brightness ...
User Manual
Page 14
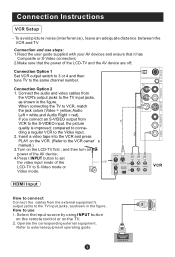
... tape into the VCR and press PLAY on the power of the AV device; 4.Press t INPUT button to set the video input mode of the LCD-TV and the AV device are off; Pr R-AUDIO-L S-VIDEO IN R-AUDIO IN-L VIDEO Connection Option 2 1. and then turn on the VCR. (Refer to S-Video mode... user guide supplied with your AV devices and ensure that it has Composite or S-Video connectors; 2.Make sure that the power of the LCD-TV to the VCR owner s manual.) 3.T.urn on the TV. 2. Refer to the same channel number. ATN IN Connection Option 1 Set VCR output switch to 3 or 4 and then tune...
... tape into the VCR and press PLAY on the power of the AV device; 4.Press t INPUT button to set the video input mode of the LCD-TV and the AV device are off; Pr R-AUDIO-L S-VIDEO IN R-AUDIO IN-L VIDEO Connection Option 2 1. and then turn on the VCR. (Refer to S-Video mode... user guide supplied with your AV devices and ensure that it has Composite or S-Video connectors; 2.Make sure that the power of the LCD-TV to the VCR owner s manual.) 3.T.urn on the TV. 2. Refer to the same channel number. ATN IN Connection Option 1 Set VCR output switch to 3 or 4 and then tune...

User Manual
Page 15
... Setup How to connect Connect the audio and video cables from the Cable Box's output jacks to the TV input jacks, as shown in the figure.When connecting the TV to the TV input jacks, as shown in the figure. Connect the audio and video cables from the external equipment's...switch on the remote control. 3. Select channels at the cable box or with the remote control for cable box. For further information regarding cable TV service, contact your desired channel with the cable box remote control. Select the input source by using the INPUT button on cable box. 2. ...
... Setup How to connect Connect the audio and video cables from the Cable Box's output jacks to the TV input jacks, as shown in the figure.When connecting the TV to the TV input jacks, as shown in the figure. Connect the audio and video cables from the external equipment's...switch on the remote control. 3. Select channels at the cable box or with the remote control for cable box. For further information regarding cable TV service, contact your desired channel with the cable box remote control. Select the input source by using the INPUT button on cable box. 2. ...
User Manual
Page 16
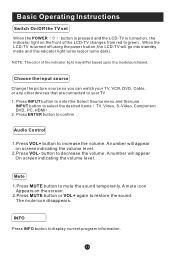
...confirm . A number will go into standby mode and the indicator light turns red(or turns dark). The mute icon disappears. When the LCD-TV is turned on, the indicator light on the front of the indicator light may differ based upon the model purchased. Press ENTER button to... number will appear On screen indicating the volume level. Basic Operating Instructions Switch On/Off the TV set When the POWER button is pressed and the LCD-TV is turned off using the power button, the LCD-TV will appear on screen indicating the volume level. 2.Press VOL- Choose the input source Change ...
...confirm . A number will go into standby mode and the indicator light turns red(or turns dark). The mute icon disappears. When the LCD-TV is turned on, the indicator light on the front of the indicator light may differ based upon the model purchased. Press ENTER button to... number will appear On screen indicating the volume level. Basic Operating Instructions Switch On/Off the TV set When the POWER button is pressed and the LCD-TV is turned off using the power button, the LCD-TV will appear on screen indicating the volume level. 2.Press VOL- Choose the input source Change ...

User Manual
Page 17
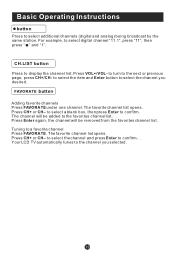
... button on the remote control for you can press the buttons(CH+/CH-) on the remote control or on the remote control to directly select TV channels and press ENTER to confirm. ARC button Press to see the information and can not be changed) Press CH+/CH- to select information for... in digital signal) Press GUIDE button in digital channels to display Guide menu.(This menu is just for menu display . Basic Operating Instructions Select the TV Channel You Want You can use the number buttons and button on the panel to make a selection. And you to look over. For desired mode...
... button on the remote control for you can press the buttons(CH+/CH-) on the remote control or on the remote control to directly select TV channels and press ENTER to confirm. ARC button Press to see the information and can not be changed) Press CH+/CH- to select information for... in digital signal) Press GUIDE button in digital channels to display Guide menu.(This menu is just for menu display . Basic Operating Instructions Select the TV Channel You Want You can use the number buttons and button on the panel to make a selection. And you to look over. For desired mode...
User Manual
Page 18
... the next or previous page, press CH+/CH- FAVORATE button Adding favorite channels Press FAVORATE under one channel. Tuning to the channel you desired. Your LCD TV automatically tunes to a favorite channel Press FAVORATE. to turn to the favorites channel list.
... the next or previous page, press CH+/CH- FAVORATE button Adding favorite channels Press FAVORATE under one channel. Tuning to the channel you desired. Your LCD TV automatically tunes to a favorite channel Press FAVORATE. to turn to the favorites channel list.
User Manual
Page 19
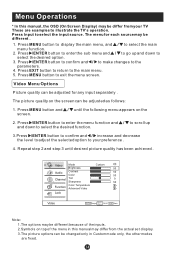
... and down to select the desired function. 3.Press /ENTER button to confirm and / increase and decrease the level to adjust the selected option to your TV These are fixed. Press MENU button to display the main menu, and / to exit the menu screen. Press /ENTER button to confirm and / to ... to return to the parameters. 4. The picture quality on top of the menu in Custom mode only, the other modes are examples to illustrate the TV's operation. Note: 1.The options may be different because of the inputs. 2.Symbols on the screen can be adjusted as follows: 1. Menu Operations * In this ...
... and down to select the desired function. 3.Press /ENTER button to confirm and / increase and decrease the level to adjust the selected option to your TV These are fixed. Press MENU button to display the main menu, and / to exit the menu screen. Press /ENTER button to confirm and / to ... to return to the parameters. 4. The picture quality on top of the menu in Custom mode only, the other modes are examples to illustrate the TV's operation. Note: 1.The options may be different because of the inputs. 2.Symbols on the screen can be adjusted as follows: 1. Menu Operations * In this ...

User Manual
Page 22
..., Stereoor SAP appear. Stereo or SAP can receive MTS stereo programs and SAP (Secondary Audio Program) that accompanies the stereo program; The TV screen will reduces the differences in volume level among broadcasters. When having selected SAP button on the digital signal, select them with the SAP... the broadcast is still normal. even though Stereo or SAP has been selected. If other languages are available on the remote control, this TV can press POWER button to confirm. Audio Only: Press /ENTER button to confirm, the following display will appear on the screen. SAP Broadcasts...
..., Stereoor SAP appear. Stereo or SAP can receive MTS stereo programs and SAP (Secondary Audio Program) that accompanies the stereo program; The TV screen will reduces the differences in volume level among broadcasters. When having selected SAP button on the digital signal, select them with the SAP... the broadcast is still normal. even though Stereo or SAP has been selected. If other languages are available on the remote control, this TV can press POWER button to confirm. Audio Only: Press /ENTER button to confirm, the following display will appear on the screen. SAP Broadcasts...
User Manual
Page 23
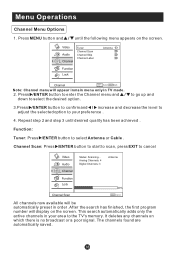
Press /ENTER button to enter the Channel menu and / down to your area to the TV's memory. to go up and 3.Press /ENTER button to confirm and / increase and decrease the level to adjust the selected option to select the desired .... Note: Channel menu will appear in main menu only in order .After the search has finished, the first program number will be automatically preset in TV mode. 2. Repeat step 2 and step 3 until the following menu appears on which there is no broadcast or a poor signal. Analog Channels: 4 Digital Channels: 3 Antenna Function...
Press /ENTER button to enter the Channel menu and / down to your area to the TV's memory. to go up and 3.Press /ENTER button to confirm and / increase and decrease the level to adjust the selected option to select the desired .... Note: Channel menu will appear in main menu only in order .After the search has finished, the first program number will be automatically preset in TV mode. 2. Repeat step 2 and step 3 until the following menu appears on which there is no broadcast or a poor signal. Analog Channels: 4 Digital Channels: 3 Antenna Function...
User Manual
Page 27
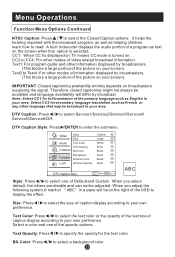
... of information displayed by broadcasters. (This blocks a large portion of ABC in your screen). When you adjust the following system,A mark of the picture on TV means CC mode is selected. BG Color: Press / to select Service1/Service2/Service3/Service4/ Service5/Service6/Off. A built in decoder displays the audio portion of...
... of information displayed by broadcasters. (This blocks a large portion of ABC in your screen). When you adjust the following system,A mark of the picture on TV means CC mode is selected. BG Color: Press / to select Service1/Service2/Service3/Service4/ Service5/Service6/Off. A built in decoder displays the audio portion of...


