
User Manual
Page 2
...: USE OF ANY CONTROLS, ADJUSTMENTS, OR PROCEDURES OTHER THAN THOSE SPECIFIED HEREIN MAY RESULT IN HAZARDOUS RADIATION EXPOSURE. (This item is intended to alert the user to do not perform any servicing other than that may be of sufficient magnitude to the presence of important operating and maintenance (servicing) instructions in the operating instructions unless you are for TV with DVD models.) WARNING...
...: USE OF ANY CONTROLS, ADJUSTMENTS, OR PROCEDURES OTHER THAN THOSE SPECIFIED HEREIN MAY RESULT IN HAZARDOUS RADIATION EXPOSURE. (This item is intended to alert the user to do not perform any servicing other than that may be of sufficient magnitude to the presence of important operating and maintenance (servicing) instructions in the operating instructions unless you are for TV with DVD models.) WARNING...

User Manual
Page 5
Component Setup 8 VCR Setup 9 HDMI Input 9 Cable TV Setup 10 External Component Source Setup 10 Basic Operating Instructions 11 Switch On/Off the TV set for specific details. Menu Operations 14 Video Menu Options 14 Video Menu Options Continued 15 Audio Menu Options 16 Audio Menu Options Continued 17 Channel Menu Options 18 Channel Menu Options Continued 19 Function Menu Options 20 Function Menu Options Continued 2. 1 Lock Menu Options 23 Lock Menu Options Continued 24 PC Menu Options 28 PC Menu Options Continued 29 Stream media broadcast system 30 DVD Features 32 Special...
Component Setup 8 VCR Setup 9 HDMI Input 9 Cable TV Setup 10 External Component Source Setup 10 Basic Operating Instructions 11 Switch On/Off the TV set for specific details. Menu Operations 14 Video Menu Options 14 Video Menu Options Continued 15 Audio Menu Options 16 Audio Menu Options Continued 17 Channel Menu Options 18 Channel Menu Options Continued 19 Function Menu Options 20 Function Menu Options Continued 2. 1 Lock Menu Options 23 Lock Menu Options Continued 24 PC Menu Options 28 PC Menu Options Continued 29 Stream media broadcast system 30 DVD Features 32 Special...

User Manual
Page 6
... do not use ; If service is correct; l Do not place the unit on the machine and in this manual for proper ventilation; If water comes in direct sunlight or near heat sources; l Never put the unit in contact with the LCD-TV, disconnect the power cord from the LCD-TV . l Please keep this book; l Please comply strictly with the instructions provided...
... do not use ; If service is correct; l Do not place the unit on the machine and in this manual for proper ventilation; If water comes in direct sunlight or near heat sources; l Never put the unit in contact with the LCD-TV, disconnect the power cord from the LCD-TV . l Please keep this book; l Please comply strictly with the instructions provided...
User Manual
Page 8
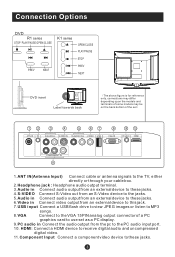
... models may be on the back bottom of the set ATN IN R-AUDIO-L S-VIDEO IN R-AUDIO IN-L VIDEO USB VGA IN PC AUDIO IN HDMI Pr Pb Y COMPONENT IN 1.ANT IN(Antenna Input) Connect cable or antenna signals to the TV, either directly or through your cable box. 2.Headphone jack : Headphone audio output terminal. 3.Audio in Connect audio output from an external device to these jacks. 4.S-VIDEO Connect S-Video out from an S-Video device to the jacks. 5.Audio in Connect audio output from an external...
... models may be on the back bottom of the set ATN IN R-AUDIO-L S-VIDEO IN R-AUDIO IN-L VIDEO USB VGA IN PC AUDIO IN HDMI Pr Pb Y COMPONENT IN 1.ANT IN(Antenna Input) Connect cable or antenna signals to the TV, either directly or through your cable box. 2.Headphone jack : Headphone audio output terminal. 3.Audio in Connect audio output from an external device to these jacks. 4.S-VIDEO Connect S-Video out from an S-Video device to the jacks. 5.Audio in Connect audio output from an external...

User Manual
Page 9
... no obstacle between the remote controller and television set. Remote Control Installing Batteries Remove the battery cover. As strong light may interfere with the signals, change your position to the +/marks inside the battery compartment. Precautions Make sure that two AA1.5V or AAA depending up the model alkaline batteries are loaded. The batteries must be of the same type, must be inserted...
... no obstacle between the remote controller and television set. Remote Control Installing Batteries Remove the battery cover. As strong light may interfere with the signals, change your position to the +/marks inside the battery compartment. Precautions Make sure that two AA1.5V or AAA depending up the model alkaline batteries are loaded. The batteries must be of the same type, must be inserted...

User Manual
Page 10
... favourite channel list in 1 USB DVD 3.Display the guide when you are watching analog or 2 21 digital channels GUIDE CCD MTS/SAP CH.LIST 4.Select a closed caption 3 22 4 PICTURE AUDIO ARC FAVORITE 23 5.Press repeatedly to cycle through the available picture 5 24 modes 6 25 6.Press to cycle through different sound settings 7.Show the input source 8.Switches the video sound on or off the TV 2.Press to switch input source to USB in TV 25.Press to change the aspect ratio 26.Press to change a channel...
... favourite channel list in 1 USB DVD 3.Display the guide when you are watching analog or 2 21 digital channels GUIDE CCD MTS/SAP CH.LIST 4.Select a closed caption 3 22 4 PICTURE AUDIO ARC FAVORITE 23 5.Press repeatedly to cycle through the available picture 5 24 modes 6 25 6.Press to cycle through different sound settings 7.Show the input source 8.Switches the video sound on or off the TV 2.Press to switch input source to USB in TV 25.Press to change the aspect ratio 26.Press to change a channel...

User Manual
Page 11
... change the aspect ratio 3.Select a closed caption 4.Show the input source 5.Press to open the on-screen menu 6.Volume/Channel Selection 7.Exit On Screen Display 8.Press to switch input source to USB in 9.DVD PLAY/PAUSE 10.DVD fast reverse 11.DVD fast forward 12.Press to display the TV status information on the top of TV with DVD for example. Remote Control Key Functions When using the remote control, aim it towards the remote sensor on and off 21.Accesses...
... change the aspect ratio 3.Select a closed caption 4.Show the input source 5.Press to open the on-screen menu 6.Volume/Channel Selection 7.Exit On Screen Display 8.Press to switch input source to USB in 9.DVD PLAY/PAUSE 10.DVD fast reverse 11.DVD fast forward 12.Press to display the TV status information on the top of TV with DVD for example. Remote Control Key Functions When using the remote control, aim it towards the remote sensor on and off 21.Accesses...

User Manual
Page 13
... LCD-TV.Tighten the screws on the PC connectors once they are firmly connected; 4.Turn on the power of the LCD-TV first , and then turn on the power of the PC; 5.Press INPUT button to set the video input mode of the LCD-TV to use steps: 1.Read the user guide supplied with the resolution, vertical pattern, contrast or brightness in the figure. If the refresh rate of the PC graphic card can use S-Video. Connection Instructions...
... LCD-TV.Tighten the screws on the PC connectors once they are firmly connected; 4.Turn on the power of the LCD-TV first , and then turn on the power of the PC; 5.Press INPUT button to set the video input mode of the LCD-TV to use steps: 1.Read the user guide supplied with the resolution, vertical pattern, contrast or brightness in the figure. If the refresh rate of the PC graphic card can use S-Video. Connection Instructions...
User Manual
Page 14
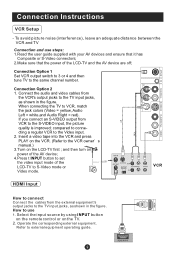
... jack colors (Video = yellow, Audio Left = white,and Audio Right = red). When connecting the TV to the same channel number. Insert a video tape into the VCR and press PLAY on the VCR. (Refer to the VCR owner s manual.) 3.T.urn on the power of the AV device; 4.Press t INPUT button to the S-VIDEO input, the picture quality is improved; COMPONENT IN 1 2 VCR Y Pb HDMI Input HDMI How to connect Connect the cables from VCR to set the video input mode of the LCD-TV...
... jack colors (Video = yellow, Audio Left = white,and Audio Right = red). When connecting the TV to the same channel number. Insert a video tape into the VCR and press PLAY on the VCR. (Refer to the VCR owner s manual.) 3.T.urn on the power of the AV device; 4.Press t INPUT button to the S-VIDEO input, the picture quality is improved; COMPONENT IN 1 2 VCR Y Pb HDMI Input HDMI How to connect Connect the cables from VCR to set the video input mode of the LCD-TV...
User Manual
Page 15
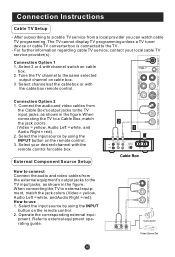
...service, contact your desired channel with the remote control for cable box. Select channels at the cable box or with channel switch on the remote control. 3. Select the input source by using the INPUT button on cable box. 3. Operate the corresponding external equi- After subscribing to external equipment operating guide. Tune the TV channel to the TV input jacks, as shown in the figure.When connecting the TV to external equipment, match the jack colors (Video = yellow, Audio Left = white, and Audio Right = red). Connect the audio and video cables from the Cable Box's output...
...service, contact your desired channel with the remote control for cable box. Select channels at the cable box or with channel switch on the remote control. 3. Select the input source by using the INPUT button on cable box. 3. Operate the corresponding external equi- After subscribing to external equipment operating guide. Tune the TV channel to the TV input jacks, as shown in the figure.When connecting the TV to external equipment, match the jack colors (Video = yellow, Audio Left = white, and Audio Right = red). Connect the audio and video cables from the Cable Box's output...

User Manual
Page 16
... TV, Video, S-Video, Component DVD, PC, HDMI . 2. Basic Operating Instructions Switch On/Off the TV set When the POWER button is pressed and the LCD-TV is turned off using the power button, the LCD-TV will appear On screen indicating the volume level. Press INPUT button to enter the Select Source menu and then use INPUT button to confirm . INFO Press INFO button to increase the volume. NOTE: The color of the LCD-TV changes from red to green. Audio Control 1.Press VOL+ button to display current program information. A number will go into standby mode...
... TV, Video, S-Video, Component DVD, PC, HDMI . 2. Basic Operating Instructions Switch On/Off the TV set When the POWER button is pressed and the LCD-TV is turned off using the power button, the LCD-TV will appear On screen indicating the volume level. Press INPUT button to enter the Select Source menu and then use INPUT button to confirm . INFO Press INFO button to increase the volume. NOTE: The color of the LCD-TV changes from red to green. Audio Control 1.Press VOL+ button to display current program information. A number will go into standby mode...

User Manual
Page 17
... Standard Vivid Custom Audio Mode Press AUDIO button on the remote control for you can use the number buttons and button on the remote control for you to look over. to select information for menu display . Basic Operating Instructions Select the TV Channel You Want You can press the buttons(CH+/CH-) on the remote control or on the panel to make a selection. Picture Mode Press PICTURE button on the remote control to directly select TV channels and press ENTER...
... Standard Vivid Custom Audio Mode Press AUDIO button on the remote control for you can use the number buttons and button on the remote control for you to look over. to select information for menu display . Basic Operating Instructions Select the TV Channel You Want You can press the buttons(CH+/CH-) on the remote control or on the panel to make a selection. Picture Mode Press PICTURE button on the remote control to directly select TV channels and press ENTER...

User Manual
Page 21
...-pitched sounds . Mode : Press /ENTER to select the type of the higher-pitched sounds Surround: To turn the simulated surround sound on the screen. You can be adjusted for any input as follows: 1. Repeat step 2 and step 3 until the following menu appears on and off. Video Balance 0 Bass 50 Audio Treble 50 Sound Surround On Channel Mode Off Equalizer Off Function AVL Off Lock Audio Only Audio ENTER Adjust...
...-pitched sounds . Mode : Press /ENTER to select the type of the higher-pitched sounds Surround: To turn the simulated surround sound on the screen. You can be adjusted for any input as follows: 1. Repeat step 2 and step 3 until the following menu appears on and off. Video Balance 0 Bass 50 Audio Treble 50 Sound Surround On Channel Mode Off Equalizer Off Function AVL Off Lock Audio Only Audio ENTER Adjust...

User Manual
Page 23
Note: Channel menu will appear in main menu only in order .After the search has finished, the first program number will be automatically preset in TV mode. 2. Function: Tuner: Press /ENTER button to cancel Video Audio Channel Status: Scanning... Analog Channels: 4 Digital Channels: 3 Antenna Function Lock 40% Channel Scan EXIT Cancel All channels now available will display on the screen. Channel Scan: Press /ENTER button to start to scan, press EXIT to select Antenna or Cable . This search automatically adds only...
Note: Channel menu will appear in main menu only in order .After the search has finished, the first program number will be automatically preset in TV mode. 2. Function: Tuner: Press /ENTER button to cancel Video Audio Channel Status: Scanning... Analog Channels: 4 Digital Channels: 3 Antenna Function Lock 40% Channel Scan EXIT Cancel All channels now available will display on the screen. Channel Scan: Press /ENTER button to start to scan, press EXIT to select Antenna or Cable . This search automatically adds only...
User Manual
Page 24
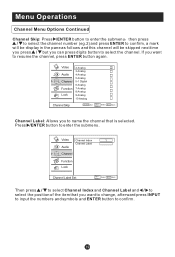
... Lock 2 Analog 3 Analog 4 Analog 5 Analog 5-1 Digital 6 Analog 7 Analog 8 Analog 9 Analog 10 Analog Channel Skip ENTER Set CH+/- Video Channel Index 1 Channel Label Audio Channel Function Lock Channel Label Set CH+/- Then press / to select Channel Index and Channel Label and / to select the position of the item that is selected. If you want to change, afterward press INPUT to input the numbers and symbols and ENTER button to select the channel. Press /ENTER button to resume the channel, press ENTER button again. Menu Operations Channel Menu...
... Lock 2 Analog 3 Analog 4 Analog 5 Analog 5-1 Digital 6 Analog 7 Analog 8 Analog 9 Analog 10 Analog Channel Skip ENTER Set CH+/- Video Channel Index 1 Channel Label Audio Channel Function Lock Channel Label Set CH+/- Then press / to select Channel Index and Channel Label and / to select the position of the item that is selected. If you want to change, afterward press INPUT to input the numbers and symbols and ENTER button to select the channel. Press /ENTER button to resume the channel, press ENTER button again. Menu Operations Channel Menu...

User Manual
Page 25
... language of the OSD display. Video Language OSD Timeout English Short Audio OSD Transparency Middle Screen Mode Channel Blue Screen Full screen On DPMS On Function Time Setup Lock Closed Caption Default Function CH+/- OSD Transparency: Press / to select among Full Screen, Normal, Wide, Zoom and Cinema to change the time of the OSD. Time Zone: Press / to change the display mode. ( display mode may differ from different inputs) Blue Screen: Press / to select On...
... language of the OSD display. Video Language OSD Timeout English Short Audio OSD Transparency Middle Screen Mode Channel Blue Screen Full screen On DPMS On Function Time Setup Lock Closed Caption Default Function CH+/- OSD Transparency: Press / to select among Full Screen, Normal, Wide, Zoom and Cinema to change the time of the OSD. Time Zone: Press / to change the display mode. ( display mode may differ from different inputs) Blue Screen: Press / to select On...

User Manual
Page 35
... can be connected to mobile hard disks (working voltage 5.0V, working current not over 500mA). 4.The television operation may be read. 2.Before starting operation, verify USB storage device is used then an identification problem may play interface. 12 3 4 5 67 1.Play mode: None/Dissolve/Wipe right/Wipeleft/ Wipe up takes about 3 second. In such case, restart the system. To play picture 1.Press USB button on the remote control to select...
... can be connected to mobile hard disks (working voltage 5.0V, working current not over 500mA). 4.The television operation may be read. 2.Before starting operation, verify USB storage device is used then an identification problem may play interface. 12 3 4 5 67 1.Play mode: None/Dissolve/Wipe right/Wipeleft/ Wipe up takes about 3 second. In such case, restart the system. To play picture 1.Press USB button on the remote control to select...

User Manual
Page 40
... the picture even if using the DVD with the internal TV, select 4 3/LB. ..General Setup Page.. Back bars may select this page, press SETUP button twice. ..Preference Page.. This is a more common choice. Angle Mark On 4 3/Lb Osd Lang ENG16 9 4:3/PS (PS = Pan and Scan) Caption On Screen Saver Off You may select this feature to work, the disc must be viewed...
... the picture even if using the DVD with the internal TV, select 4 3/LB. ..General Setup Page.. Back bars may select this page, press SETUP button twice. ..Preference Page.. This is a more common choice. Angle Mark On 4 3/Lb Osd Lang ENG16 9 4:3/PS (PS = Pan and Scan) Caption On Screen Saver Off You may select this feature to work, the disc must be viewed...

User Manual
Page 43
DVD System Setup(Continued) DVD System Setup SETUP PLAY/ENTER DEFAULT: Resets all settings (except password and parental lock status) for this DVD player back to perform the reset. ..Preference Page.. Parental Password Default Reset Note: Some functions may not be available depending on the type of disc. Press ENTER to the manufacturers original settings.
DVD System Setup(Continued) DVD System Setup SETUP PLAY/ENTER DEFAULT: Resets all settings (except password and parental lock status) for this DVD player back to perform the reset. ..Preference Page.. Parental Password Default Reset Note: Some functions may not be available depending on the type of disc. Press ENTER to the manufacturers original settings.

User Manual
Page 46
... properly plugged in good condition. Make fine adjustment of power supply is in . Spots with some channel Verify if correct channel is on adjusting. Press MUTE button and verify if Mute mode is selected. Troubleshooting Guide To assist in other channels. Press INPUT button to change signal input to the power supply. If the problem still exists, contact an authorized service depot for color adjust. No color for some channel Check picture and sound systems. program (black and white) Refer...
... properly plugged in good condition. Make fine adjustment of power supply is in . Spots with some channel Verify if correct channel is on adjusting. Press MUTE button and verify if Mute mode is selected. Troubleshooting Guide To assist in other channels. Press INPUT button to change signal input to the power supply. If the problem still exists, contact an authorized service depot for color adjust. No color for some channel Check picture and sound systems. program (black and white) Refer...


