
User Manual
Page 2
... lightning flash with DVD models.) The exclamation point within the product s enclosure that contained in the literature accompanying the appliance. CAUTION: USE OF ANY CONTROLS, ADJUSTMENTS, OR PROCEDURES OTHER THAN THOSE SPECIFIED HEREIN MAY RESULT IN HAZARDOUS RADIATION EXPOSURE. (This item is intended to alert the user to the presence of important operating and maintenance (servicing) instructions in the operating instructions unless...
... lightning flash with DVD models.) The exclamation point within the product s enclosure that contained in the literature accompanying the appliance. CAUTION: USE OF ANY CONTROLS, ADJUSTMENTS, OR PROCEDURES OTHER THAN THOSE SPECIFIED HEREIN MAY RESULT IN HAZARDOUS RADIATION EXPOSURE. (This item is intended to alert the user to the presence of important operating and maintenance (servicing) instructions in the operating instructions unless...

User Manual
Page 5
... 34 DVD System Setup 35 Playable Discs 39 Disc Protection and DVD Characteristics 40 Troubleshooting Guide 41 Specifications 42 Warranty 43 Note: DVD is available only on certain models. Component Setup 8 VCR Setup 9 HDMI Input 9 Cable TV Setup 10 External Component Source Setup 10 Basic Operating Instructions 11 Switch On/Off the TV set for specific details. CONTENT Safety Notice Items 1 Front Panel Controls 2 Connection Options 3 Remote Control 4 Remote Control Key Functions 5 Connection Instructions 7 External equipment Connections 7 Antenna Connection 7 VGA Setup...
... 34 DVD System Setup 35 Playable Discs 39 Disc Protection and DVD Characteristics 40 Troubleshooting Guide 41 Specifications 42 Warranty 43 Note: DVD is available only on certain models. Component Setup 8 VCR Setup 9 HDMI Input 9 Cable TV Setup 10 External Component Source Setup 10 Basic Operating Instructions 11 Switch On/Off the TV set for specific details. CONTENT Safety Notice Items 1 Front Panel Controls 2 Connection Options 3 Remote Control 4 Remote Control Key Functions 5 Connection Instructions 7 External equipment Connections 7 Antenna Connection 7 VGA Setup...

User Manual
Page 6
... with the LCD-TV, disconnect the power cord from the LCD-TV . To prevent this, please do not use ; l Please keep water away from the power source, then wipe the set with a dry soft cloth; l Allow enough space for later use additional devices that the operating voltage of LCD-TV, please read and understand all the instructions before using and cleaning this machine. l Do not remove the...
... with the LCD-TV, disconnect the power cord from the LCD-TV . To prevent this, please do not use ; l Please keep water away from the power source, then wipe the set with a dry soft cloth; l Allow enough space for later use additional devices that the operating voltage of LCD-TV, please read and understand all the instructions before using and cleaning this machine. l Do not remove the...
User Manual
Page 8
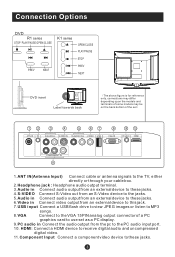
... receive digital audio and uncompressed digital video. 11. Component Input Connect a component video device to these jacks. 6.Video in Connect video output from an external device to this jack. 7.USB input Connect a USB flash drive to view JPEG images or listen to MP3 songs. 8.VGA Connect to the VGA 15PIN analog output connector of the set as a PC display. 9.PC audio in Connect the audio output from the pc to the PC audio input port. 10. Connection Options DVD R1 series STOP PLAY/PAUSE OPEN/CLOSE K1 series OPEN/CLOSE PLAY...
... receive digital audio and uncompressed digital video. 11. Component Input Connect a component video device to these jacks. 6.Video in Connect video output from an external device to this jack. 7.USB input Connect a USB flash drive to view JPEG images or listen to MP3 songs. 8.VGA Connect to the VGA 15PIN analog output connector of the set as a PC display. 9.PC audio in Connect the audio output from the pc to the PC audio input port. 10. Connection Options DVD R1 series STOP PLAY/PAUSE OPEN/CLOSE K1 series OPEN/CLOSE PLAY...

User Manual
Page 9
... the model alkaline batteries are loaded. Make sure that there is no obstacle between the remote controller and television set. Remote Control Installing Batteries Remove the battery cover. The batteries must be of the same type, must be inserted properly, and must not be turned on or off as expected. Insert two size AAA batteries matching the +/-polarities of the remote. As strong light...
... the model alkaline batteries are loaded. Make sure that there is no obstacle between the remote controller and television set. Remote Control Installing Batteries Remove the battery cover. The batteries must be of the same type, must be inserted properly, and must not be turned on or off as expected. Insert two size AAA batteries matching the +/-polarities of the remote. As strong light...

User Manual
Page 10
... to display the TV status information on or off the TV 2.Press to switch input source to USB in TV 25.Press to change the aspect ratio 26.Press to change a channel 27.Press to scan through different sound settings 7.Show the input source 8.Switches the video sound on the top of the TV screen 33.DVD STOP 34.DVD REPEAT 35.DVD Previous Chapter 36.DVD Next Chapter (For TV with DVD) 37.DVD AUDIO Mode 38.DVD SETUP 39.DVD PROGRAM 40.DVD...
... to display the TV status information on or off the TV 2.Press to switch input source to USB in TV 25.Press to change the aspect ratio 26.Press to change a channel 27.Press to scan through different sound settings 7.Show the input source 8.Switches the video sound on the top of the TV screen 33.DVD STOP 34.DVD REPEAT 35.DVD Previous Chapter 36.DVD Next Chapter (For TV with DVD) 37.DVD AUDIO Mode 38.DVD SETUP 39.DVD PROGRAM 40.DVD...

User Manual
Page 11
... TV PICTURE 14 AUDIO 1 15 ARC CCD MTS/SAP SLEEP 2 16 3 17 1 23 4 56 18 7 89 4 INPUT 0 19 MENU 5 MUTE 20 CH+ 6 VOL- RECALL 7 22 USB PLAY/PAUSE STOP REPEAT 8 23 9 REV PREV NEXT 24 10 25 11 DISPLAY GUIDE FAVORITE CH.LIST 26 12 27 13 28 (For TV without DVD) 1.Press repeatedly to cycle through different sound settings 16.Press to select digital channels. Remote Control Key Functions When using the remote control...
... TV PICTURE 14 AUDIO 1 15 ARC CCD MTS/SAP SLEEP 2 16 3 17 1 23 4 56 18 7 89 4 INPUT 0 19 MENU 5 MUTE 20 CH+ 6 VOL- RECALL 7 22 USB PLAY/PAUSE STOP REPEAT 8 23 9 REV PREV NEXT 24 10 25 11 DISPLAY GUIDE FAVORITE CH.LIST 26 12 27 13 28 (For TV without DVD) 1.Press repeatedly to cycle through different sound settings 16.Press to select digital channels. Remote Control Key Functions When using the remote control...

User Manual
Page 13
... and contrast on the menu until the picture is clear. NOTE: If your personal computer using a VGA cable (not supplied). Turn on the PC connectors once they are subject to PC; Connection Instructions VGA Setup You can not be noise associated with your TV. Once the input for your DVD player does not have component video output, use your LCD-TV as shown in PC mode. Resolution Mode Resolution Line frequency(KHz) Frame...
... and contrast on the menu until the picture is clear. NOTE: If your personal computer using a VGA cable (not supplied). Turn on the PC connectors once they are subject to PC; Connection Instructions VGA Setup You can not be noise associated with your TV. Once the input for your DVD player does not have component video output, use your LCD-TV as shown in PC mode. Resolution Mode Resolution Line frequency(KHz) Frame...
User Manual
Page 14
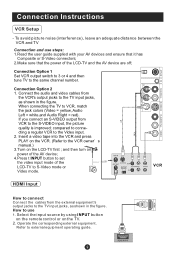
... jack colors (Video = yellow, Audio Left = white,and Audio Right = red). Select the input source by using INPUT button on the remote control or on the power of the AV device; 4.Press t INPUT button to set the video input mode of the LCD-TV and the AV device are off; When connecting the TV to the Video input. 2. If you connect an S-VIDEO output from the VCR's output jacks to the TV input jacks, as shown in the figure. HDMI To avoid picture noise...
... jack colors (Video = yellow, Audio Left = white,and Audio Right = red). Select the input source by using INPUT button on the remote control or on the power of the AV device; 4.Press t INPUT button to set the video input mode of the LCD-TV and the AV device are off; When connecting the TV to the Video input. 2. If you connect an S-VIDEO output from the VCR's output jacks to the TV input jacks, as shown in the figure. HDMI To avoid picture noise...
User Manual
Page 15
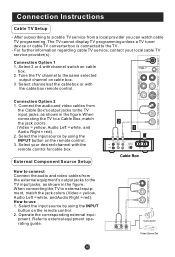
... Box's output jacks to a Cable Box, match the jack colors (Video = yellow, Audio Left = white, and Audio Right = red). 2. Select 3 or 4 with channel switch on the remote control. 2. Operate the corresponding external equi- Select the input source by using the INPUT button on cable box. 2. Select channels at the cable box or with the remote control for cable box. Select your local cable TV service provider(s). Connection Option 1 1. How to external equipment, match the jack colors (Video = yellow, Audio Left = white, and Audio Right = red). External Component Source Setup...
... Box's output jacks to a Cable Box, match the jack colors (Video = yellow, Audio Left = white, and Audio Right = red). 2. Select 3 or 4 with channel switch on the remote control. 2. Operate the corresponding external equi- Select the input source by using the INPUT button on cable box. 2. Select channels at the cable box or with the remote control for cable box. Select your local cable TV service provider(s). Connection Option 1 1. How to external equipment, match the jack colors (Video = yellow, Audio Left = white, and Audio Right = red). External Component Source Setup...

User Manual
Page 16
... the volume. button to display current program information. Audio Control 1.Press VOL+ button to mute the sound temporarily. Mute 1.Press MUTE button to increase the volume. Press ENTER button to green. A number will go into standby mode and the indicator light turns red(or turns dark). A number will appear On screen indicating the volume level. The mute icon disappears. NOTE: The color of the LCD-TV changes from red to confirm . Basic Operating Instructions Switch On/Off the TV set When the POWER button...
... the volume. button to display current program information. Audio Control 1.Press VOL+ button to mute the sound temporarily. Mute 1.Press MUTE button to increase the volume. Press ENTER button to green. A number will go into standby mode and the indicator light turns red(or turns dark). A number will appear On screen indicating the volume level. The mute icon disappears. NOTE: The color of the LCD-TV changes from red to confirm . Basic Operating Instructions Switch On/Off the TV set When the POWER button...

User Manual
Page 17
... Custom Audio Mode Press AUDIO button on the panel to confirm. to select information for you can press the buttons(CH+/CH-) on the remote control or on the remote control for menu display . Picture Mode Press PICTURE button on the remote control to directly select TV channels and press ENTER to make a selection. ARC button Press to look over. Basic Operating Instructions Select the TV Channel You Want You can use the number buttons and button on the remote control for menu display...
... Custom Audio Mode Press AUDIO button on the panel to confirm. to select information for you can press the buttons(CH+/CH-) on the remote control or on the remote control for menu display . Picture Mode Press PICTURE button on the remote control to directly select TV channels and press ENTER to make a selection. ARC button Press to look over. Basic Operating Instructions Select the TV Channel You Want You can use the number buttons and button on the remote control for menu display...

User Manual
Page 21
... the lower-pitched sounds . Menu Operations Audio Menu Options Sound can adjust sound options to the levels you prefer. 2. You can be adjusted for any input as follows: 1. Bass : Press / button and /ENTER to confirm, then press / to adjust the audio output between left and right speakers. Treble : Press / button and /ENTER to confirm, then press / to increase or decrease the level of sound which best corresponds to...
... the lower-pitched sounds . Menu Operations Audio Menu Options Sound can adjust sound options to the levels you prefer. 2. You can be adjusted for any input as follows: 1. Bass : Press / button and /ENTER to confirm, then press / to adjust the audio output between left and right speakers. Treble : Press / button and /ENTER to confirm, then press / to increase or decrease the level of sound which best corresponds to...

User Manual
Page 23
... to cancel Video Audio Channel Status: Scanning... This search automatically adds only the active channels in TV mode. 2. Video Audio Channel Tuner Channel Scan Channel Skip Channel Label Function Lock Antenna Channel CH+/- Note: Channel menu will display on the screen. Repeat step 2 and step 3 until the following menu appears on which there is no broadcast or a poor signal. Channel Scan: Press /ENTER button to start to scan, press EXIT to select the desired option . Analog Channels: 4 Digital Channels: 3 Antenna Function Lock 40% Channel Scan EXIT...
... to cancel Video Audio Channel Status: Scanning... This search automatically adds only the active channels in TV mode. 2. Video Audio Channel Tuner Channel Scan Channel Skip Channel Label Function Lock Antenna Channel CH+/- Note: Channel menu will display on the screen. Repeat step 2 and step 3 until the following menu appears on which there is no broadcast or a poor signal. Channel Scan: Press /ENTER button to start to scan, press EXIT to select the desired option . Analog Channels: 4 Digital Channels: 3 Antenna Function Lock 40% Channel Scan EXIT...
User Manual
Page 24
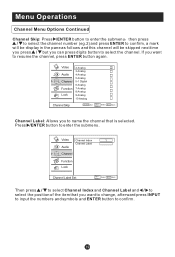
... Back VOL+/- Video Audio Channel Function Lock 2 Analog 3 Analog 4 Analog 5 Analog 5-1 Digital 6 Analog 7 Analog 8 Analog 9 Analog 10 Analog Channel Skip ENTER Set CH+/- Video Channel Index 1 Channel Label Audio Channel Function Lock Channel Label Set CH+/- Then press / to select Channel Index and Channel Label and / to select the position of the item that you to name the channel that is selected. Menu Operations Channel Menu Options Continued Channel Skip: Press /ENTER button to enter the submenu then press / to select the channel number (eg...
... Back VOL+/- Video Audio Channel Function Lock 2 Analog 3 Analog 4 Analog 5 Analog 5-1 Digital 6 Analog 7 Analog 8 Analog 9 Analog 10 Analog Channel Skip ENTER Set CH+/- Video Channel Index 1 Channel Label Audio Channel Function Lock Channel Label Set CH+/- Then press / to select Channel Index and Channel Label and / to select the position of the item that you to name the channel that is selected. Menu Operations Channel Menu Options Continued Channel Skip: Press /ENTER button to enter the submenu then press / to select the channel number (eg...

User Manual
Page 25
... / to select among Low, High and Middle to change the time of the OSD. Function: Language: Press / button to change the transparency of the OSD. Video Language OSD Timeout English Short Audio OSD Transparency Middle Screen Mode Channel Blue Screen Full screen On DPMS On Function Time Setup Lock Closed Caption Default Function CH+/- Press /ENTER button to enter the Function menu and / to go up and down to...
... / to select among Low, High and Middle to change the time of the OSD. Function: Language: Press / button to change the transparency of the OSD. Video Language OSD Timeout English Short Audio OSD Transparency Middle Screen Mode Channel Blue Screen Full screen On DPMS On Function Time Setup Lock Closed Caption Default Function CH+/- Press /ENTER button to enter the Function menu and / to go up and down to...

User Manual
Page 35
... (working voltage 5.0V, working current not over 500mA). 4.The television operation may be read. 2.Before starting operation, verify USB storage device is used then an identification problem may play the pictures among selected. The system start up /Wipe down/Box in/Box out 2.Play time: Short/Medium/Long; 3.File name 4.Pause/Play 5. Duration/Rotate 6.Effect 7.Infomation 4.Press the button on the remote to excessive rate of information code errors...
... (working voltage 5.0V, working current not over 500mA). 4.The television operation may be read. 2.Before starting operation, verify USB storage device is used then an identification problem may play the pictures among selected. The system start up /Wipe down/Box in/Box out 2.Play time: Short/Medium/Long; 3.File name 4.Pause/Play 5. Duration/Rotate 6.Effect 7.Infomation 4.Press the button on the remote to excessive rate of information code errors...

User Manual
Page 40
... to work, the disc must be specially coded. NOTE: Preference page will be displayed when there is a more common choice. Angle Mark On 4 3/Lb Osd Lang ENG16 9 4:3/PS (PS = Pan and Scan) Caption On Screen Saver Off You may select this if you have a widescreen (16:9) TV. DVD System Setup DVD System Setup SETUP PLAY/ENTER General Setup Process 1.Press the setup button, the general set up...
... to work, the disc must be specially coded. NOTE: Preference page will be displayed when there is a more common choice. Angle Mark On 4 3/Lb Osd Lang ENG16 9 4:3/PS (PS = Pan and Scan) Caption On Screen Saver Off You may select this if you have a widescreen (16:9) TV. DVD System Setup DVD System Setup SETUP PLAY/ENTER General Setup Process 1.Press the setup button, the general set up...

User Manual
Page 43
Press ENTER to the manufacturers original settings. DVD System Setup(Continued) DVD System Setup SETUP PLAY/ENTER DEFAULT: Resets all settings (except password and parental lock status) for this DVD player back to perform the reset. ..Preference Page.. Parental Password Default Reset Note: Some functions may not be available depending on the type of disc.
Press ENTER to the manufacturers original settings. DVD System Setup(Continued) DVD System Setup SETUP PLAY/ENTER DEFAULT: Resets all settings (except password and parental lock status) for this DVD player back to perform the reset. ..Preference Page.. Parental Password Default Reset Note: Some functions may not be available depending on the type of disc.

User Manual
Page 46
... for color adjust. Spots with power. Verify if the television is correctly connected. Restart the television of channel. Verify if sound system is interrupted. Make fine adjustment of power supply is functional. Press INPUT button to change signal input to see if the problem can not be repaired using the above guide consult with your local authorized service center. 2.The TV set has dangerous voltages levels inside that electricity is properly plugged in the Manual...
... for color adjust. Spots with power. Verify if the television is correctly connected. Restart the television of channel. Verify if sound system is interrupted. Make fine adjustment of power supply is functional. Press INPUT button to change signal input to see if the problem can not be repaired using the above guide consult with your local authorized service center. 2.The TV set has dangerous voltages levels inside that electricity is properly plugged in the Manual...


