
User Manual
Page 1
R HL15R/HLC15R/ HL15RW/HLC15RW/HL15T/HLC15T / HL19R/HLC19R / HL19T/HLC19T/ HL19RW/HLC19RW/ HL22R/HLC22R/ HL22T/HLC22T LCD TV & LCD TV/DVD Combo USER MANUAL Please read this manual carefully before using this TV set and keep it for future reference.
R HL15R/HLC15R/ HL15RW/HLC15RW/HL15T/HLC15T / HL19R/HLC19R / HL19T/HLC19T/ HL19RW/HLC19RW/ HL22R/HLC22R/ HL22T/HLC22T LCD TV & LCD TV/DVD Combo USER MANUAL Please read this manual carefully before using this TV set and keep it for future reference.

User Manual
Page 2
... models.) CAUTION: These servicing instructions are qualified to constitute a risk of important operating and maintenance (servicing) instructions in the operating instructions unless you are for TV with arrowhead symbol, within an equilateral triangle is intended to alert the user to the presence of uninsulated dangerous voltage within an equilateral triangle is...
... models.) CAUTION: These servicing instructions are qualified to constitute a risk of important operating and maintenance (servicing) instructions in the operating instructions unless you are for TV with arrowhead symbol, within an equilateral triangle is intended to alert the user to the presence of uninsulated dangerous voltage within an equilateral triangle is...

User Manual
Page 4
... equipment may generate or use radio frequency energy.Changes or modifications to this equipment if an unauthorized change or modification is made. Safety Instructions(for TV with DVD) PRECAUTIONS FCC WARNING-This equipment may cause harmful interference unless the modifications are expressly approved in the instruction manual.The user could lose...
... equipment may generate or use radio frequency energy.Changes or modifications to this equipment if an unauthorized change or modification is made. Safety Instructions(for TV with DVD) PRECAUTIONS FCC WARNING-This equipment may cause harmful interference unless the modifications are expressly approved in the instruction manual.The user could lose...

User Manual
Page 5
Please refer to your original set 11 Choose the input source 11 Audio Control 11 Mute...11 INFO...11 Select the TV Channel You Want 12 Picture Mode 12 Audio Mode 12 Sleep...12 GUIDE 12 ARC button 12 -button 13 CH.LIST button 13 FAV.LIST ...button 13 Menu Operations 14 Video Menu Options 14 Video Menu Options Continued 15 Audio Menu Options 16 Audio Menu Options Continued 17 Channel Menu Options 18 Channel Menu Options Continued 19 Function Menu Options 20 Function Menu Options...
Please refer to your original set 11 Choose the input source 11 Audio Control 11 Mute...11 INFO...11 Select the TV Channel You Want 12 Picture Mode 12 Audio Mode 12 Sleep...12 GUIDE 12 ARC button 12 -button 13 CH.LIST button 13 FAV.LIST ...button 13 Menu Operations 14 Video Menu Options 14 Video Menu Options Continued 15 Audio Menu Options 16 Audio Menu Options Continued 17 Channel Menu Options 18 Channel Menu Options Continued 19 Function Menu Options 20 Function Menu Options...

User Manual
Page 6
... the following items carefully before operation; l Never put the unit in this book; If water comes in contact with the LCD-TV, disconnect the power cord from the LCD-TV . l Do not remove the back cover. l Please keep water away from the power source, then wipe the set ... this manual for proper ventilation; If service is correct; l Allow enough space for later use additional devices that the operating voltage of LCD-TV, please read and understand all the instructions before using and cleaning this , please do not use ; To prevent this machine. Safety Notice...
... the following items carefully before operation; l Never put the unit in this book; If water comes in contact with the LCD-TV, disconnect the power cord from the LCD-TV . l Do not remove the back cover. l Please keep water away from the power source, then wipe the set ... this manual for proper ventilation; If service is correct; l Allow enough space for later use additional devices that the operating voltage of LCD-TV, please read and understand all the instructions before using and cleaning this , please do not use ; To prevent this machine. Safety Notice...
User Manual
Page 7
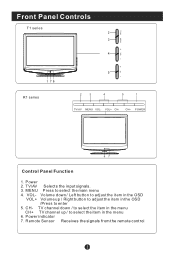
CH- Remote Sensor Receives the signals from the remote control Power 2. MENU Press to enter 5. Power indicator 7. TV channel down / Left button to adjust the item in the OSD VOL+ Volume up / to select the item in the OSD /Press to select the main menu 4. VOL- TV/AV Selects the input signals. 3. VOL+ CH- Volume down / to select the item in the menu CH+ TV channel up / Right button to adjust the item in the menu 6. Front Panel Controls T1 series R1 series 2 3 4 5 1 TV/AV MENU VOL- CH+ POWER 67 Control Panel Function 1.
CH- Remote Sensor Receives the signals from the remote control Power 2. MENU Press to enter 5. Power indicator 7. TV channel down / Left button to adjust the item in the OSD VOL+ Volume up / to select the item in the OSD /Press to select the main menu 4. VOL- TV/AV Selects the input signals. 3. VOL+ CH- Volume down / to select the item in the menu CH+ TV channel up / Right button to adjust the item in the menu 6. Front Panel Controls T1 series R1 series 2 3 4 5 1 TV/AV MENU VOL- CH+ POWER 67 Control Panel Function 1.

User Manual
Page 8
... external device to these jacks HDMI Connect to HDMI output of the set as a PC display Connect audio output from an S-Video device to the TV, either directly or through your cable box.
... external device to these jacks HDMI Connect to HDMI output of the set as a PC display Connect audio output from an S-Video device to the TV, either directly or through your cable box.

User Manual
Page 9
... AA batteries matching the +/-polarities of the battery to the +/marks inside the battery compartment (see image 2-for remote of TV with the signals, change your position to ensure effective performance of TV without DVD) . Make sure that there is no obstacle between the remote controller and television set. Remote Control Installing...
... AA batteries matching the +/-polarities of the battery to the +/marks inside the battery compartment (see image 2-for remote of TV with the signals, change your position to ensure effective performance of TV without DVD) . Make sure that there is no obstacle between the remote controller and television set. Remote Control Installing...
User Manual
Page 10
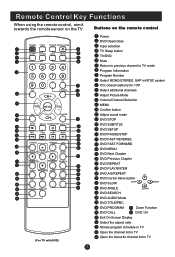
Remote Control Key Functions When using the remote control, aim it towards the remote sensor on the TV Buttons on the remote control POWER TV/AV TV/DVD OPEN/CLOSE SLEEP Q.VIEW INFO MUTE 1234 5678 CC 90 SAP P.MODE CH+ VOL - OK MENU CH- PREV NEXT D.MENU REPEAT A-B PLAY/...TITLE/PBC SEARCH AUDIO PROGRAM ZOOM D.CALL 10+ EXIT ARC GUIDE CH.LIST FAV.LIST (For TV with DVD) Power DVD Open/close Input selection TV Sleep button TV/DVD Mute Return to previous channel in TV mode Program Infromation Program Number Select MONO,STEREO, SAP in NTSC system CC( closed caption) ...
Remote Control Key Functions When using the remote control, aim it towards the remote sensor on the TV Buttons on the remote control POWER TV/AV TV/DVD OPEN/CLOSE SLEEP Q.VIEW INFO MUTE 1234 5678 CC 90 SAP P.MODE CH+ VOL - OK MENU CH- PREV NEXT D.MENU REPEAT A-B PLAY/...TITLE/PBC SEARCH AUDIO PROGRAM ZOOM D.CALL 10+ EXIT ARC GUIDE CH.LIST FAV.LIST (For TV with DVD) Power DVD Open/close Input selection TV Sleep button TV/DVD Mute Return to previous channel in TV mode Program Infromation Program Number Select MONO,STEREO, SAP in NTSC system CC( closed caption) ...

User Manual
Page 11
... SAP in NTSC system Confirm button Volume/Channel Selection CC ( closed caption) On / Off TV Sleep button Shows program schedule in TV Select the aspect ratio Open the favorite channel list in TV Open the channel list in TV Adjust sound mode MENU Select additional channels Adjust Picture Mode Exit On Screen Display Program... Infromation Power (For TV without DVD) Note: the instruction on the remote control MUTE Q.VIEW INPUT INFO EXIT SAP OK P.MODE CH+ VOL - MENU VOL + CH- Remote Control Key...
... SAP in NTSC system Confirm button Volume/Channel Selection CC ( closed caption) On / Off TV Sleep button Shows program schedule in TV Select the aspect ratio Open the favorite channel list in TV Open the channel list in TV Adjust sound mode MENU Select additional channels Adjust Picture Mode Exit On Screen Display Program... Infromation Power (For TV without DVD) Note: the instruction on the remote control MUTE Q.VIEW INPUT INFO EXIT SAP OK P.MODE CH+ VOL - MENU VOL + CH- Remote Control Key...

User Manual
Page 12
...family Dwellings /Houses (Connect to be split for assistance. External Equipment Connections Antenna Connection - Antenna or Cable Service with the TV Bronze Wire outdoor antenna Be careful not to tighten. Multi-family Dwellings/Apartments (Connect to wall antenna socket) wall antenna socket... the unit by connecting it to prevent possible electric shock. If the antenna is not installed properly, contact your dealer for two Tvs, install a 2-Way Signal Splitter in a poor signal area, purchase and install a signal amplifier. Connection Instructions Grounding Ensure that ...
...family Dwellings /Houses (Connect to be split for assistance. External Equipment Connections Antenna Connection - Antenna or Cable Service with the TV Bronze Wire outdoor antenna Be careful not to tighten. Multi-family Dwellings/Apartments (Connect to wall antenna socket) wall antenna socket... the unit by connecting it to prevent possible electric shock. If the antenna is not installed properly, contact your dealer for two Tvs, install a 2-Way Signal Splitter in a poor signal area, purchase and install a signal amplifier. Connection Instructions Grounding Ensure that ...

User Manual
Page 13
... manufacturer of the PC graphic card. There may be changed, change the refresh rate to PC; If the refresh rate of the LCD -TV and the PC are firmly connected; 4.Turn on the power of the LCD-TV first , and then turn on the remote control to the PC video interface connector on the... card can use 1. Then connect the other end to the PC video interface connector on the back of the LCD-TV.Tighten the screws on the PC connectors once they are off; 3.Connect a D type 15-pin PC interface cable ( not supplied ) to select the proper input. Component Setup How to connect Connect the...
... manufacturer of the PC graphic card. There may be changed, change the refresh rate to PC; If the refresh rate of the LCD -TV and the PC are firmly connected; 4.Turn on the power of the LCD-TV first , and then turn on the remote control to the PC video interface connector on the... card can use 1. Then connect the other end to the PC video interface connector on the back of the LCD-TV.Tighten the screws on the PC connectors once they are off; 3.Connect a D type 15-pin PC interface cable ( not supplied ) to select the proper input. Component Setup How to connect Connect the...

User Manual
Page 14
... a video tape into the VCR and press PLAY on the VCR. (Refer to the TV input jacks, as shown in the figure. Select the input source by using TV/AV button on the remote control or on the LCD-TV first ; cting a regular VCR to S-Video mode or Video mode. How to VCR, match... = red). and then turn on the power of the AV device; 4.Press the TV/AV button to set the video input mode of the LCD-TV and the AV device are off; Connection Instructions VCR Setup - When connecting the TV to use steps: 1.Read the user guide supplied with your AV devices and ensure...
... a video tape into the VCR and press PLAY on the VCR. (Refer to the TV input jacks, as shown in the figure. Select the input source by using TV/AV button on the remote control or on the LCD-TV first ; cting a regular VCR to S-Video mode or Video mode. How to VCR, match... = red). and then turn on the power of the AV device; 4.Press the TV/AV button to set the video input mode of the LCD-TV and the AV device are off; Connection Instructions VCR Setup - When connecting the TV to use steps: 1.Read the user guide supplied with your AV devices and ensure...
User Manual
Page 15
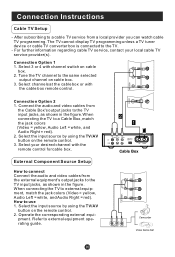
... for cable box. Select channels at the cable box or with channel switch on cable box. 3. How to the TV. - Select the input source by using the TV/AV button on the remote control. 3. Connect the audio and video cables from the Cable Box's output jacks to ...remote control. External Component Source Setup How to connect Connect the audio and video cables from a local provider you can watch cable TV programming. When connecting the TV to a cable TV service from the external equipment's output jacks to a Cable Box, match the jack colors (Video = yellow, Audio Left = white...
... for cable box. Select channels at the cable box or with channel switch on cable box. 3. How to the TV. - Select the input source by using the TV/AV button on the remote control. 3. Connect the audio and video cables from the Cable Box's output jacks to ...remote control. External Component Source Setup How to connect Connect the audio and video cables from a local provider you can watch cable TV programming. When connecting the TV to a cable TV service from the external equipment's output jacks to a Cable Box, match the jack colors (Video = yellow, Audio Left = white...

User Manual
Page 16
... , or any other devices that are connected to confirm . Choose the input source Change the picture source so you can watch your TV. 1. NOTE: The color of the LCD-TV changes from red to green. A number will go into standby mode and the indicator light turns red(or turns dark). INFO Press ...INFO button to increase the volume. Audio Control 1.Press the VOL+ button to display current program information. When the LCD-TV is turned on, the indicator light on the front of the indicator light may differ based upon the model purchased. Press the...
... , or any other devices that are connected to confirm . Choose the input source Change the picture source so you can watch your TV. 1. NOTE: The color of the LCD-TV changes from red to green. A number will go into standby mode and the indicator light turns red(or turns dark). INFO Press ...INFO button to increase the volume. Audio Control 1.Press the VOL+ button to display current program information. When the LCD-TV is turned on, the indicator light on the front of the indicator light may differ based upon the model purchased. Press the...
User Manual
Page 17
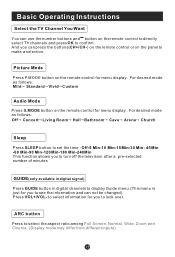
... desired mode as follows: Off Concert Living Room Hall Bathroom Cave Arena Church Sleep Press SLEEP button to set the time : Off-5 Min-10 Min-15 Min-30 Min- 45 Min -60 Min-90 Min-120 Min-180 Min-240Min This function allows you to turn off the television after a pre... information and can press the buttons(CH+/CH-) on the remote control or on the remote control to directly select TV channels and press OK to confirm. Basic Operating Instructions Select the TV Channel You Want You can use the number buttons and button on the panel to make a selection. ARC button...
... desired mode as follows: Off Concert Living Room Hall Bathroom Cave Arena Church Sleep Press SLEEP button to set the time : Off-5 Min-10 Min-15 Min-30 Min- 45 Min -60 Min-90 Min-120 Min-180 Min-240Min This function allows you to turn off the television after a pre... information and can press the buttons(CH+/CH-) on the remote control or on the remote control to directly select TV channels and press OK to confirm. Basic Operating Instructions Select the TV Channel You Want You can use the number buttons and button on the panel to make a selection. ARC button...
User Manual
Page 18
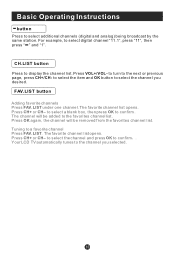
... opens. FAV.LIST button Adding favorite channels Press FAV.LIST under one channel. The channel will be added to select the channel you selected. Your LCD TV automatically tunes to confirm . For example, to select additional channels (digital and analog) being broadcast by the same station. The favorite channel list opens. Press...
... opens. FAV.LIST button Adding favorite channels Press FAV.LIST under one channel. The channel will be added to select the channel you selected. Your LCD TV automatically tunes to confirm . For example, to select additional channels (digital and analog) being broadcast by the same station. The favorite channel list opens. Press...

User Manual
Page 19
...appears on the screen. 2. Menu Operations * In this manual may be different . 1. The menu for any input separately . to illustrate the TV's operation. Video Mode Brightness Custom 50 Audio Contrast 50 Color 50 Channel Tint 0 Sharpness 50 Color Temperature Function Advanced Video Lock Video OK Adjust...set display. 3.The picture options can be adjusted for each source may differ from your preference . 4. Press MENU button to your TV These are fixed. increase and decrease the level to adjust the selected option to display the main menu, and CH+/CH- Press ...
...appears on the screen. 2. Menu Operations * In this manual may be different . 1. The menu for any input separately . to illustrate the TV's operation. Video Mode Brightness Custom 50 Audio Contrast 50 Color 50 Channel Tint 0 Sharpness 50 Color Temperature Function Advanced Video Lock Video OK Adjust...set display. 3.The picture options can be adjusted for each source may differ from your preference . 4. Press MENU button to your TV These are fixed. increase and decrease the level to adjust the selected option to display the main menu, and CH+/CH- Press ...

User Manual
Page 22
...VOL- Stereo or SAP can receive MTS stereo programs and SAP (Secondary Audio Program) that accompanies the stereo program; SAP Broadcasts Setup: This TV can be black and no picture , but the sound is only in a Analog channel. 1. Menu Operations Audio Menu Options Continued SPDIF Type... To adjust the spdif output: Off, Dolby Digital and PCM. The TV screen will appear on the digital signal, select them with the SAP button. 2. Mono sound is automatically received if the broadcast is still normal...
...VOL- Stereo or SAP can receive MTS stereo programs and SAP (Secondary Audio Program) that accompanies the stereo program; SAP Broadcasts Setup: This TV can be black and no picture , but the sound is only in a Analog channel. 1. Menu Operations Audio Menu Options Continued SPDIF Type... To adjust the spdif output: Off, Dolby Digital and PCM. The TV screen will appear on the digital signal, select them with the SAP button. 2. Mono sound is automatically received if the broadcast is still normal...

User Manual
Page 23
.... 2. Press MENU button and CH+/CH- to go up and down to select the desired option . 3.Press VOL+/OK button to the TV's memory. Channel Scan: Press VOL+/OK button to start to scan, press EXIT to select Antenna or Cable . The channels found are automatically saved. Select ...
.... 2. Press MENU button and CH+/CH- to go up and down to select the desired option . 3.Press VOL+/OK button to the TV's memory. Channel Scan: Press VOL+/OK button to start to scan, press EXIT to select Antenna or Cable . The channels found are automatically saved. Select ...


