User Guide
Page 3
3 Contents Contents 3 About this guide 11 Your phone and accessories 15 What's in the box 16 Getting to know your phone 17 Installing the battery, SIM, and microSD card 18 ...off 25 Android basics 27 Starting Android for the first time 28 If you don't have a SIM card 28 Your Google Account 29 Additional accounts 30 Google services 31 Getting to know the Home screen 32 Using the touchscreen 36 Using the phone's buttons 37 Using the trackball...48 Options menus 48 Context menus 49 Monitoring your phone's status 50 Status icons 50 Notification icons 51 NOUG-2.1-update1-105 Nexus One User's Guide
3 Contents Contents 3 About this guide 11 Your phone and accessories 15 What's in the box 16 Getting to know your phone 17 Installing the battery, SIM, and microSD card 18 ...off 25 Android basics 27 Starting Android for the first time 28 If you don't have a SIM card 28 Your Google Account 29 Additional accounts 30 Google services 31 Getting to know the Home screen 32 Using the touchscreen 36 Using the phone's buttons 37 Using the trackball...48 Options menus 48 Context menus 49 Monitoring your phone's status 50 Status icons 50 Notification icons 51 NOUG-2.1-update1-105 Nexus One User's Guide
User Guide
Page 11
... connections to place, receive, and manage multiple calls. Your handset, its components and accessories, and how to a computer. "Placing and receiving Using your calendar and synchronizing them with Google Voice. "Gmail" on page 15 come with friends by using Gmail™ webmail .... "Android basics" on page 93 Organizing and finding contact information for use release 2.1-update1 of Google Apps™, and performing basic Android tasks. NOUG-2.1-update1-105 Nexus One User's Guide calls" on page 79 "Contacts" on page 27 Starting Android the first time,...
... connections to place, receive, and manage multiple calls. Your handset, its components and accessories, and how to a computer. "Placing and receiving Using your calendar and synchronizing them with Google Voice. "Gmail" on page 15 come with friends by using Gmail™ webmail .... "Android basics" on page 93 Organizing and finding contact information for use release 2.1-update1 of Google Apps™, and performing basic Android tasks. NOUG-2.1-update1-105 Nexus One User's Guide calls" on page 79 "Contacts" on page 27 Starting Android the first time,...
User Guide
Page 15
15 Your phone and accessories Your phone comes with a number of your phone, how to install and charge the battery, how to insert it and charge it fully before using ... on page 25 NOUG-2.1-update1-105 Nexus One User's Guide In this section "What's in the box" on page 16 "Getting to know your phone" on page 17 "Installing the battery, SIM, and microSD card" on page 18 "Charging your phone. This chapter describes the parts of accessories, including a headset and a protective pouch...
15 Your phone and accessories Your phone comes with a number of your phone, how to install and charge the battery, how to insert it and charge it fully before using ... on page 25 NOUG-2.1-update1-105 Nexus One User's Guide In this section "What's in the box" on page 16 "Getting to know your phone" on page 17 "Installing the battery, SIM, and microSD card" on page 18 "Charging your phone. This chapter describes the parts of accessories, including a headset and a protective pouch...
User Guide
Page 16
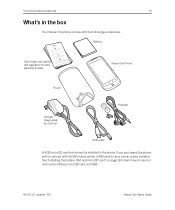
... What's in the phone. If you purchased the phone with a contract with the following accessories. NOUG-2.1-update1-105 Nexus One User's Guide See "Installing the battery, SIM, and microSD card" on page 18 to learn how to insert or remove the battery, microSD card, and ...SIM. Battery Quick-start card, safety and regulatory booklet, warranty booklet Nexus One Phone Pouch Charger (plug varies by country) Headset USB cable A 4GB microSD card (not shown) is installed in the box Your...
... What's in the phone. If you purchased the phone with a contract with the following accessories. NOUG-2.1-update1-105 Nexus One User's Guide See "Installing the battery, SIM, and microSD card" on page 18 to learn how to insert or remove the battery, microSD card, and ...SIM. Battery Quick-start card, safety and regulatory booklet, warranty booklet Nexus One Phone Pouch Charger (plug varies by country) Headset USB cable A 4GB microSD card (not shown) is installed in the box Your...
User Guide
Page 17
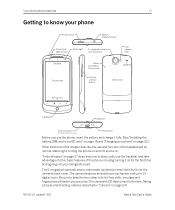
...Taking pictures and shooting videos is built into your Google Account. The camera features an autofocus mechanism and up...zoom. NOUG-2.1-update1-105 Nexus One User's Guide "Android basics" on page 27 describes how to place calls, use and function of the phone, including turning it on for optional dock accessories) Microphone Before you use ...page 18 and "Charging your phone" on page 22.) Other sections in "Camera" on . Your phone and accessories 17 Getting to know your phone Power button 3.5mm headphone jack Proximity & light sensors Status light 5-megapixel camera ...
...Taking pictures and shooting videos is built into your Google Account. The camera features an autofocus mechanism and up...zoom. NOUG-2.1-update1-105 Nexus One User's Guide "Android basics" on page 27 describes how to place calls, use and function of the phone, including turning it on for optional dock accessories) Microphone Before you use ...page 18 and "Charging your phone" on page 22.) Other sections in "Camera" on . Your phone and accessories 17 Getting to know your phone Power button 3.5mm headphone jack Proximity & light sensors Status light 5-megapixel camera ...
User Guide
Page 18
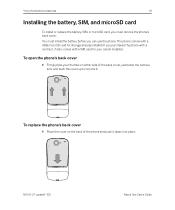
Your phone and accessories 18 Installing the battery, SIM, and microSD card To install or replace the battery, SIM, or microSD card, you must install the battery before you ... press your carrier installed. To replace the phone's back cover S Place the cover on either side of the phone and push it . NOUG-2.1-update1-105 Nexus One User's Guide If you can use the phone. You must remove the phone's back cover. The phone comes with a SIM card for storage already installed...
Your phone and accessories 18 Installing the battery, SIM, and microSD card To install or replace the battery, SIM, or microSD card, you must install the battery before you ... press your carrier installed. To replace the phone's back cover S Place the cover on either side of the phone and push it . NOUG-2.1-update1-105 Nexus One User's Guide If you can use the phone. You must remove the phone's back cover. The phone comes with a SIM card for storage already installed...
User Guide
Page 19
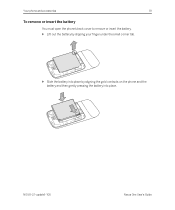
S Slide the battery into place by slipping your finger under the small corner tab. S Lift out the battery by aligning the gold contacts on the phone and the battery and then gently pressing the battery into place. 2 1 NOUG-2.1-update1-105 Nexus One User's Guide Your phone and accessories 19 To remove or insert the battery You must open the phone's back cover to remove or insert the battery.
S Slide the battery into place by slipping your finger under the small corner tab. S Lift out the battery by aligning the gold contacts on the phone and the battery and then gently pressing the battery into place. 2 1 NOUG-2.1-update1-105 Nexus One User's Guide Your phone and accessories 19 To remove or insert the battery You must open the phone's back cover to remove or insert the battery.
User Guide
Page 20
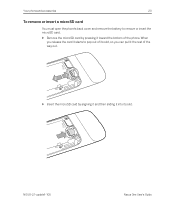
Your phone and accessories 20 To remove or insert a microSD card You must open the phone's back cover and remove the battery to pop out of its slot. S Remove the microSD card by pressing it toward the bottom of the way out. 1 2 S Insert the microSD card by aligning it and then sliding it into its slot, so you can pull it starts to remove or insert the microSD card. When you release the card it the rest of the phone. NOUG-2.1-update1-105 Nexus One User's Guide
Your phone and accessories 20 To remove or insert a microSD card You must open the phone's back cover and remove the battery to pop out of its slot. S Remove the microSD card by pressing it toward the bottom of the way out. 1 2 S Insert the microSD card by aligning it and then sliding it into its slot, so you can pull it starts to remove or insert the microSD card. When you release the card it the rest of the phone. NOUG-2.1-update1-105 Nexus One User's Guide
User Guide
Page 21
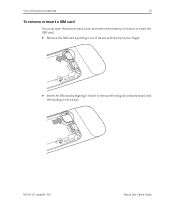
S Insert the SIM card by sliding it out of your finger. NOUG-2.1-update1-105 Nexus One User's Guide Your phone and accessories 21 To remove or insert a SIM card You must open the phone's back cover and remove the battery to the top left and gold contacts down) and then sliding it into its slot with the tip of its slot. S Remove the SIM card by aligning it (notch to remove or insert the SIM card.
S Insert the SIM card by sliding it out of your finger. NOUG-2.1-update1-105 Nexus One User's Guide Your phone and accessories 21 To remove or insert a SIM card You must open the phone's back cover and remove the battery to the top left and gold contacts down) and then sliding it into its slot with the tip of its slot. S Remove the SIM card by aligning it (notch to remove or insert the SIM card.
User Guide
Page 22
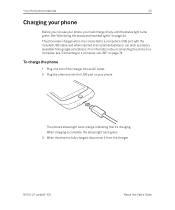
...it is fully charged, disconnect it from google.com/phone ). For information about connecting the phone to a computer, see "Connecting to a computer's USB port with the included USB cable, and when inserted in an optional desktop or car dock accessory (available from the charger. When charging... is complete, the status light turns green. 3 When the phone is connected to a computer via USB" on your phone, you must charge it 's charging. NOUG-2.1-update1-105 Nexus One User's Guide To charge the phone 1 Plug one end of...
...it is fully charged, disconnect it from google.com/phone ). For information about connecting the phone to a computer, see "Connecting to a computer's USB port with the included USB cable, and when inserted in an optional desktop or car dock accessory (available from the charger. When charging... is complete, the status light turns green. 3 When the phone is connected to a computer via USB" on your phone, you must charge it 's charging. NOUG-2.1-update1-105 Nexus One User's Guide To charge the phone 1 Plug one end of...

User Guide
Page 23
... clip 3.5mm headphone jack Remote (microphone on back) Headphones The remote features a microphone on the back and three buttons on the back. Your phone and accessories 23 Using the headset The headset plugs into the phone's 3.5mm headset jack.It includes a pair of headphones and a remote with the phone's Volume Up... your mouth. Use the lapel clip to music, press pause and play. You control the headphones' volume with a microphone on the front. NOUG-2.1-update1-105 Nexus One User's Guide
... clip 3.5mm headphone jack Remote (microphone on back) Headphones The remote features a microphone on the back and three buttons on the back. Your phone and accessories 23 Using the headset The headset plugs into the phone's 3.5mm headset jack.It includes a pair of headphones and a remote with the phone's Volume Up... your mouth. Use the lapel clip to music, press pause and play. You control the headphones' volume with a microphone on the front. NOUG-2.1-update1-105 Nexus One User's Guide
User Guide
Page 24
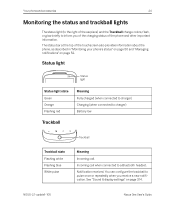
... notifications" on page 314. You can configure the trackball to inform you receive a new notification. See "Sound & display settings" on page 52. Your phone and accessories 24 Monitoring the status and trackball lights The status light (to the right of the earpiece) and the Trackball change colors, flash, or glow briefly... Status light Status light state Green Orange Flashing red Meaning Fully charged (when connected to charger) Charging (when connected to a Bluetooth headset. NOUG-2.1-update1-105 Nexus One User's Guide
... notifications" on page 314. You can configure the trackball to inform you receive a new notification. See "Sound & display settings" on page 52. Your phone and accessories 24 Monitoring the status and trackball lights The status light (to the right of the earpiece) and the Trackball change colors, flash, or glow briefly... Status light Status light state Green Orange Flashing red Meaning Fully charged (when connected to charger) Charging (when connected to a Bluetooth headset. NOUG-2.1-update1-105 Nexus One User's Guide

User Guide
Page 25
... more about working with the touchscreen and menus, see "Android basics" on the phone, you 're welcomed to Android and prompted to sign into your Google Account. You must obtain a PIN Unblocking Key (PUK) from your carrier and replacing both instances of your choosing: **05*PUK*PIN*PIN# To turn off... you want to turn the phone on page 28. NOUG-2.1-update1-105 Nexus One User's Guide to 8-digit PIN of "PIN" with the PUK from your mobile carrier to unblock the SIM and set a new PIN. Your phone and accessories 25 Turning the phone on and off You use your phone except to...
... more about working with the touchscreen and menus, see "Android basics" on the phone, you 're welcomed to Android and prompted to sign into your Google Account. You must obtain a PIN Unblocking Key (PUK) from your carrier and replacing both instances of your choosing: **05*PUK*PIN*PIN# To turn off... you want to turn the phone on page 28. NOUG-2.1-update1-105 Nexus One User's Guide to 8-digit PIN of "PIN" with the PUK from your mobile carrier to unblock the SIM and set a new PIN. Your phone and accessories 25 Turning the phone on and off You use your phone except to...

User Guide
Page 26
Your phone and accessories 26 NOUG-2.1-update1-105 Nexus One User's Guide
Your phone and accessories 26 NOUG-2.1-update1-105 Nexus One User's Guide

User Guide
Page 28
...if you want to use all the features of to a mobile network) to set up , as described in "Your phone and accessories" on page 68. NOUG-2.1-update1-105 Nexus One User's Guide Android basics 28 Starting Android for voice and data services, but you can 't connect to mobile networks for the first... time The first time you power on your phone (after setting it up your Google Account, and you're asked to make ...
...if you want to use all the features of to a mobile network) to set up , as described in "Your phone and accessories" on page 68. NOUG-2.1-update1-105 Nexus One User's Guide Android basics 28 Starting Android for voice and data services, but you can 't connect to mobile networks for the first... time The first time you power on your phone (after setting it up your Google Account, and you're asked to make ...
User Guide
Page 75
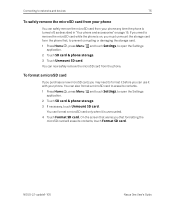
... erase its contents, touch Format SD card. On the screen that warns you can use it is turned off, as described in "Your phone and accessories" on , you must unmount the storage card form the phone first, to prevent corrupting or damaging the storage card. 1 Press Home , press Menu , and touch... and devices 75 To safely remove the microSD card from your phone You can safely remove the microSD card from the phone. NOUG-2.1-update1-105 Nexus One User's Guide
... erase its contents, touch Format SD card. On the screen that warns you can use it is turned off, as described in "Your phone and accessories" on , you must unmount the storage card form the phone first, to prevent corrupting or damaging the storage card. 1 Press Home , press Menu , and touch... and devices 75 To safely remove the microSD card from your phone You can safely remove the microSD card from the phone. NOUG-2.1-update1-105 Nexus One User's Guide
User Guide
Page 97
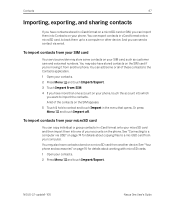
...Your service provider may store some or all . A list of your SIM card, such as customer care and voicemail numbers. NOUG-2.1-update1-105 Nexus One User's Guide And you can import them up to a microSD card from your contacts. 2 Press Menu and touch Import/Export. Or press... your computer. Contacts 97 Importing, exporting, and sharing contacts If you have contacts stored on a microSD card from another phone. See "Your phone and accessories" on the SIM appears. 5 Touch & hold a contact and touch Import in vCard format onto a microSD card, to back them into which you ...
...Your service provider may store some or all . A list of your SIM card, such as customer care and voicemail numbers. NOUG-2.1-update1-105 Nexus One User's Guide And you can import them up to a microSD card from your contacts. 2 Press Menu and touch Import/Export. Or press... your computer. Contacts 97 Importing, exporting, and sharing contacts If you have contacts stored on a microSD card from another phone. See "Your phone and accessories" on the SIM appears. 5 Touch & hold a contact and touch Import in vCard format onto a microSD card, to back them into which you ...
User Guide
Page 275
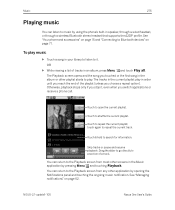
... playlist starts to play. Touch to repeat the current track. You can listen to music by pressing Menu and touching Playback. See "Your phone and accessories" on page 15 and "Connecting to it , even when you stop it . NOUG-2.1-update1-105 Nexus One User's Guide
... playlist starts to play. Touch to repeat the current track. You can listen to music by pressing Menu and touching Playback. See "Your phone and accessories" on page 15 and "Connecting to it , even when you stop it . NOUG-2.1-update1-105 Nexus One User's Guide

User Guide
Page 287
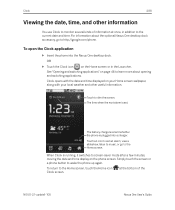
You can also use Clock. Clock is designed to work with the optional Nexus One desktop dock accessory (available from google.com/phone), though you don't need a dock to use Clock to displaying the date and time, the Clock application displays information about the weather and your phone into an alarm clock. In this section "Viewing the date, time, and other information" on page 288 "Setting alarms" on page 290 "Changing Clock alarm settings" on page 292 NOUG-2.1-update1-105 Nexus One User's Guide 287 Clock In addition to turn your phone.
You can also use Clock. Clock is designed to work with the optional Nexus One desktop dock accessory (available from google.com/phone), though you don't need a dock to use Clock to displaying the date and time, the Clock application displays information about the weather and your phone into an alarm clock. In this section "Viewing the date, time, and other information" on page 288 "Setting alarms" on page 290 "Changing Clock alarm settings" on page 292 NOUG-2.1-update1-105 Nexus One User's Guide 287 Clock In addition to turn your phone.
User Guide
Page 288
... dock. Simply touch the screen or a phone button to learn more about the optional Nexus One desktop dock accessory, go to monitor several kinds of information at the bottom of the NOUG-2.1-update1-105 Nexus One User's Guide Touch to http://google.com/phone. For information about opening and switching applications. When Clock is set an...
... dock. Simply touch the screen or a phone button to learn more about the optional Nexus One desktop dock accessory, go to monitor several kinds of information at the bottom of the NOUG-2.1-update1-105 Nexus One User's Guide Touch to http://google.com/phone. For information about opening and switching applications. When Clock is set an...
