Manual
Page 1
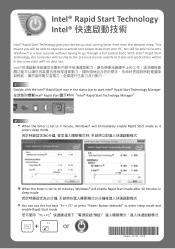
... Intel® Rapid Start Technology, the computer will resume to the previous session exactly as it enters sleep mode 0 When the timer is set to 0 minute, Windows® will immediately enable Rapid Start mode as it was and applications will enable Rapid Start mode after 10 minutes in sleep mode 10 10 You can use the hot keys "Fn + F1" or press "Power Button (default)" to go through a full system boot.
... Intel® Rapid Start Technology, the computer will resume to the previous session exactly as it enters sleep mode 0 When the timer is set to 0 minute, Windows® will immediately enable Rapid Start mode as it was and applications will enable Rapid Start mode after 10 minutes in sleep mode 10 10 You can use the hot keys "Fn + F1" or press "Power Button (default)" to go through a full system boot.
Manual
Page 2
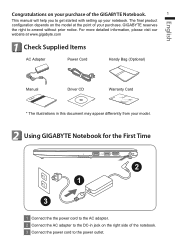
... model at www.gigabyte.com 1 Check Supplied Items AC Adapter Power Cord Handy Bag (Optional) Manual Driver CD Warranty Card * The illustrations in this document may appear differently from your model. 2 Using GIGABYTE Notebook for the First Time 2 1 3 1 Connect the the power cord to the AC adapter. 2 Connect the AC adapter to the DC-in jack on your purchase of the GIGABYTE Notebook. 1 This manual will help you to get started with setting...
... model at www.gigabyte.com 1 Check Supplied Items AC Adapter Power Cord Handy Bag (Optional) Manual Driver CD Warranty Card * The illustrations in this document may appear differently from your model. 2 Using GIGABYTE Notebook for the First Time 2 1 3 1 Connect the the power cord to the AC adapter. 2 Connect the AC adapter to the DC-in jack on your purchase of the GIGABYTE Notebook. 1 This manual will help you to get started with setting...
Manual
Page 3
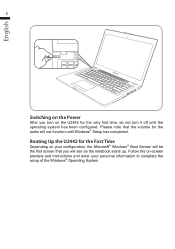
... and instructions and enter your configuration, the Microsoft® Windows® Boot Screen will be the first screen that the volume for the audio will see as the notebook starts up. Booting Up the U2442 for the very first time, do not turn on the U2442 for the First Time Depending on your personal information to complete the setup of the Windows® Operating System. English 2 Switching on the Power...
... and instructions and enter your configuration, the Microsoft® Windows® Boot Screen will be the first screen that the volume for the audio will see as the notebook starts up. Booting Up the U2442 for the very first time, do not turn on the U2442 for the First Time Depending on your personal information to complete the setup of the Windows® Operating System. English 2 Switching on the Power...
Manual
Page 4
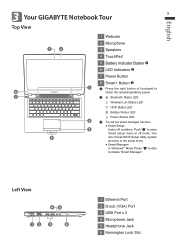
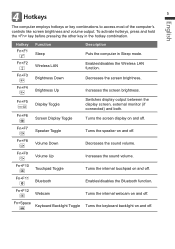
...enter "smart setup" menu in the setup menu. ● Smart Manager- Left View 45 12 3 6 1 Ethernet Port 2 D-sub (VGA) Port 3 USB Port x 2 4 Microphone Jack 5 Headphone Jack 6 Kensington Lock Slot English 3 Your GIGABYTE Notebook Tour 3 Top View 1 Webcam 1 2 2 Microphone 3 Speakers 4 TouchPad 5 Battery Indicator Button 6 LED Indicators 7 Power Button 8 7 6 8 Smart+ Button 3 Press the right button of touchpad to check the remaining battery power. Bluetooth Status LED Wireless Lan Status LED HDD Status LED Battery Status LED...
...enter "smart setup" menu in the setup menu. ● Smart Manager- Left View 45 12 3 6 1 Ethernet Port 2 D-sub (VGA) Port 3 USB Port x 2 4 Microphone Jack 5 Headphone Jack 6 Kensington Lock Slot English 3 Your GIGABYTE Notebook Tour 3 Top View 1 Webcam 1 2 2 Microphone 3 Speakers 4 TouchPad 5 Battery Indicator Button 6 LED Indicators 7 Power Button 8 7 6 8 Smart+ Button 3 Press the right button of touchpad to check the remaining battery power. Bluetooth Status LED Wireless Lan Status LED HDD Status LED Battery Status LED...
Manual
Page 6
... the sound volume. Fn+F7 Speaker Toggle Turns the speaker on and off . Fn+F12 Webcam Turns the internal webcam on and off . Fn+Space Keyboard Backlight Toggle Turns the keyboard backlight on and off. Decreases the screen brightness. To activate hotkeys, press and hold the key before pressing the other key in Sleep mode. Fn+F10 Touchpad Toggle Turns the internal touchpad on and off . Fn+F2 Fn+F3 Wireless LAN Brightness Down Enables/disables the Wireless LAN function. Hotkey...
... the sound volume. Fn+F7 Speaker Toggle Turns the speaker on and off . Fn+F12 Webcam Turns the internal webcam on and off . Fn+Space Keyboard Backlight Toggle Turns the keyboard backlight on and off. Decreases the screen brightness. To activate hotkeys, press and hold the key before pressing the other key in Sleep mode. Fn+F10 Touchpad Toggle Turns the internal touchpad on and off . Fn+F2 Fn+F3 Wireless LAN Brightness Down Enables/disables the Wireless LAN function. Hotkey...
Manual
Page 7
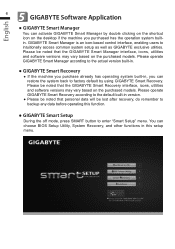
... BIOS Setup Utility, System Recovery, and other functions in , you purchased has the operation system builtin. Please be noted that the GIGABYTE Smart Recovery interface, icons, utilities and software versions may vary based on the purchased models. English 5 6 GIGABYTE Software Application ● GIGABYTE Smart Manager You can activate GIGABYTE Smart Manager by using GIGABYTE Smart Recovery. You can restore the system back to enter "Smart Setup" menu. Please be noted that the GIGABYTE Smart Manager interface, icons, utilities...
... BIOS Setup Utility, System Recovery, and other functions in , you purchased has the operation system builtin. Please be noted that the GIGABYTE Smart Recovery interface, icons, utilities and software versions may vary based on the purchased models. English 5 6 GIGABYTE Software Application ● GIGABYTE Smart Manager You can activate GIGABYTE Smart Manager by using GIGABYTE Smart Recovery. You can restore the system back to enter "Smart Setup" menu. Please be noted that the GIGABYTE Smart Manager interface, icons, utilities...
Manual
Page 8
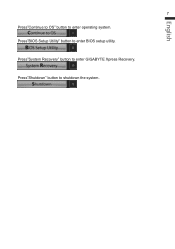
Press"BIOS Setup Utility" button to enter operating system. English 7 Press"Continue to OS" button to enter BIOS setup utility. Press"Shutdown" button to enter GIGABYTE Xpress Recovery. Press"System Recovery" button to shutdown the system.
Press"BIOS Setup Utility" button to enter operating system. English 7 Press"Continue to OS" button to enter BIOS setup utility. Press"Shutdown" button to enter GIGABYTE Xpress Recovery. Press"System Recovery" button to shutdown the system.
Manual
Page 9
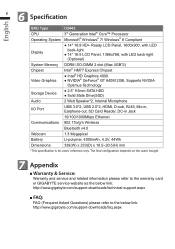
...; GT 640M 2GB, Supports NVIDIA Optimus Technology Storage Device ● 2.5" 9.5mm SATA HDD ● Solid State Drive(SSD) Audio 2 Watt Speaker*2, Internal Microphone I/O Port USB 3.0*2, USB 2.0*2, HDMI, D-sub, RJ45, Mic-in, Earphone-out, SD Card Reader, DC-in Jack 10/100/1000Mbps Ethernet Communications 802.11b/g/n Wireless Bluetooth v4.0 Webcam 1.3 Megapixel Battery Li-polymer, 4000mAh, 4.2V, 44Wh Dimensions 339(W) x 233(D) x 18.5~20.5(H) mm * This specification is for users' reference only.
...; GT 640M 2GB, Supports NVIDIA Optimus Technology Storage Device ● 2.5" 9.5mm SATA HDD ● Solid State Drive(SSD) Audio 2 Watt Speaker*2, Internal Microphone I/O Port USB 3.0*2, USB 2.0*2, HDMI, D-sub, RJ45, Mic-in, Earphone-out, SD Card Reader, DC-in Jack 10/100/1000Mbps Ethernet Communications 802.11b/g/n Wireless Bluetooth v4.0 Webcam 1.3 Megapixel Battery Li-polymer, 4000mAh, 4.2V, 44Wh Dimensions 339(W) x 233(D) x 18.5~20.5(H) mm * This specification is for users' reference only.


