
Manual
Page 2
... 4 Software Install ...5 Prerequisites on remote management PC 5 Install Java Tool ...5 Gigabyte Content Management Network Configuration 6 Using the Web UI...8 Gigabyte Content Management System Console Overview 9 Enter Gigabyte Content Management System Console 10 Properties ...10 Configuration ...11 Network...11 Network Security ...12 Security ...13 Users ...14 Services ...15 IPMI ...16 Time Setting ...18 Language ...19 Sessions ...20 LDAP ...21 Updates ...22 Utilities ...23 Server Information ...24 General Setting...24 Power Control ...25 Power...
... 4 Software Install ...5 Prerequisites on remote management PC 5 Install Java Tool ...5 Gigabyte Content Management Network Configuration 6 Using the Web UI...8 Gigabyte Content Management System Console Overview 9 Enter Gigabyte Content Management System Console 10 Properties ...10 Configuration ...11 Network...11 Network Security ...12 Security ...13 Users ...14 Services ...15 IPMI ...16 Time Setting ...18 Language ...19 Sessions ...20 LDAP ...21 Updates ...22 Utilities ...23 Server Information ...24 General Setting...24 Power Control ...25 Power...

Manual
Page 5
... LAN. FRU information report includes main board part number, product name, and manufacturer, etc.) Health status/Hardware monitoring report. Events log, view, and clear. Event notification via PET (Platform Event Trap). Platform Event Filtering (PEF) to take selected action for selected events. Chassis management includes power control and status report, front panel buttons and LEDs control. Support...
... LAN. FRU information report includes main board part number, product name, and manufacturer, etc.) Health status/Hardware monitoring report. Events log, view, and clear. Event notification via PET (Platform Event Trap). Platform Event Filtering (PEF) to take selected action for selected events. Chassis management includes power control and status report, front panel buttons and LEDs control. Support...

Manual
Page 6
Software Install Prerequisites on remote management PC Before installing Java tool, please check your system for the following required configuration requirements: Supported Browsers: Internet Explorer 8~12 Google chrome Version 29.0.1547.66m Firefox 2.0 JAVA Recommended Version 8 Update 25 or later version (file size: ~ 623KB) Install Java Tool Please follow the instruction to a known location on your computer) 7. Click Download on the...
Software Install Prerequisites on remote management PC Before installing Java tool, please check your system for the following required configuration requirements: Supported Browsers: Internet Explorer 8~12 Google chrome Version 29.0.1547.66m Firefox 2.0 JAVA Recommended Version 8 Update 25 or later version (file size: ~ 623KB) Install Java Tool Please follow the instruction to a known location on your computer) 7. Click Download on the...

Manual
Page 7
Go to enable the console redirection function. 1. Select BMC network Configuration 4. Save and Exit. 6. Gigabyte Content Management Network Configuration Please follow the instruction to BIOS setup menu. 2. Define Configuration Address source to DynamicBmcDhcp or Static. 5. Select Server Management. 3. The BMC IP Address will appear on the IPv4 Address parameter. 6
Go to enable the console redirection function. 1. Select BMC network Configuration 4. Save and Exit. 6. Gigabyte Content Management Network Configuration Please follow the instruction to BIOS setup menu. 2. Define Configuration Address source to DynamicBmcDhcp or Static. 5. Select Server Management. 3. The BMC IP Address will appear on the IPv4 Address parameter. 6
Manual
Page 10
... values: Username: root Password: superuser The default user name and password are in lower-case characters. Open a web browser and type in your motherboard is advised that once you log in using your DHCP server. 2. When you log in , you to enter Username and Password. 3. It is Intel C20x series chipset, please enter the following values: Username: admin Password: password If your identified IP. The...
... values: Username: root Password: superuser The default user name and password are in lower-case characters. Open a web browser and type in your motherboard is advised that once you log in using your DHCP server. 2. When you log in , you to enter Username and Password. 3. It is Intel C20x series chipset, please enter the following values: Username: admin Password: password If your identified IP. The...
Manual
Page 12
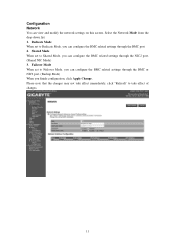
... take effect immediately, click "Refresh" to Failover Mode, you can configure the BMC related settings through the BMC or NIC2 port. (Backup Mode) When you can configure the BMC related settings through the BMC port. 2. Dedicate Mode When set to take effect of changes. 11 Configuration Network You can configure the BMC related settings through the NIC2 port. (Shared NIC Mode) 3. Select the Network Mode from the drop-down list. 1.
... take effect immediately, click "Refresh" to Failover Mode, you can configure the BMC related settings through the BMC or NIC2 port. (Backup Mode) When you can configure the BMC related settings through the BMC port. 2. Dedicate Mode When set to take effect of changes. 11 Configuration Network You can configure the BMC related settings through the NIC2 port. (Shared NIC Mode) 3. Select the Network Mode from the drop-down list. 1.
Manual
Page 16
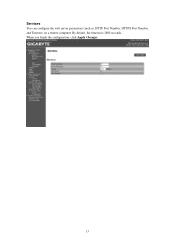
By default, the timeout is 1800 seconds. When you finish the configuration, click Apply Changes. 15 Services You can configure the web server parameters (such as, HTTP Port Number, HTTPS Port Number, and Timeout) on a remote computer.
By default, the timeout is 1800 seconds. When you finish the configuration, click Apply Changes. 15 Services You can configure the web server parameters (such as, HTTP Port Number, HTTPS Port Number, and Timeout) on a remote computer.
Manual
Page 17
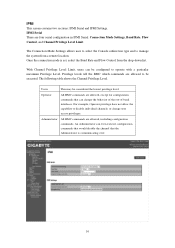
...-down list. Privilege levels tell the BMC which commands are allowed, except for configuration commands that the Administrator is set, select the Baud Rate and Flow Control from a remote location. The Connection Mode Settings allows user to select the Console redirection type and to be executed. IPMI This screen contains two sections: IPMI Serial and IPMI Settings. With Channel Privilege Level Limit, users can change user access privileges...
...-down list. Privilege levels tell the BMC which commands are allowed, except for configuration commands that the Administrator is set, select the Baud Rate and Flow Control from a remote location. The Connection Mode Settings allows user to select the Console redirection type and to be executed. IPMI This screen contains two sections: IPMI Serial and IPMI Settings. With Channel Privilege Level Limit, users can change user access privileges...

Manual
Page 18
IPMI Settings IPMI Settings provides remote configuration over LAN. When you finish the configuration, click "Apply Changes". 17 To activate IPMI remote configuration by LAN, check Enable IPMI Over LAN option, define the Channel Privilege Level Limit, and enter the Encryption Key.
IPMI Settings IPMI Settings provides remote configuration over LAN. When you finish the configuration, click "Apply Changes". 17 To activate IPMI remote configuration by LAN, check Enable IPMI Over LAN option, define the Channel Privilege Level Limit, and enter the Encryption Key.
Manual
Page 19
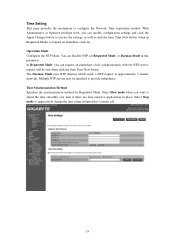
... Time Now button. Time Setting This page provides the mechanism to aggressively change the time using settimeofday() system call. 18 Operation Mode Configures the NTP Mode. The Daemon Mode runs NTP daemon which sends a NTP request at approximately 5 minute intervals. Select Slew mode when you can request an immediate clock synchronization with the NTP server; Select Step mode to configure the Network Time...
... Time Now button. Time Setting This page provides the mechanism to aggressively change the time using settimeofday() system call. 18 Operation Mode Configures the NTP Mode. The Daemon Mode runs NTP daemon which sends a NTP request at approximately 5 minute intervals. Select Slew mode when you can request an immediate clock synchronization with the NTP server; Select Step mode to configure the Network Time...

Manual
Page 22
Click Apply Changes to access the LDAP server. LDAP LDAP screen allows download user list of LDAP server then create Gigabyte Content Management System Console user account from this list directly. Check the box below to enable LDAP authentication and enter the required information to save your changes. 21
Click Apply Changes to access the LDAP server. LDAP LDAP screen allows download user list of LDAP server then create Gigabyte Content Management System Console user account from this list directly. Check the box below to enable LDAP authentication and enter the required information to save your changes. 21
Manual
Page 24
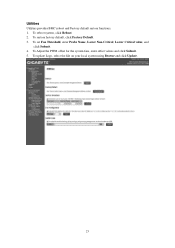
To Adjust the PWM offset for the system fans, enter offset values and click Submit. 5. To update Logo, select the file on your local system using Browse and click Update. 23 To restore factory default, click Factory Default. 3. To set Fan Threshold, enter Probe Name, Lower Non-Critical, Lower Critical value, and click Submit. 4. To reboot system, click Reboot. 2. Utilities Utilities provides BMC reboot and Factory default restore functions. 1.
To Adjust the PWM offset for the system fans, enter offset values and click Submit. 5. To update Logo, select the file on your local system using Browse and click Update. 23 To restore factory default, click Factory Default. 3. To set Fan Threshold, enter Probe Name, Lower Non-Critical, Lower Critical value, and click Submit. 4. To reboot system, click Reboot. 2. Utilities Utilities provides BMC reboot and Factory default restore functions. 1.

Manual
Page 25
Click Refresh to update current health status for Voltage, Power Supplies, Fans and Temperatures. 24 Define Auto Refresh Interval and Sensor Type form the drop-down list, and select Display Type. Server Information General Setting This page displays a real-time record of the system health related information such as Voltage, Power Supplies, Fans and Temperatures.
Click Refresh to update current health status for Voltage, Power Supplies, Fans and Temperatures. 24 Define Auto Refresh Interval and Sensor Type form the drop-down list, and select Display Type. Server Information General Setting This page displays a real-time record of the system health related information such as Voltage, Power Supplies, Fans and Temperatures.
Manual
Page 30
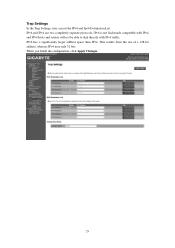
IPv6 has a significantly larger address space than IPv4. When you finish the configuration, click Apply Changes. 29 This results from the use of a 128-bit address, whereas IPv4 uses only 32 bits. Trap Settings In the Trap Settings, user can set the IPv4 and Ipv6 Destination List. IPv6 and IPv4 are two completely separate protocols. IPv6 is not backwards compatible with IPv4, and IPv4 hosts and routers will not be able to deal directly with IPv6 traffic.
IPv6 has a significantly larger address space than IPv4. When you finish the configuration, click Apply Changes. 29 This results from the use of a 128-bit address, whereas IPv4 uses only 32 bits. Trap Settings In the Trap Settings, user can set the IPv4 and Ipv6 Destination List. IPv6 and IPv4 are two completely separate protocols. IPv6 is not backwards compatible with IPv4, and IPv4 hosts and routers will not be able to deal directly with IPv6 traffic.
Manual
Page 31
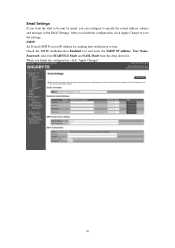
SMTP Set E-mail (SMTP) server IP address for sending alert notification to specify the e-mail address, subject and message in the Email Settings. Check the SMTP Authentication Enabled box and enter the SMTP IP address, User Name, Password; When you finish the configuration, click Apply Change to save the settings. After you finish the configuration, click "Apply Changes". 30 select the STARTTLS Mode and SASL Mode from the drop-down list. Email Settings If you want the alert to be sent by email, you can configure to user.
SMTP Set E-mail (SMTP) server IP address for sending alert notification to specify the e-mail address, subject and message in the Email Settings. Check the SMTP Authentication Enabled box and enter the SMTP IP address, User Name, Password; When you finish the configuration, click Apply Change to save the settings. After you finish the configuration, click "Apply Changes". 30 select the STARTTLS Mode and SASL Mode from the drop-down list. Email Settings If you want the alert to be sent by email, you can configure to user.
Manual
Page 32
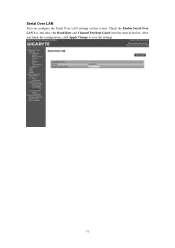
After you finish the configuration, click Apply Change to save the settings. 31 Serial Over LAN You can configure the Serial Over LAN settings on this screen. Check the Enable Serial Over LAN box and select the Baud Rate and Channel Privilege Limit from the drop-down list.
After you finish the configuration, click Apply Change to save the settings. 31 Serial Over LAN You can configure the Serial Over LAN settings on this screen. Check the Enable Serial Over LAN box and select the Baud Rate and Channel Privilege Limit from the drop-down list.

Manual
Page 35
......button and create to connect. Remove Image Exit Details USB Reset Resulting Action Check the mapped box next to the drive types you want to the image. Click Exit button to see more information of the image. After clicking the button, a console appears as below: Function Item Mapped Create Image... Click Details to terminate the Media Redirection wizard. Click USB Reset...
......button and create to connect. Remove Image Exit Details USB Reset Resulting Action Check the mapped box next to the drive types you want to the image. Click Exit button to see more information of the image. After clicking the button, a console appears as below: Function Item Mapped Create Image... Click Details to terminate the Media Redirection wizard. Click USB Reset...
Manual
Page 36
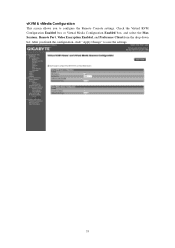
After you to save the settings. 35 Check the Virtual KVM Configuration Enabled box or Virtual Media Configuration Enabled box, and select the Max Sessions, Remote Port, Video Encryption Enabled, and Preference Client from the drop-down list. vKVM & vMedia Configuration This screen allows you finish the configuration, click "Apply Change" to configure the Remote Console settings.
After you to save the settings. 35 Check the Virtual KVM Configuration Enabled box or Virtual Media Configuration Enabled box, and select the Max Sessions, Remote Port, Video Encryption Enabled, and Preference Client from the drop-down list. vKVM & vMedia Configuration This screen allows you finish the configuration, click "Apply Change" to configure the Remote Console settings.
Manual
Page 42
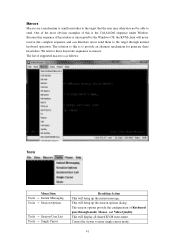
... to the target that the user may otherwise not be able to enter single cursor mode. 41 The solution to this is as macros. The list of Keyboard pass through normal keyboard operation. The session options provide the configuration of supported macros is the Ctrl-Alt-Del sequence under Window. This will bring up the session options dialog. Because this sequence...
... to the target that the user may otherwise not be able to enter single cursor mode. 41 The solution to this is as macros. The list of Keyboard pass through normal keyboard operation. The session options provide the configuration of supported macros is the Ctrl-Alt-Del sequence under Window. This will bring up the session options dialog. Because this sequence...
Manual
Page 1
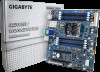
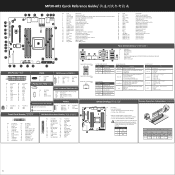
...data. 2 SATA Port 3 DOM Support Jumper Jumper 1-2 Close: Enable SATA port DOM support funtion. 2-3 Close: Normal Operation. (Default setting) If a SATA type hard drive is connected to the motherboard, please ensure the jumper is not ready. Code Description 1 LED_STA System status LED 2 USB2_MLAN KVM Server Management 10/100/1000 LAN port (top)/USB 2.0 ports (bottom) 3 VGA1_COM1 Serial port (top)/VGA port (bottom) 4 SFP+_1_2 SFP+ LAN port #1/#2 5 LAN1_2 GbE LAN port #1/#2 6 SW_PWR Power button with LED 7 SW_ID ID switch button with LED 8 CPU_FAN CPU fan connector...
...data. 2 SATA Port 3 DOM Support Jumper Jumper 1-2 Close: Enable SATA port DOM support funtion. 2-3 Close: Normal Operation. (Default setting) If a SATA type hard drive is connected to the motherboard, please ensure the jumper is not ready. Code Description 1 LED_STA System status LED 2 USB2_MLAN KVM Server Management 10/100/1000 LAN port (top)/USB 2.0 ports (bottom) 3 VGA1_COM1 Serial port (top)/VGA port (bottom) 4 SFP+_1_2 SFP+ LAN port #1/#2 5 LAN1_2 GbE LAN port #1/#2 6 SW_PWR Power button with LED 7 SW_ID ID switch button with LED 8 CPU_FAN CPU fan connector...


