Gigabyte GA-X99-UD4P Support and Manuals
Get Help and Manuals for this Gigabyte item
View All Support Options Below
Free Gigabyte GA-X99-UD4P manuals!
Problems with Gigabyte GA-X99-UD4P?
Ask a Question
Free Gigabyte GA-X99-UD4P manuals!
Problems with Gigabyte GA-X99-UD4P?
Ask a Question
Popular Gigabyte GA-X99-UD4P Manual Pages
User Manual - Page 1

GA-X99-UD4P
User's Manual
Rev. 1001 12ME-X99UD4P-1001R
For more product details, please visit GIGABYTE's website. To reduce the impacts on global warming, the packaging materials of this product are recyclable and reusable. GIGABYTE works with you to protect the environment.
User Manual - Page 2

Motherboard GA-X99-UD4P
Jan. 30, 2015
Motherboard GA-X99-UD4P
Jan. 30, 2015
User Manual - Page 4
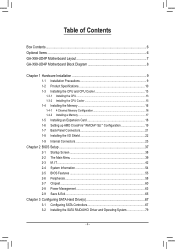
... 7 GA-X99-UD4P Motherboard Block Diagram 8
Chapter 1 Hardware Installation 9 1-1 Installation Precautions 9 1-2 Product Specifications 10 1-3 Installing the CPU and CPU Cooler 13
1-3-1 Installing the CPU...13 1-3-2 Installing the CPU Cooler 15 1-4 Installing the Memory 16 1-4-1 4 Channel Memory Configuration 16 1-4-2 Installing a Memory 17 1-5 Installing an Expansion Card 18 1-6 Setting...
User Manual - Page 6
...-3SATPW-4*R) †† 3.5" Front Panel with 2 USB 3.0/2.0 ports (Part No. 12CR1-FPX582-2*R)
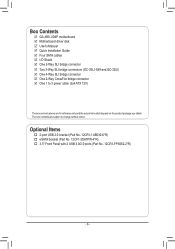
- 6 - The box contents are for reference only and the actual items shall depend on the product package you obtain. Box Contents
55 GA-X99-UD4P motherboard 55 Motherboard driver disk 55 User's Manual 55 Quick Installation Guide 55 Four SATA cables 55 I/O Shield 55 One 2-Way...
User Manual - Page 8
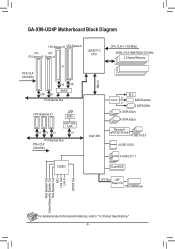
GA-X99-UD4P Motherboard Block Diagram
1 PCI Express x16 2 PCI Express x8
1 PCI
1 PCI
PCI... x1 x1 x1 x1
LAN RJ45 Intel® GbE LAN
x1
PCI Express Bus
PCIe CLK (100 MHz)
Intel® X99
CODEC
CPU CLK+/- (100 MHz) DDR4 2133/1866/1600/1333 MHz 4 Channel Memory
or Switch
or
M.2 SATA Express 2... Out
For detailed product information/limitation(s), refer to "1-2 Product Specifications." - 8 -
User Manual - Page 18
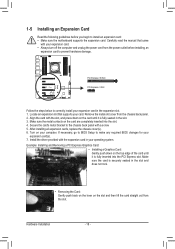
... slot and then lift the card straight out from the slot.
Secure the card's metal bracket to install an expansion card: •• Make sure the motherboard supports the expansion card. Carefully read the manual that supports your operating system. Remove the metal slot cover from the power outlet before you begin to the...
User Manual - Page 19
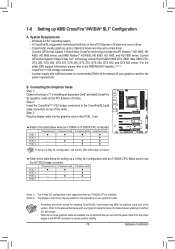
... the steps in the CrossFire/SLI gold
edge connectors on your graphics cards.
•• Procedure and driver screen for setting up a 3-Way SLI configuration with two or more graphics cards are installed, we recommend that support 3-Way/4-Way CrossFire technology include the ATI Radeon™ HD 3800, HD 4800, HD 5800 series, and...
User Manual - Page 35
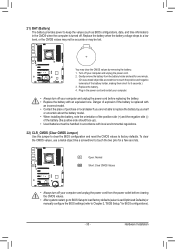
...Setup to load factory defaults (select Load Optimized Defaults) or manually configure the BIOS settings (refer to Chapter 2, "BIOS Setup," for 5 seconds.) 3. Hardware Installation Gently remove the battery from the power outlet before replacing the battery. •• Replace...CMOS when the computer is replaced with
an incorrect model. •• Contact the place of purchase or local dealer ...
User Manual - Page 37
...problems using the Q-Flash and @BIOS utilities, refer to clear the CMOS values.)
- 37 - BIOS Setup For instructions on using the current version of the system in Chapter 1 for how to Chapter 5, "BIOS Update Utilities."
•• Because BIOS flashing is turned off, the battery on .
To upgrade the BIOS, use either the GIGABYTE...configuration settings or to the "Load ...
User Manual - Page 44

...sets the CPU Turbo ratios according to the CPU specifications. (Default: Auto)
&& Turbo Power Limit (Watts) Allows you to set the CPU PLL. Auto sets the power limit according to the CPU specifications...only when you install a CPU that supports this setting. (Default: Auto)
&& Filter PLL Level Allows you to set the Filter PLL. Auto lets the BIOS automatically configure this setting. (Default: ...
User Manual - Page 45

... power limit according to the CPU specifications. (Default: Auto)
&& Active Cores Control (Note 1) Allows you install a CPU that support multi-processor mode. Auto lets the BIOS automatically configure this setting. (Default: Auto)
&& CPU Thermal Monitor (Note 1) Enables or disables Intel® Thermal Monitor function, a CPU overheating protection function. When enabled, the CPU core frequency...
User Manual - Page 79

... to be installed requires that you install all required drivers from the Windows setup disk and perform standard OS installation steps. Step 2: Boot from the motherboard driver disk using "Xpress Install" to ensure system performance and compatibility.
The locations of the driver. 3-2 Installing the SATA RAID/AHCI Driver and Operating System
With the correct BIOS settings, you provide...
User Manual - Page 85
...
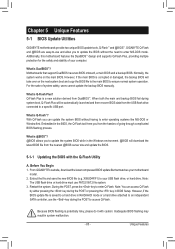
Embedded in BIOS Setup. Chapter 5 Unique Features
5-1 BIOS Update Utilities
GIGABYTE motherboards provide two unique BIOS update tools, Q-Flash™ and @BIOS™. Additionally, this motherboard features the DualBIOS™ design and supports Q-Flash Plus, providing multiple protection for the safety and stability of system safety, users cannot update the backup BIOS manually. What is...
User Manual - Page 86

Q-Flash
Model Name : X99-UD4P BIOS Version : F1
BIOS Date : 07/29/2014 Flash TypeU/Spidzaete: MBIXOISCF2r5oLm/UDSrievreies 16MB
UPpdleaatseeBsIeOleSctFdrrovmiceDrive SUavSeBBFIOlaSshtoDDrivrieve ExitCQlo-sFeLASH
3.
Step 1: 1.
Insert the USB flash drive containing the BIOS file into the computer. Select the BIOS update file.
Updating the BIOS In the main menu of Q-Flash, ...
User Manual - Page 111

...driver.
•• Audio signals will appear in and out) to instructions on the next page. A. Configuring Speakers (The following for each jack may vary based on hardware specification...instructions use Windows 8.1 as the example operating system.)
Step 1: After installing the audio driver, restart your microphone to the Mic in jack and manually... the audio driver. (Supported functions for ...
Gigabyte GA-X99-UD4P Reviews
We have not received any reviews for Gigabyte yet.