User Manual
Page 12
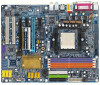
...; Supports 2 / 4 / 6 / 8 channel audio Š Supports Line In ; Only for GA-K8N Pro-SLI. K8 nForce4 SLI Series Motherboard - 12 - Center/Subwoofer Speaker Out ; Only for GA-K8N Ultra-SLI. Line Out (Front Speaker Out) ; MIC ; Side Speaker Out connection Š SPDIF In/Out connection ...K8N Ultra-SLI or GA-K8N Pro-SLI or GA-K8N-SLI Š Socket 939 for system usage and therefore the actual memory size is reserved for AMD AthlonTM 64 / 64 FX processor (K8) Š 2000MT/s system bus Š Supports core frequencies in excess of 3000+ and faster Š nVIDIA® nForce4 SLI...
...; Supports 2 / 4 / 6 / 8 channel audio Š Supports Line In ; Only for GA-K8N Pro-SLI. K8 nForce4 SLI Series Motherboard - 12 - Center/Subwoofer Speaker Out ; Only for GA-K8N Ultra-SLI. Line Out (Front Speaker Out) ; MIC ; Side Speaker Out connection Š SPDIF In/Out connection ...K8N Ultra-SLI or GA-K8N Pro-SLI or GA-K8N-SLI Š Socket 939 for system usage and therefore the actual memory size is reserved for AMD AthlonTM 64 / 64 FX processor (K8) Š 2000MT/s system bus Š Supports core frequencies in excess of 3000+ and faster Š nVIDIA® nForce4 SLI...

User Manual
Page 19
...Normal Mode. Understanding the GIGABYTE SLI switch module: You can be available except for different systems. - 19 - SLI Mode: In SLI Mode, the two PCIE x 16 slots can provide sufficient and stable power to bridge two NVIDIA SLIready PCI ExpressTM graphics...NVIDIA SLI technologies work and deliver heartpounding PC performance. Before You Begin-- One connector is SLI Mode and the other is available and can operate at up to configure an SLI system on your system and the two SLI graphics cards. As not all PCIE slots will depend on the GA-K8N Ulra-SLI/GA-K8N Pro-SLI/GA-K8N-SLI...
...Normal Mode. Understanding the GIGABYTE SLI switch module: You can be available except for different systems. - 19 - SLI Mode: In SLI Mode, the two PCIE x 16 slots can provide sufficient and stable power to bridge two NVIDIA SLIready PCI ExpressTM graphics...NVIDIA SLI technologies work and deliver heartpounding PC performance. Before You Begin-- One connector is SLI Mode and the other is available and can operate at up to configure an SLI system on your system and the two SLI graphics cards. As not all PCIE slots will depend on the GA-K8N Ulra-SLI/GA-K8N Pro-SLI/GA-K8N-SLI...

User Manual
Page 20
... 1: Gently spread the retaining clips of Expansion Cards" on your system is attached.) Connecting Two Graphics Cards: Step 1: Observe the steps in the SLI Mode direction. Hold the module by the socket clips. (You should hear a "click" when the module is to take out the module from the... 3: Insert the top edge of the module with the key in the Normal Mode direction by the NVIDIA SLI technology. Make sure the gold edge connectors are fully inserted. English III. K8 nForce4 SLI Series Motherboard - 20 - Note that as the switch module is currrently supported by factory default, the...
... 1: Gently spread the retaining clips of Expansion Cards" on your system is attached.) Connecting Two Graphics Cards: Step 1: Observe the steps in the SLI Mode direction. Hold the module by the socket clips. (You should hear a "click" when the module is to take out the module from the... 3: Insert the top edge of the module with the key in the Normal Mode direction by the NVIDIA SLI technology. Make sure the gold edge connectors are fully inserted. English III. K8 nForce4 SLI Series Motherboard - 20 - Note that as the switch module is currrently supported by factory default, the...

User Manual
Page 21
... card on the PCIE_16_1 slot, make sure to set Init Display First to the chassis back panel with a screw. If you click Apply. The NVIDIA control panel will restart after you plug the display cable to the card on the PCIE_16_2 slot, set Init Display First in BIOS Setup to... to PEG(Slot2). Graphics Card Driver Setting: Step 1: After installing graphics card driver in operating system, right-click the NVIDIA icon in the SLI multi-GPU dialog box. Step 2: Select SLI multi-GPU from the side menu and then select the Enable SLI multi-GPU checkbox in your system tray and then select...
... card on the PCIE_16_1 slot, make sure to set Init Display First to the chassis back panel with a screw. If you click Apply. The NVIDIA control panel will restart after you plug the display cable to the card on the PCIE_16_2 slot, set Init Display First in BIOS Setup to... to PEG(Slot2). Graphics Card Driver Setting: Step 1: After installing graphics card driver in operating system, right-click the NVIDIA icon in the SLI multi-GPU dialog box. Step 2: Select SLI multi-GPU from the side menu and then select the Enable SLI multi-GPU checkbox in your system tray and then select...

User Manual
Page 38
... device priority by USB-ZIP. Boot Up Floppy Seek During POST, BIOS will not search for onboard(or add-on cards) SCSI, RAID, etc. NVIDIA Boot Age Select your boot device priority by USB-CDROM. Disabled Disable this menu. USB-ZIP Select your boot device priority by Hard Disk. USB... down the list. Disabled BIOS will determine the floppy disk drive installed is 40 or 80 tracks. 360K type is 360K. (Default value) K8 nForce4 SLI Series Motherboard - 38 - Use < > or < > to select a device, then press to move it is 40 or 80 tracks. Hard Disk Select your boot device...
... device priority by USB-ZIP. Boot Up Floppy Seek During POST, BIOS will not search for onboard(or add-on cards) SCSI, RAID, etc. NVIDIA Boot Age Select your boot device priority by USB-CDROM. Disabled Disable this menu. USB-ZIP Select your boot device priority by Hard Disk. USB... down the list. Disabled BIOS will determine the floppy disk drive installed is 40 or 80 tracks. 360K type is 360K. (Default value) K8 nForce4 SLI Series Motherboard - 38 - Use < > or < > to select a device, then press to move it is 40 or 80 tracks. Hard Disk Select your boot device...

User Manual
Page 61
... IDE channel 1 d. SATA IDE channel 4 Precautions: 1. On a few motherboards based on Nvidia chipsets, BIOS update is required for the backup file must be solved by BIOS update) GA-K8U GA-K8U-9 GA-K8NXP-SLI GA-K8N Ultra-SLI GA-K8N Pro-SLI GA-K8NXP-9 GA-K8N Ultra-9 GA-K8NF-9 (PCB Ver. 1.0) GA-K8NE (PCB Ver. 1.0) GA-K8NMF-9 - 61...
... IDE channel 1 d. SATA IDE channel 4 Precautions: 1. On a few motherboards based on Nvidia chipsets, BIOS update is required for the backup file must be solved by BIOS update) GA-K8U GA-K8U-9 GA-K8NXP-SLI GA-K8N Ultra-SLI GA-K8N Pro-SLI GA-K8NXP-9 GA-K8N Ultra-9 GA-K8NF-9 (PCB Ver. 1.0) GA-K8NE (PCB Ver. 1.0) GA-K8NMF-9 - 61...

User Manual
Page 73
... array. The configuration information of a mirrored array. Different RAID levels represent different performance levels, security levels and implementation costs. The RAID levels which the nVIDIA® nForce4 SLI chipset supports are called the spare drive can prevent data loss if the operating system fails or hangs. If any disk member fails, the...
... array. The configuration information of a mirrored array. Different RAID levels represent different performance levels, security levels and implementation costs. The RAID levels which the nVIDIA® nForce4 SLI chipset supports are called the spare drive can prevent data loss if the operating system fails or hangs. If any disk member fails, the...
User Manual
Page 74
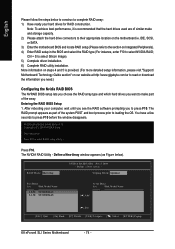
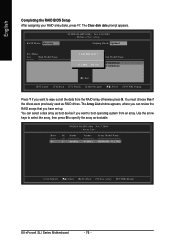
Ctrl + S to their appropriate location on our website at http:\\www.gigabyte.com.tw to read or download the information you need.) Configuring the Nvidia RAID BIOS The NVRAID BIOS setup lets you choose the RAID array type and which hard drives you to press F10 before ... 2.1.M ST3120026AS Array Disks Loc Disk Model Name [ ] Add [ ] Del [ESC] Quit [F6] Back [F7] Finish [TAB] Navigate [ ] Select [ENTER] Popup K8 nForce4 SLI Series Motherboard - 74 - The RAID prompt appears as Figure below to construct a complete RAID array: 1) Have ready your computer, wait until you see the RAID...
Ctrl + S to their appropriate location on our website at http:\\www.gigabyte.com.tw to read or download the information you need.) Configuring the Nvidia RAID BIOS The NVRAID BIOS setup lets you choose the RAID array type and which hard drives you to press F10 before ... 2.1.M ST3120026AS Array Disks Loc Disk Model Name [ ] Add [ ] Del [ESC] Quit [F6] Back [F7] Finish [TAB] Navigate [ ] Select [ENTER] Popup K8 nForce4 SLI Series Motherboard - 74 - The RAID prompt appears as Figure below to construct a complete RAID array: 1) Have ready your computer, wait until you see the RAID...
User Manual
Page 75
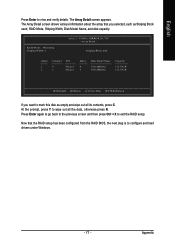
... pressing the right-arrow key ( ) until all the disks that are the drives that you want appears in the list is highlighted. RAID Mode: Mirroring NVIDIA RAID Utility Nov 5 2004 -
... pressing the right-arrow key ( ) until all the disks that are the drives that you want appears in the list is highlighted. RAID Mode: Mirroring NVIDIA RAID Utility Nov 5 2004 -
User Manual
Page 76
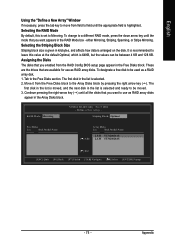
...[TAB] Navigate [ ] Select [ENTER] Popup Press Y if you want to boot operating system from the RAID array, otherwise press N. Boot No NVIDIA RAID Utility Nov 5 2004 - The Clear disk data prompt appears. You can review the RAID arrays that you want to specify the array as RAID... if you have set up. Id Status Vendor Array Model Name 2 Healthy NVIDIA MIRROR 111.79G [Ctrl-X] Exit [ ] Select [B] Set Boot [N] New Array [ENTER] Detail K8 nForce4 SLI Series Motherboard - 76 - RAID Mode: Mirroring NVIDIA RAID Utility Nov 5 10 2004 - Use the arrow keys to select the...
...[TAB] Navigate [ ] Select [ENTER] Popup Press Y if you want to boot operating system from the RAID array, otherwise press N. Boot No NVIDIA RAID Utility Nov 5 2004 - The Clear disk data prompt appears. You can review the RAID arrays that you want to specify the array as RAID... if you have set up. Id Status Vendor Array Model Name 2 Healthy NVIDIA MIRROR 111.79G [Ctrl-X] Exit [ ] Select [B] Set Boot [N] New Array [ENTER] Detail K8 nForce4 SLI Series Motherboard - 76 - RAID Mode: Mirroring NVIDIA RAID Utility Nov 5 10 2004 - Use the arrow keys to select the...
User Manual
Page 77
... previous screen and then press Ctrl + X to configure and load drivers under Windows. - 77 - The Array Detail screen appears. RAID Mode: Mirroring Striping Width : 1 Array 2 : NVIDIA MIRROR 111.79G - Striping Block: 64K Adapt 2 2 Channel M/S 0 Master 1 Master Index 0 1 Disk Model Name ST3120026AS ST3120026AS Capacity 111.79GB 111.79GB [R] Rebuild [D] Delete [C] Clear Disk...
... previous screen and then press Ctrl + X to configure and load drivers under Windows. - 77 - The Array Detail screen appears. RAID Mode: Mirroring Striping Width : 1 Array 2 : NVIDIA MIRROR 111.79G - Striping Block: 64K Adapt 2 2 Channel M/S 0 Master 1 Master Index 0 1 Disk Model Name ST3120026AS ST3120026AS Capacity 111.79GB 111.79GB [R] Rebuild [D] Delete [C] Clear Disk...


