Manual
Page 7
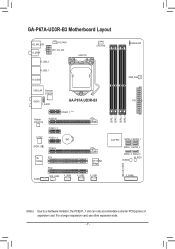
For a longer expansion card, use other expansion slots. - 7 - GA-P67A-UD3R-B3 Motherboard Layout KB_MS_USB R_SPDIF SYS_FAN1 ATX_12V_2X4 R_USB_2 R_USB_1 R_USB30 LGA1155 CPU_FAN PHASE LED PWR_FAN USB_LAN Renesas D720200 AUDIO F_AUDIO GA-P67A-UD3R-B3 Realtek RTL8111E PCIEX1_1 (Note) PCIEX16 PCIEX1_2 CODEC PCIEX1_3 BAT SPDIF_O PCIEX4 iTE IT8728 COMA PCI1 PCI2 SYS_FAN2 F_USB3 F_USB2 iTE IT8892 Bridge F_USB1 DDR3_1 DDR3_2 ...
For a longer expansion card, use other expansion slots. - 7 - GA-P67A-UD3R-B3 Motherboard Layout KB_MS_USB R_SPDIF SYS_FAN1 ATX_12V_2X4 R_USB_2 R_USB_1 R_USB30 LGA1155 CPU_FAN PHASE LED PWR_FAN USB_LAN Renesas D720200 AUDIO F_AUDIO GA-P67A-UD3R-B3 Realtek RTL8111E PCIEX1_1 (Note) PCIEX16 PCIEX1_2 CODEC PCIEX1_3 BAT SPDIF_O PCIEX4 iTE IT8728 COMA PCI1 PCI2 SYS_FAN2 F_USB3 F_USB2 iTE IT8892 Bridge F_USB1 DDR3_1 DDR3_2 ...
Manual
Page 21
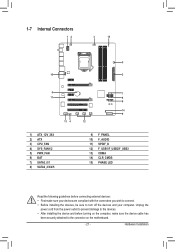
... 13 4 1) ATX_12V_2X4 2) ATX 3) CPU_FAN 4) SYS_FAN1/2 5) PWR_FAN 6) BAT 7) SATA3_0/1 8) SATA2_2/3/4/5 7 8 8 14 9 12 9) F_PANEL 10) F_AUDIO 11) SPDIF_O 12) F_USB1/F_USB2/F_USB3 13) COMA 14) CLR_CMOS 15) PHASE LED Read the following guidelines before connecting external devices: • First make sure the device cable has been securely attached to the connector on the computer...
... 13 4 1) ATX_12V_2X4 2) ATX 3) CPU_FAN 4) SYS_FAN1/2 5) PWR_FAN 6) BAT 7) SATA3_0/1 8) SATA2_2/3/4/5 7 8 8 14 9 12 9) F_PANEL 10) F_AUDIO 11) SPDIF_O 12) F_USB1/F_USB2/F_USB3 13) COMA 14) CLR_CMOS 15) PHASE LED Read the following guidelines before connecting external devices: • First make sure the device cable has been securely attached to the connector on the computer...
Manual
Page 28
... configure the BIOS settings (refer to Chapter 2, "BIOS Setup," for BIOS configurations). 15) PHASE LED The number of lighted LEDs. Refer to touch the two pins for more the number of lighted LEDs indicates the CPU loading. Open: Normal Short: Clear CMOS Values • Always turn off...two pins or use a metal object like a screwdriver to Chapter 4, "Dynamic Energy Saver™ 2," for a few seconds. To enable the Phase LED display function, please first enable Dynamic Energy Saver™ 2. 14) CLR_CMOS (Clearing CMOS Jumper) Use this jumper to factory defaults. The higher ...
... configure the BIOS settings (refer to Chapter 2, "BIOS Setup," for BIOS configurations). 15) PHASE LED The number of lighted LEDs. Refer to touch the two pins for more the number of lighted LEDs indicates the CPU loading. Open: Normal Short: Clear CMOS Values • Always turn off...two pins or use a metal object like a screwdriver to Chapter 4, "Dynamic Energy Saver™ 2," for a few seconds. To enable the Phase LED display function, please first enable Dynamic Energy Saver™ 2. 14) CLR_CMOS (Clearing CMOS Jumper) Use this jumper to factory defaults. The higher ...
Manual
Page 67
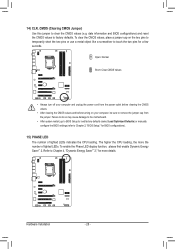
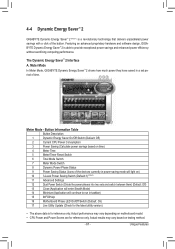
...10 16 17 Meter Mode - riod of the button. Meter Mode In Meter Mode, GIGABYTE Dynamic Energy Saver™ 2 shows how much power they have saved in taskbar) 15 INFO/Help 16 Motherboard Phase LED On/Off Switch (Default: On) 17 Live Utility Update (Check for the latest utility... depending on testing method. - 67 - The Dynamic Energy Saver™ 2 Interface A. Featuring an advanced proprietary hardware and software design, GIGABYTE Dynamic Energy Saver™ 2 is for reference only. Actual performance may vary based on motherboard model. • CPU Power and Power ...
...10 16 17 Meter Mode - riod of the button. Meter Mode In Meter Mode, GIGABYTE Dynamic Energy Saver™ 2 shows how much power they have saved in taskbar) 15 INFO/Help 16 Motherboard Phase LED On/Off Switch (Default: On) 17 Live Utility Update (Check for the latest utility... depending on testing method. - 67 - The Dynamic Energy Saver™ 2 Interface A. Featuring an advanced proprietary hardware and software design, GIGABYTE Dynamic Energy Saver™ 2 is for reference only. Actual performance may vary based on motherboard model. • CPU Power and Power ...
Manual
Page 68
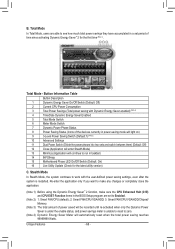
...power-saving mode will light on) 9 3-Level Power Saving Switch (Default:1) (Note 2) 10 Advanced Settings 11 Dual Power Switch (Divide the power phases into two sets and switch between them) (Default: Off) 12 Close (Application will enter Stealth Mode) 13 Minimize (Application will continue to zero. ... the Dynamic Energy Saver™ 2 function, make sure the CPU Enhanced Halt (C1E) and CPU EIST Function items in taskbar) 14 INFO/Help 15 Motherboard Phase LED On/Off Switch (Default: On) 16 Live Utility Update (Check for the first time (Note 3). 12 13 14 3 2 4 65 7 1 8 15...
...power-saving mode will light on) 9 3-Level Power Saving Switch (Default:1) (Note 2) 10 Advanced Settings 11 Dual Power Switch (Divide the power phases into two sets and switch between them) (Default: Off) 12 Close (Application will enter Stealth Mode) 13 Minimize (Application will continue to zero. ... the Dynamic Energy Saver™ 2 function, make sure the CPU Enhanced Halt (C1E) and CPU EIST Function items in taskbar) 14 INFO/Help 15 Motherboard Phase LED On/Off Switch (Default: On) 16 Live Utility Update (Check for the first time (Note 3). 12 13 14 3 2 4 65 7 1 8 15...


