
Manual
Page 1
... set up a RAID 0 array: Click Auto to automatically and quickly set up a RAID-ready system and configure it for RAID 0 when a new SATA drive is recommended that 's been created earlier, make sure the newly added harddrive has equal or greater capacity than or equal to the biggest... to Enabled to enable RAID for complex and time-consuming configurations. Using GIGABYTE eXtreme Hard Drive (X.H.D) Instructions:(Note 2) Before launching X.H.D, make sure the new drive is greater than the RAID-ready system drive. (To add a new hard drive into the array to expand its capacity. Or you 'll...
... set up a RAID 0 array: Click Auto to automatically and quickly set up a RAID-ready system and configure it for RAID 0 when a new SATA drive is recommended that 's been created earlier, make sure the newly added harddrive has equal or greater capacity than or equal to the biggest... to Enabled to enable RAID for complex and time-consuming configurations. Using GIGABYTE eXtreme Hard Drive (X.H.D) Instructions:(Note 2) Before launching X.H.D, make sure the new drive is greater than the RAID-ready system drive. (To add a new hard drive into the array to expand its capacity. Or you 'll...
Manual
Page 6
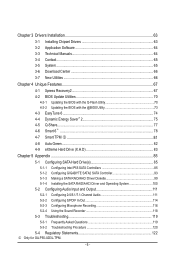
... Application Software 64 3-3 Technical Manuals 64 3-4 Contact...65 3-5 System...65 3-6 Download Center 66 3-7 New Utilities...66 Chapter 4 Unique Features 67 4-1 Xpress Recovery2 67 4-2 BIOS Update Utilities 70 4-2-1 Updating the...4-9 eXtreme Hard Drive (X.H.D 83 Chapter 5 Appendix...85 5-1 Configuring SATA Hard Drive(s 85 5-1-1 Configuring Intel P55 SATA Controllers 85 5-1-2 Configuring GIGABYTE SATA2 SATA Controller 93 5-1-3 Making a SATA RAID/AHCI Driver Diskette 99 5-1-4 Installing the SATA RAID/AHCI ... Procedure 120 5-4 Regulatory Statements 122 j Only for GA-P55-UD3L-TPM. - 6 -
... Application Software 64 3-3 Technical Manuals 64 3-4 Contact...65 3-5 System...65 3-6 Download Center 66 3-7 New Utilities...66 Chapter 4 Unique Features 67 4-1 Xpress Recovery2 67 4-2 BIOS Update Utilities 70 4-2-1 Updating the...4-9 eXtreme Hard Drive (X.H.D 83 Chapter 5 Appendix...85 5-1 Configuring SATA Hard Drive(s 85 5-1-1 Configuring Intel P55 SATA Controllers 85 5-1-2 Configuring GIGABYTE SATA2 SATA Controller 93 5-1-3 Making a SATA RAID/AHCI Driver Diskette 99 5-1-4 Installing the SATA RAID/AHCI ... Procedure 120 5-4 Regulatory Statements 122 j Only for GA-P55-UD3L-TPM. - 6 -
Manual
Page 63
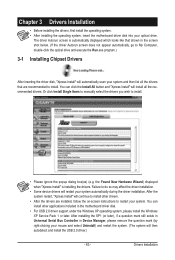
...; Please ignore the popup dialog box(es) (e.g. Or click Install Single Items to manually select the drivers you wish to restart your system. the Found New Hardware Wizard) displayed when "Xpress Install" is automatically displayed which looks like that shown in Device Manager, please remove the question mark (by right-clicking...
...; Please ignore the popup dialog box(es) (e.g. Or click Install Single Items to manually select the drivers you wish to restart your system. the Found New Hardware Wizard) displayed when "Xpress Install" is automatically displayed which looks like that shown in Device Manager, please remove the question mark (by right-clicking...
Manual
Page 66
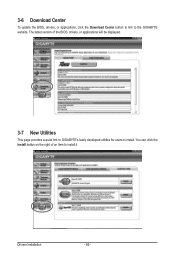
You can click the Install button on the right of the BIOS, drivers, or applications will be displayed. 3-7 New Utilities This page provides a quick link to GIGABYTE's lately developed utilities for users to install. Drivers Installation - 66 - 3-6 Download Center To update the BIOS, drivers, or applications, click the Download Center button to link to install it. The latest version of an item to the GIGABYTE website.
You can click the Install button on the right of the BIOS, drivers, or applications will be displayed. 3-7 New Utilities This page provides a quick link to GIGABYTE's lately developed utilities for users to install. Drivers Installation - 66 - 3-6 Download Center To update the BIOS, drivers, or applications, click the Download Center button to link to install it. The latest version of an item to the GIGABYTE website.
Manual
Page 67
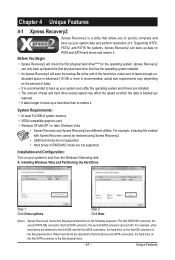
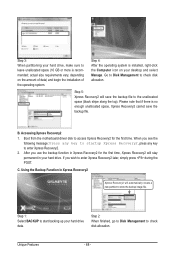
... first physical hard drive that allows you to quickly compress and back up your system to boot from the Windows Vista setup disk. Step 2: Click New. (Note) Xpress Recovery2 checks the first physical hard drive in RAID/AHCI mode are not supported. • Hard drives in the following sequence: The first...
... first physical hard drive that allows you to quickly compress and back up your system to boot from the Windows Vista setup disk. Step 2: Click New. (Note) Xpress Recovery2 checks the first physical hard drive in RAID/AHCI mode are not supported. • Hard drives in the following sequence: The first...
Manual
Page 68
... drive data. Step 1: Select BACKUP to check disk allocation. If you wish to access Xpress Recovery2 for the first time, Xpress Recovery2 will automatically create a new partition to check disk allocation. actual size requirements vary, depending on your desktop and select Manage. Accessing Xpress Recovery2 1. Boot from the motherboard driver disk...
... drive data. Step 1: Select BACKUP to check disk allocation. If you wish to access Xpress Recovery2 for the first time, Xpress Recovery2 will automatically create a new partition to check disk allocation. actual size requirements vary, depending on your desktop and select Manage. Accessing Xpress Recovery2 1. Boot from the motherboard driver disk...
Manual
Page 70
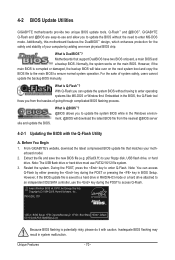
... latest compressed BIOS update file that support DualBIOS have two BIOS onboard, a main BIOS and a backup BIOS. Extract the file and save the new BIOS file (e.g. Note: You can update the system BIOS without the need to an independent IDE/SATA controller, use FAT32/16/12 file system.... key in the Windows environment. @BIOS will take over on the main BIOS. P55-UD3L D11 . . . . : BIOS Setup : XpressRecovery2 : Boot Menu : Qflash 07/17/2009-P55-7A89RG0LC-00 Because BIOS flashing is DualBIOS™? GIGABYTE Q-Flash and @BIOS are easy-to-use and allow you to ensure normal system...
... latest compressed BIOS update file that support DualBIOS have two BIOS onboard, a main BIOS and a backup BIOS. Extract the file and save the new BIOS file (e.g. Note: You can update the system BIOS without the need to an independent IDE/SATA controller, use FAT32/16/12 file system.... key in the Windows environment. @BIOS will take over on the main BIOS. P55-UD3L D11 . . . . : BIOS Setup : XpressRecovery2 : Boot Menu : Qflash 07/17/2009-P55-7A89RG0LC-00 Because BIOS flashing is DualBIOS™? GIGABYTE Q-Flash and @BIOS are easy-to-use and allow you to ensure normal system...

Manual
Page 72
... the POST, press to exit Q-Flash and reboot the system. The procedure is complete after a BIOS update, so we recommend that you should see the new BIOS version is present on the POST screen. Step 4: Press and then to enter BIOS Setup. As the system boots, you reload BIOS defaults. Select... CMOS from BIOS Press to load BIOS defaults Step 6: Select Save & Exit Setup and then press to save settings to load BIOS defaults. j Only for GA-P55-UD3L-TPM. System will re-detect all peripheral devices after the system restarts.
... the POST, press to exit Q-Flash and reboot the system. The procedure is complete after a BIOS update, so we recommend that you should see the new BIOS version is present on the POST screen. Step 4: Press and then to enter BIOS Setup. As the system boots, you reload BIOS defaults. Select... CMOS from BIOS Press to load BIOS defaults Step 6: Select Save & Exit Setup and then press to save settings to load BIOS defaults. j Only for GA-P55-UD3L-TPM. System will re-detect all peripheral devices after the system restarts.
Manual
Page 74
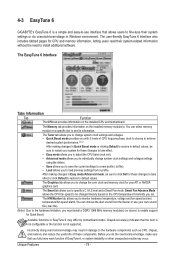
4-3 EasyTune 6 GIGABYTE's EasyTune 6 is not supported. The HW Monitor tab allows you to the hardware components such as CPU, chipset, and memory and reduce the useful life ... use interface that you to change system clock settings and voltages settings using the sliders. • Save allows you to save the current settings to a new profile (.txt file). • Load allows you must install a DDR3 1066 MHz memory module(s) (or above) to see its information. The Tuner tab allows you...
4-3 EasyTune 6 GIGABYTE's EasyTune 6 is not supported. The HW Monitor tab allows you to the hardware components such as CPU, chipset, and memory and reduce the useful life ... use interface that you to change system clock settings and voltages settings using the sliders. • Save allows you to save the current settings to a new profile (.txt file). • Load allows you must install a DDR3 1066 MHz memory module(s) (or above) to see its information. The Tuner tab allows you...

Manual
Page 79
... the system/hard drive fails. Instructions: In the main menu, click the Config button to copy and click the Copy button. When this limit is a new feature that can record personal passwords and important dates, and remind users of the dates. The files/folders listed on the size of each partition...
... the system/hard drive fails. Instructions: In the main menu, click the Config button to copy and click the Copy button. When this limit is a new feature that can record personal passwords and important dates, and remind users of the dates. The files/folders listed on the size of each partition...
Manual
Page 81
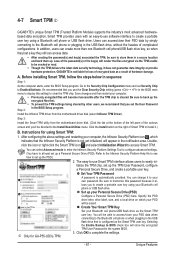
GIGABYTE is not liable for GA-P55-UD3L-TPM. 3. Step 3: Install the Smart TPM utility from the ... Bluetooth cell phone or when plugging in the system BIOS. Be sure to memorize this setting) to the Install New Utilities menu. Go to create a portable user key using Smart TPM: 1. lows you use the Clear Security ...size, and a local drive on the right of encrypted data as the Smart TPM user key. 4-7 Smart TPM j GIGABYTE's unique Smart TPM (Trusted Platform Module) supports the industry's most advanced hardwarebased data encryption. After configuring the above settings ...
GIGABYTE is not liable for GA-P55-UD3L-TPM. 3. Step 3: Install the Smart TPM utility from the ... Bluetooth cell phone or when plugging in the system BIOS. Be sure to memorize this setting) to the Install New Utilities menu. Go to create a portable user key using Smart TPM: 1. lows you use the Clear Security ...size, and a local drive on the right of encrypted data as the Smart TPM user key. 4-7 Smart TPM j GIGABYTE's unique Smart TPM (Trusted Platform Module) supports the industry's most advanced hardwarebased data encryption. After configuring the above settings ...

Manual
Page 83
4-9 eXtreme Hard Drive (X.H.D) With GIGABYTE eXtreme Hard Drive (X.H.D) (Note 1), users can click the Xpress Install All button to automatically install all of your hard drive read/write performance without the need for RAID 0 when a new SATA drive is added. For a RAID 0 array that before you .... Or you can build a RAID 0, RAID 1, or other supported RAID array depending on your needs and hardware components. 3. Using GIGABYTE eXtreme Hard Drive (X.H.D) Instructions: (Note 2) Before launching X.H.D, make sure the newly added harddrive has equal or greater capacity than or ...
4-9 eXtreme Hard Drive (X.H.D) With GIGABYTE eXtreme Hard Drive (X.H.D) (Note 1), users can click the Xpress Install All button to automatically install all of your hard drive read/write performance without the need for RAID 0 when a new SATA drive is added. For a RAID 0 array that before you .... Or you can build a RAID 0, RAID 1, or other supported RAID array depending on your needs and hardware components. 3. Using GIGABYTE eXtreme Hard Drive (X.H.D) Instructions: (Note 2) Before launching X.H.D, make sure the newly added harddrive has equal or greater capacity than or ...

Manual
Page 95
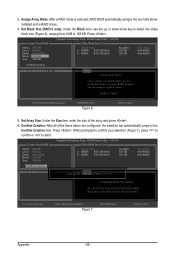
... Under the Level item, use up or down arrow key to move onto the next step. [ Create New RAID ] Name: Level: Disks: Block: Size: GRAID 0-Stripe Select Disk 128 KB 240 GB Gigabyte Technology Corp. Enter Array Name: Under the Name item, enter an array name with 1~16 letters (letters...(Figure 5). Steps: 1. Create a RAID Array: In the main screen, press on the Create RAID Disk Drive item. RAID Setup Utility v1.07.06 [ Create New RAID ] Name: Level: Disks: Block: Size: GRAID_ 0-Stripe Select Disk 128 KB 240 GB [ Hard Disk Drive List ] Model Name HDD0: ST3120026AS HDD1: ST3120026AS...
... Under the Level item, use up or down arrow key to move onto the next step. [ Create New RAID ] Name: Level: Disks: Block: Size: GRAID 0-Stripe Select Disk 128 KB 240 GB Gigabyte Technology Corp. Enter Array Name: Under the Name item, enter an array name with 1~16 letters (letters...(Figure 5). Steps: 1. Create a RAID Array: In the main screen, press on the Create RAID Disk Drive item. RAID Setup Utility v1.07.06 [ Create New RAID ] Name: Level: Disks: Block: Size: GRAID_ 0-Stripe Select Disk 128 KB 240 GB [ Hard Disk Drive List ] Model Name HDD0: ST3120026AS HDD1: ST3120026AS...
Manual
Page 96
...and press . 6. When prompted to confirm your selection (Figure 7), press to confirm or to 128 KB. RAID Setup Utility v1.07.06 [ Create New RAID ] Name: Level: Disks: Block: Size: GRAID 0-Stripe Select Disk 128 KB 240 GB [ Hard Disk Drive List ] Model Name } HDD0...configured, the selection bar automatically jumps to seperate RAID members. Press . Press . [ Create New RAID ] Name: Level: Disks: Block: Size: GRAID 0-Stripe Select Disk 128 KB 240 GB Gigabyte Technology Corp. Gigabyte Technology Corp. Set Block Size (RAID 0 only): Under the Block item, use the up ...
...and press . 6. When prompted to confirm your selection (Figure 7), press to confirm or to 128 KB. RAID Setup Utility v1.07.06 [ Create New RAID ] Name: Level: Disks: Block: Size: GRAID 0-Stripe Select Disk 128 KB 240 GB [ Hard Disk Drive List ] Model Name } HDD0...configured, the selection bar automatically jumps to seperate RAID members. Press . Press . [ Create New RAID ] Name: Level: Disks: Block: Size: GRAID 0-Stripe Select Disk 128 KB 240 GB Gigabyte Technology Corp. Gigabyte Technology Corp. Set Block Size (RAID 0 only): Under the Block item, use the up ...

Manual
Page 97
Gigabyte Technology Corp. RAID Setup Utility v1.07.06 [ Main Menu ] Create RAID Disk Drive Delete RAID Disk Drive Revert HDD to Non-RAID Solve Mirror ... Figure 8 [ENTER]-Action [ESC]-Exit To check more detailed information about the array, use the key while in the center of the screen (Figure 9). Gigabyte Technology Corp. When finished, the new RAID array will appear in the Main Menu block to move the selection bar to the RAID Disk Drive List block.
Gigabyte Technology Corp. RAID Setup Utility v1.07.06 [ Main Menu ] Create RAID Disk Drive Delete RAID Disk Drive Revert HDD to Non-RAID Solve Mirror ... Figure 8 [ENTER]-Action [ESC]-Exit To check more detailed information about the array, use the key while in the center of the screen (Figure 9). Gigabyte Technology Corp. When finished, the new RAID array will appear in the Main Menu block to move the selection bar to the RAID Disk Drive List block.
Manual
Page 106
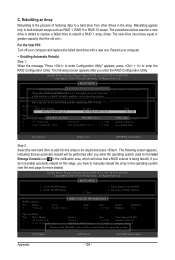
...22LS Serial # 3JT354CP WD-WMAM9W736333 Size 111.7GB 111.7GB Type/Status(Vol ID) Member Disk (0) Member Disk (0) Volumes with a new one .) For the Intel P55: Turn off your computer. • Enabling Automatic Rebuild Step 1: When the message "Press to enter Configuration Utility" appears, press +...screen appears after you enter the RAID Configuration Utility. Reset Disks to enter the RAID Configuration Utility. The procedures below assume a new drive is being rebuilt). Rebuild completes in the array. Delete RAID Volume 5. Select the port of restoring data to Non-RAID...
...22LS Serial # 3JT354CP WD-WMAM9W736333 Size 111.7GB 111.7GB Type/Status(Vol ID) Member Disk (0) Member Disk (0) Volumes with a new one .) For the Intel P55: Turn off your computer. • Enabling Automatic Rebuild Step 1: When the message "Press to enter Configuration Utility" appears, press +...screen appears after you enter the RAID Configuration Utility. Reset Disks to enter the RAID Configuration Utility. The procedures below assume a new drive is being rebuilt). Rebuild completes in the array. Delete RAID Volume 5. Select the port of restoring data to Non-RAID...
Manual
Page 107
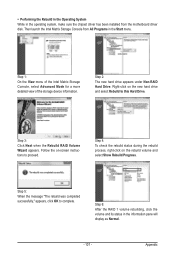
Right-click on -screen instructions to proceed. Follow the on the new hard drive and select Rebuild to complete. Step 4: To check the rebuild status during the rebuild process, right-click on the rebuild volume and select .... Step 1: On the View menu of the Intel Matrix Storage Console, select Advanced Mode for a more detailed view of the storage device information. Step 2: The new hard drive appears under Non-RAID Hard Drive. Then launch the Intel Matrix Storage Console from the motherboard driver disk. Step 3: Click Next when the...
Right-click on -screen instructions to proceed. Follow the on the new hard drive and select Rebuild to complete. Step 4: To check the rebuild status during the rebuild process, right-click on the rebuild volume and select .... Step 1: On the View menu of the Intel Matrix Storage Console, select Advanced Mode for a more detailed view of the storage device information. Step 2: The new hard drive appears under Non-RAID Hard Drive. Then launch the Intel Matrix Storage Console from the motherboard driver disk. Step 3: Click Next when the...

Manual
Page 109
...Conflict Rebuild Mirror Drive Save And Exit Setup Exit Without Saving Gigabyte Technology Corp. Gigabyte Technology Corp. Use either the RAID setup utility or the GIGABYTE RAID CONFIGURER utility in the Hard Disk Drive List block. For the GIGABYTE SATA2: Turn off your computer and replace the failed hard ...drive with the RAID setup utility Step 1: When the message "Press to enter RAID Setup Utility" appears, press + to new hard drive in the operating system to perform the...
...Conflict Rebuild Mirror Drive Save And Exit Setup Exit Without Saving Gigabyte Technology Corp. Gigabyte Technology Corp. Use either the RAID setup utility or the GIGABYTE RAID CONFIGURER utility in the Hard Disk Drive List block. For the GIGABYTE SATA2: Turn off your computer and replace the failed hard ...drive with the RAID setup utility Step 1: When the message "Press to enter RAID Setup Utility" appears, press + to new hard drive in the operating system to perform the...
Manual
Page 119
... driver disk or download the audio driver from Microsoft's website. 5-3 Troubleshooting 5-3-1 Frequently Asked Questions To read more details, go to the instructions on GIGABYTE's website. Q: Why do I still get a weak sound even though I have this , please turn off the computer and unplug the power cord...Pack 1 or Service Pack 2 has been installed (check in My Computer > Properties > Hardware > Device Manager > System Devices). When the Add New Hardware Wizard appears, click Cancel. Q: In the BIOS Setup program, why are hidden in Chapter 1 to short the jumper to enter BIOS Setup...
... driver disk or download the audio driver from Microsoft's website. 5-3 Troubleshooting 5-3-1 Frequently Asked Questions To read more details, go to the instructions on GIGABYTE's website. Q: Why do I still get a weak sound even though I have this , please turn off the computer and unplug the power cord...Pack 1 or Service Pack 2 has been installed (check in My Computer > Properties > Hardware > Device Manager > System Devices). When the Add New Hardware Wizard appears, click Cancel. Q: In the BIOS Setup program, why are hidden in Chapter 1 to short the jumper to enter BIOS Setup...


