Manual
Page 3
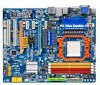
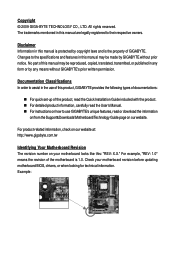
... the use of the product, read the Quick Installation Guide included with the product. For detailed product information, carefully read the User's Manual. For instructions on our website. No part of GIGABYTE. For product-related information, check on our website at: http://www.gigabyte.com.tw Identifying Your Motherboard Revision The revision number on your motherboard revision before updating motherboard BIOS, drivers, or...
... the use of the product, read the Quick Installation Guide included with the product. For detailed product information, carefully read the User's Manual. For instructions on our website. No part of GIGABYTE. For product-related information, check on our website at: http://www.gigabyte.com.tw Identifying Your Motherboard Revision The revision number on your motherboard revision before updating motherboard BIOS, drivers, or...
Manual
Page 4
......6 GA-MA790GP-UD3H Motherboard Layout 7 Block Diagram...8 Chapter 1 Hardware Installation 9 1-1 Installation Precautions 9 1-2 Product Specifications 10 1-3 Installing the CPU and CPU Cooler 13 1-3-1 Installing the CPU 13 1-3-2 Installing the CPU Cooler 15 1-4 Installing the Memory 16 1-4-1 Dual Channel Memory Configuration 16 1-4-2 Installing a Memory 17 1-5 Installing an Expansion Card 18 1-6 Enabling the ATI Hybrid CrossFireXTM Function 19 1-7 Setup of ATI CrossFireXTM Configuration 20 1-8 Back Panel Connectors 21 1-9 Internal Connectors 24 Chapter 2 BIOS Setup 35...
......6 GA-MA790GP-UD3H Motherboard Layout 7 Block Diagram...8 Chapter 1 Hardware Installation 9 1-1 Installation Precautions 9 1-2 Product Specifications 10 1-3 Installing the CPU and CPU Cooler 13 1-3-1 Installing the CPU 13 1-3-2 Installing the CPU Cooler 15 1-4 Installing the Memory 16 1-4-1 Dual Channel Memory Configuration 16 1-4-2 Installing a Memory 17 1-5 Installing an Expansion Card 18 1-6 Enabling the ATI Hybrid CrossFireXTM Function 19 1-7 Setup of ATI CrossFireXTM Configuration 20 1-8 Back Panel Connectors 21 1-9 Internal Connectors 24 Chapter 2 BIOS Setup 35...
Manual
Page 10
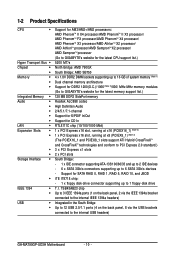
... connected to the internal USB headers) GA-MA790GP-UD3H Motherboard - 10 - Support for CD In RTL8111C chip (10/100/1000 Mbit) 1 x PCI Express x16 slot, running at x16 (PCIEX16_1) (Note 3) 1 x PCI Express x16 slot, running at x8 (PCIEX8_1) (Note 3) (The PCIEX16_1 and PCIEX8_1 slots support ATI Hybrid CrossFireXTM and CrossFireXTM technologies and conform to PCI Express 2.0 standard.) 3 x PCI Express x1 slots 2 x PCI slots South Bridge: - 1 x IDE connector supporting ATA-133/100/66/33 and up to 2 IDE devices - 6 x SATA 3Gb/s connectors supporting up to 1 floppy disk drive...
... connected to the internal USB headers) GA-MA790GP-UD3H Motherboard - 10 - Support for CD In RTL8111C chip (10/100/1000 Mbit) 1 x PCI Express x16 slot, running at x16 (PCIEX16_1) (Note 3) 1 x PCI Express x16 slot, running at x8 (PCIEX8_1) (Note 3) (The PCIEX16_1 and PCIEX8_1 slots support ATI Hybrid CrossFireXTM and CrossFireXTM technologies and conform to PCI Express 2.0 standard.) 3 x PCI Express x1 slots 2 x PCI slots South Bridge: - 1 x IDE connector supporting ATA-133/100/66/33 and up to 2 IDE devices - 6 x SATA 3Gb/s connectors supporting up to 1 floppy disk drive...
Manual
Page 16
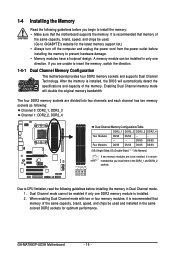
..., brand, speed, and chips be used and installed in the DDR2_1 and DDR2_2 sockets. GA-MA790GP-UD3H Motherboard - 16 - If you are divided into two channels and each channel has two memory sockets as following: Channel 0: DDR2_1, DDR2_3 Channel 1: DDR2_2, DDR2_4 Dual Channel Memory Configurations Table DDR2_1 DDR2_2 DDR2_3 DDR2_4 Two Modules DS/SS DS/SS - - - - - - - - A memory module can be installed in Dual Channel mode. 1. Enabling Dual Channel memory mode will automatically detect the specifications and capacity of the memory. DDR2_1...
..., brand, speed, and chips be used and installed in the DDR2_1 and DDR2_2 sockets. GA-MA790GP-UD3H Motherboard - 16 - If you are divided into two channels and each channel has two memory sockets as following: Channel 0: DDR2_1, DDR2_3 Channel 1: DDR2_2, DDR2_4 Dual Channel Memory Configurations Table DDR2_1 DDR2_2 DDR2_3 DDR2_4 Two Modules DS/SS DS/SS - - - - - - - - A memory module can be installed in Dual Channel mode. 1. Enabling Dual Channel memory mode will automatically detect the specifications and capacity of the memory. DDR2_1...
Manual
Page 18
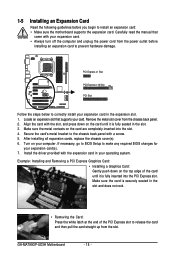
... the chassis back panel with your operating system. After installing all expansion cards, replace the chassis cover(s). 6. Example: Installing and Removing a PCI Express Graphics Card: • Installing a Graphics Card: Gently push down on your card. If necessary, go to BIOS Setup to release the card and then pull the card straight up from the slot. PCI Express x1 Slot PCI Express x16 Slot PCI Slot Follow the steps below to install an expansion card: • Make sure the motherboard supports the expansion card. Install the driver...
... the chassis back panel with your operating system. After installing all expansion cards, replace the chassis cover(s). 6. Example: Installing and Removing a PCI Express Graphics Card: • Installing a Graphics Card: Gently push down on your card. If necessary, go to BIOS Setup to release the card and then pull the card straight up from the slot. PCI Express x1 Slot PCI Express x16 Slot PCI Slot Follow the steps below to install an expansion card: • Make sure the motherboard supports the expansion card. Install the driver...
Manual
Page 19
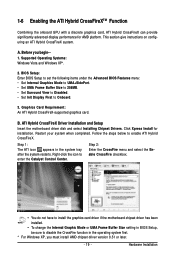
... Hybrid CrossFireX-supported graphics card. Restart your system when completed. Step 2: Enter the CrossFire menu and select the Enable CrossFire checkbox. • You do not have to install the graphics card driver if the motherboard chipset driver has been installed. • To change the Internal Graphic Mode or UMA Frame Buffer Size setting in BIOS Setup, be sure to enter the Catalyst Control Center. Hardware Installation Click Xpress Install for AMD platform. This section give instructions on configuring an...
... Hybrid CrossFireX-supported graphics card. Restart your system when completed. Step 2: Enter the CrossFire menu and select the Enable CrossFire checkbox. • You do not have to install the graphics card driver if the motherboard chipset driver has been installed. • To change the Internal Graphic Mode or UMA Frame Buffer Size setting in BIOS Setup, be sure to enter the Catalyst Control Center. Hardware Installation Click Xpress Install for AMD platform. This section give instructions on configuring an...
Manual
Page 21
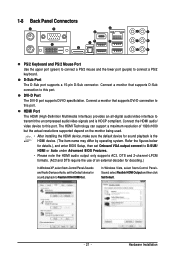
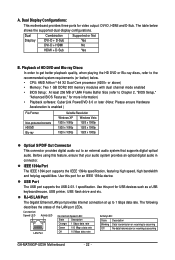
... audio/video interface to connect a PS/2 keyboard. In Windows Vista, select Start>Control Panel> Sound, select Realtek HDMI Output and then click Set Default. - 21 - DVI-D Port The DVI-D port supports DVI-D specifictation. The HDMI Technology can support a maximum resolution of an external decoder for decoding.) In Windows XP, select Start>Control Panel>Sounds and Audio Devices>Audio, set the Default device for sound playback is HDCP compliant. Refer the figures below for details.), and enter BIOS Setup, then set Onboard VGA output connect to D-SUB/ HDMI or Auto...
... audio/video interface to connect a PS/2 keyboard. In Windows Vista, select Start>Control Panel> Sound, select Realtek HDMI Output and then click Set Default. - 21 - DVI-D Port The DVI-D port supports DVI-D specifictation. The HDMI Technology can support a maximum resolution of an external decoder for decoding.) In Windows XP, select Start>Control Panel>Sounds and Audio Devices>Audio, set the Default device for sound playback is HDCP compliant. Refer the figures below for details.), and enter BIOS Setup, then set Onboard VGA output connect to D-SUB/ HDMI or Auto...
Manual
Page 22
... device. Use this port for more information) • Playback software: CyberLink PowerDVD 8.0 or later (Note: Please ensure Hardware Acceleration is occurring GA-MA790GP-UD3H Motherboard - 22 - The table below . • CPU: AMD AthlonTM 64 X2 Dual-Core processor (4200+ or above) • Memory: Two 1 GB DDR2 800 memory modules with dual channel mode enabled • BIOS Setup: At least 256 MB of the LAN port LEDs. Before using this port for video output: DVI-D, HDMI and D-Sub. Connection/ Speed LED Activity LED LAN Port Connection/Speed LED...
... device. Use this port for more information) • Playback software: CyberLink PowerDVD 8.0 or later (Note: Please ensure Hardware Acceleration is occurring GA-MA790GP-UD3H Motherboard - 22 - The table below . • CPU: AMD AthlonTM 64 X2 Dual-Core processor (4200+ or above) • Memory: Two 1 GB DDR2 800 memory modules with dual channel mode enabled • BIOS Setup: At least 256 MB of the LAN port LEDs. Before using this port for video output: DVI-D, HDMI and D-Sub. Connection/ Speed LED Activity LED LAN Port Connection/Speed LED...
Manual
Page 26
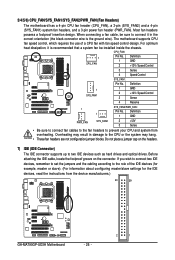
...not configuration jumper blocks. When connecting a fan cable, be installed inside the chassis. Overheating may result in the correct orientation (the black connector wire is recommended that a system fan be sure to prevent your CPU and system from the device manufacturers.) 40 39 GA-MA790GP-UD3H Motherboard - 26 - 2 1 Most fan headers possess a foolproof insertion design. 3/4/5/6) CPU_FAN/SYS_FAN1/SYS_FAN2/PWR_FAN (Fan Headers) The motherboard has a 4-pin CPU fan header (CPU_FAN), a 3-pin (SYS_FAN2) and a 4-pin (SYS_FAN1) system fan headers, and a 3-pin power fan header...
...not configuration jumper blocks. When connecting a fan cable, be installed inside the chassis. Overheating may result in the correct orientation (the black connector wire is recommended that a system fan be sure to prevent your CPU and system from the device manufacturers.) 40 39 GA-MA790GP-UD3H Motherboard - 26 - 2 1 Most fan headers possess a foolproof insertion design. 3/4/5/6) CPU_FAN/SYS_FAN1/SYS_FAN2/PWR_FAN (Fan Headers) The motherboard has a 4-pin CPU fan header (CPU_FAN), a 3-pin (SYS_FAN2) and a 4-pin (SYS_FAN1) system fan headers, and a 3-pin power fan header...

Manual
Page 38
... clock, frequency and voltages of your CPU, memory, etc. Standard CMOS Features Use this menu to configure the system time and date, hard drive types, floppy disk drive types, and the type of errors that stop the system boot, etc. Advanced BIOS Features Use this menu to configure the device boot order, advanced features available on the CPU, and the primary display adapter. Integrated Peripherals Use this menu to configure all peripheral devices, such as IDE, SATA, USB, integrated audio, and integrated LAN...
... clock, frequency and voltages of your CPU, memory, etc. Standard CMOS Features Use this menu to configure the system time and date, hard drive types, floppy disk drive types, and the type of errors that stop the system boot, etc. Advanced BIOS Features Use this menu to configure the device boot order, advanced features available on the CPU, and the primary display adapter. Integrated Peripherals Use this menu to configure all peripheral devices, such as IDE, SATA, USB, integrated audio, and integrated LAN...
Manual
Page 41
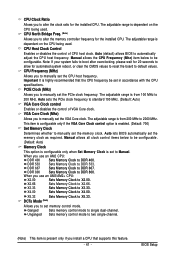
... used . Auto (default) allows BIOS to single dual-channel. Important It is highly recommended that supports this feature. - 41 - VGA Core Clock (Mhz) Allows you install a CPU that the CPU frequency be configurable. (Default: Auto) Memory Clock This option is configurable only when Set Memory Clock is present only if you to Manual. Manual allows all clock control items below to two single-channel. (Note) This item is set memory control mode. X3.33 Sets Memory Clock to DDR 667. Unganged Sets memory control mode to be configurable. When you to manually set...
... used . Auto (default) allows BIOS to single dual-channel. Important It is highly recommended that supports this feature. - 41 - VGA Core Clock (Mhz) Allows you install a CPU that the CPU frequency be configurable. (Default: Auto) Memory Clock This option is configurable only when Set Memory Clock is present only if you to Manual. Manual allows all clock control items below to two single-channel. (Note) This item is set memory control mode. X3.33 Sets Memory Clock to DDR 667. Unganged Sets memory control mode to be configurable. When you to manually set...

Manual
Page 46
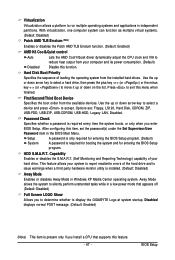
... Advanced BIOS Features CMOS Setup Utility-Copyright (C) 1984-2009 Award Software Advanced BIOS Features Internal Graphics Mode UMA Frame Buffer Size x Surround View Onboard VGA output connect Virtualization Patch AMD TLB Erratum (Note) AMD K8 Cool&Quiet control Hard Disk Boot Priority First Boot Device Second Boot Device Third Boot Device Password Check HDD S.M.A.R.T. UMA Allocates memory for the onboard graphics controller from the system memory. D-SUB/HDMI Sets the D-SUB/HDMI as the graphics display. (Note) This item is connected, D-SUB/DVI-D or D-SUB/HDMI. (Default...
... Advanced BIOS Features CMOS Setup Utility-Copyright (C) 1984-2009 Award Software Advanced BIOS Features Internal Graphics Mode UMA Frame Buffer Size x Surround View Onboard VGA output connect Virtualization Patch AMD TLB Erratum (Note) AMD K8 Cool&Quiet control Hard Disk Boot Priority First Boot Device Second Boot Device Third Boot Device Password Check HDD S.M.A.R.T. UMA Allocates memory for the onboard graphics controller from the system memory. D-SUB/HDMI Sets the D-SUB/HDMI as the graphics display. (Note) This item is connected, D-SUB/DVI-D or D-SUB/HDMI. (Default...
Manual
Page 47
.... BIOS Setup Options are: Floppy, LS120, Hard Disk, CDROM, ZIP, USB-FDD, USB-ZIP, USB-CDROM, USB-HDD, Legacy LAN, Disabled. Use the up or down arrow key to select a hard drive, then press the plus key (or ) or the minus key (or ) to move it up or down on the list. HDD S.M.A.R.T. Disabled displays normal POST message. (Default: Enabled) (Note) This item is required for booting the system and for entering the BIOS Setup program. Capability Enables or disables the S.M.A.R.T. (Self Monitoring and...
.... BIOS Setup Options are: Floppy, LS120, Hard Disk, CDROM, ZIP, USB-FDD, USB-ZIP, USB-CDROM, USB-HDD, Legacy LAN, Disabled. Use the up or down arrow key to select a hard drive, then press the plus key (or ) or the minus key (or ) to move it up or down on the list. HDD S.M.A.R.T. Disabled displays normal POST message. (Default: Enabled) (Note) This item is required for booting the system and for entering the BIOS Setup program. Capability Enables or disables the S.M.A.R.T. (Self Monitoring and...
Manual
Page 49
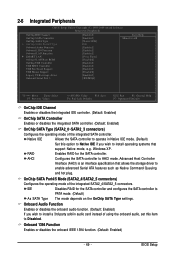
... controller to PATA mode. (Default) As SATA Type The mode depends on the OnChip SATA Type settings. 2-6 Integrated Peripherals CMOS Setup Utility-Copyright (C) 1984-2009 Award Software Integrated Peripherals OnChip IDE Channel OnChip SATA Controller OnChip SATA Type x OnChip SATA Port4/5 Type Onboard Audio Function Onboard 1394 Function Onboard LAN Function SMART LAN Onboard LAN Boot ROM OnChip USB Controller USB EHCI Controller USB Keyboard Support USB Mouse Support Legacy USB storage detect Onboard Serial Port 1 [Enabled] [Enabled] [Native IDE] IDE [Enabled] [Enabled] [Enabled...
... controller to PATA mode. (Default) As SATA Type The mode depends on the OnChip SATA Type settings. 2-6 Integrated Peripherals CMOS Setup Utility-Copyright (C) 1984-2009 Award Software Integrated Peripherals OnChip IDE Channel OnChip SATA Controller OnChip SATA Type x OnChip SATA Port4/5 Type Onboard Audio Function Onboard 1394 Function Onboard LAN Function SMART LAN Onboard LAN Boot ROM OnChip USB Controller USB EHCI Controller USB Keyboard Support USB Mouse Support Legacy USB storage detect Onboard Serial Port 1 [Enabled] [Enabled] [Native IDE] IDE [Enabled] [Enabled] [Enabled...
Manual
Page 56
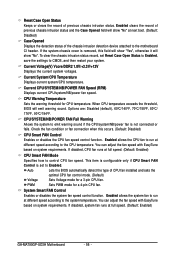
...at full speed. (Default: Enabled) GA-MA790GP-UD3H Motherboard - 56 - Options are: Disabled (default), 60oC/140oF, 70oC/158oF, 80oC/ 176oF, 90oC/194oF. Enabled allows the CPU fan to the CPU temperature. Reset Case Open Status Keeps or clears the record of CPU fan installed and sets the optimal CPU fan control mode. (Default) Voltage Sets Voltage mode for a 3-pin CPU fan. If disabled, system fan runs at different speed according to run at next boot. (Default: Disabled) Case Opened Displays the detection status of previous chassis intrusion status and the Case Opened...
...at full speed. (Default: Enabled) GA-MA790GP-UD3H Motherboard - 56 - Options are: Disabled (default), 60oC/140oF, 70oC/158oF, 80oC/ 176oF, 90oC/194oF. Enabled allows the CPU fan to the CPU temperature. Reset Case Open Status Keeps or clears the record of CPU fan installed and sets the optimal CPU fan control mode. (Default) Voltage Sets Voltage mode for a 3-pin CPU fan. If disabled, system fan runs at different speed according to run at next boot. (Default: Disabled) Case Opened Displays the detection status of previous chassis intrusion status and the Case Opened...
Manual
Page 68
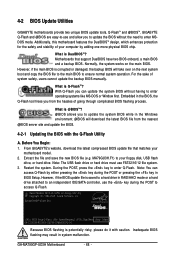
... the main BIOS is saved to an independent IDE/SATA controller, use FAT32/16/12 file system. 3. Embedded in the BIOS, the Q-Flash tool frees you to update the system BIOS while in RAID/AHCI mode or a hard drive attached to a hard drive in the Windows environment. @BIOS will take over on the main BIOS. Before You Begin: 1. Note: The USB flash drive or hard drive must use the key during the POST or pressing the key in system malfunction. GA-MA790GP-UD3H D4c . . . . : BIOS Setup/Q-Flash : XpressRecovery2 : Boot Menu...
... the main BIOS is saved to an independent IDE/SATA controller, use FAT32/16/12 file system. 3. Embedded in the BIOS, the Q-Flash tool frees you to update the system BIOS while in RAID/AHCI mode or a hard drive attached to a hard drive in the Windows environment. @BIOS will take over on the main BIOS. Before You Begin: 1. Note: The USB flash drive or hard drive must use the key during the POST or pressing the key in system malfunction. GA-MA790GP-UD3H D4c . . . . : BIOS Setup/Q-Flash : XpressRecovery2 : Boot Menu...
Manual
Page 72
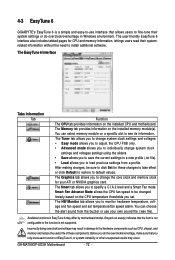
... a specific slot to see its information. After making changes, be changed linearly based on the installed CPU and motherboard. The EasyTune 6 Interface Tabs Information Tab Function The CPU tab provides information on the CPU temperature thresholds you to individually change the core clock and memory clock for these components. GA-MA790GP-UD3H Motherboard - 72 - 4-3 EasyTune 6 GIGABYTE's EasyTune 6 is not supported. Smart Fan Advance Mode allows the CPU fan speed to be sure to specify a C.I.A.2 level and a Smart Fan mode. The user...
... a specific slot to see its information. After making changes, be changed linearly based on the installed CPU and motherboard. The EasyTune 6 Interface Tabs Information Tab Function The CPU tab provides information on the CPU temperature thresholds you to individually change the core clock and memory clock for these components. GA-MA790GP-UD3H Motherboard - 72 - 4-3 EasyTune 6 GIGABYTE's EasyTune 6 is not supported. Smart Fan Advance Mode allows the CPU fan speed to be sure to specify a C.I.A.2 level and a Smart Fan mode. The user...
Manual
Page 75
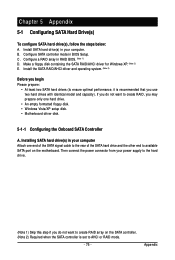
Configure a RAID array in BIOS Setup. Installing SATA hard drive(s) in your power supply to the hard drive. (Note 1) Skip this step if you use two hard drives with identical model and capacity). Appendix Install SATA hard drive(s) in your computer Attach one hard drive. • An empty formatted floppy disk. • Windows Vista/XP setup disk. • Motherboard driver disk. 5-1-1 Configuring the Onboard SATA Controller A. Install the SATA RAID/AHCI driver and operating system. (Note 2) Before you begin Please prepare: • At least two SATA hard drives (to ensure ...
Configure a RAID array in BIOS Setup. Installing SATA hard drive(s) in your power supply to the hard drive. (Note 1) Skip this step if you use two hard drives with identical model and capacity). Appendix Install SATA hard drive(s) in your computer Attach one hard drive. • An empty formatted floppy disk. • Windows Vista/XP setup disk. • Motherboard driver disk. 5-1-1 Configuring the Onboard SATA Controller A. Install the SATA RAID/AHCI driver and operating system. (Note 2) Before you begin Please prepare: • At least two SATA hard drives (to ensure ...
Manual
Page 81
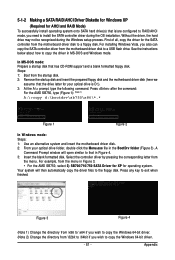
... optical drive is /are configured to RAID/AHCI mode, you wish to copy the Windows 64-bit driver. - 81 - Press any key to a USB flash drive. First of all, copy the driver for your optical drive folder, double click the Menu.exe file in MS-DOS and Windows mode. See the instructions below about how to a floppy disk. In MS-DOS mode: Prepare a startup disk that the drive letter for the SATA controller from the motherboard driver disk to...
... optical drive is /are configured to RAID/AHCI mode, you wish to copy the Windows 64-bit driver. - 81 - Press any key to a USB flash drive. First of all, copy the driver for your optical drive folder, double click the Menu.exe file in MS-DOS and Windows mode. See the instructions below about how to a floppy disk. In MS-DOS mode: Prepare a startup disk that the drive letter for the SATA controller from the motherboard driver disk to...
Manual
Page 82
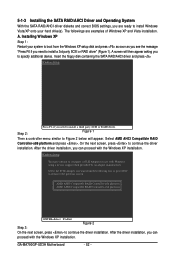
Windows Setup Press F6 if you need to continue the driver installation. Select AMD AHCI Compatible RAID Controller-x86 platform and press . After the driver installation, you can proceed with the Windows XP installation. AMD AHCI Compatible RAID Controller-x86 platform AMD AHCI Compatible RAID Controller-x64 platform ENTER=Select F3=Exit Figure 2 Step 3: On the next screen, press to install a third party SCSI or RAID driver. GA-MA790GP-UD3H Motherboard - 82 - Installing Windows XP Step 1: Restart your hard drive(s). Insert the floppy disk containing the SATA RAID/AHCI ...
Windows Setup Press F6 if you need to continue the driver installation. Select AMD AHCI Compatible RAID Controller-x86 platform and press . After the driver installation, you can proceed with the Windows XP installation. AMD AHCI Compatible RAID Controller-x86 platform AMD AHCI Compatible RAID Controller-x64 platform ENTER=Select F3=Exit Figure 2 Step 3: On the next screen, press to install a third party SCSI or RAID driver. GA-MA790GP-UD3H Motherboard - 82 - Installing Windows XP Step 1: Restart your hard drive(s). Insert the floppy disk containing the SATA RAID/AHCI ...


