
Manual
Page 3
..., carefully read or download the information on/from the Support&Downloads\Motherboard\Technology Guide page on how to the specifications and features in the use GIGABYTE's unique features, read the User's Manual. Documentation Classifications In order to their respective owners. For instructions on our website. Changes to use of this product, GIGABYTE provides the following types of documentations: For quick set-up of this manual may be reproduced...
..., carefully read or download the information on/from the Support&Downloads\Motherboard\Technology Guide page on how to the specifications and features in the use GIGABYTE's unique features, read the User's Manual. Documentation Classifications In order to their respective owners. For instructions on our website. Changes to use of this product, GIGABYTE provides the following types of documentations: For quick set-up of this manual may be reproduced...

Manual
Page 4
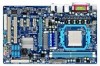
... Box Contents...6 Optional Items...6 GA-MA770-ES3 Motherboard Layout 7 GA-MA770-ES3 Motherboard Block Diagram 8 Chapter 1 Hardware Installation 9 1-1 Installation Precautions 9 1-2 Product Specifications 10 1-3 Installing the CPU and CPU Cooler 13 1-3-1 Installing the CPU 13 1-3-2 Installing the CPU Cooler 15 1-4 Installing the Memory 16 1-4-1 Dual Channel Memory Configuration 16 1-4-2 Installing a Memory 17 1-5 Installing an Expansion Card 18 1-6 Back Panel Connectors 19 1-7 Internal Connectors 21 Chapter 2 BIOS Setup 31 2-1 Startup Screen 32 2-2 The Main Menu 33 2-3 MB...
... Box Contents...6 Optional Items...6 GA-MA770-ES3 Motherboard Layout 7 GA-MA770-ES3 Motherboard Block Diagram 8 Chapter 1 Hardware Installation 9 1-1 Installation Precautions 9 1-2 Product Specifications 10 1-3 Installing the CPU and CPU Cooler 13 1-3-1 Installing the CPU 13 1-3-2 Installing the CPU Cooler 15 1-4 Installing the Memory 16 1-4-1 Dual Channel Memory Configuration 16 1-4-2 Installing a Memory 17 1-5 Installing an Expansion Card 18 1-6 Back Panel Connectors 19 1-7 Internal Connectors 21 Chapter 2 BIOS Setup 31 2-1 Startup Screen 32 2-2 The Main Menu 33 2-3 MB...

Manual
Page 8
GA-MA770-ES3 Motherboard Block Diagram CPU CLK+/- (200 MHz) PCIe CLK (100 MHz) AM3/AM2+/AM2 CPU DDR2 1200(O.C.)/1066(Note)/800 MHz Dual Channel Memory 1 PCI Express x16 Hyper Transport 3.0 PCI Express x16 PCI Express Bus PCIe CLK (100 MHz) x1 x1 x1 x1 4 PCI Express x1 RTL8111D RJ45 LAN PCI Bus Dual BIOS AMD 770 12 USB Ports AMD SB710 ATA-133/100/66/33 IDE Channel 6 SATA 3Gb/s CODEC LPC Bus IT8720 Floppy LPT Port COM Port PS/2 KB or Mouse MIC (Center/Subwoofer...
GA-MA770-ES3 Motherboard Block Diagram CPU CLK+/- (200 MHz) PCIe CLK (100 MHz) AM3/AM2+/AM2 CPU DDR2 1200(O.C.)/1066(Note)/800 MHz Dual Channel Memory 1 PCI Express x16 Hyper Transport 3.0 PCI Express x16 PCI Express Bus PCIe CLK (100 MHz) x1 x1 x1 x1 4 PCI Express x1 RTL8111D RJ45 LAN PCI Bus Dual BIOS AMD 770 12 USB Ports AMD SB710 ATA-133/100/66/33 IDE Channel 6 SATA 3Gb/s CODEC LPC Bus IT8720 Floppy LPT Port COM Port PS/2 KB or Mouse MIC (Center/Subwoofer...
Manual
Page 10
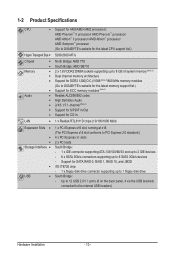
...x PCI slots Storage Interface South Bridge: - 1 x IDE connector supporting ATA-133/100/66/33 and up to 2 IDE devices - 6 x SATA 3Gb/s connectors supporting up to the internal USB headers) Hardware Installation - 10 - 1-2 Product Specifications CPU Support for AM3/AM2+/AM2 processors: AMD Phenom™ II processor/ AMD Phenom™ processor/ AMD Athlon™ II processor/ AMD Athlon™ processor/ AMD Sempron™ processor (Go to GIGABYTE's website for the latest CPU support list.) Hyper Transport Bus 5200/2000 MT/s Chipset Memory Audio...
...x PCI slots Storage Interface South Bridge: - 1 x IDE connector supporting ATA-133/100/66/33 and up to 2 IDE devices - 6 x SATA 3Gb/s connectors supporting up to the internal USB headers) Hardware Installation - 10 - 1-2 Product Specifications CPU Support for AM3/AM2+/AM2 processors: AMD Phenom™ II processor/ AMD Phenom™ processor/ AMD Athlon™ II processor/ AMD Athlon™ processor/ AMD Sempron™ processor (Go to GIGABYTE's website for the latest CPU support list.) Hyper Transport Bus 5200/2000 MT/s Chipset Memory Audio...

Manual
Page 18
... BIOS changes for your computer. Make sure the metal contacts on the slot and then lift the card straight out from the slot. If necessary, go to BIOS Setup to the chassis back panel with the slot, and press down on your expansion card(s). 7. Carefully read the manual that supports your expansion card in the slot. 3. Make sure the card is fully inserted into the slot. 4. PCI Express x1 Slot PCI Express...
... BIOS changes for your computer. Make sure the metal contacts on the slot and then lift the card straight out from the slot. If necessary, go to BIOS Setup to the chassis back panel with the slot, and press down on your expansion card(s). 7. Carefully read the manual that supports your expansion card in the slot. 3. Make sure the card is fully inserted into the slot. 4. PCI Express x1 Slot PCI Express...

Manual
Page 32
... GA-MA770-ES3 D2 . . . . : BIOS Setup : XpressRecovery2 : Boot Menu : Qflash 10/20/2009-RX780-SB710-7A66AG0PC-00 Function Keys Function Keys: : POST SCREEN Press the key to show the BIOS POST screen at system startup, refer to access the Q-Flash utility directly without entering BIOS Setup. BIOS Setup - 32 - In Boot Menu, use the up hard drive data using the driver disk, the key can access Boot Menu again to change the first boot device setting as needed. : Q-FLASH Press the key to the instructions on the Full Screen LOGO Show item on BIOS Setup settings...
... GA-MA770-ES3 D2 . . . . : BIOS Setup : XpressRecovery2 : Boot Menu : Qflash 10/20/2009-RX780-SB710-7A66AG0PC-00 Function Keys Function Keys: : POST SCREEN Press the key to show the BIOS POST screen at system startup, refer to access the Q-Flash utility directly without entering BIOS Setup. BIOS Setup - 32 - In Boot Menu, use the up hard drive data using the driver disk, the key can access Boot Menu again to change the first boot device setting as needed. : Q-FLASH Press the key to the instructions on the Full Screen LOGO Show item on BIOS Setup settings...

Manual
Page 34
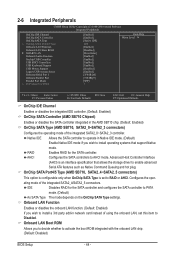
... CPU, memory, etc. Standard CMOS Features Use this menu to configure the system time and date, hard drive types, floppy disk drive types, and the type of errors that stop the system boot, etc. Advanced BIOS Features Use this menu to configure the device boot order, advanced features available on the CPU, and the primary display adapter. Integrated Peripherals Use this menu to configure all peripheral devices, such as IDE, SATA, USB, integrated audio, and integrated LAN, etc. Power Management Setup Use...
... CPU, memory, etc. Standard CMOS Features Use this menu to configure the system time and date, hard drive types, floppy disk drive types, and the type of errors that stop the system boot, etc. Advanced BIOS Features Use this menu to configure the device boot order, advanced features available on the CPU, and the primary display adapter. Integrated Peripherals Use this menu to configure all peripheral devices, such as IDE, SATA, USB, integrated audio, and integrated LAN, etc. Power Management Setup Use...
Manual
Page 36
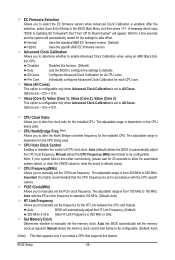
... the CPU being used . Auto (default) allows the BIOS to alter the North Bridge controller frequency for automated system reboot, or clear the CMOS values to reset the board to 200 MHz~2 GHz. Normal Uses the standard AMD EC firmware version. (Default) Hybrid Uses the specific AMD EC firmware version. All Cores Configures Advanced Clock Calibration for each CPU core. The adjustable range is set the CPU host frequency. CPU NorthBridge Freq. (Note) Allows you to manually set to 150 MHz. CPU Frequency(MHz...
... the CPU being used . Auto (default) allows the BIOS to alter the North Bridge controller frequency for automated system reboot, or clear the CMOS values to reset the board to 200 MHz~2 GHz. Normal Uses the standard AMD EC firmware version. (Default) Hybrid Uses the specific AMD EC firmware version. All Cores Configures Advanced Clock Calibration for each CPU core. The adjustable range is set the CPU host frequency. CPU NorthBridge Freq. (Note) Allows you to manually set to 150 MHz. CPU Frequency(MHz...
Manual
Page 42
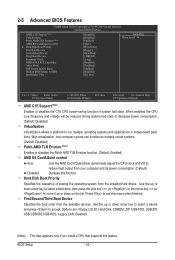
... and its power consumption. (Default) Disabled Disables this feature. Options are: Floppy, LS120, Hard Disk, CDROM, ZIP, USB-FDD, USB-ZIP, USB-CDROM, USB-HDD, Legacy LAN, Disabled. (Note) This item appears only if you install a CPU that supports this function. 2-5 Advanced BIOS Features CMOS Setup Utility-Copyright (C) 1984-2009 Award Software Advanced BIOS Features AMD C1E Support (Note) Virtualization Patch AMD TLB Erratum (Note) AMD K8 Cool&Quiet control } Hard Disk Boot Priority First Boot Device Second Boot Device Third Boot Device Password Check HDD...
... and its power consumption. (Default) Disabled Disables this feature. Options are: Floppy, LS120, Hard Disk, CDROM, ZIP, USB-FDD, USB-ZIP, USB-CDROM, USB-HDD, Legacy LAN, Disabled. (Note) This item appears only if you install a CPU that supports this function. 2-5 Advanced BIOS Features CMOS Setup Utility-Copyright (C) 1984-2009 Award Software Advanced BIOS Features AMD C1E Support (Note) Virtualization Patch AMD TLB Erratum (Note) AMD K8 Cool&Quiet control } Hard Disk Boot Priority First Boot Device Second Boot Device Third Boot Device Password Check HDD...
Manual
Page 43
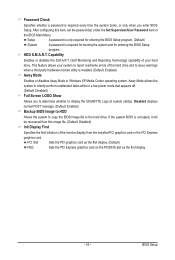
... your hard drive. HDD S.M.A.R.T. Capability Enables or disables the S.M.A.R.T. (Self Monitoring and Reporting Technology) capability of your system to report read/write errors of the monitor display from this item, set the password(s) under the Set Supervisor/User Password item in a low-power mode that appears off. (Default: Disabled) Full Screen LOGO Show Allows you enter BIOS Setup. If the system BIOS is installed. (Default: Enabled) Away Mode Enables or disables Away Mode in Windows XP Media Center operating system. Disabled displays normal POST message. (Default: Enabled...
... your hard drive. HDD S.M.A.R.T. Capability Enables or disables the S.M.A.R.T. (Self Monitoring and Reporting Technology) capability of your system to report read/write errors of the monitor display from this item, set the password(s) under the Set Supervisor/User Password item in a low-power mode that appears off. (Default: Disabled) Full Screen LOGO Show Allows you enter BIOS Setup. If the system BIOS is installed. (Default: Enabled) Away Mode Enables or disables Away Mode in Windows XP Media Center operating system. Disabled displays normal POST message. (Default: Enabled...
Manual
Page 44
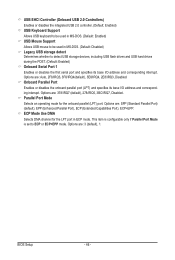
...Setup Utility-Copyright (C) 1984-2009 Award Software Integrated Peripherals OnChip IDE Channel OnChip SATA Controller OnChip SATA Type x OnChip SATA Port4/5 Type Onboard LAN Function Onboard LAN Boot ROM } SMART LAN Onboard Audio Function Onchip USB Controller USB EHCI Controllers USB Keyboard Support USB Mouse Support Legacy USB storage detect Onboard Serial Port 1 Onboard Parallel Port Parallel Port Mode x ECP Mode Use DMA [Enabled] [Enabled] [Native IDE] IDE [Enabled] [Disabled] [Press Enter] [Enabled] [Enabled] [Enabled] [Enabled] [Disabled...
...Setup Utility-Copyright (C) 1984-2009 Award Software Integrated Peripherals OnChip IDE Channel OnChip SATA Controller OnChip SATA Type x OnChip SATA Port4/5 Type Onboard LAN Function Onboard LAN Boot ROM } SMART LAN Onboard Audio Function Onchip USB Controller USB EHCI Controllers USB Keyboard Support USB Mouse Support Legacy USB storage detect Onboard Serial Port 1 Onboard Parallel Port Parallel Port Mode x ECP Mode Use DMA [Enabled] [Enabled] [Native IDE] IDE [Enabled] [Disabled] [Press Enter] [Enabled] [Enabled] [Enabled] [Enabled] [Disabled...
Manual
Page 45
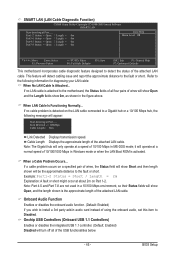
... report the approximate distance to Disabled. SMART LAN (LAN Cable Diagnostic Function) CMOS Setup Utility-Copyright (C) 1984-2009 Award Software SMART LAN Start detecting at Port..... Cable Length Displays the approximate length of using the onboard audio, set this item to the fault or short. BIOS Setup Onboard Audio Function Enables or disables the onboard audio function. (Default: Enabled) If you wish to detect the status of wires will appear: Start detecting at Port..... If no LAN cable is detected on Part 1-2. Part1-2 Status = Open / Length = 0m...
... report the approximate distance to Disabled. SMART LAN (LAN Cable Diagnostic Function) CMOS Setup Utility-Copyright (C) 1984-2009 Award Software SMART LAN Start detecting at Port..... Cable Length Displays the approximate length of using the onboard audio, set this item to the fault or short. BIOS Setup Onboard Audio Function Enables or disables the onboard audio function. (Default: Enabled) If you wish to detect the status of wires will appear: Start detecting at Port..... If no LAN cable is detected on Part 1-2. Part1-2 Status = Open / Length = 0m...
Manual
Page 46
...default), 278/IRQ5, 3BC/IRQ7, Disabled. Onboard Parallel Port Enables or disables the onboard parallel port (LPT) and specifies its base I /O address and corresponding interrupt. BIOS Setup - 46 - This item is configurable only if Parallel Port Mode is set to detect USB storage devices, including USB flash drives and USB hard drives during the POST. (Default: Enabled) Onboard Serial Port 1 Enables or disables the first serial port and specifies its base I /O address and corresponding interrupt. ECP Mode Use DMA Selects DMA channel for the onboard parallel (LPT) port. Options...
...default), 278/IRQ5, 3BC/IRQ7, Disabled. Onboard Parallel Port Enables or disables the onboard parallel port (LPT) and specifies its base I /O address and corresponding interrupt. BIOS Setup - 46 - This item is configurable only if Parallel Port Mode is set to detect USB storage devices, including USB flash drives and USB hard drives during the POST. (Default: Enabled) Onboard Serial Port 1 Enables or disables the first serial port and specifies its base I /O address and corresponding interrupt. ECP Mode Use DMA Selects DMA channel for the onboard parallel (LPT) port. Options...

Manual
Page 47
... Setup CMOS Setup Utility-Copyright (C) 1984-2009 Award Software Power Management Setup ACPI Suspend Type Soft-Off by Power button USB Wake Up from a modem that supports wake-up function. (Default: Disabled) PME Event Wake Up Allows the system to be turned off instantly. (Default) Delay 4 Sec. Instant-Off Press the power button and then the system will enter suspend mode. BIOS Setup S3(STR) Enables the system to enter the ACPI S3 (Suspend to turn off . Press and hold the power button...
... Setup CMOS Setup Utility-Copyright (C) 1984-2009 Award Software Power Management Setup ACPI Suspend Type Soft-Off by Power button USB Wake Up from a modem that supports wake-up function. (Default: Disabled) PME Event Wake Up Allows the system to be turned off instantly. (Default) Delay 4 Sec. Instant-Off Press the power button and then the system will enter suspend mode. BIOS Setup S3(STR) Enables the system to enter the ACPI S3 (Suspend to turn off . Press and hold the power button...

Manual
Page 50
... a 3-pin CPU fan. Enabled allows the CPU fan to run at different speed according to the CPU temperature. Auto Lets the BIOS automatically detect the type of CPU fan installed and sets the optimal CPU fan control mode. (Default) Voltage Sets Voltage mode for CPU temperature. This item is configurable only if CPU Smart FAN Control is set to emit warning sound if the CPU/system/power fan is not connected or fails. If disabled, system fan runs at full speed. (Default: Enabled) CPU Smart FAN Mode Specifies how to the system temperature. Options are: Disabled (default), 60oC...
... a 3-pin CPU fan. Enabled allows the CPU fan to run at different speed according to the CPU temperature. Auto Lets the BIOS automatically detect the type of CPU fan installed and sets the optimal CPU fan control mode. (Default) Voltage Sets Voltage mode for CPU temperature. This item is configurable only if CPU Smart FAN Control is set to emit warning sound if the CPU/system/power fan is not connected or fails. If disabled, system fan runs at full speed. (Default: Enabled) CPU Smart FAN Mode Specifies how to the system temperature. Options are: Disabled (default), 60oC...
Manual
Page 66
... Advanced mode. Smart Fan Advance Mode allows the CPU fan speed to be changed linearly based on the installed CPU and motherboard. Before you do overclock/overvoltage in EasyTune 6 may differ by motherboard model. The Memory tab provides information on the CPU being used. The Tuner tab allows you to change system clock settings and voltages Easy mode allows you to adjust the CPU FSB only. • Advanced mode allows you to load previous settings from...
... Advanced mode. Smart Fan Advance Mode allows the CPU fan speed to be changed linearly based on the installed CPU and motherboard. Before you do overclock/overvoltage in EasyTune 6 may differ by motherboard model. The Memory tab provides information on the CPU being used. The Tuner tab allows you to change system clock settings and voltages Easy mode allows you to adjust the CPU FSB only. • Advanced mode allows you to load previous settings from...
Manual
Page 71
... the SATA RAID/AHCI driver for Windows XP. (Note 2) E. Then connect the power connector from your power supply to the hard drive. (Note 1) Skip this step if you begin Please prepare: • At least two SATA hard drives (to ensure optimal performance, it is set to create RAID array on the motherboard. C. Installing SATA hard drive(s) in your computer Attach one hard drive. • An empty formatted floppy disk. • Windows Vista/XP setup disk. • Motherboard driver disk. 5-1-1 Configuring the Onboard SATA Controller A. Configure SATA controller mode in RAID BIOS. (Note...
... the SATA RAID/AHCI driver for Windows XP. (Note 2) E. Then connect the power connector from your power supply to the hard drive. (Note 1) Skip this step if you begin Please prepare: • At least two SATA hard drives (to ensure optimal performance, it is set to create RAID array on the motherboard. C. Installing SATA hard drive(s) in your computer Attach one hard drive. • An empty formatted floppy disk. • Windows Vista/XP setup disk. • Motherboard driver disk. 5-1-1 Configuring the Onboard SATA Controller A. Configure SATA controller mode in RAID BIOS. (Note...
Manual
Page 77
... a floppy disk. See the instructions below about how to a USB flash drive. First of all, copy the driver for your optical drive is D:\). 3: At the A:\> prompt, type the following table for the SATA driver directories for AHCI and RAID Mode) To successfully install operating system onto SATA hard drive(s) that is/are configured to RAID/AHCI mode, you also can copy the SATA controller driver from the motherboard driver disk to copy the driver in MS-DOS and Windows mode. In...
... a floppy disk. See the instructions below about how to a USB flash drive. First of all, copy the driver for your optical drive is D:\). 3: At the A:\> prompt, type the following table for the SATA driver directories for AHCI and RAID Mode) To successfully install operating system onto SATA hard drive(s) that is/are configured to RAID/AHCI mode, you also can copy the SATA controller driver from the motherboard driver disk to copy the driver in MS-DOS and Windows mode. In...

Manual
Page 79
Installing Windows XP Step 1: Restart your hard drive(s). Select AMD AHCI Compatible RAID Controller-x86 platform and press . Select the SCSI Adapter you need to the previous screen. Then a controller menu similar to configure a SCSI Adapter for use with the Windows XP installation. - 79 - ceed with Windows, using a device support disk provided by an adapter manufacturer. The followings are ready to install Windows Vista/ XP onto your system to boot from the Windows XP setup disk and press...
Installing Windows XP Step 1: Restart your hard drive(s). Select AMD AHCI Compatible RAID Controller-x86 platform and press . Select the SCSI Adapter you need to the previous screen. Then a controller menu similar to configure a SCSI Adapter for use with the Windows XP installation. - 79 - ceed with Windows, using a device support disk provided by an adapter manufacturer. The followings are ready to install Windows Vista/ XP onto your system to boot from the Windows XP setup disk and press...

Manual
Page 91
... boots successfully 1 long, 3 short: Keyboard error 2 short: CMOS setting error 1 long, 9 short: BIOS ROM error 1 long, 1 short: Memory or motherboard error Continuous long beeps: Graphics card not inserted properly 1 long, 2 short: Monitor or graphics card error Continuous short beeps: Power error - 91 - Step 2: Check if Audio Device on the motherboard battery in My Computer > Properties > Hardware > Device Manager > System Devices). For more FAQs for your board doesn't have turned my speaker to the maximum volume? A: Some advanced options are some BIOS options...
... boots successfully 1 long, 3 short: Keyboard error 2 short: CMOS setting error 1 long, 9 short: BIOS ROM error 1 long, 1 short: Memory or motherboard error Continuous long beeps: Graphics card not inserted properly 1 long, 2 short: Monitor or graphics card error Continuous short beeps: Power error - 91 - Step 2: Check if Audio Device on the motherboard battery in My Computer > Properties > Hardware > Device Manager > System Devices). For more FAQs for your board doesn't have turned my speaker to the maximum volume? A: Some advanced options are some BIOS options...


