Manual
Page 3
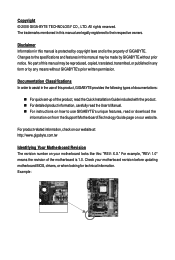
...use of this manual may be made by copyright laws and is the property of the motherboard is protected by GIGABYTE without GIGABYTE's prior written permission. Changes to their respective owners. Check your motherboard looks like this manual are legally registered ...to the specifications and features in the use GIGABYTE's unique features, read or download the information on/from the Support\Motherboard\Technology Guide page on your motherboard revision before updating motherboard BIOS, drivers, or when looking for technical information. Example: The...
...use of this manual may be made by copyright laws and is the property of the motherboard is protected by GIGABYTE without GIGABYTE's prior written permission. Changes to their respective owners. Check your motherboard looks like this manual are legally registered ...to the specifications and features in the use GIGABYTE's unique features, read or download the information on/from the Support\Motherboard\Technology Guide page on your motherboard revision before updating motherboard BIOS, drivers, or when looking for technical information. Example: The...

Manual
Page 5
... 53 3-1 Installing Chipset Drivers 53 3-2 Application Software 54 3-3 Technical Manuals 54 3-4 Contact ...55 3-5 System ...55 3-6 Download Center 56 Chapter 4 Unique Features 57 4-1 Xpress Recovery2 57 4-2 ... ...65 Chapter 5 Appendix ...67 5-1 Configuring SATA Hard Drive(s 67 5-1-1 Configuring the Onboard SATA Controller 67 5-1-2 Making a SATA RAID Driver Diskette for Windows XP 72 5-1-3 Installing the SATA RAID Driver and Operating System 73 5-2 Configuring Audio Input and Output 75 5-2-1 Configuring 2/4/5.1/7.1-Channel Audio 75 5-2-2 Configuring S/PDIF In/Out 77 5-2-3 Configuring...
... 53 3-1 Installing Chipset Drivers 53 3-2 Application Software 54 3-3 Technical Manuals 54 3-4 Contact ...55 3-5 System ...55 3-6 Download Center 56 Chapter 4 Unique Features 57 4-1 Xpress Recovery2 57 4-2 ... ...65 Chapter 5 Appendix ...67 5-1 Configuring SATA Hard Drive(s 67 5-1-1 Configuring the Onboard SATA Controller 67 5-1-2 Making a SATA RAID Driver Diskette for Windows XP 72 5-1-3 Installing the SATA RAID Driver and Operating System 73 5-2 Configuring Audio Input and Output 75 5-2-1 Configuring 2/4/5.1/7.1-Channel Audio 75 5-2-2 Configuring S/PDIF In/Out 77 5-2-3 Configuring...
Manual
Page 6
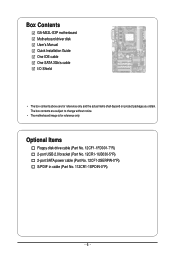
Box Contents GA-M52L-S3P motherboard Motherboard driver disk User's Manual Quick Installation Guide One IDE cable One SATA 3Gb/s cable I/O Shield • The box contents above are subject to change without notice. &#...
Box Contents GA-M52L-S3P motherboard Motherboard driver disk User's Manual Quick Installation Guide One IDE cable One SATA 3Gb/s cable I/O Shield • The box contents above are subject to change without notice. &#...

Manual
Page 17
.... PCI Express x1 slot PCI Express x16 slot PCI slot Follow the steps below to make any required BIOS changes for your computer. Install the driver provided with a screw. 5. Make sure the metal contacts on the top edge of the card until it is fully inserted into the slot. 4. After installing...
.... PCI Express x1 slot PCI Express x16 slot PCI slot Follow the steps below to make any required BIOS changes for your computer. Install the driver provided with a screw. 5. Make sure the metal contacts on the top edge of the card until it is fully inserted into the slot. 4. After installing...
Manual
Page 32
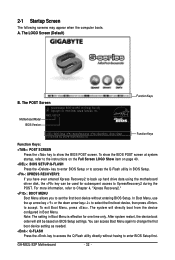
... using the motherboard driver disk, the key can access Boot Menu again to change the first boot device setting as needed. : Q-FLASH Press the key to XpressRecovery2 during the POST. The system will still be used for one time only. A. Note: The setting in Boot Menu. GA-M52L-S3P Motherboard - 32 - M52L-S3P E7 . . . . : BIOS Setup...
... using the motherboard driver disk, the key can access Boot Menu again to change the first boot device setting as needed. : Q-FLASH Press the key to XpressRecovery2 during the POST. The system will still be used for one time only. A. Note: The setting in Boot Menu. GA-M52L-S3P Motherboard - 32 - M52L-S3P E7 . . . . : BIOS Setup...
Manual
Page 39
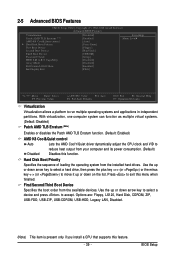
... TLB Erratum (Note) Enables or disables the Patch AMD TLB Erratum function. (Default: Enabled) AMD K8 Cool&Quiet control Auto Lets the AMD Cool'n'Quiet driver dynamically adjust the CPU clock and VID to reduce heat output from the installed hard drives. Hard Disk Boot Priority Specifies the sequence of loading...
... TLB Erratum (Note) Enables or disables the Patch AMD TLB Erratum function. (Default: Enabled) AMD K8 Cool&Quiet control Auto Lets the AMD Cool'n'Quiet driver dynamically adjust the CPU clock and VID to reduce heat output from the installed hard drives. Hard Disk Boot Priority Specifies the sequence of loading...

Manual
Page 53
... mark (by right-clicking your system automatically during the driver installation. You can install other drivers. • After the drivers are recommended to do so may affect the driver installation. • Some device drivers will restart your mouse and select Uninstall) and restart the... My Computer, double-click the optical drive and execute the Run.exe program.) 3-1 Installing Chipset Drivers After inserting the driver disk, "Xpress Install" will install all the drivers that are installed, follow the onscreen instructions to install. • Please ignore the popup dialog...
... mark (by right-clicking your system automatically during the driver installation. You can install other drivers. • After the drivers are recommended to do so may affect the driver installation. • Some device drivers will restart your mouse and select Uninstall) and restart the... My Computer, double-click the optical drive and execute the Run.exe program.) 3-1 Installing Chipset Drivers After inserting the driver disk, "Xpress Install" will install all the drivers that are installed, follow the onscreen instructions to install. • Please ignore the popup dialog...
Manual
Page 54
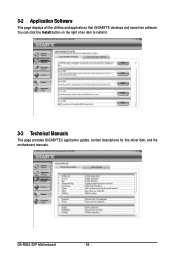
3-2 Application Software This page displays all the utilities and applications that GIGABYTE develops and some free software. You can click the Install button on the right of an item to install it. 3-3 Technical Manuals This page provides GIGABYTE's application guides, content descriptions for this driver disk, and the motherboard manuals. GA-M52L-S3P Motherboard - 54 -
3-2 Application Software This page displays all the utilities and applications that GIGABYTE develops and some free software. You can click the Install button on the right of an item to install it. 3-3 Technical Manuals This page provides GIGABYTE's application guides, content descriptions for this driver disk, and the motherboard manuals. GA-M52L-S3P Motherboard - 54 -
Manual
Page 55
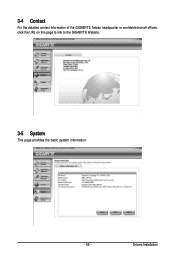
3-4 Contact For the detailed contact information of the GIGABYTE Taiwan headquarter or worldwide branch offices, click the URL on this page to link to the GIGABYTE Website. 3-5 System This page provides the basic system information. - 55 - Drivers Installation
3-4 Contact For the detailed contact information of the GIGABYTE Taiwan headquarter or worldwide branch offices, click the URL on this page to link to the GIGABYTE Website. 3-5 System This page provides the basic system information. - 55 - Drivers Installation
Manual
Page 56
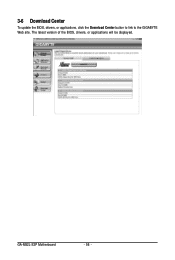
The latest version of the BIOS, drivers, or applications will be displayed. 3-6 Download Center To update the BIOS, drivers, or applications, click the Download Center button to link to the GIGABYTE Web site. GA-M52L-S3P Motherboard - 56 -
The latest version of the BIOS, drivers, or applications will be displayed. 3-6 Download Center To update the BIOS, drivers, or applications, click the Download Center button to link to the GIGABYTE Web site. GA-M52L-S3P Motherboard - 56 -

Manual
Page 57
... checks the first physical hard drive in advanced (10 GB or more is recommended to back up your system soon after the operating system and drivers are attached to the first IDE and the first SATA connectors, the hard drive on your system data and perform restoration of it . Chapter 4 Unique...
... checks the first physical hard drive in advanced (10 GB or more is recommended to back up your system soon after the operating system and drivers are attached to the first IDE and the first SATA connectors, the hard drive on your system data and perform restoration of it . Chapter 4 Unique...
Manual
Page 58
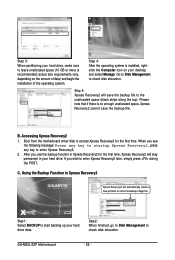
...will automatically create a new partition to store the backup image file. Step 2: When finished, go to Disk Management to check disk allocation. GA-M52L-S3P Motherboard - 58 - Go to Disk Management to check disk allocation. After you use the backup function in Xpress Recovery2 for the first time...there is recommended; Step 1: Select BACKUP to enter Xpress Recovery2 later, simply press during the POST. B. Boot from the motherboard driver disk to access Xpress Recovery2 for the first time, Xpress Recovery2 will stay permanent in Xpress Recovery2 Xpress Recovery2 will save the backup...
...will automatically create a new partition to store the backup image file. Step 2: When finished, go to Disk Management to check disk allocation. GA-M52L-S3P Motherboard - 58 - Go to Disk Management to check disk allocation. After you use the backup function in Xpress Recovery2 for the first time...there is recommended; Step 1: Select BACKUP to enter Xpress Recovery2 later, simply press during the POST. B. Boot from the motherboard driver disk to access Xpress Recovery2 for the first time, Xpress Recovery2 will stay permanent in Xpress Recovery2 Xpress Recovery2 will save the backup...
Manual
Page 63
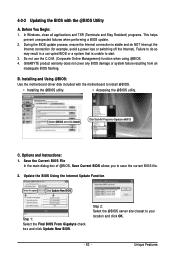
Do not use the C.O.M. (Corporate Online Management) function when using @BIOS. 4. GIGABYTE product warranty does not cover any BIOS damage or system failure resulting from an inadequate BIOS flashing. Step 2: Select the @BIOS server site ... Internet Update Function Select this option Click Update New BIOS Step 1: Select the Find BIOS From Gigabyte check box and click Update New BIOS. Click Start>All Programs>Gigabyte>@BIOS C. Installing and Using @BIOS: Use the motherboard driver disk included with the @BIOS Utility A. 4-2-2 Updating the BIOS with the motherboard to start. 3....
Do not use the C.O.M. (Corporate Online Management) function when using @BIOS. 4. GIGABYTE product warranty does not cover any BIOS damage or system failure resulting from an inadequate BIOS flashing. Step 2: Select the @BIOS server site ... Internet Update Function Select this option Click Update New BIOS Step 1: Select the Find BIOS From Gigabyte check box and click Update New BIOS. Click Start>All Programs>Gigabyte>@BIOS C. Installing and Using @BIOS: Use the motherboard driver disk included with the @BIOS Utility A. 4-2-2 Updating the BIOS with the motherboard to start. 3....
Manual
Page 67
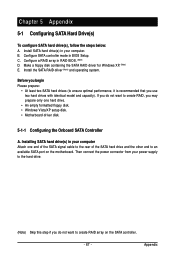
Install the SATA RAID driver (Note) and operating system. Appendix Chapter 5 Appendix 5-1 Configuring SATA Hard Drive(s) To configure SATA hard drive(s), follow the... do not want to an available SATA port on the SATA controller. - 67 - Make a floppy disk containing the SATA RAID driver for Windows XP. (Note) E. Then connect the power connector from your computer Attach one end of the SATA signal cable to ...one hard drive. • An empty formatted floppy disk. • Windows Vista/XP setup disk. • Motherboard driver disk. 5-1-1 Configuring the Onboard SATA Controller A.
Install the SATA RAID driver (Note) and operating system. Appendix Chapter 5 Appendix 5-1 Configuring SATA Hard Drive(s) To configure SATA hard drive(s), follow the... do not want to an available SATA port on the SATA controller. - 67 - Make a floppy disk containing the SATA RAID driver for Windows XP. (Note) E. Then connect the power connector from your computer Attach one end of the SATA signal cable to ...one hard drive. • An empty formatted floppy disk. • Windows Vista/XP setup disk. • Motherboard driver disk. 5-1-1 Configuring the Onboard SATA Controller A.

Manual
Page 71
... [C] Clear Disk [ENTER] Return Figure 8 To delete the array, press in the Array List screen. Press to return to the installation of the SATA controller driver and operating system. - 71 - After that, the Array List screen appears, displaying the RAID array that you can proceed to the Array List screen.
... [C] Clear Disk [ENTER] Return Figure 8 To delete the array, press in the Array List screen. Press to return to the installation of the SATA controller driver and operating system. - 71 - After that, the Array List screen appears, displaying the RAID array that you can proceed to the Array List screen.
Manual
Page 72
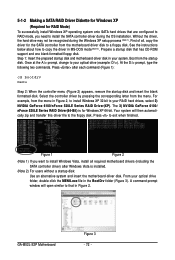
...). Your system will open similar to that has CD-ROM support and one blank formatted floppy disk. GA-M52L-S3P Motherboard Figure 3 - 72 - First of all required motherboard drivers (including the SATA controller driver) after each command (Figure 1): cd bootdrv menu Step 2: When the controller menu (Figure 2) appears, remove the startup disk and insert the...
...). Your system will open similar to that has CD-ROM support and one blank formatted floppy disk. GA-M52L-S3P Motherboard Figure 3 - 72 - First of all required motherboard drivers (including the SATA controller driver) after each command (Figure 1): cd bootdrv menu Step 2: When the controller menu (Figure 2) appears, remove the startup disk and insert the...
Manual
Page 73
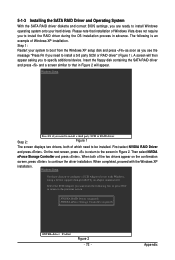
..., proceed with Windows, using a device support disk provided by an adapter manufacturer. A screen will appear. Figure 1 The screen displays two drivers, both of Windows Vista does not require you need to install Windows operating system onto your system to boot from the following is an example...ENTER=Select F3=Exit Figure 2 - 73 - Please note that in Figure 2 will then appear asking you to install a 3rd party SCSI or RAID driver" (Figure 1). The following list, or press ESC to return to the screen in advance. When both of Windows XP installation. Windows Setup Step 2:...
..., proceed with Windows, using a device support disk provided by an adapter manufacturer. A screen will appear. Figure 1 The screen displays two drivers, both of Windows Vista does not require you need to install Windows operating system onto your system to boot from the following is an example...ENTER=Select F3=Exit Figure 2 - 73 - Please note that in Figure 2 will then appear asking you to install a 3rd party SCSI or RAID driver" (Figure 1). The following list, or press ESC to return to the screen in advance. When both of Windows XP installation. Windows Setup Step 2:...
Manual
Page 75
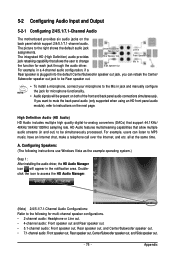
... jack retasking capability that allow multiple audio streams (in the notification area. A. Configuring Speakers: (The following for each jack through the audio driver. Doubleclick the icon to access the HD Audio Manager. (Note) 2/4/5.1/7.1-Channel Audio Configurations: Refer to the right shows the default audio jack .... The picture to the following instructions use Windows Vista as the example operating system.) Step 1: After installing the audio driver, the HD Audio Manager icon will be present on both of the front and back panel audio connections simultaneously.
... jack retasking capability that allow multiple audio streams (in the notification area. A. Configuring Speakers: (The following for each jack through the audio driver. Doubleclick the icon to access the HD Audio Manager. (Note) 2/4/5.1/7.1-Channel Audio Configurations: Refer to the right shows the default audio jack .... The picture to the following instructions use Windows Vista as the example operating system.) Step 1: After installing the audio driver, the HD Audio Manager icon will be present on both of the front and back panel audio connections simultaneously.
Manual
Page 79
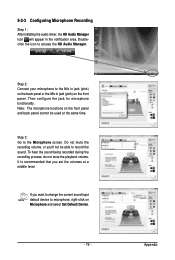
... to the Mic in jack (pink) on the back panel or the Mic in the notification area. 5-2-3 Configuring Microphone Recording Step 1: After installing the audio driver, the HD Audio Manager icon will appear in jack (pink) on the front panel. Step 2: Connect your microphone to microphone, right-click on Microphone and...
... to the Mic in jack (pink) on the back panel or the Mic in the notification area. 5-2-3 Configuring Microphone Recording Step 1: After installing the audio driver, the HD Audio Manager icon will appear in jack (pink) on the front panel. Step 2: Connect your microphone to microphone, right-click on Microphone and...


