
User Manual
Page 17
...the AGP slot when you try to install / uninstall the AGP card. Power on the card are indeed seated in motherboard. 4. Install related driver from the computer. 3. When an AGP 2X (3.3V) card is installed the 2X_DET will light up normally due to the onboard AGP slot ... sure the metal contacts on the computer, if necessary, setup BIOS utility of expansion card from BIOS. 8. Make sure your computer's chassis cover. 7. GA-K8NSNXP Motherboard - 17 - Informing users that system might not boot up , indicating a non-supported graphics card is locked by the chipset. Press the expansion ...
...the AGP slot when you try to install / uninstall the AGP card. Power on the card are indeed seated in motherboard. 4. Install related driver from the computer. 3. When an AGP 2X (3.3V) card is installed the 2X_DET will light up normally due to the onboard AGP slot ... sure the metal contacts on the computer, if necessary, setup BIOS utility of expansion card from BIOS. 8. Make sure your computer's chassis cover. 7. GA-K8NSNXP Motherboard - 17 - Informing users that system might not boot up , indicating a non-supported graphics card is locked by the chipset. Press the expansion ...
User Manual
Page 19
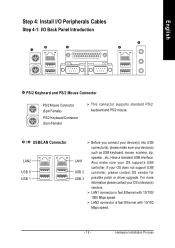
... your OS supports USB controller. For more information please contact your OS does not support USB controller, please contact OS vendor for possible patch or driver upgrade. LAN2 connector is fast Ethernet with 10/100 Mbps speed. - 19 - Have a standard USB interface. LAN1 connector is fast Ethernet with 10/100/ 1000...
... your OS supports USB controller. For more information please contact your OS does not support USB controller, please contact OS vendor for possible patch or driver upgrade. LAN2 connector is fast Ethernet with 10/100 Mbps speed. - 19 - Have a standard USB interface. LAN1 connector is fast Ethernet with 10/100/ 1000...
User Manual
Page 20
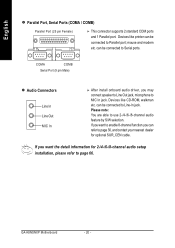
...please refer to Parallel port; COMA COMB Serial Port (9 pin Male) Audio Connectors Line In Line Out MIC In After install onboard audio driver, you can be connected to Serial ports. mouse and modem etc. Devices like CD-ROM, walkman etc. can refer to Line-In jack... speaker to Line Out jack, microphone to use 2-/4-/6-/8-channel audio feature by S/W selection. Devices like printer can be connected to page 66. GA-K8NSNXP Motherboard - 20 - English Parallel Port, Serial Ports (COMA / COMB) Parallel Port (25 pin Female) This connector supports 2 standard COM ports and ...
...please refer to Parallel port; COMA COMB Serial Port (9 pin Male) Audio Connectors Line In Line Out MIC In After install onboard audio driver, you can be connected to Serial ports. mouse and modem etc. Devices like CD-ROM, walkman etc. can refer to Line-In jack... speaker to Line Out jack, microphone to use 2-/4-/6-/8-channel audio feature by S/W selection. Devices like printer can be connected to page 66. GA-K8NSNXP Motherboard - 20 - English Parallel Port, Serial Ports (COMA / COMB) Parallel Port (25 pin Female) This connector supports 2 standard COM ports and ...
User Manual
Page 26
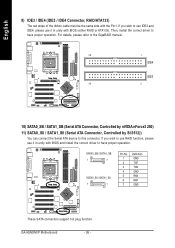
... Connector, RAID/ATA133) The red stripe of the ribbon cable must be the same side with BIOS and install the correct driver to this connector. GA-K8NSNXP Motherboard - 26 - Then, install the correct driver to use IDE3 and IDE4, please use it in unity with the Pin1. If you wish to use RAID function...
... Connector, RAID/ATA133) The red stripe of the ribbon cable must be the same side with BIOS and install the correct driver to this connector. GA-K8NSNXP Motherboard - 26 - Then, install the correct driver to use IDE3 and IDE4, please use it in unity with the Pin1. If you wish to use RAID function...
User Manual
Page 57
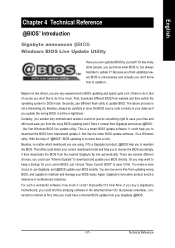
.... - 57 - Now Gigabyte announces @BIOS - Not like to maintain the BIOS. With the help of "@BIOS", BIOS updating is no matter which mainboard you to download the BIOS from your correct mainboard model and help you are very experienced in the attached driver CD. This utility could have a... internet BIOS update from internetand update it 's a Gigabyte's product, @BIOS help you to do it too much it first. Or you just know how...
.... - 57 - Now Gigabyte announces @BIOS - Not like to maintain the BIOS. With the help of "@BIOS", BIOS updating is no matter which mainboard you to download the BIOS from your correct mainboard model and help you are very experienced in the attached driver CD. This utility could have a... internet BIOS update from internetand update it 's a Gigabyte's product, @BIOS help you to do it too much it first. Or you just know how...
User Manual
Page 66
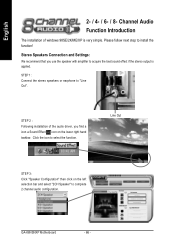
... function! Channel Audio Function Introduction The installation of the audio driver, you use the speaker with amplifier to acquire the best sound effect if the stereo output is very simple. STEP 2 : Following installation of windows 98SE/2K/ME/XP is applied. GA-K8NSNXP Motherboard - 66 - Please follow next step to "Line Out". Stereo...
... function! Channel Audio Function Introduction The installation of the audio driver, you use the speaker with amplifier to acquire the best sound effect if the stereo output is very simple. STEP 2 : Following installation of windows 98SE/2K/ME/XP is applied. GA-K8NSNXP Motherboard - 66 - Please follow next step to "Line Out". Stereo...
User Manual
Page 67
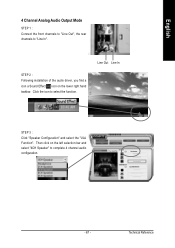
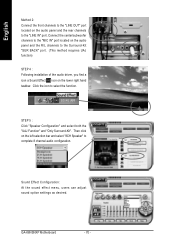
Line Out Line In STEP 3 : Click "Speaker Configuration" and select the "UAJ Function". English 4 Channel Analog Audio Output Mode STEP 1 : Connect the front channels to "Line Out", the rear channels to select the function. Then click on the lower right hand taskbar. Click the icon to "Line In". Technical Reference STEP 2 : Following installation of the audio driver, you find a icon a Sound Effect icon on the left selection bar and select "4CH Speaker" to complete 4 channel audio configuration. - 67 -
Line Out Line In STEP 3 : Click "Speaker Configuration" and select the "UAJ Function". English 4 Channel Analog Audio Output Mode STEP 1 : Connect the front channels to "Line Out", the rear channels to select the function. Then click on the lower right hand taskbar. Click the icon to "Line In". Technical Reference STEP 2 : Following installation of the audio driver, you find a icon a Sound Effect icon on the left selection bar and select "4CH Speaker" to complete 4 channel audio configuration. - 67 -
User Manual
Page 68
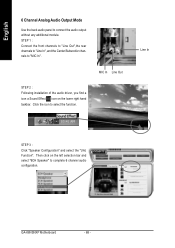
Click the icon to "MIC In". GA-K8NSNXP Motherboard - 68 - STEP 1 : Connect the front channels to "Line Out",the rear channels to "Line In", and the Center/Subwoofer channels to select the function. ... 6 Channel Analog Audio Output Mode Use the back audio panel to complete 6 channel audio configuration. MIC In Line Out STEP 2 : Following installation of the audio driver, you find a icon a Sound Effect icon on the left selection bar and select "6CH Speaker" to connect the audio output without any additional module.
Click the icon to "MIC In". GA-K8NSNXP Motherboard - 68 - STEP 1 : Connect the front channels to "Line Out",the rear channels to "Line In", and the Center/Subwoofer channels to select the function. ... 6 Channel Analog Audio Output Mode Use the back audio panel to complete 6 channel audio configuration. MIC In Line Out STEP 2 : Following installation of the audio driver, you find a icon a Sound Effect icon on the left selection bar and select "6CH Speaker" to connect the audio output without any additional module.
User Manual
Page 70
... icon to the Surround-Kit "SUR BACK" port. (This method requires UAJ function) STEP 4 : Following installation of the audio driver, you find a icon a Sound Effect icon on the lower right hand taskbar. GA-K8NSNXP Motherboard - 70 - Then click on the audio panel and the rear channels to the "LINE IN" port. Sound Effect...
... icon to the Surround-Kit "SUR BACK" port. (This method requires UAJ function) STEP 4 : Following installation of the audio driver, you find a icon a Sound Effect icon on the lower right hand taskbar. GA-K8NSNXP Motherboard - 70 - Then click on the audio panel and the rear channels to the "LINE IN" port. Sound Effect...
User Manual
Page 74
...2011 GA-K8NSNXP Motherboard - 74 - Must be set to enter Xpress Recovery. When the boot partition is backed up and restore an OS partition. Xpress Recovery is not working properly, the user can also function by pressing the F9 key during computer power on. . . Insert the provided driver ...Enter the BIOS menu, select "Advanced BIOS Feature" and set as the boot partition. Once you have completed this step, subsequent access to NTFS format. GIGABYTE Technology CO. , Ltd. 1. How to back up , please do not alter its original state. 1. Remove Backup Image 4. Must be used to...
...2011 GA-K8NSNXP Motherboard - 74 - Must be set to enter Xpress Recovery. When the boot partition is backed up and restore an OS partition. Xpress Recovery is not working properly, the user can also function by pressing the F9 key during computer power on. . . Insert the provided driver ...Enter the BIOS menu, select "Advanced BIOS Feature" and set as the boot partition. Once you have completed this step, subsequent access to NTFS format. GIGABYTE Technology CO. , Ltd. 1. How to back up , please do not alter its original state. 1. Remove Backup Image 4. Must be used to...
User Manual
Page 75
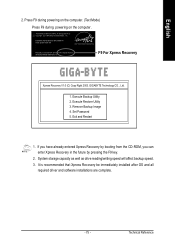
... Recovery in the future by pressing the F9 key. 2. Technical Reference It is recommended that Xpress Recovery be immediately installed after OS and all required driver and software installations are complete. - 75 - Remove Backup Image 4. Press DEL to enter SETUP / Q-Flash, F9 For Xpress Recovery 08/16/2002-I845GE-6A69YG01C-00...
... Recovery in the future by pressing the F9 key. 2. Technical Reference It is recommended that Xpress Recovery be immediately installed after OS and all required driver and software installations are complete. - 75 - Remove Backup Image 4. Press DEL to enter SETUP / Q-Flash, F9 For Xpress Recovery 08/16/2002-I845GE-6A69YG01C-00...
User Manual
Page 78
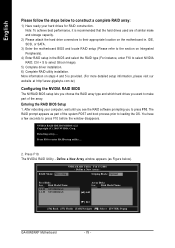
...To achieve best performance, it is provided. (For more detailed setup information, please visit our website at http:\\www.gigabyte.com.tw) Configuring the NVIDIA RAID BIOS The NVRAID BIOS setup lets you choose the RAID array type and which...F7] Finish [TAB] Navigate [KL] Select [ENTER] Popup GA-K8NSNXP Motherboard - 78 - You have a few seconds to select NVIDIA RAID; English Please follow the steps below ). Ctrl + S to enter RAID setup utility ... 2. Press F10 to select Silicon Image). 5) Complete driver installation. 6) Complete RAID utility installation. Define a New Array window...
...To achieve best performance, it is provided. (For more detailed setup information, please visit our website at http:\\www.gigabyte.com.tw) Configuring the NVIDIA RAID BIOS The NVRAID BIOS setup lets you choose the RAID array type and which...F7] Finish [TAB] Navigate [KL] Select [ENTER] Popup GA-K8NSNXP Motherboard - 78 - You have a few seconds to select NVIDIA RAID; English Please follow the steps below ). Ctrl + S to enter RAID setup utility ... 2. Press F10 to select Silicon Image). 5) Complete driver installation. 6) Complete RAID utility installation. Define a New Array window...
User Manual
Page 80
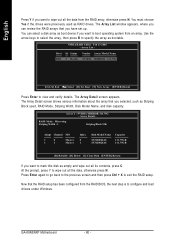
... previously used , RAID Mode, Striping Width, Disk Model Name, and disk capacity. You can review the RAID arrays that you want to configure and load drivers under Windows. The Array Detail screen shows various information about the array that the RAID setup has been configured from the RAID BIOS, the next... Channel M/S 1 0 1 1 Master Master Index 0 1 Disk Model Name ST3120026AS ST3120026AS Capacity 111.79GB 111.79GB [R] Rebuild [D] Delete [C] Clear Disk [ENTER] Return If you have set up. GA-K8NSNXP Motherboard - 80 -
... previously used , RAID Mode, Striping Width, Disk Model Name, and disk capacity. You can review the RAID arrays that you want to configure and load drivers under Windows. The Array Detail screen shows various information about the array that the RAID setup has been configured from the RAID BIOS, the next... Channel M/S 1 0 1 1 Master Master Index 0 1 Disk Model Name ST3120026AS ST3120026AS Capacity 111.79GB 111.79GB [R] Rebuild [D] Delete [C] Clear Disk [ENTER] Return If you have set up. GA-K8NSNXP Motherboard - 80 -
User Manual
Page 81
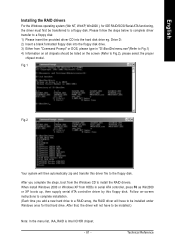
...Fig.1 Fig.2 (Note) Your system will then automatically zip and transfer this floppy disk. After you add a new hard drive to a RAID array, the RAID driver will not have to be installed.) Note: In the menu list, IAA_RAID is Intel ICH5R chipset. - 81 - Please follow the steps below to complete... from "Command Prompt" or DOS, please type in serial ATA controller, press F6 as Win2000 or XP boots up, then supply serial ATA controller driver by this driver file to the floppy disk. Drive D: 2) Insert a blank formatted floppy disk into the hard disk drive eg. Follow on the screen (Refer to...
...Fig.1 Fig.2 (Note) Your system will then automatically zip and transfer this floppy disk. After you add a new hard drive to a RAID array, the RAID driver will not have to be installed.) Note: In the menu list, IAA_RAID is Intel ICH5R chipset. - 81 - Please follow the steps below to complete... from "Command Prompt" or DOS, please type in serial ATA controller, press F6 as Win2000 or XP boots up, then supply serial ATA controller driver by this driver file to the floppy disk. Drive D: 2) Insert a blank formatted floppy disk into the hard disk drive eg. Follow on the screen (Refer to...
User Manual
Page 83
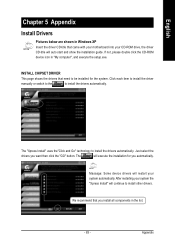
...ROM device icon in Windows XP Insert the driver CD-title that came with your motherboard into your system automatically. We recommend that need to install the drivers automatically. Appendix INSTALL CHIPSET DRIVER This page shows the drivers that you install all components in the list....restarting your system the "Xpress Install" will restart your CD-ROM drive, the driver CD-title will execute the installation for the system. Massage: Some device drivers will continue to install the drivers automatically. The "Xpress Install" uses the"Click and Go" technology to be ...
...ROM device icon in Windows XP Insert the driver CD-title that came with your motherboard into your system automatically. We recommend that need to install the drivers automatically. Appendix INSTALL CHIPSET DRIVER This page shows the drivers that you install all components in the list....restarting your system the "Xpress Install" will restart your CD-ROM drive, the driver CD-title will execute the installation for the system. Massage: Some device drivers will continue to install the drivers automatically. The "Xpress Install" uses the"Click and Go" technology to be ...
User Manual
Page 84
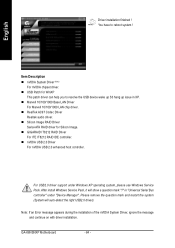
.../100/1000 LAN chip driver. „ RealTek AC97 Codec Driver Realtek audio driver. „ Silicon Image RAID Driver Serial-ATA RAID driver for WinXP This patch driver can help you to reboot system ! After install Windows Service Pack, it will auto-detect the right USB2.0 driver). GA-K8NSNXP Motherboard - 84 - Item Description „ nVIDIA System Driver (Note) For nVIDIA chipset...
.../100/1000 LAN chip driver. „ RealTek AC97 Codec Driver Realtek audio driver. „ Silicon Image RAID Driver Serial-ATA RAID driver for WinXP This patch driver can help you to reboot system ! After install Windows Service Pack, it will auto-detect the right USB2.0 driver). GA-K8NSNXP Motherboard - 84 - Item Description „ nVIDIA System Driver (Note) For nVIDIA chipset...
User Manual
Page 86
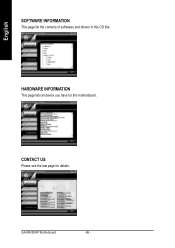
English SOFTWARE INFORMATION This page list the contects of softwares and drivers in this motherboard. GA-K8NSNXP Motherboard - 86 - CONTACT US Please see the last page for this CD title. HARDWARE INFORMATION This page lists all device you have for details.
English SOFTWARE INFORMATION This page list the contects of softwares and drivers in this motherboard. GA-K8NSNXP Motherboard - 86 - CONTACT US Please see the last page for this CD title. HARDWARE INFORMATION This page lists all device you have for details.


