
User Manual
Page 1
GA-K8NS (rev. 2.0) AMD Socket 754 Processor Motherboard User's Manual Rev. 2002 12ME-K8NS-2002
GA-K8NS (rev. 2.0) AMD Socket 754 Processor Motherboard User's Manual Rev. 2002 12ME-K8NS-2002

User Manual
Page 2
Motherboard GA-K8NS(2.0) Jun. 1, 2005 Motherboard GA-K8NS(2.0) Jun. 1, 2005
Motherboard GA-K8NS(2.0) Jun. 1, 2005 Motherboard GA-K8NS(2.0) Jun. 1, 2005
User Manual
Page 4
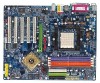
Table of Contents GA-K8NS(rev. 2.0) Motherboard Layout 6 Block Diagram ...7 Chapter 1 Hardware Installation 9 1-1 Considerations Prior to Installation 9 1-2 Feature Summary 10 1-3 Installation of the CPU and Heatsink 12 1-3-1 Installation of the CPU 12 1-3-2 ...
Table of Contents GA-K8NS(rev. 2.0) Motherboard Layout 6 Block Diagram ...7 Chapter 1 Hardware Installation 9 1-1 Considerations Prior to Installation 9 1-2 Feature Summary 10 1-3 Installation of the CPU and Heatsink 12 1-3-1 Installation of the CPU 12 1-3-2 ...

User Manual
Page 9
...(CPU, RAM). 4. Turning on an uneven surface. 7. Damage as a result of uncertified components. 5. Damage due to be an unofficial Gigabyte product. - 9 - Prior to installing the electronic components, please have a problem related to the use of the product, please consult a...due to use exceeding the permitted parameters. 6. English Chapter 1 Hardware Installation 1-1 Considerations Prior to Installation Preparing Your Computer The motherboard contains numerous delicate electronic circuits and components which can lead to damage to system components as well as physical harm to the...
...(CPU, RAM). 4. Turning on an uneven surface. 7. Damage as a result of uncertified components. 5. Damage due to be an unofficial Gigabyte product. - 9 - Prior to installing the electronic components, please have a problem related to the use of the product, please consult a...due to use exceeding the permitted parameters. 6. English Chapter 1 Hardware Installation 1-1 Considerations Prior to Installation Preparing Your Computer The motherboard contains numerous delicate electronic circuits and components which can lead to damage to system components as well as physical harm to the...

User Manual
Page 10
...) Š Supports Jack Sensing function Š Supports 2 / 4 / 6 / 8 channel audio (Note 1) Š Supports Line In ; English 1-2 Feature Summary Motherboard CPU Chipset Memory Slots IDE Connections FDD Connections Onboard SATA Peripherals Onboard LAN Onboard Audio Š GA-K8NS rev. 2.0 Š Socket 754 for AMD AthlonTM 64 processor (K8) Š 1600MHz system bus Š Supports core... Š Supported on the Win 2000/XP operating systems (Note 1) To set up an 8 channel audio configuration, you must use Audio Combo Kit (optional device). GA-K8NS(rev. 2.0) Motherboard - 10 -
...) Š Supports Jack Sensing function Š Supports 2 / 4 / 6 / 8 channel audio (Note 1) Š Supports Line In ; English 1-2 Feature Summary Motherboard CPU Chipset Memory Slots IDE Connections FDD Connections Onboard SATA Peripherals Onboard LAN Onboard Audio Š GA-K8NS rev. 2.0 Š Socket 754 for AMD AthlonTM 64 processor (K8) Š 1600MHz system bus Š Supports core... Š Supported on the Win 2000/XP operating systems (Note 1) To set up an 8 channel audio configuration, you must use Audio Combo Kit (optional device). GA-K8NS(rev. 2.0) Motherboard - 10 -

User Manual
Page 11
...)) Š Over Clock via BIOS (CPU/ AGP) Form Factor Š ATX form factor; 29.4cm x 23.7cm (Note 2) EasyTune 5 functions may vary depending on different motherboards. - 11 -
...)) Š Over Clock via BIOS (CPU/ AGP) Form Factor Š ATX form factor; 29.4cm x 23.7cm (Note 2) EasyTune 5 functions may vary depending on different motherboards. - 11 -

User Manual
Page 12
Please add an even layer of the motherboard) prior to inserting the processor. Please set the frequency beyond hardware specifications since it into place. Move the socket lever to see that none are ... the CPU. 2. Please use , otherwise overheating and permanent damage of the CPU and Heatsink Before installing the CPU, please comply with the processor specifications. GA-K8NS(rev. 2.0) Motherboard - 12 - If this occurs, please change the positioning of the CPU. 3. It is installed on the middle of the CPU. If you install the CPU...
Please add an even layer of the motherboard) prior to inserting the processor. Please set the frequency beyond hardware specifications since it into place. Move the socket lever to see that none are ... the CPU. 2. Please use , otherwise overheating and permanent damage of the CPU and Heatsink Before installing the CPU, please comply with the processor specifications. GA-K8NS(rev. 2.0) Motherboard - 12 - If this occurs, please change the positioning of the CPU. 3. It is installed on the middle of the CPU. If you install the CPU...

User Manual
Page 13
... sink. - 13 - English 1-3-2 Installation of the Heatsink Fig.1 Before installing the heat sink, please first add an even layer of heat sink paste on the motherboard so that either thermal tape rather than heat sink paste be used for detailed installation instructions). Install all the heat sink components (Please refer to...
... sink. - 13 - English 1-3-2 Installation of the Heatsink Fig.1 Before installing the heat sink, please first add an even layer of heat sink paste on the motherboard so that either thermal tape rather than heat sink paste be used for detailed installation instructions). Install all the heat sink components (Please refer to...

User Manual
Page 14
...edges of Memory Before installing the memory modules, please comply with each slot. Insert the DIMM memory module vertically into the DIMM socket. GA-K8NS(rev. 2.0) Motherboard - 14 - Notch DDR Fig.1 The DIMM socket has a notch, so the DIMM memory module can be used. 2. Before installing... brand be inserted only in one direction. Please make sure that the memory used can be installed in one direction. The motherboard supports DDR memory modules, whereby BIOS will automatically detect memory capacity and specifications. The memory capacity used is switched off to remove...
...edges of Memory Before installing the memory modules, please comply with each slot. Insert the DIMM memory module vertically into the DIMM socket. GA-K8NS(rev. 2.0) Motherboard - 14 - Notch DDR Fig.1 The DIMM socket has a notch, so the DIMM memory module can be used. 2. Before installing... brand be inserted only in one direction. Please make sure that the memory used can be installed in one direction. The motherboard supports DDR memory modules, whereby BIOS will automatically detect memory capacity and specifications. The memory capacity used is switched off to remove...

User Manual
Page 15
... system. Power on the slot. Press the expansion card firmly into the computer. 2. Be sure the metal contacts on the card are indeed seated in motherboard. 4. Hardware Installation Read the related expansion card's instruction document before install the expansion card into expansion slot in the slot. 5. Make sure your computer's chassis...
... system. Power on the slot. Press the expansion card firmly into the computer. 2. Be sure the metal contacts on the card are indeed seated in motherboard. 4. Hardware Installation Read the related expansion card's instruction document before install the expansion card into expansion slot in the slot. 5. Make sure your computer's chassis...
User Manual
Page 16
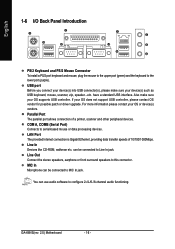
... OS or device(s) vendors. MIC In Microphone can be connected to Line In jack. Parallel Port The parallel port allows connection of 10/100/1000Mbps. GA-K8NS(rev. 2.0) Motherboard - 16 - LAN Port The provided Internet connection is Gigabit Ethernet, providing data transfer speeds of a printer, scanner and other peripheral devices. For more information...
... OS or device(s) vendors. MIC In Microphone can be connected to Line In jack. Parallel Port The parallel port allows connection of 10/100/1000Mbps. GA-K8NS(rev. 2.0) Motherboard - 16 - LAN Port The provided Internet connection is Gigabit Ethernet, providing data transfer speeds of a printer, scanner and other peripheral devices. For more information...

User Manual
Page 18
...Pin No. Align the power connector with its proper location on /off) 15 GND 16 GND 17 GND 18 -5V 19 +5V 20 +5V GA-K8NS(rev. 2.0) Motherboard - 18 - Please use of the power connector, the power supply can lead to an unstable system or a system that all the components on the...+5V 7 GND 8 Power Good 9 5V SB (stand by +5V) 10 +12V 11 3.3V 20 10 12 -12V 13 GND 14 PS_ON(soft on the motherboard and connect tightly. If the ATX_12V power connector is unable to start . The ATX_12V power connector mainly supplies power to the CPU. English 1/2) ATX_12V / ATX...
...Pin No. Align the power connector with its proper location on /off) 15 GND 16 GND 17 GND 18 -5V 19 +5V 20 +5V GA-K8NS(rev. 2.0) Motherboard - 18 - Please use of the power connector, the power supply can lead to an unstable system or a system that all the components on the...+5V 7 GND 8 Power Good 9 5V SB (stand by +5V) 10 +12V 11 3.3V 20 10 12 -12V 13 GND 14 PS_ON(soft on the motherboard and connect tightly. If the ATX_12V power connector is unable to start . The ATX_12V power connector mainly supplies power to the CPU. English 1/2) ATX_12V / ATX...

User Manual
Page 20
Definition 1 GND 1 7 2 TXP 3 TXN 4 GND 5 RXN 6 RXP 7 GND GA-K8NS(rev. 2.0) Motherboard - 20 - One IDE connector can connect to one IDE device as Master and the other as Slave (for the Serial ATA and install the proper ...
Definition 1 GND 1 7 2 TXP 3 TXN 4 GND 5 RXN 6 RXP 7 GND GA-K8NS(rev. 2.0) Motherboard - 20 - One IDE connector can connect to one IDE device as Master and the other as Slave (for the Serial ATA and install the proper ...

User Manual
Page 22
.... Pin 3: NC Pin 4: Data(-) Open: Normal Operation Close: Reset Hardware System Open: Normal Operation Close: Power On/Off Pin 1: LED anode(+) Pin 2: LED cathode(-) NC GA-K8NS(rev. 2.0) Motherboard - 22 -
.... Pin 3: NC Pin 4: Data(-) Open: Normal Operation Close: Reset Hardware System Open: Normal Operation Close: Power On/Off Pin 1: LED anode(+) Pin 2: LED cathode(-) NC GA-K8NS(rev. 2.0) Motherboard - 22 -

User Manual
Page 24
... digital input and output function. Use this feature only when your local dealer. 26 15 Pin No. 1 2 3 4 5 6 Definition Power No Pin SPDIF SPDIFI GND GND GA-K8NS(rev. 2.0) Motherboard - 24 - Use SPDIF in feature only when your nearest dealer for optional SUR_CEN cable. 8 7 2 1 Pin No. 1 2 3 4 5 6 7 8 Definition SUR OUTL SUR OUTR GND No Pin...
... digital input and output function. Use this feature only when your local dealer. 26 15 Pin No. 1 2 3 4 5 6 Definition Power No Pin SPDIF SPDIFI GND GND GA-K8NS(rev. 2.0) Motherboard - 24 - Use SPDIF in feature only when your nearest dealer for optional SUR_CEN cable. 8 7 2 1 Pin No. 1 2 3 4 5 6 7 8 Definition SUR OUTL SUR OUTR GND No Pin...

User Manual
Page 26
English GA-K8NS(rev. 2.0) Motherboard - 26 -
English GA-K8NS(rev. 2.0) Motherboard - 26 -

User Manual
Page 27
...CMOS SETUP saves the configuration in the event that you wish to upgrade to the CMOS SETUP screen. When the power is turned on the motherboard supplies the necessary power to Main Menu Increase the numeric value or make changes Decrease the numeric value or make changes General help window that...function is turned off, the battery on , pushing the button during the BIOS POST (Power-On Self Test) will take you to a new BIOS, either GIGABYTE's Q-Flash or @BIOS utility can enter the BIOS setup screen by pressing "Ctrl + F1". Status Page Setup Menu / Option Page Setup Menu Press F1 ...
...CMOS SETUP saves the configuration in the event that you wish to upgrade to the CMOS SETUP screen. When the power is turned on the motherboard supplies the necessary power to Main Menu Increase the numeric value or make changes Decrease the numeric value or make changes General help window that...function is turned off, the battery on , pushing the button during the BIOS POST (Power-On Self Test) will take you to a new BIOS, either GIGABYTE's Q-Flash or @BIOS utility can enter the BIOS setup screen by pressing "Ctrl + F1". Status Page Setup Menu / Option Page Setup Menu Press F1 ...
User Manual
Page 28
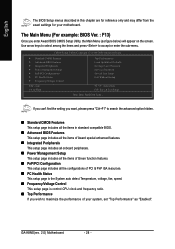
The Main Menu (For example: BIOS Ver. : F13) Once you wish to maximize the performance of your motherboard. CMOS Setup Utility-Copyright (C) 1984-2005 Award Software ` Standard CMOS Features ` Advanced BIOS Features ` Integrated Peripherals ` Power Management Setup ` PnP/PCI ... Set User Password Save & Exit Setup Exit Without Saving KLJI: Select Item F10: Save & Exit Setup Time, Date, Hard Disk Type... GA-K8NS(rev. 2.0) Motherboard - 28 - English The BIOS Setup menus described in standard compatible BIOS. „ Advanced BIOS Features This setup page includes all the items ...
The Main Menu (For example: BIOS Ver. : F13) Once you wish to maximize the performance of your motherboard. CMOS Setup Utility-Copyright (C) 1984-2005 Award Software ` Standard CMOS Features ` Advanced BIOS Features ` Integrated Peripherals ` Power Management Setup ` PnP/PCI ... Set User Password Save & Exit Setup Exit Without Saving KLJI: Select Item F10: Save & Exit Setup Time, Date, Hard Disk Type... GA-K8NS(rev. 2.0) Motherboard - 28 - English The BIOS Setup menus described in standard compatible BIOS. „ Advanced BIOS Features This setup page includes all the items ...

User Manual
Page 30
... used and the system will skip the automatic detection step and allow for automatic device detection. Access Mode Use this option for the hard drive. GA-K8NS(rev. 2.0) Motherboard - 30 - to Dec. 1 to select this option for faster system start up . English 2-1 Standard CMOS Features Date (mm:dd:yy) Time (hh:mm:ss...
... used and the system will skip the automatic detection step and allow for automatic device detection. Access Mode Use this option for the hard drive. GA-K8NS(rev. 2.0) Motherboard - 30 - to Dec. 1 to select this option for faster system start up . English 2-1 Standard CMOS Features Date (mm:dd:yy) Time (hh:mm:ss...

User Manual
Page 32
... 40 tracks 720K, 1.2M and 1.44M are all 80 tracks. Enabled BIOS searches for floppy disk drive to move it is 360K. (Default value) GA-K8NS(rev. 2.0) Motherboard - 32 - Disabled BIOS will not be any warning message if the drive installed is 40 or 80 tracks. LS120 Hard Disk Select your boot device...
... 40 tracks 720K, 1.2M and 1.44M are all 80 tracks. Enabled BIOS searches for floppy disk drive to move it is 360K. (Default value) GA-K8NS(rev. 2.0) Motherboard - 32 - Disabled BIOS will not be any warning message if the drive installed is 40 or 80 tracks. LS120 Hard Disk Select your boot device...


