User Manual
Page 4
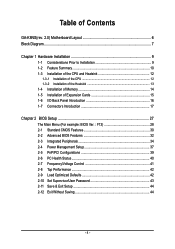
... 1-3-1 Installation of the CPU 12 1-3-2 Installation of the Heatsink 13 1-4 Installation of Memory 14 1-5 Installation of Expansion Cards 15 1-6 I/O Back Panel Introduction 16 1-7 Connectors Introduction 17 Chapter 2 BIOS Setup 27 The Main Menu (For example: BIOS Ver. : F13 28 2-1 Standard CMOS Features 30 2-2 Advanced BIOS Features 32 2-3 Integrated Peripherals 34 2-4 Power Management Setup 37 2-5 PnP/PCI Configurations 39 2-6 PC Health Status 40 2-7 Frequency/Voltage Control 41 2-8 Top Performance 42 2-9 Load Optimized Defaults 42 2-10 Set Supervisor/User Password 43...
... 1-3-1 Installation of the CPU 12 1-3-2 Installation of the Heatsink 13 1-4 Installation of Memory 14 1-5 Installation of Expansion Cards 15 1-6 I/O Back Panel Introduction 16 1-7 Connectors Introduction 17 Chapter 2 BIOS Setup 27 The Main Menu (For example: BIOS Ver. : F13 28 2-1 Standard CMOS Features 30 2-2 Advanced BIOS Features 32 2-3 Integrated Peripherals 34 2-4 Power Management Setup 37 2-5 PnP/PCI Configurations 39 2-6 PC Health Status 40 2-7 Frequency/Voltage Control 41 2-8 Top Performance 42 2-9 Load Optimized Defaults 42 2-10 Set Supervisor/User Password 43...

User Manual
Page 10
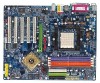
GA-K8NS(rev. 2.0) Motherboard - 10 - English 1-2 Feature Summary Motherboard CPU Chipset Memory Slots IDE Connections FDD Connections Onboard SATA Peripherals Onboard LAN Onboard Audio Š GA-K8NS rev. 2.0 Š Socket 754 for AMD AthlonTM 64 processor (K8) Š 1600MHz system bus Š Supports core frequencies in excess of 2800+ and faster Š nVIDIA® nForce3TM 250 Chipset Š Supported on the Win 2000/XP operating systems Š 3 DDR DIMM memory slots (supports up to 3GB memory) Š Supports DDR 400/333/266/200 DIMM Š...
GA-K8NS(rev. 2.0) Motherboard - 10 - English 1-2 Feature Summary Motherboard CPU Chipset Memory Slots IDE Connections FDD Connections Onboard SATA Peripherals Onboard LAN Onboard Audio Š GA-K8NS rev. 2.0 Š Socket 754 for AMD AthlonTM 64 processor (K8) Š 1600MHz system bus Š Supports core frequencies in excess of 2800+ and faster Š nVIDIA® nForce3TM 250 Chipset Š Supported on the Win 2000/XP operating systems Š 3 DDR DIMM memory slots (supports up to 3GB memory) Š Supports DDR 400/333/266/200 DIMM Š...

User Manual
Page 20
... the IDE device). 40 39 2 IDE2 1 IDE1 7) SATA0_SB / SATA1_SB (Serial ATA Connector) Serial ATA can then connect to 150MB/s transfer rate. Pin No. If you wish to connect two IDE devices, please set the jumper on one IDE cable, and the single IDE cable can provide up to two IDE devices (hard drive or optical drive). English 6) IDE1 / IDE2 (IDE Connector) An IDE device connects to work properly. Definition 1 GND 1 7 2 TXP 3 TXN 4 GND 5 RXN 6 RXP 7 GND GA-K8NS(rev. 2.0) Motherboard...
... the IDE device). 40 39 2 IDE2 1 IDE1 7) SATA0_SB / SATA1_SB (Serial ATA Connector) Serial ATA can then connect to 150MB/s transfer rate. Pin No. If you wish to connect two IDE devices, please set the jumper on one IDE cable, and the single IDE cable can provide up to two IDE devices (hard drive or optical drive). English 6) IDE1 / IDE2 (IDE Connector) An IDE device connects to work properly. Definition 1 GND 1 7 2 TXP 3 TXN 4 GND 5 RXN 6 RXP 7 GND GA-K8NS(rev. 2.0) Motherboard...

User Manual
Page 22
... Power On/Off Pin 1: LED anode(+) Pin 2: LED cathode(-) NC GA-K8NS(rev. 2.0) Motherboard - 22 - HDHD+ IDE Hard Disk Active LED Reset Switch HD (IDE Hard Disk Active LED) (Blue) SPEAK (Speaker Connector) (Amber) RES (Reset Switch) (Green) PW (Power Switch) (Red) MSG (Message LED/Power/Sleep LED) (Yellow) NC (Purple) Pin 1: LED anode(+) Pin 2: LED cathode(-) Pin 1: Power(+) Pin 2- Message LED/ Power/ Sleep LED Power Switch Speaker Connector SPEAK- English 10) F_PANEL (Front Panel Jumper) Please connect the power LED, PC speaker, reset switch and power switch etc. of your chassis...
... Power On/Off Pin 1: LED anode(+) Pin 2: LED cathode(-) NC GA-K8NS(rev. 2.0) Motherboard - 22 - HDHD+ IDE Hard Disk Active LED Reset Switch HD (IDE Hard Disk Active LED) (Blue) SPEAK (Speaker Connector) (Amber) RES (Reset Switch) (Green) PW (Power Switch) (Red) MSG (Message LED/Power/Sleep LED) (Yellow) NC (Purple) Pin 1: LED anode(+) Pin 2: LED cathode(-) Pin 1: Power(+) Pin 2- Message LED/ Power/ Sleep LED Power Switch Speaker Connector SPEAK- English 10) F_PANEL (Front Panel Jumper) Please connect the power LED, PC speaker, reset switch and power switch etc. of your chassis...
User Manual
Page 28
... Menu (For example: BIOS Ver. : F13) Once you enter Award BIOS CMOS Setup Utility, the Main Menu (as "Enabled". GA-K8NS(rev. 2.0) Motherboard - 28 - CMOS Setup Utility-Copyright (C) 1984-2005 Award Software ` Standard CMOS Features ` Advanced BIOS Features ` Integrated Peripherals ` Power Management Setup ` PnP/PCI Configurations ` PC Health Status ` Frequency/Voltage Control ESC: Quit F8: Q-Flash Top Performance Load Optimized Defaults Set Supervisor Password Set User Password Save & Exit Setup Exit Without Saving KLJI: Select Item F10: Save & Exit Setup Time, Date, Hard Disk Type...
... Menu (For example: BIOS Ver. : F13) Once you enter Award BIOS CMOS Setup Utility, the Main Menu (as "Enabled". GA-K8NS(rev. 2.0) Motherboard - 28 - CMOS Setup Utility-Copyright (C) 1984-2005 Award Software ` Standard CMOS Features ` Advanced BIOS Features ` Integrated Peripherals ` Power Management Setup ` PnP/PCI Configurations ` PC Health Status ` Frequency/Voltage Control ESC: Quit F8: Q-Flash Top Performance Load Optimized Defaults Set Supervisor Password Set User Password Save & Exit Setup Exit Without Saving KLJI: Select Item F10: Save & Exit Setup Time, Date, Hard Disk Type...

User Manual
Page 30
...) CMOS Setup Utility-Copyright (C) 1984-2005 Award Software Standard CMOS Features Tue, May 17 2005 22:31:24 Item Help Menu Level` ` IDE Channel 0 Master ` IDE Channel 0 Slave ` IDE Channel 1 Master ` IDE Channel 1 Slave ` IDE Channel 2 Master ` IDE Channel 3 Master Drive A Drive B Halt On Floppy 3 Mode Support [None] [None] [None] [None] [None] [None] [1.44M, 3.5"] [None] [All, But Keyboard] [Disabled] Change the day, month, year Sun. to select this option for automatic device detection. Jan. to automatically detect SATA IDE devices during POST. (Default value...
...) CMOS Setup Utility-Copyright (C) 1984-2005 Award Software Standard CMOS Features Tue, May 17 2005 22:31:24 Item Help Menu Level` ` IDE Channel 0 Master ` IDE Channel 0 Slave ` IDE Channel 1 Master ` IDE Channel 1 Slave ` IDE Channel 2 Master ` IDE Channel 3 Master Drive A Drive B Halt On Floppy 3 Mode Support [None] [None] [None] [None] [None] [None] [1.44M, 3.5"] [None] [All, But Keyboard] [Disabled] Change the day, month, year Sun. to select this option for automatic device detection. Jan. to automatically detect SATA IDE devices during POST. (Default value...

User Manual
Page 32
... BIOS Features CMOS Setup Utility-Copyright (C) 1984-2005 Award Software Advanced BIOS Features ` Hard Disk Boot Priority First Boot Device Second Boot Device Third Boot Device Boot Up Floppy Seek Password Check Init Display First [Press Enter] [Floppy] [Hard Disk] [CDROM] [Disabled] [Setup] [AGP] Item Help Menu Level` Select Hard Disk Boot Device Priority KLJI: Move Enter: Select +/-/PU/PD: Value F5: Previous Values F10: Save ESC: Exit F7: Optimized Defaults F1: General Help Hard Disk Boot Priority Select boot sequence for the type of floppy disk drive by USB-CDROM. USB...
... BIOS Features CMOS Setup Utility-Copyright (C) 1984-2005 Award Software Advanced BIOS Features ` Hard Disk Boot Priority First Boot Device Second Boot Device Third Boot Device Boot Up Floppy Seek Password Check Init Display First [Press Enter] [Floppy] [Hard Disk] [CDROM] [Disabled] [Setup] [AGP] Item Help Menu Level` Select Hard Disk Boot Device Priority KLJI: Move Enter: Select +/-/PU/PD: Value F5: Previous Values F10: Save ESC: Exit F7: Optimized Defaults F1: General Help Hard Disk Boot Priority Select boot sequence for the type of floppy disk drive by USB-CDROM. USB...
User Manual
Page 34
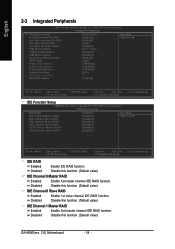
... Peripherals CMOS Setup Utility-Copyright (C) 1984-2005 Award Software Integrated Peripherals ` IDE Function Setup On-Chip Primary PCI IDE On-Chip Secondary PCI IDE On-Chip LAN(nVIDIA) On-Chip LAN BOOT ROM USB Host Controller USB Keyboard Support USB Mouse Support Serial-ATA 2(Internal PHY) AC97 Audio Onboard Serial Port 1 Onboard Serial Port 2 Onboard Parallel Port Parallel Port Mode x ECP Mode Use DMA IDE DMA transfer [Press Enter] [Enabled] [Enabled] [Auto] [Disabled] [V1.1+V2.0] [Disabled] [Disabled] [Enabled] [Auto] [3F8/IRQ4] [2F8/IRQ3] [378/IRQ7] [SPP] 3 [Enabled] Item Help Menu...
... Peripherals CMOS Setup Utility-Copyright (C) 1984-2005 Award Software Integrated Peripherals ` IDE Function Setup On-Chip Primary PCI IDE On-Chip Secondary PCI IDE On-Chip LAN(nVIDIA) On-Chip LAN BOOT ROM USB Host Controller USB Keyboard Support USB Mouse Support Serial-ATA 2(Internal PHY) AC97 Audio Onboard Serial Port 1 Onboard Serial Port 2 Onboard Parallel Port Parallel Port Mode x ECP Mode Use DMA IDE DMA transfer [Press Enter] [Enabled] [Enabled] [Auto] [Disabled] [V1.1+V2.0] [Disabled] [Disabled] [Enabled] [Auto] [3F8/IRQ4] [2F8/IRQ3] [378/IRQ7] [SPP] 3 [Enabled] Item Help Menu...
User Manual
Page 35
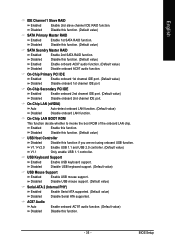
... the boot ROM of the onboard LAN chip. Enabled Enable this function if you are not using onboard USB function. Disabled Disable this function. (Default value) USB Host Controller Disabled V1.1+V2.0 Disable this function. On-Chip Primary PCI IDE Enabled Enable onboard 1st channel IDE port. (Default value) Disabled Disable onboard 1st channel IDE port. Disabled Disable this function. - 35 - AC97 Audio Auto Enable onboard AC'97 audio function. (Default value) Disabled Disable this function. (Default value) SATA Secndry Master RAID Enabled Disabled Enable...
... the boot ROM of the onboard LAN chip. Enabled Enable this function if you are not using onboard USB function. Disabled Disable this function. (Default value) USB Host Controller Disabled V1.1+V2.0 Disable this function. On-Chip Primary PCI IDE Enabled Enable onboard 1st channel IDE port. (Default value) Disabled Disable onboard 1st channel IDE port. Disabled Disable this function. - 35 - AC97 Audio Auto Enable onboard AC'97 audio function. (Default value) Disabled Disable this function. (Default value) SATA Secndry Master RAID Enabled Disabled Enable...
User Manual
Page 42
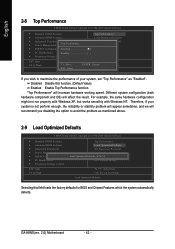
... 2-9 Load Optimized Defaults CMOS Setup Utility-Copyright (C) 1984-2005 Award Software ` Standard CMOS Features ` Advanced BIOS Features ` Integrated Peripherals ` Power Management Setup ` PnP/PCI Configurations ` PC Health Status ` Frequency/Voltage Control ESC: Quit F8: Q-Flash Top Performance Load Optimized Defaults Set Supervisor Password Set User Password Load Optimized DefaultsS(aYve/N&)?ENxit Setup Exit Without Saving KLJI: Select Item F10: Save & Exit Setup Load Optimized Defaults Selecting this function. (Default Value) Enabled Enable Top Performance function. Disabled Disable...
... 2-9 Load Optimized Defaults CMOS Setup Utility-Copyright (C) 1984-2005 Award Software ` Standard CMOS Features ` Advanced BIOS Features ` Integrated Peripherals ` Power Management Setup ` PnP/PCI Configurations ` PC Health Status ` Frequency/Voltage Control ESC: Quit F8: Q-Flash Top Performance Load Optimized Defaults Set Supervisor Password Set User Password Load Optimized DefaultsS(aYve/N&)?ENxit Setup Exit Without Saving KLJI: Select Item F10: Save & Exit Setup Load Optimized Defaults Selecting this function. (Default Value) Enabled Enable Top Performance function. Disabled Disable...

User Manual
Page 43
...to enter Setup Menu. BIOS Setup You will be prompted only when you are prompted to enter password. The BIOS Setup program allows you in Advance BIOS Features Menu, you will be asked to confirm the password being disabled. English 2-10 Set Supervisor/User Password CMOS Setup Utility-Copyright (C) 1984-2005 Award Software ` Standard CMOS Features ` Advanced BIOS Features ` Integrated Peripherals ` Power Management Setup ` PnP/PCI ConfiguratioEnsnter Password: ` PC Health Status ` Frequency/Voltage Control Top Performance Load Optimized Defaults Set Supervisor Password Set User Password...
...to enter Setup Menu. BIOS Setup You will be prompted only when you are prompted to enter password. The BIOS Setup program allows you in Advance BIOS Features Menu, you will be asked to confirm the password being disabled. English 2-10 Set Supervisor/User Password CMOS Setup Utility-Copyright (C) 1984-2005 Award Software ` Standard CMOS Features ` Advanced BIOS Features ` Integrated Peripherals ` Power Management Setup ` PnP/PCI ConfiguratioEnsnter Password: ` PC Health Status ` Frequency/Voltage Control Top Performance Load Optimized Defaults Set Supervisor Password Set User Password...
User Manual
Page 44
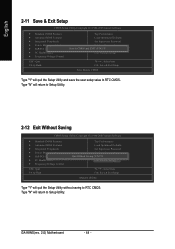
... Save Data to CMOS Type "Y" will return to Setup Utility. GA-K8NS(rev. 2.0) Motherboard - 44 - Type "N" will quit the Setup Utility and save the user setup value to RTC CMOS. Type "N" will return to Setup Utility. 2-12 Exit Without Saving CMOS Setup Utility-Copyright (C) 1984-2005 Award Software ` Standard CMOS Features ` Advanced BIOS Features ` Integrated Peripherals ` Power Management Setup ` PnP/PCI Configurations ` PC Health Status ` Frequency/Voltage Control ESC: Quit F8: Q-Flash Top Performance Load Optimized Defaults Set Supervisor Password Set User Password Quit Without...
... Save Data to CMOS Type "Y" will return to Setup Utility. GA-K8NS(rev. 2.0) Motherboard - 44 - Type "N" will quit the Setup Utility and save the user setup value to RTC CMOS. Type "N" will return to Setup Utility. 2-12 Exit Without Saving CMOS Setup Utility-Copyright (C) 1984-2005 Award Software ` Standard CMOS Features ` Advanced BIOS Features ` Integrated Peripherals ` Power Management Setup ` PnP/PCI Configurations ` PC Health Status ` Frequency/Voltage Control ESC: Quit F8: Q-Flash Top Performance Load Optimized Defaults Set Supervisor Password Set User Password Quit Without...

User Manual
Page 50
.... Boot from CD: Xpress Recovery V1.0 (C) Copy Right 2003. Xpress Recovery is Xpress Recovery ? Insert the provided driver CD into your CD drive, then save and exit the BIOS menu. Verifying DMI Pool Data Boot from CD: Boot from CD-ROM (BMP Mode) Enter the BIOS menu, select "Advanced BIOS Feature" and set as the boot partition. Execute Backup Utility 2. Execute Restore Utility 3. Set Password 5. Exit and Restart Build 2011 GA-K8NS(rev. 2.0) Motherboard - 50...
.... Boot from CD: Xpress Recovery V1.0 (C) Copy Right 2003. Xpress Recovery is Xpress Recovery ? Insert the provided driver CD into your CD drive, then save and exit the BIOS menu. Verifying DMI Pool Data Boot from CD: Boot from CD-ROM (BMP Mode) Enter the BIOS menu, select "Advanced BIOS Feature" and set as the boot partition. Execute Backup Utility 2. Execute Restore Utility 3. Set Password 5. Exit and Restart Build 2011 GA-K8NS(rev. 2.0) Motherboard - 50...
User Manual
Page 54
... to enter BIOS menu. CMOS Setup Utility-Copyright (C) 1984-2004 Award Software Standard CMOS Features Advanced BIOS Features Integrated Peripherals Power Management Setup PnP/PCI Configurations PC Health Status MB Intelligent Tweaker(M.I.T.) ESC: Quit F8: Dual BIOS/Q-Flash Select Language Load Fail-Safe Defaults Load Optimized Defaults Set Supervisor Password Set User Password Save & Exit Setup Exit Without Saving F3: Change Language F10: Save & Exit Setup Time, Date, Hard Disk Type... English Entering the Q-FlashTM utility: Step1: To use Q-Flash utility, you must press Del in the boot...
... to enter BIOS menu. CMOS Setup Utility-Copyright (C) 1984-2004 Award Software Standard CMOS Features Advanced BIOS Features Integrated Peripherals Power Management Setup PnP/PCI Configurations PC Health Status MB Intelligent Tweaker(M.I.T.) ESC: Quit F8: Dual BIOS/Q-Flash Select Language Load Fail-Safe Defaults Load Optimized Defaults Set Supervisor Password Set User Password Save & Exit Setup Exit Without Saving F3: Change Language F10: Save & Exit Setup Time, Date, Hard Disk Type... English Entering the Q-FlashTM utility: Step1: To use Q-Flash utility, you must press Del in the boot...
User Manual
Page 56
... Dual BIOS Utility Boot From Main Bios Main ROM Type/Size SST 49LF004A Backup ROM Type/Size SST 49LF004A 512K 512K Wide Range Protection Disable Boot From Main Bios !A! The BIOS file becomes Fba after you exit Q-Flash. Halt On Error Disable CPopleyasMe apirneRssOaMnyDkaetya tto cBoanctkiunpue Load Default Settings Save Settings to CMOS Q-Flash Utility Load Main BIOS from Floppy Load Backup BIOS from Floppy Save Main BIOS to Floppy Save Backup BIOS to Floppy Enter : Run :Move ESC:Reset F10:Power Off After system reboots, you may find the BIOS version on your boot screen...
... Dual BIOS Utility Boot From Main Bios Main ROM Type/Size SST 49LF004A Backup ROM Type/Size SST 49LF004A 512K 512K Wide Range Protection Disable Boot From Main Bios !A! The BIOS file becomes Fba after you exit Q-Flash. Halt On Error Disable CPopleyasMe apirneRssOaMnyDkaetya tto cBoanctkiunpue Load Default Settings Save Settings to CMOS Q-Flash Utility Load Main BIOS from Floppy Load Backup BIOS from Floppy Save Main BIOS to Floppy Save Backup BIOS to Floppy Enter : Run :Move ESC:Reset F10:Power Off After system reboots, you may find the BIOS version on your boot screen...

User Manual
Page 57
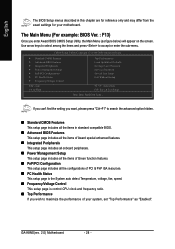
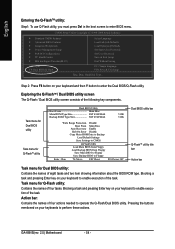
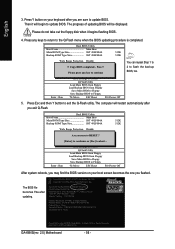
..., Hard Disk Type... - 57 - Press Del to load BIOS Fail-Safe Defaults. Select Save & Exit Setup item to save and exit. This part guides users of single-BIOS motherboards how to CMOS and exit the BIOS menu. Appendix English 6. Part Two: Updating BIOS with Q-FlashTM Utility on your keyboard to CMOS and EXIT (SYe/tNS)u?pYervisor Password PnP/PCI Configurations Set User Password PC Health Status Save & Exit Setup MB Intelligent Tweaker(M.I.T.) Exit Without Saving ESC: Quit F8: Dual BIOS/Q-Flash F3: Change...
..., Hard Disk Type... - 57 - Press Del to load BIOS Fail-Safe Defaults. Select Save & Exit Setup item to save and exit. This part guides users of single-BIOS motherboards how to CMOS and exit the BIOS menu. Appendix English 6. Part Two: Updating BIOS with Q-FlashTM Utility on your keyboard to CMOS and EXIT (SYe/tNS)u?pYervisor Password PnP/PCI Configurations Set User Password PC Health Status Save & Exit Setup MB Intelligent Tweaker(M.I.T.) Exit Without Saving ESC: Quit F8: Dual BIOS/Q-Flash F3: Change...

User Manual
Page 60
... "Internet Update" icon. Please search for BIOS unzip file, downloading from internet or any other methods (such as: K8NS.F13). c. Installing the @BIOS utility Fig 2. Click Start/ All Programs/ Gigabyte/@BIOS Fig 3. Update BIOS through Internet: a. c. Select the exact model name on your motherboard. Methods and steps: I. The @BIOS utility Click " " Click "Update New BIOS" Fig 4. b. e. Click "Update New BIOS" icon. d. Just select the desired @BIOS server to update their BIOS under Windows. GA-K8NS(rev. 2.0) Motherboard - 60...
... "Internet Update" icon. Please search for BIOS unzip file, downloading from internet or any other methods (such as: K8NS.F13). c. Installing the @BIOS utility Fig 2. Click Start/ All Programs/ Gigabyte/@BIOS Fig 3. Update BIOS through Internet: a. c. Select the exact model name on your motherboard. Methods and steps: I. The @BIOS utility Click " " Click "Update New BIOS" Fig 4. b. e. Click "Update New BIOS" icon. d. Just select the desired @BIOS server to update their BIOS under Windows. GA-K8NS(rev. 2.0) Motherboard - 60...
User Manual
Page 63
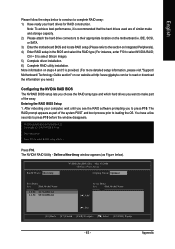
... storage capacity. 2) Please attach the hard drive connectors to their appropriate location on the motherboard ie. Press F10. The NVIDIA RAID Utility - Note: To achieve best performance, it is provided. (For more detailed setup information, please visit "Support\ Motherboard\ Technology Guide section" on Integrated Peripherals). 4) Enter RAID setup in the BIOS and select the RAID type (For instance, enter F10 to select NVIDIA RAID; Ctrl + S to select Silicon Image). 5) Complete driver installation. 6) Complete RAID utility installation...
... storage capacity. 2) Please attach the hard drive connectors to their appropriate location on the motherboard ie. Press F10. The NVIDIA RAID Utility - Note: To achieve best performance, it is provided. (For more detailed setup information, please visit "Support\ Motherboard\ Technology Guide section" on Integrated Peripherals). 4) Enter RAID setup in the BIOS and select the RAID type (For instance, enter F10 to select NVIDIA RAID; Ctrl + S to select Silicon Image). 5) Complete driver installation. 6) Complete RAID utility installation...

User Manual
Page 67
... installed under Windows once for the SATA controller from the motherboard driver CD-ROM to install the RAID drivers. Follow the on-screen instructions to complete the installation. (Each time you need to install a third party SCSI or RAID driver" message, then supply serial ATA controller driver by pressing the corresponding letter from the menu. Use an alternative system and insert the GIGABYTE motherboard drive CD-ROM. Boot from the startup disk. Select the controller driver by this driver file to the floppy disk...
... installed under Windows once for the SATA controller from the motherboard driver CD-ROM to install the RAID drivers. Follow the on-screen instructions to complete the installation. (Each time you need to install a third party SCSI or RAID driver" message, then supply serial ATA controller driver by pressing the corresponding letter from the menu. Use an alternative system and insert the GIGABYTE motherboard drive CD-ROM. Boot from the startup disk. Select the controller driver by this driver file to the floppy disk...

User Manual
Page 76
... short: Keyboard error 1 long 9 short: BIOS ROM error Continuous long beeps: DRAM error Continuous short beeps: Power error GA-K8NS(rev. 2.0) Motherboard - 76 - Why? Turn off the on power. 6. Connect power cord to MB again and turn on -board battery to leak voltage to the maximum volume? Question 5: Sometimes I still get a weak sound after system boots up the speaker to clear CMOS. Answer: The beep codes below : Steps: 1. English 4-2 Troubleshooting Below is a collection of general asked questions based on a specific motherboard model, please log on standby after updating...
... short: Keyboard error 1 long 9 short: BIOS ROM error Continuous long beeps: DRAM error Continuous short beeps: Power error GA-K8NS(rev. 2.0) Motherboard - 76 - Why? Turn off the on power. 6. Connect power cord to MB again and turn on -board battery to leak voltage to the maximum volume? Question 5: Sometimes I still get a weak sound after system boots up the speaker to clear CMOS. Answer: The beep codes below : Steps: 1. English 4-2 Troubleshooting Below is a collection of general asked questions based on a specific motherboard model, please log on standby after updating...


