
Manual
Page 1
nVIDIA nForce4 SLI 2 (1) Installing SATA hard drive(s) in your computer 2 (2) Configuring SATA controller mode and boot sequence in BIOS Setup 3 (3) Configuring RAID set in RAID BIOS 6 (4) Making a SATA controller driver disk 9 (5) Installing SATA controller driver during OS installation 11 (6) Configuring a bootable RAID array with Microsoft Windows 2000 14 Table of Contents Configuring SATA Hard Drive(s) (Controller: nVIDIA nForce4 Ultra;
nVIDIA nForce4 SLI 2 (1) Installing SATA hard drive(s) in your computer 2 (2) Configuring SATA controller mode and boot sequence in BIOS Setup 3 (3) Configuring RAID set in RAID BIOS 6 (4) Making a SATA controller driver disk 9 (5) Installing SATA controller driver during OS installation 11 (6) Configuring a bootable RAID array with Microsoft Windows 2000 14 Table of Contents Configuring SATA Hard Drive(s) (Controller: nVIDIA nForce4 Ultra;
Manual
Page 2
...on the motherboard. (If there are more than one hard drive. (b) An empty formatted floppy disk. (c) Windows XP/2000 setup disk. (d) Driver CD for the connector. SATA Hard Drive Configurations (nForce series) - 2 - For example, S_ATA1_SB/S_ATA2_SB is recommended that you do not want to... "*" Skip this step if you use two hard drives with identical model and capacity). Ác Configuring SATA Hard Drive(s) (Controller: nVIDIA nForce4 Ultra; Åé nVIDIA nForce4 SLI) ¤¤ ¤å To configure SATA hard drive(s), follow the steps below: (1) Install SATA hard...
...on the motherboard. (If there are more than one hard drive. (b) An empty formatted floppy disk. (c) Windows XP/2000 setup disk. (d) Driver CD for the connector. SATA Hard Drive Configurations (nForce series) - 2 - For example, S_ATA1_SB/S_ATA2_SB is recommended that you do not want to... "*" Skip this step if you use two hard drives with identical model and capacity). Ác Configuring SATA Hard Drive(s) (Controller: nVIDIA nForce4 Ultra; Åé nVIDIA nForce4 SLI) ¤¤ ¤å To configure SATA hard drive(s), follow the steps below: (1) Install SATA hard...

Manual
Page 8
... displaying the RAID array you created will show Yes. ¤¤ NVIDIA RAID Utility Nov 5 2004 - Press ENTER to return to install the SATA controller driver and operating system. Array List - ¤å Boot Id Status Vendor Array Model Name No 2 Healthy NVIDIA STRIPE 111.79G [Ctrl-X] Exit [h i ] Select [B] Set Boot...
... displaying the RAID array you created will show Yes. ¤¤ NVIDIA RAID Utility Nov 5 2004 - Press ENTER to return to install the SATA controller driver and operating system. Array List - ¤å Boot Id Status Vendor Array Model Name No 2 Healthy NVIDIA STRIPE 111.79G [Ctrl-X] Exit [h i ] Select [B] Set Boot...
Manual
Page 9
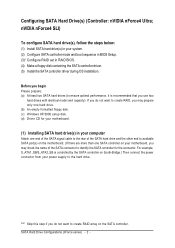
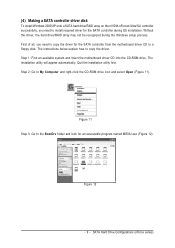
... the SATA controller during the Windows setup process. (4) Making a SATA controller driver disk To install Windows 2000/XP onto a SATA hard drive/RAID array on the nVIDIA nForce4 Ultra/SLI controller successfully, you need to the BootDrv folder and look for an executable program named MENU.exe (Figure 12...). Step 2: Go to a floppy disk. Without the driver, the hard drive/RAID array may not be recognized ...
... the SATA controller during the Windows setup process. (4) Making a SATA controller driver disk To install Windows 2000/XP onto a SATA hard drive/RAID array on the nVIDIA nForce4 Ultra/SLI controller successfully, you need to the BootDrv folder and look for an executable program named MENU.exe (Figure 12...). Step 2: Go to a floppy disk. Without the driver, the hard drive/RAID array may not be recognized ...
Manual
Page 10
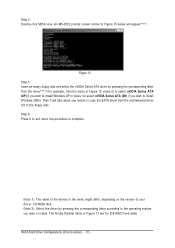
...(Note 2) (for IDE RAID hard disks. An MS-DOS prompt screen similar to Figure 13 below will take about one minute to copy the SATA driver from the menu in Figure 13, press G to select nVIDIA Series ATA (XP) if you wish to install Windows XP or press I to select nVIDIA... series) - 10 - Then it will appear(Note 1). ¤¤ ¤å Figure 13 Step 5: Insert an empty floppy disk and select the nVIDIA Series ATA driver by pressing the corresponding letter according to the operating system you wish to the floppy disk. Step 6: Press 0 to exit when the procedure is complete...
...(Note 2) (for IDE RAID hard disks. An MS-DOS prompt screen similar to Figure 13 below will take about one minute to copy the SATA driver from the menu in Figure 13, press G to select nVIDIA Series ATA (XP) if you wish to install Windows XP or press I to select nVIDIA... series) - 10 - Then it will appear(Note 1). ¤¤ ¤å Figure 13 Step 5: Insert an empty floppy disk and select the nVIDIA Series ATA driver by pressing the corresponding letter according to the operating system you wish to the floppy disk. Step 6: Press 0 to exit when the procedure is complete...

Manual
Page 11
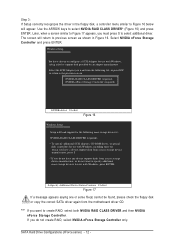
...system to boot from a mass storage device manufacturer, press S. * If you do not have prepared the SATA driver disk and configured BIOS settings, you need to install a 3rd party SCSI or RAID driver. Figure 14 Step 2: When a screen similar to manually specify an adapter. Windows Setup Press F6 if you...determine the type of some files being loaded before you see the "Press F6 if you are ready to install a 3rd party SCSI or RAID driver" message (Figure 14). Currently, Setup will be a few moments of one or more mass storage devices installed in your SATA hard drive with ...
...system to boot from a mass storage device manufacturer, press S. * If you do not have prepared the SATA driver disk and configured BIOS settings, you need to install a 3rd party SCSI or RAID driver. Figure 14 Step 2: When a screen similar to manually specify an adapter. Windows Setup Press F6 if you...determine the type of some files being loaded before you see the "Press F6 if you are ready to install a 3rd party SCSI or RAID driver" message (Figure 14). Currently, Setup will be a few moments of one or more mass storage devices installed in your SATA hard drive with ...
Manual
Page 12
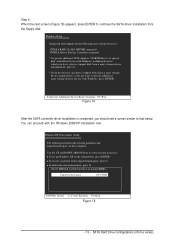
...Exit Figure 17 If a message appears saying one or some file(s) cannot be found, please check the floppy disk or copy the correct SATA driver again from a mass storage device manufacturer, press S. * If you do not want to the previous screen. Windows Setup You have any ...configure a SCSI Adapter for use with Windows, press ENTER. Select the SCSI Adapter you want from the following mass storage device(s): NVIDIA RAID CLASS DRIVER (required) * To specify additional SCSI adapters, CD-ROM drives, or special disk controllers for use with Windows, including those for which you want...
...Exit Figure 17 If a message appears saying one or some file(s) cannot be found, please check the floppy disk or copy the correct SATA driver again from a mass storage device manufacturer, press S. * If you do not want to the previous screen. Windows Setup You have any ...configure a SCSI Adapter for use with Windows, press ENTER. Select the SCSI Adapter you want from the following mass storage device(s): NVIDIA RAID CLASS DRIVER (required) * To specify additional SCSI adapters, CD-ROM drives, or special disk controllers for use with Windows, including those for which you want...
Manual
Page 13
...in the list. You can proceed with the Windows 2000/XP installation now. WindowsXP Professional Setup The following mass storage device(s): NVIDIA RAID CLASS DRIVER (required) NVIDIA nForce Storage Controller (required) * To specify additional SCSI adapters, CD-ROM drives, or special disk controllers for use with...Install C=Create Partition F3=Quit Figure 19 - 13 - S=Specify Additional Device Enter=Continue F3=Exit Figure 18 After the SATA controller driver installation is completed, you do not have a device support disk from the floppy disk. Windows Setup Setup will load support for ...
...in the list. You can proceed with the Windows 2000/XP installation now. WindowsXP Professional Setup The following mass storage device(s): NVIDIA RAID CLASS DRIVER (required) NVIDIA nForce Storage Controller (required) * To specify additional SCSI adapters, CD-ROM drives, or special disk controllers for use with...Install C=Create Partition F3=Quit Figure 19 - 13 - S=Specify Additional Device Enter=Continue F3=Exit Figure 18 After the SATA controller driver installation is completed, you do not have a device support disk from the floppy disk. Windows Setup Setup will load support for ...
Manual
Page 14
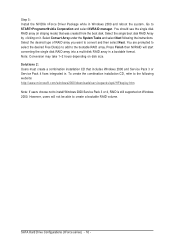
...system BIOS Setup during POST (Power-On Self Test). Save settings and exit the BIOS setup. Download and install Windows 2000 Service Pack 4 from GA-K8N Ultra-SLI, BIOS ver. F2a) SATA Hard Drive Configurations (nForce series) - 14 - Step 2: After system restarts, press Del to resolve this issue...step-by-step instructions: Step 1: Install Windows 2000 onto a selected hard drive. Solutions 1: ¤å Use the NVRAID tool (nForce Driver Version 5.xx) to convert the boot volume to a RAID array. Under the Integrated Peripherals menu (Figure 20) assure the SATA port connecting ...
...system BIOS Setup during POST (Power-On Self Test). Save settings and exit the BIOS setup. Download and install Windows 2000 Service Pack 4 from GA-K8N Ultra-SLI, BIOS ver. F2a) SATA Hard Drive Configurations (nForce series) - 14 - Step 2: After system restarts, press Del to resolve this issue...step-by-step instructions: Step 1: Install Windows 2000 onto a selected hard drive. Solutions 1: ¤å Use the NVRAID tool (nForce Driver Version 5.xx) to convert the boot volume to a RAID array. Under the Integrated Peripherals menu (Figure 20) assure the SATA port connecting ...
Manual
Page 16
... is still supported on disk size. Select the single boot disk RAID Array by clicking on it. Ác Step 5: Åé Install the NVIDIA nForce Driver Package while in a bootable format. Go to the bootable RAID array.
... is still supported on disk size. Select the single boot disk RAID Array by clicking on it. Ác Step 5: Åé Install the NVIDIA nForce Driver Package while in a bootable format. Go to the bootable RAID array.
User Manual
Page 5
Chapter 3 Drivers Installation 49 3-1 Install Chipset Drivers 49 3-2 SoftwareApplication 50 3-3 Software Information 50 3-4 Hardware Information 51 3-5 Contact Us ...51 Chapter 4 Appendix 53 4-1 Unique Software Utilities 53 4-1-1 EasyTune 5 Introduction 53 4-1-2 Xpress Recovery Introduction 54 4-1-3 Flash BIOS Method Introduction 57 4-1-4 Serial ATA BIOS Setting Utility Introduction 68 4-1-5 2- / 4- / 6- / 8- Channel Audio Function Introduction 74 4-2 Troubleshooting 78 - 5 -
Chapter 3 Drivers Installation 49 3-1 Install Chipset Drivers 49 3-2 SoftwareApplication 50 3-3 Software Information 50 3-4 Hardware Information 51 3-5 Contact Us ...51 Chapter 4 Appendix 53 4-1 Unique Software Utilities 53 4-1-1 EasyTune 5 Introduction 53 4-1-2 Xpress Recovery Introduction 54 4-1-3 Flash BIOS Method Introduction 57 4-1-4 Serial ATA BIOS Setting Utility Introduction 68 4-1-5 2- / 4- / 6- / 8- Channel Audio Function Introduction 74 4-2 Troubleshooting 78 - 5 -

User Manual
Page 16
Press the expansion card firmly into the computer. 2. GA-K8NF9 Ultra Motherboard - 16 - Make sure your expansion card by the small white-drawable bar. English 1-5 Installation of Expansion Cards You can install your VGA card is ... into expansion slot in the slot. 5. Be sure the metal contacts on the computer, if necessary, setup BIOS utility of the expansion card. 6. Install related driver from the computer. 3. Replace the screw to install/uninstall the VGA card. Replace your computer's chassis cover, screws and slot bracket from the operating system...
Press the expansion card firmly into the computer. 2. GA-K8NF9 Ultra Motherboard - 16 - Make sure your expansion card by the small white-drawable bar. English 1-5 Installation of Expansion Cards You can install your VGA card is ... into expansion slot in the slot. 5. Be sure the metal contacts on the computer, if necessary, setup BIOS utility of the expansion card. 6. Install related driver from the computer. 3. Replace the screw to install/uninstall the VGA card. Replace your computer's chassis cover, screws and slot bracket from the operating system...
User Manual
Page 17
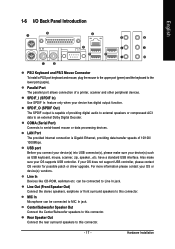
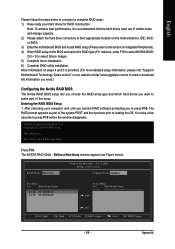
... connector. SPDIF_I (SPDIF In) Use SPDIF In feature only when your OS does not support USB controller, please contact OS vendor for possible patch or driver upgrade. Rear Speaker Out Connect the rear surround speakers to this connector. - 17 - Hardware Installation SPDIF_O (SPDIF Out) The SPDIF output is Gigabit Ethernet, providing...
... connector. SPDIF_I (SPDIF In) Use SPDIF In feature only when your OS does not support USB controller, please contact OS vendor for possible patch or driver upgrade. Rear Speaker Out Connect the rear surround speakers to this connector. - 17 - Hardware Installation SPDIF_O (SPDIF Out) The SPDIF output is Gigabit Ethernet, providing...

User Manual
Page 21
... No. One IDE connector can connect to one IDE device as Master and the other as Slave (for the SATA controller(s)and install the proper driver in order to the computer via an IDE connector. Definition 1 GND 2 TXP 7 1 3 TXN 4 GND 5 RXN 6 RXP 7 GND - 21 - If you wish to connect two IDE... devices, please set the jumper on the IDE device). 40 39 2 IDE2 1 IDE1 8) S_ATA0/1/2/3_SB (SATA 3Gb/s Connectors, Controlled by nForce4 Ultra) SATA 3Gb/s can then connect to 150MB/s transfer rate. Hardware Installation
... No. One IDE connector can connect to one IDE device as Master and the other as Slave (for the SATA controller(s)and install the proper driver in order to the computer via an IDE connector. Definition 1 GND 2 TXP 7 1 3 TXN 4 GND 5 RXN 6 RXP 7 GND - 21 - If you wish to connect two IDE... devices, please set the jumper on the IDE device). 40 39 2 IDE2 1 IDE1 8) S_ATA0/1/2/3_SB (SATA 3Gb/s Connectors, Controlled by nForce4 Ultra) SATA 3Gb/s can then connect to 150MB/s transfer rate. Hardware Installation
User Manual
Page 49
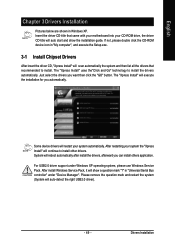
...computer", and execute the Setup.exe. 3-1 Install Chipset Drivers After insert the driver CD, "Xpress Install" will continue to install other drivers. Drivers Installation Some device drivers will reboot automatically after install the drivers, afterward you can install others application. The "Xpress ...Install" uses the"Click and Go" technology to install. For USB2.0 driver support under "Device Manager". English Chapter 3 Drivers Installation Pictures below are shown in "Universal Serial Bus controller" under Windows XP operating system, ...
...computer", and execute the Setup.exe. 3-1 Install Chipset Drivers After insert the driver CD, "Xpress Install" will continue to install other drivers. Drivers Installation Some device drivers will reboot automatically after install the drivers, afterward you can install others application. The "Xpress ...Install" uses the"Click and Go" technology to install. For USB2.0 driver support under "Device Manager". English Chapter 3 Drivers Installation Pictures below are shown in "Universal Serial Bus controller" under Windows XP operating system, ...

User Manual
Page 50
GA-K8NF9 Ultra Motherboard - 50 - English 3-2 Software Application This page displays all the tools that GIGABYTE developed and some free software. You can click an item to install it. 3-3 Software Information This page lists the contents of software and drivers in this CD-title.
GA-K8NF9 Ultra Motherboard - 50 - English 3-2 Software Application This page displays all the tools that GIGABYTE developed and some free software. You can click an item to install it. 3-3 Software Information This page lists the contents of software and drivers in this CD-title.
User Manual
Page 51
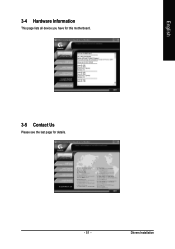
Drivers Installation English 3-4 Hardware Information This page lists all device you have for this motherboard. 3-5 Contact Us Please see the last page for details. - 51 -
Drivers Installation English 3-4 Hardware Information This page lists all device you have for this motherboard. 3-5 Contact Us Please see the last page for details. - 51 -
User Manual
Page 54
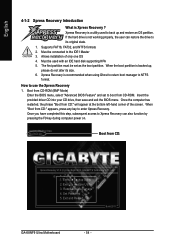
...Supports FAT16, FAT32, and NTFS formats 2. Exit and Restart Build 2011 GA-K8NF9 Ultra Motherboard - 54 - If the hard drive is not working properly, the...When the boot partition is a utility used with an IDE hard disk supporting HPA 5. Insert the provided driver CD into your CD drive, then save and exit the BIOS menu. Once you have completed this ...CD-ROM (BMP Mode) Enter the BIOS menu, select "Advanced BIOS Feature" and set as the boot partition. GIGABYTE Technology CO. , Ltd. 1. Set Password 5. The first partition must be used to Xpress Recovery can restore the...
...Supports FAT16, FAT32, and NTFS formats 2. Exit and Restart Build 2011 GA-K8NF9 Ultra Motherboard - 54 - If the hard drive is not working properly, the...When the boot partition is a utility used with an IDE hard disk supporting HPA 5. Insert the provided driver CD into your CD drive, then save and exit the BIOS menu. Once you have completed this ...CD-ROM (BMP Mode) Enter the BIOS menu, select "Advanced BIOS Feature" and set as the boot partition. GIGABYTE Technology CO. , Ltd. 1. Set Password 5. The first partition must be used to Xpress Recovery can restore the...
User Manual
Page 55
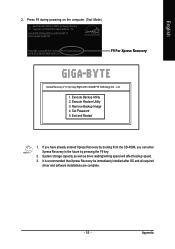
... enter Xpress Recovery in the future by pressing the F9 key. 2. It is recommended that Xpress Recovery be immediately installed after OS and all required driver and software installations are complete. - 55 - English 2. Press F9 during powering on the computer. (Text Mode) Award Modular BIOS v6.00PG, ...An Energy Star Al ly Copyright (C) 1984-2004, Award Software, Inc. GIGABYTE Technology CO. , Ltd. 1. Intel 865PE AGPSet BIOS for 8IPE1000MT F1 Check System Health OK . . . Execute Restore Utility 3. Remove Backup Image 4.
... enter Xpress Recovery in the future by pressing the F9 key. 2. It is recommended that Xpress Recovery be immediately installed after OS and all required driver and software installations are complete. - 55 - English 2. Press F9 during powering on the computer. (Text Mode) Award Modular BIOS v6.00PG, ...An Energy Star Al ly Copyright (C) 1984-2004, Award Software, Inc. GIGABYTE Technology CO. , Ltd. 1. Intel 865PE AGPSet BIOS for 8IPE1000MT F1 Check System Health OK . . . Execute Restore Utility 3. Remove Backup Image 4.
User Manual
Page 69
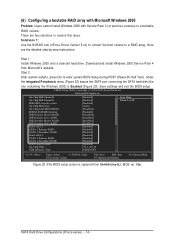
...Integrated Peripherals). 4) Enter RAID setup in the BIOS and select the RAID type (For instance, enter F10 to select Silicon Image). 5) Complete driver installation. 6) Complete RAID utility installation. The RAID prompt appears as Figure below to make and storage capacity. 2) Please attach the hard drive connectors..., SCSI, or SATA. 3) Enter the motherboard BIOS and locate RAID setup (Please refer to the section on our website at http:\\www.gigabyte.com.tw to read or download the information you need.) Configuring the Nvidia RAID BIOS The Nvidia RAID BIOS setup lets you choose the RAID...
...Integrated Peripherals). 4) Enter RAID setup in the BIOS and select the RAID type (For instance, enter F10 to select Silicon Image). 5) Complete driver installation. 6) Complete RAID utility installation. The RAID prompt appears as Figure below to make and storage capacity. 2) Please attach the hard drive connectors..., SCSI, or SATA. 3) Enter the motherboard BIOS and locate RAID setup (Please refer to the section on our website at http:\\www.gigabyte.com.tw to read or download the information you need.) Configuring the Nvidia RAID BIOS The Nvidia RAID BIOS setup lets you choose the RAID...


