
User Manual
Page 37
...Auto Enable onboard AC'97 audio function. (Default value) Disabled Disable this function. (Default value) NV SATA 2 Secondary RAID Enabled Enable 2nd SATA secondary RAID function. Onboard 1394 Enabled Enable onboard IEEE1394 function. (Default value) Disabled Disable onboard IEEE1394 function. Onboard Serial Port 1 Auto...) 2F8/IRQ3 3E8/IRQ4 Enable onboard Serial port 1 and address is 3BC/IRQ7. (Note) When using driver version 1.2, please enable "NV IDE/SATA RAID function" if you wish to base memory(640K). Onboard Parallel Port Disabled Disable onboard LPT port. 378/IRQ7...
...Auto Enable onboard AC'97 audio function. (Default value) Disabled Disable this function. (Default value) NV SATA 2 Secondary RAID Enabled Enable 2nd SATA secondary RAID function. Onboard 1394 Enabled Enable onboard IEEE1394 function. (Default value) Disabled Disable onboard IEEE1394 function. Onboard Serial Port 1 Auto...) 2F8/IRQ3 3E8/IRQ4 Enable onboard Serial port 1 and address is 3BC/IRQ7. (Note) When using driver version 1.2, please enable "NV IDE/SATA RAID function" if you wish to base memory(640K). Onboard Parallel Port Disabled Disable onboard LPT port. 378/IRQ7...

User Manual
Page 53
..., so free space available on the size of the data to correctly identify RAID and SATA IDE mode. REBOOT: Exit the main screen and restart the system... BIOS update) GA-K8U GA-K8NXP-9 GA-8N-SLI Royal GA-K8U-9 GA-K8N Ultra-9 GA-8N-SLI Pro GA-K8NXP-SLI GA-K8NF-9 (PCB Ver. 1.0) GA-8N-SLI GA-K8N Ultra-SLI GA-K8NE (PCB Ver. 1.0) GA-K8N Pro-SLI GA-K8NMF-9 - 53... SATA IDE channel 1 d. SATA IDE channel 2 e. The Main Screen of backing up data from the driver CD before data backup. 2. SATA IDE channel 4 Precautions: 1. Appendix Capable of Xpress Recovery2 1. RESTORE: ...
..., so free space available on the size of the data to correctly identify RAID and SATA IDE mode. REBOOT: Exit the main screen and restart the system... BIOS update) GA-K8U GA-K8NXP-9 GA-8N-SLI Royal GA-K8U-9 GA-K8N Ultra-9 GA-8N-SLI Pro GA-K8NXP-SLI GA-K8NF-9 (PCB Ver. 1.0) GA-8N-SLI GA-K8N Ultra-SLI GA-K8NE (PCB Ver. 1.0) GA-K8N Pro-SLI GA-K8NMF-9 - 53... SATA IDE channel 1 d. SATA IDE channel 2 e. The Main Screen of backing up data from the driver CD before data backup. 2. SATA IDE channel 4 Precautions: 1. Appendix Capable of Xpress Recovery2 1. RESTORE: ...

User Manual
Page 64
...Image). 5) Complete driver installation. 6) Complete RAID utility installation. Define a New Array window appears (as part of the array. English Please follow the steps below ). IDE, SCSI, or SATA. 3) Enter the motherboard BIOS and locate RAID setup (Please ...GA-K8NF-9 Motherboard - 64 - After rebooting your hard drives for RAID construction. The NVIDIA RAID Utility - Ctrl + S to press F10 before the window disappears. Press F10 to press F10. Note: To achieve best performance, it is provided. (For more detailed setup information, please visit our website at http:\\www.gigabyte...
...Image). 5) Complete driver installation. 6) Complete RAID utility installation. Define a New Array window appears (as part of the array. English Please follow the steps below ). IDE, SCSI, or SATA. 3) Enter the motherboard BIOS and locate RAID setup (Please ...GA-K8NF-9 Motherboard - 64 - After rebooting your hard drives for RAID construction. The NVIDIA RAID Utility - Ctrl + S to press F10 before the window disappears. Press F10 to press F10. Note: To achieve best performance, it is provided. (For more detailed setup information, please visit our website at http:\\www.gigabyte...

User Manual
Page 67
Array Detail - At the prompt, press Y to configure and load drivers under Windows. - 67 - Appendix Now that you want to exit the RAID setup. RAID Mode: Mirroring Striping Width : 1 Array 2 : NVIDIA MIRROR 111.79G - Press Enter again to go back to the previous screen and ..., Striping Width, Disk Model Name, and disk capacity. The Array Detail screen shows various information about the array that the RAID setup has been configured from the RAID BIOS, the next step is to wipe out all its contents, press C. Striping Block: 64K Adapt 2 2 Channel M/S 1 Master 0 Master...
Array Detail - At the prompt, press Y to configure and load drivers under Windows. - 67 - Appendix Now that you want to exit the RAID setup. RAID Mode: Mirroring Striping Width : 1 Array 2 : NVIDIA MIRROR 111.79G - Press Enter again to go back to the previous screen and ..., Striping Width, Disk Model Name, and disk capacity. The Array Detail screen shows various information about the array that the RAID setup has been configured from the RAID BIOS, the next step is to wipe out all its contents, press C. Striping Block: 64K Adapt 2 2 Channel M/S 1 Master 0 Master...
User Manual
Page 68
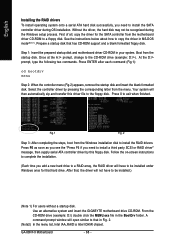
...installation disk to install the RAID drivers. Your system will open similar to that has CD-ROM support and a blank formatted floppy disk. Use an alternative system and insert the GIGABYTE motherboard drive CD-ROM. Without the driver, the hard disk may not...English Installing the RAID drivers To install operating system onto a serial ATA hard disk successfully, you need to install a third party SCSI or RAID driver" message, then supply serial ATA controller driver by pressing the corresponding letter from the motherboard driver CD-ROM to a floppy disk. GA-K8NF-9 Motherboard - ...
...installation disk to install the RAID drivers. Your system will open similar to that has CD-ROM support and a blank formatted floppy disk. Use an alternative system and insert the GIGABYTE motherboard drive CD-ROM. Without the driver, the hard disk may not...English Installing the RAID drivers To install operating system onto a serial ATA hard disk successfully, you need to install a third party SCSI or RAID driver" message, then supply serial ATA controller driver by pressing the corresponding letter from the motherboard driver CD-ROM to a floppy disk. GA-K8NF-9 Motherboard - ...


