Manual
Page 3
... the Support\Motherboard\Technology Guide page on your motherboard revision before updating motherboard BIOS, drivers, or when looking for technical information. is 1.0. Check your motherboard looks like this manual may be made by any form or by GIGABYTE without GIGABYTE's prior written permission. Example: Changes to the specifications and features in this manual...
... the Support\Motherboard\Technology Guide page on your motherboard revision before updating motherboard BIOS, drivers, or when looking for technical information. is 1.0. Check your motherboard looks like this manual may be made by any form or by GIGABYTE without GIGABYTE's prior written permission. Example: Changes to the specifications and features in this manual...
Manual
Page 5
... 41 3-1 Installing Chipset Drivers 41 3-2 SoftwareApplications 42 3-3 Driver CD Information 42 3-4 Hardware Information 43 3-5 Contact Us ...43 Chapter 4 Unique Features 45 4-1 Xpress Recovery2 45 4-2 BIOS Update Utilities 50 4-2-1 Updating the BIOS with the Q-...
... 41 3-1 Installing Chipset Drivers 41 3-2 SoftwareApplications 42 3-3 Driver CD Information 42 3-4 Hardware Information 43 3-5 Contact Us ...43 Chapter 4 Unique Features 45 4-1 Xpress Recovery2 45 4-2 BIOS Update Utilities 50 4-2-1 Updating the BIOS with the Q-...

Manual
Page 6
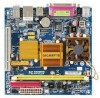
Box Contents GA-GC220 motherboard Motherboard driver disk User's Manual One IDE cable One SATA 3Gb/s cables I/O Shield • The box contents above are subject to change without notice. • The motherboard image is for reference only and the actual items shall depend on product package you obtain. The box contents are for reference only. Optional Items 2-port USB 2.0 bracket (Part No. 12CR1-1UB030-51R) 2-port SATA power cable (Part No. 12CF1-2SERPW-01R) - 6 -
Box Contents GA-GC220 motherboard Motherboard driver disk User's Manual One IDE cable One SATA 3Gb/s cables I/O Shield • The box contents above are subject to change without notice. • The motherboard image is for reference only and the actual items shall depend on product package you obtain. The box contents are for reference only. Optional Items 2-port USB 2.0 bracket (Part No. 12CR1-1UB030-51R) 2-port SATA power cable (Part No. 12CF1-2SERPW-01R) - 6 -
Manual
Page 24
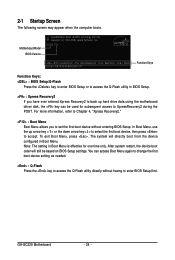
...Boot Menu, use the up hard drive data using the motherboard driver disk, the key can access Boot Menu again to change the...entering BIOS Setup. After system restart, the device boot order will directly boot from the device configured in Boot Menu. GC220 F1c . . . . : BIOS Setup/Q-Flash : XpressRecovery2 : Boot Menu : Qflash 03/26/2008-I945-6A89HG06C-00...setting in BIOS Setup. : Xpress Recovery2 If you to accept. You can be based on BIOS Setup settings. GA-GC220 Motherboard - 24 - To exit Boot Menu, press . Motherboard Model BIOS Version Award Modular BIOS v6.00PG, An...
...Boot Menu, use the up hard drive data using the motherboard driver disk, the key can access Boot Menu again to change the...entering BIOS Setup. After system restart, the device boot order will directly boot from the device configured in Boot Menu. GC220 F1c . . . . : BIOS Setup/Q-Flash : XpressRecovery2 : Boot Menu : Qflash 03/26/2008-I945-6A89HG06C-00...setting in BIOS Setup. : Xpress Recovery2 If you to accept. You can be based on BIOS Setup settings. GA-GC220 Motherboard - 24 - To exit Boot Menu, press . Motherboard Model BIOS Version Award Modular BIOS v6.00PG, An...
Manual
Page 41
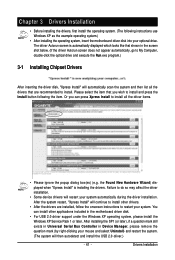
... box(es) (e.g. You can press Xpress Install to install all the drivers that you can install other drivers. • After the drivers are recommended to install. Chapter 3 Drivers Installation • Before installing the drivers, first install the operating system. (The following the item. Or you... automatically, go to My Computer, double-click the optical drive and execute the Run.exe program.) 3-1 Installing Chipset Drivers After inserting the driver disk, "Xpress Install" will continue to install and press the Install button following instructions use Windows XP as the example...
... box(es) (e.g. You can press Xpress Install to install all the drivers that you can install other drivers. • After the drivers are recommended to install. Chapter 3 Drivers Installation • Before installing the drivers, first install the operating system. (The following the item. Or you... automatically, go to My Computer, double-click the optical drive and execute the Run.exe program.) 3-1 Installing Chipset Drivers After inserting the driver disk, "Xpress Install" will continue to install and press the Install button following instructions use Windows XP as the example...
Manual
Page 42
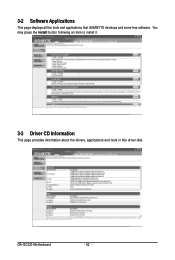
GA-GC220 Motherboard - 42 - 3-2 Software Applications This page displays all the tools and applications that GIGABYTE develops and some free software. You may press the Install button following an item to install it. 3-3 Driver CD Information This page provides information about the drivers, applications and tools in this driver disk.
GA-GC220 Motherboard - 42 - 3-2 Software Applications This page displays all the tools and applications that GIGABYTE develops and some free software. You may press the Install button following an item to install it. 3-3 Driver CD Information This page provides information about the drivers, applications and tools in this driver disk.
Manual
Page 43
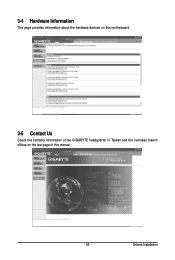
3-4 Hardware Information This page provides information about the hardware devices on this motherboard. 3-5 Contact Us Check the contacts information of the GIGABYTE headquarter in Taiwan and the overseas branch offices on the last page of this manual. - 43 - Drivers Installation
3-4 Hardware Information This page provides information about the hardware devices on this motherboard. 3-5 Contact Us Check the contacts information of the GIGABYTE headquarter in Taiwan and the overseas branch offices on the last page of this manual. - 43 - Drivers Installation
Manual
Page 45
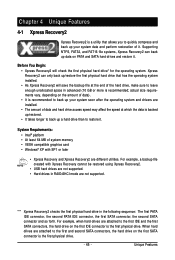
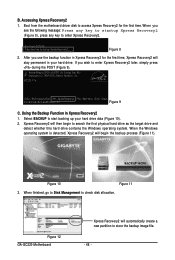
... restore it. Unique Features Supporting NTFS, FAT32, and FAT16 file systems, Xpress Recovery2 can only back up your system soon after the operating system and drivers are attached to the first IDE and the first SATA connectors, the hard drive on the amount of data). • It is recommended to back...
... restore it. Unique Features Supporting NTFS, FAT32, and FAT16 file systems, Xpress Recovery2 can only back up your system soon after the operating system and drivers are attached to the first IDE and the first SATA connectors, the hard drive on the amount of data). • It is recommended to back...
Manual
Page 48
...driver disk to access Xpress Recovery2 for the first time, Xpress Recovery2 will automatically create a new partition to start backing up your hard drive. Using the Backup Function in your hard drive data (Figure 10). 2. Figure 10 Figure 11 3. When you wish to enter Xpress Recovery2. . . Figure 12 GA-GC220... the Windows operating system. B. Boot from CD/DVD: Press any key to enter Xpress Recovery2 later, simply press during the POST (Figure 9). GC220 F1c . . . . : BIOS Setup/Q-Flash : XpressRecovery2 : Boot Menu : Qflash 03/26/2008-I945-6A89HG06C-00 Figure 9 C. When the...
...driver disk to access Xpress Recovery2 for the first time, Xpress Recovery2 will automatically create a new partition to start backing up your hard drive. Using the Backup Function in your hard drive data (Figure 10). 2. Figure 10 Figure 11 3. When you wish to enter Xpress Recovery2. . . Figure 12 GA-GC220... the Windows operating system. B. Boot from CD/DVD: Press any key to enter Xpress Recovery2 later, simply press during the POST (Figure 9). GC220 F1c . . . . : BIOS Setup/Q-Flash : XpressRecovery2 : Boot Menu : Qflash 03/26/2008-I945-6A89HG06C-00 Figure 9 C. When the...
Manual
Page 53
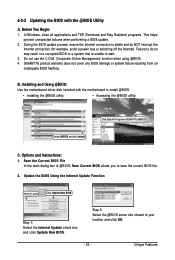
...Save Current BIOS allows you to your location and click OK. - 53 - Installing and Using @BIOS: Use the motherboard driver disk included with the @BIOS Utility A. GIGABYTE product warranty does not cover any BIOS damage or system failure resulting from an inadequate BIOS flashing. Click Start>All Programs...>GIGABYTE>@BIOS C. Before You Begin: 1. Options and Instructions: 1. Update the BIOS Using the Internet Update Function Select this option Click Update ...
...Save Current BIOS allows you to your location and click OK. - 53 - Installing and Using @BIOS: Use the motherboard driver disk included with the @BIOS Utility A. GIGABYTE product warranty does not cover any BIOS damage or system failure resulting from an inadequate BIOS flashing. Click Start>All Programs...>GIGABYTE>@BIOS C. Before You Begin: 1. Options and Instructions: 1. Update the BIOS Using the Internet Update Function Select this option Click Update ...
Manual
Page 57
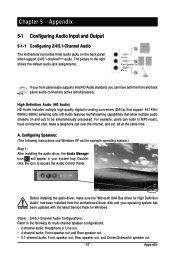
...panel audio supports Intel HD Audio standard, you can listen to be simultaneously processed. all at the same time. Before installing the audio driver, make a telephone call over the Internet, and etc. Configuring Speakers: (The following for Windows. (Note) 2/4/5.1-Channel Audio Configurations:... Refer to the following instructions use Windows XP as the example operating system.) Step 1: After installing the audio driver, the Audio Manager icon will appear in and out) to MP3 music, have both the front and back panel audio connectors active...
...panel audio supports Intel HD Audio standard, you can listen to be simultaneously processed. all at the same time. Before installing the audio driver, make a telephone call over the Internet, and etc. Configuring Speakers: (The following for Windows. (Note) 2/4/5.1-Channel Audio Configurations:... Refer to the following instructions use Windows XP as the example operating system.) Step 1: After installing the audio driver, the Audio Manager icon will appear in and out) to MP3 music, have both the front and back panel audio connectors active...
Manual
Page 60
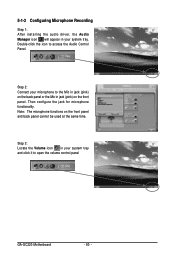
... at the same time. Then configure the jack for microphone functionality. 5-1-2 Configuring Microphone Recording Step 1: After installing the audio driver, the Audio Manager icon will appear in your system tray and click it to open the volume control panel GA-GC220 Motherboard - 60 - Step 2: Connect your microphone to access the Audio Control Panel.
... at the same time. Then configure the jack for microphone functionality. 5-1-2 Configuring Microphone Recording Step 1: After installing the audio driver, the Audio Manager icon will appear in your system tray and click it to open the volume control panel GA-GC220 Motherboard - 60 - Step 2: Connect your microphone to access the Audio Control Panel.


