Manual
Page 1
GA-G41MT-ES2L LGA775 socket motherboard for Intel® Core™ processor family/ Intel® Pentium® processor family/Intel® Celeron® processor family User's Manual Rev. 1101 12ME-G41MT2L-1101R
GA-G41MT-ES2L LGA775 socket motherboard for Intel® Core™ processor family/ Intel® Pentium® processor family/Intel® Celeron® processor family User's Manual Rev. 1101 12ME-G41MT2L-1101R
Manual
Page 10
.../Intel® Core™ 2 Duo processor/ Intel® Pentium® processor/Intel® Celeron® processor in the LGA775 package (Go to GIGABYTE's website for the latest CPU support list.) L2 cache varies with CPU Front Side Bus w 1333/1066/800 MHz FSB Chipset w w Memory ...G41 Express Chipset South Bridge: Intel® ICH7 2 x 1.5V DDR3 DIMM sockets supporting up to 4 GB of system memory (Note 1) Dual channel memory architecture Support for DDR3 1066/800 MHz memory modules (Go to GIGABYTE's website for the latest memory support list.) Integrated in the North Bridge: - ...
.../Intel® Core™ 2 Duo processor/ Intel® Pentium® processor/Intel® Celeron® processor in the LGA775 package (Go to GIGABYTE's website for the latest CPU support list.) L2 cache varies with CPU Front Side Bus w 1333/1066/800 MHz FSB Chipset w w Memory ...G41 Express Chipset South Bridge: Intel® ICH7 2 x 1.5V DDR3 DIMM sockets supporting up to 4 GB of system memory (Note 1) Dual channel memory architecture Support for DDR3 1066/800 MHz memory modules (Go to GIGABYTE's website for the latest memory support list.) Integrated in the North Bridge: - ...
Manual
Page 13
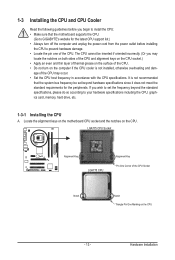
... to your hardware specifications including the CPU, graphics card, memory, hard drive, etc. 1-3-1 Installing the CPU A. LGA775 CPU Socket Alignment Key LGA775 CPU Alignment Key Pin One Corner of the CPU Socket Notch Notch Triangle Pin One Marking on the CPU. If you may occur. • Set the CPU host frequency... CPU support list.) • Always turn on the computer if the CPU cooler is not recommended that the motherboard supports the CPU. (Go to GIGABYTE's website for the peripherals. age of the CPU may locate the notches on both sides of the CPU and alignment keys on the CPU...
... to your hardware specifications including the CPU, graphics card, memory, hard drive, etc. 1-3-1 Installing the CPU A. LGA775 CPU Socket Alignment Key LGA775 CPU Alignment Key Pin One Corner of the CPU Socket Notch Notch Triangle Pin One Marking on the CPU. If you may occur. • Set the CPU host frequency... CPU support list.) • Always turn on the computer if the CPU cooler is not recommended that the motherboard supports the CPU. (Go to GIGABYTE's website for the peripherals. age of the CPU may locate the notches on both sides of the CPU and alignment keys on the CPU...
Manual
Page 14
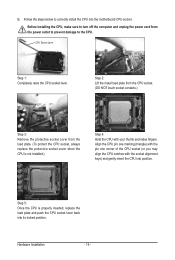
... from the power outlet to prevent damage to the CPU. Align the CPU pin one marking (triangle) with the pin one corner of the CPU socket (or you may align the CPU notches with your thumb and index fingers. Hardware Installation - 14 - Follow the steps below to turn off the ... unplug the power cord from the load plate. (To protect the CPU socket, always replace the protective socket cover when the CPU is properly inserted, replace the load plate and push the CPU socket lever back into the motherboard CPU socket. Before installing the CPU, make sure to correctly install the CPU into...
... from the power outlet to prevent damage to the CPU. Align the CPU pin one marking (triangle) with the pin one corner of the CPU socket (or you may align the CPU notches with your thumb and index fingers. Hardware Installation - 14 - Follow the steps below to turn off the ... unplug the power cord from the load plate. (To protect the CPU socket, always replace the protective socket cover when the CPU is properly inserted, replace the load plate and push the CPU socket lever back into the motherboard CPU socket. Before installing the CPU, make sure to correctly install the CPU into...
Manual
Page 16
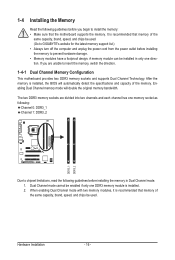
... in only one DDR3 memory module is recommended that memory of the same capacity, brand, speed, and chips be used . (Go to GIGABYTE's website for the latest memory support list.) • Always turn off the computer and unplug the power cord from the power outlet before ...mode will automatically detect the specifications and capacity of the memory. It is installed. 2. The two DDR3 memory sockets are divided into two channels and each channel has one memory socket as following: Channel 0: DDR3_1 Channel 1: DDR3_2 DDR3_1 DDR3_2 Due to chipset limitations, read the following guidelines ...
... in only one DDR3 memory module is recommended that memory of the same capacity, brand, speed, and chips be used . (Go to GIGABYTE's website for the latest memory support list.) • Always turn off the computer and unplug the power cord from the power outlet before ...mode will automatically detect the specifications and capacity of the memory. It is installed. 2. The two DDR3 memory sockets are divided into two channels and each channel has one memory socket as following: Channel 0: DDR3_1 Channel 1: DDR3_2 DDR3_1 DDR3_2 Due to chipset limitations, read the following guidelines ...
Manual
Page 17
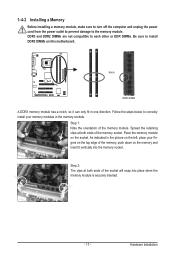
... the steps below to correctly install your memory modules in the picture on the left, place your fingers on the top edge of the memory socket. Spread the retaining clips at both ends of the memory, push down on the memory and insert it can only fit in one direction. DDR3..., make sure to turn off the computer and unplug the power cord from the power outlet to prevent damage to install DDR3 DIMMs on the socket. Step 2: The clips at both ends of the memory module. Place the memory module on this motherboard. Notch DDR3 DIMM A DDR3 memory module has a notch...
... the steps below to correctly install your memory modules in the picture on the left, place your fingers on the top edge of the memory socket. Spread the retaining clips at both ends of the memory, push down on the memory and insert it can only fit in one direction. DDR3..., make sure to turn off the computer and unplug the power cord from the power outlet to prevent damage to install DDR3 DIMMs on the socket. Step 2: The clips at both ends of the memory module. Place the memory module on this motherboard. Notch DDR3 DIMM A DDR3 memory module has a notch...

Manual
Page 80
... and solved. A (Continued...) Appendix - 80 - No Check if the CPU cooler is installed properly on the CPU. No Correctly insert the memory into the memory socket. The problem is verified and solved. Check if the memory is attached to the motherboard. Yes The problem is securely seated in the expansion slot...
... and solved. A (Continued...) Appendix - 80 - No Check if the CPU cooler is installed properly on the CPU. No Correctly insert the memory into the memory socket. The problem is verified and solved. Check if the memory is attached to the motherboard. Yes The problem is securely seated in the expansion slot...

Manual
Page 81
... connector might fail. Check if the system can boot successfully. A When the computer is turned on your monitor. No The power supply, CPU or CPU socket might fail. The problem is working properly. Or go to the Support&Downloads\Technical Service Zone page to save changes and exit BIOS Setup. Yes...
... connector might fail. Check if the system can boot successfully. A When the computer is turned on your monitor. No The power supply, CPU or CPU socket might fail. The problem is working properly. Or go to the Support&Downloads\Technical Service Zone page to save changes and exit BIOS Setup. Yes...

