Manual
Page 27
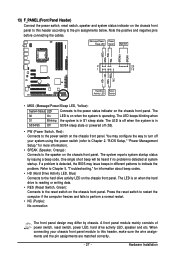
...drive activity LED, speaker and etc. Hardware Installation RESRES+ NC Hard Drive Activity LED Reset Switch • MSG (Message/Power/Sleep LED, Yellow): System Status LED Connects to the speaker on when the system is detected, the BIOS may differ by issuing a beep code. PW+ PWSPEAK+ SPEAK- 2 20 1... the power switch on the chassis front panel. If a problem is operating. 13) F_PANEL (Front Panel Header) Connect the power switch, reset switch, speaker and system status indicator on the chassis front panel. The LED is on when the hard drive is on the chassis front ...
...drive activity LED, speaker and etc. Hardware Installation RESRES+ NC Hard Drive Activity LED Reset Switch • MSG (Message/Power/Sleep LED, Yellow): System Status LED Connects to the speaker on when the system is detected, the BIOS may differ by issuing a beep code. PW+ PWSPEAK+ SPEAK- 2 20 1... the power switch on the chassis front panel. If a problem is operating. 13) F_PANEL (Front Panel Header) Connect the power switch, reset switch, speaker and system status indicator on the chassis front panel. The LED is on when the hard drive is on the chassis front ...
Manual
Page 32
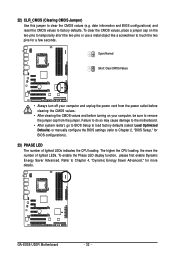
... CPU loading, the more details. To enable the Phase LED display function, please first enable Dynamic Energy Saver Advanced. date information and BIOS configurations) and reset the CMOS values to clear the CMOS values (e.g. GA-EX58-UD3R Motherboard - 32 - Failure to do so may cause damage to the motherboard. • After system restart, go to...
... CPU loading, the more details. To enable the Phase LED display function, please first enable Dynamic Energy Saver Advanced. date information and BIOS configurations) and reset the CMOS values to clear the CMOS values (e.g. GA-EX58-UD3R Motherboard - 32 - Failure to do so may cause damage to the motherboard. • After system restart, go to...

Manual
Page 33
...clear the CMOS values.) - 33 - BIOS includes a BIOS Setup program that you not alter the default settings (unless you can press + in the main menu of the battery/clearing CMOS jumper in this occurs, try to clear the CMOS values and reset the board to default values. (Refer... parameters and loading operating system, etc. To upgrade the BIOS, use either the GIGABYTE Q-Flash or @BIOS utility. • Q-Flash allows the user to quickly and easily upgrade or back up BIOS without entering the operating system. • @BIOS is recommended that allows the user to modify basic system ...
...clear the CMOS values.) - 33 - BIOS includes a BIOS Setup program that you not alter the default settings (unless you can press + in the main menu of the battery/clearing CMOS jumper in this occurs, try to clear the CMOS values and reset the board to default values. (Refer... parameters and loading operating system, etc. To upgrade the BIOS, use either the GIGABYTE Q-Flash or @BIOS utility. • Q-Flash allows the user to quickly and easily upgrade or back up BIOS without entering the operating system. • @BIOS is recommended that allows the user to modify basic system ...
Manual
Page 37
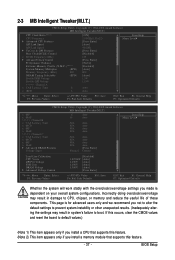
... install a memory module that supports this feature. - 37 - This page is dependent on your overall system configurations. If this occurs, clear the CMOS values and reset the board to default values.) (Note 1) This item appears only if you install a CPU that supports this feature. (Note 2) This item appears only if you... not to alter the default settings to prevent system instability or other unexpected results. (Inadequately altering the settings may result in system's failure to boot. BIOS Setup
... install a memory module that supports this feature. - 37 - This page is dependent on your overall system configurations. If this occurs, clear the CMOS values and reset the board to default values.) (Note 1) This item appears only if you install a CPU that supports this feature. (Note 2) This item appears only if you... not to alter the default settings to prevent system instability or other unexpected results. (Inadequately altering the settings may result in system's failure to boot. BIOS Setup

Manual
Page 69
... or hard drive when the system is complete, press any keEyStCo:Rcoensetitnue F10:Power Off - 69 - Insert the floppy disk containing the BIOS file into the floppy disk drive. appears, press to access Q-Flash. 2. Q-Flash Utility v2.08 Flash Type/Size SST 25VF080B 1M ... is displayed on the screen. Select Floppy A and press . Save BIOS to Drive Please:Mproevses any key to return to select Update BIOS from Drive Sa0vefilBeI(Os)SfotounDdrive :Move ESC:Reset :Power Off Total size : 0 Free size : 0 3. Step 1: 1. Step 2: The ...
... or hard drive when the system is complete, press any keEyStCo:Rcoensetitnue F10:Power Off - 69 - Insert the floppy disk containing the BIOS file into the floppy disk drive. appears, press to access Q-Flash. 2. Q-Flash Utility v2.08 Flash Type/Size SST 25VF080B 1M ... is displayed on the screen. Select Floppy A and press . Save BIOS to Drive Please:Mproevses any key to return to select Update BIOS from Drive Sa0vefilBeI(Os)SfotounDdrive :Move ESC:Reset :Power Off Total size : 0 Free size : 0 3. Step 1: 1. Step 2: The ...

Manual
Page 74
...Time/Date Dynamic Energy Saver Enabled 10 Total Power Savings (Total power saving with Dynamic Frequency Function; GA-EX58-UD3R Motherboard - 74 - B. Total Mode In Total Mode, users are set period of power saved will... for the latest utility version) 17 CPU Power Saving Mode Switch (System will automatically reset when the total power saving reaches 99999999 Watts. Re-enter the application only if you...function, make sure the CPU Enhanced Halt (C1E) and CPU EIST Function items in the BIOS Setup program are able to see how much total power savings they have accumulated in taskbar)...
...Time/Date Dynamic Energy Saver Enabled 10 Total Power Savings (Total power saving with Dynamic Frequency Function; GA-EX58-UD3R Motherboard - 74 - B. Total Mode In Total Mode, users are set period of power saved will... for the latest utility version) 17 CPU Power Saving Mode Switch (System will automatically reset when the total power saving reaches 99999999 Watts. Re-enter the application only if you...function, make sure the CPU Enhanced Halt (C1E) and CPU EIST Function items in the BIOS Setup program are able to see how much total power savings they have accumulated in taskbar)...

Manual
Page 79
... a non-RAID configuration. Figure 2 Step 2: After you want to create a RAID array, select Create RAID Volume in RAID BIOS Enter the RAID BIOS setup utility to configure a RAID array. Delete RAID Volume 3. Press + to enter Configuration Utility" (Figure 2). Intel(R) Matrix ... Volume If you press + , the MAIN MENU screen will appear (Figure 3). All Rights Reversed. [ MAIN MENU ] 1. Appendix C. Reset Disks to enter Configuration Utility.. Skip this step and proceed with the installation of Windows operating system for a message which says "Press to ...
... a non-RAID configuration. Figure 2 Step 2: After you want to create a RAID array, select Create RAID Volume in RAID BIOS Enter the RAID BIOS setup utility to configure a RAID array. Delete RAID Volume 3. Press + to enter Configuration Utility" (Figure 2). Intel(R) Matrix ... Volume If you press + , the MAIN MENU screen will appear (Figure 3). All Rights Reversed. [ MAIN MENU ] 1. Appendix C. Reset Disks to enter Configuration Utility.. Skip this step and proceed with the installation of Windows operating system for a message which says "Press to ...

Manual
Page 81
Intel(R) Matrix Storage Manager option ROM v8.0.0.1039 ICH10R wRAID5 Copyright(C) 2003-08 Intel Corporation. Create RAID Volume 2. Reset Disks to begin creating the RAID array. Delete RAID Volume 3. Step 5: Enter the array capacity and press . All Rights Reversed. [ MAIN MENU...) 111.8GB Member Disk(0) 111.8GB Member Disk(0) []-Select [ESC]-Exit Figure 7 [ENTER]-Select Menu To exit the ICH10R RAID BIOS utility, press or select Exit in the DISK/VOLUME INFORMATION section, including the RAID level, stripe block size, array name, and array capacity, ...
Intel(R) Matrix Storage Manager option ROM v8.0.0.1039 ICH10R wRAID5 Copyright(C) 2003-08 Intel Corporation. Create RAID Volume 2. Reset Disks to begin creating the RAID array. Delete RAID Volume 3. Step 5: Enter the array capacity and press . All Rights Reversed. [ MAIN MENU...) 111.8GB Member Disk(0) 111.8GB Member Disk(0) []-Select [ESC]-Exit Figure 7 [ENTER]-Select Menu To exit the ICH10R RAID BIOS utility, press or select Exit in the DISK/VOLUME INFORMATION section, including the RAID level, stripe block size, array name, and array capacity, ...


