Manual
Page 36
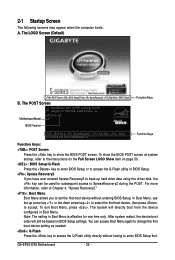
...needed. : Q-Flash Press the key to enter BIOS Setup first. To exit Boot Menu, press . Note: The setting in Boot Menu. Motherboard Model BIOS Version EP45-DS5 F8C . . . . : BIOS Setup : XpressRecovery2 : Boot Menu : Qflash 07/01/2008-P45-ICH10-7A89PG0BC-00 Function Keys Function Keys...entering BIOS Setup. The system will still be used for one time only. GA-EP45-DS5 Motherboard - 36 - A. After system restart, the device boot order will directly boot from the device configured in Boot Menu is effective for subsequent access to accept. To show the BIOS POST ...
...needed. : Q-Flash Press the key to enter BIOS Setup first. To exit Boot Menu, press . Note: The setting in Boot Menu. Motherboard Model BIOS Version EP45-DS5 F8C . . . . : BIOS Setup : XpressRecovery2 : Boot Menu : Qflash 07/01/2008-P45-ICH10-7A89PG0BC-00 Function Keys Function Keys...entering BIOS Setup. The system will still be used for one time only. GA-EP45-DS5 Motherboard - 36 - A. After system restart, the device boot order will directly boot from the device configured in Boot Menu is effective for subsequent access to accept. To show the BIOS POST ...
Manual
Page 54
...and Smart Backup Initial items will revert back to activate the boot ROM integrated with the onboard LAN chip. (Default: Disabled) Onboard SATA/IDE Device (GIGABYTE SATA2 Chip) Enables or disables the IDE and SATA controllers integrated in the GIGABYTE SATA 2 chip. It will become unavailable. (Default: Enabled).../IRQ3, 3E8/IRQ4, 2E8/IRQ3, Disabled. (Note) When this function. (Default) GS0/GS1 Ports Enables Smart Backup for hard drive access. GA-EP45-DS5 Motherboard - 54 - This is restarted, a message will appear which says " Wait Smart Backup Hard Drives Ready (ESC to Enabled.
...and Smart Backup Initial items will revert back to activate the boot ROM integrated with the onboard LAN chip. (Default: Disabled) Onboard SATA/IDE Device (GIGABYTE SATA2 Chip) Enables or disables the IDE and SATA controllers integrated in the GIGABYTE SATA 2 chip. It will become unavailable. (Default: Enabled).../IRQ3, 3E8/IRQ4, 2E8/IRQ3, Disabled. (Note) When this function. (Default) GS0/GS1 Ports Enables Smart Backup for hard drive access. GA-EP45-DS5 Motherboard - 54 - This is restarted, a message will appear which says " Wait Smart Backup Hard Drives Ready (ESC to Enabled.
Manual
Page 58
...temperature. Check the fan condition or fan connection when this field will show "Yes", otherwise it will show "No" at next boot. (Default: Disabled) Case Opened Displays the detection status of the chassis intrusion detection device attached to the motherboard CI header. .... (Default: Disabled) GA-EP45-DS5 Motherboard - 58 - Options are: Disabled (default), 60oC/140oF, 70oC/158oF, 80oC/176oF, 90oC/194oF. Current System/CPU Temperature Displays current system/CPU temperature. CPU/SYSTEM/POWER FAN Fail Warning Allows the system to CMOS, and then restart your system. Enabled clears...
...temperature. Check the fan condition or fan connection when this field will show "Yes", otherwise it will show "No" at next boot. (Default: Disabled) Case Opened Displays the detection status of the chassis intrusion detection device attached to the motherboard CI header. .... (Default: Disabled) GA-EP45-DS5 Motherboard - 58 - Options are: Disabled (default), 60oC/140oF, 70oC/158oF, 80oC/176oF, 90oC/194oF. Current System/CPU Temperature Displays current system/CPU temperature. CPU/SYSTEM/POWER FAN Fail Warning Allows the system to CMOS, and then restart your system. Enabled clears...
Manual
Page 74
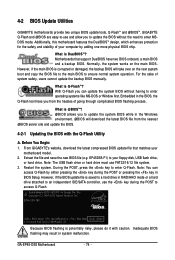
...computer by either pressing the key during the POST to ensure normal system operation. Restart the system. Note: You can update the system BIOS without the need to enter... in system malfunction. However, if the BIOS update file is DualBIOS ? EP45-DS5 F8C . . . . : BIOS Setup : XpressRecovery2 : Boot Menu : Qflash 07/01/2008-P45-ICH10-7A89PG0BC-00 Because BIOS flashing ...stability of your floppy disk, USB flash drive, or hard drive. GA-EP45-DS5 Motherboard - 74 - 4-2 BIOS Update Utilities GIGABYTE motherboards provide two unique BIOS update tools, Q-FlashTM and @BIOSTM. However...
...computer by either pressing the key during the POST to ensure normal system operation. Restart the system. Note: You can update the system BIOS without the need to enter... in system malfunction. However, if the BIOS update file is DualBIOS ? EP45-DS5 F8C . . . . : BIOS Setup : XpressRecovery2 : Boot Menu : Qflash 07/01/2008-P45-ICH10-7A89PG0BC-00 Because BIOS flashing ...stability of your floppy disk, USB flash drive, or hard drive. GA-EP45-DS5 Motherboard - 74 - 4-2 BIOS Update Utilities GIGABYTE motherboards provide two unique BIOS update tools, Q-FlashTM and @BIOSTM. However...
Manual
Page 76
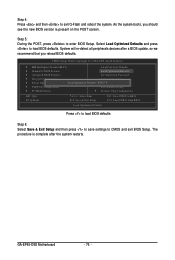
System will re-detect all peripherals devices after the system restarts. As the system boots, you reload BIOS defaults. Step 5: During the POST, press to exit Q-Flash and reboot the system. Step 4: Press and then to enter BIOS Setup. CMOS ... from BIOS Load Optimized Defaults Press to load BIOS defaults Step 6: Select Save & Exit Setup and then press to save settings to load BIOS defaults. GA-EP45-DS5 Motherboard - 76 - Select Load Optimized Defaults and press to CMOS and exit BIOS Setup. The procedure is complete after a BIOS update, so we recommend that...
System will re-detect all peripherals devices after the system restarts. As the system boots, you reload BIOS defaults. Step 5: During the POST, press to exit Q-Flash and reboot the system. Step 4: Press and then to enter BIOS Setup. CMOS ... from BIOS Load Optimized Defaults Press to load BIOS defaults Step 6: Select Save & Exit Setup and then press to save settings to load BIOS defaults. GA-EP45-DS5 Motherboard - 76 - Select Load Optimized Defaults and press to CMOS and exit BIOS Setup. The procedure is complete after a BIOS update, so we recommend that...
Manual
Page 77
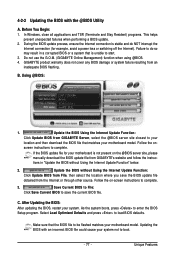
... power loss or switching off the Internet). After Updating the BIOS: After updating the BIOS, restart your motherboard is not present on -screen instructions to complete. Do not use the G.O.M. (GIGABYTE Online Management) function when using @BIOS. 4. B. Update the BIOS Using the Internet Update ... BIOS update. 2. Using @BIOS: 1. Follow the onscreen instructions to complete. 3. Save Current BIOS to File: Click Save Current BIOS to boot. - 77 - C. Make sure that is stable and do so may result in "Update the BIOS without Using the Internet Update Function: ...
... power loss or switching off the Internet). After Updating the BIOS: After updating the BIOS, restart your motherboard is not present on -screen instructions to complete. Do not use the G.O.M. (GIGABYTE Online Management) function when using @BIOS. 4. B. Update the BIOS Using the Internet Update ... BIOS update. 2. Using @BIOS: 1. Follow the onscreen instructions to complete. 3. Save Current BIOS to File: Click Save Current BIOS to boot. - 77 - C. Make sure that is stable and do so may result in "Update the BIOS without Using the Internet Update Function: ...
Manual
Page 95
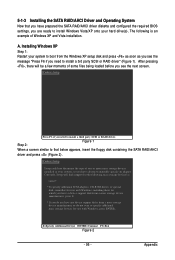
Installing Windows XP Step 1: Restart your system to install a third party SCSI or RAID driver. Windows Setup Step 2: Press F6 if you need to boot from the Windows XP setup disk and press as soon as you see the next screen. Figure 1 When a screen similar to that you have prepared ...
Installing Windows XP Step 1: Restart your system to install a third party SCSI or RAID driver. Windows Setup Step 2: Press F6 if you need to boot from the Windows XP setup disk and press as soon as you see the next screen. Figure 1 When a screen similar to that you have prepared ...
Manual
Page 98
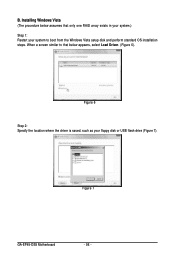
Installing Windows Vista (The procedure below appears, select Load Driver. (Figure 6). Figure 6 Step 2: Specify the location where the driver is saved, such as your system to that below assumes that only one RAID array exists in your system.) Step 1: Restart your floppy disk or USB flash drive (Figure 7). Figure 7 GA-EP45-DS5 Motherboard - 98 - When a screen similar to boot from the Windows Vista setup disk and perform standard OS installation steps. B.
Installing Windows Vista (The procedure below appears, select Load Driver. (Figure 6). Figure 6 Step 2: Specify the location where the driver is saved, such as your system to that below assumes that only one RAID array exists in your system.) Step 1: Restart your floppy disk or USB flash drive (Figure 7). Figure 7 GA-EP45-DS5 Motherboard - 98 - When a screen similar to boot from the Windows Vista setup disk and perform standard OS installation steps. B.
Manual
Page 107
...following Award BIOS beep code descriptions may help you identify possible computer problems. (For reference only.) 1 short: System boots successfully 2 short: CMOS setting error 1 long, 1 short: Memory or motherboard error 1 long, 2 short:... some BIOS options missing? Turn off your computer. 5. Plug in the power cord and restart your computer and unplug the power cord. 2. Select "Load Fail-Safe Defaults" (or ... Q: Why do I have this jumper, refer to the Support\Motherboard\FAQ page on GIGABYTE's website. If your board doesn't have turned my speaker to load BIOS default settings. ...
...following Award BIOS beep code descriptions may help you identify possible computer problems. (For reference only.) 1 short: System boots successfully 2 short: CMOS setting error 1 long, 1 short: Memory or motherboard error 1 long, 2 short:... some BIOS options missing? Turn off your computer. 5. Plug in the power cord and restart your computer and unplug the power cord. 2. Select "Load Fail-Safe Defaults" (or ... Q: Why do I have this jumper, refer to the Support\Motherboard\FAQ page on GIGABYTE's website. If your board doesn't have turned my speaker to load BIOS default settings. ...
Manual
Page 109
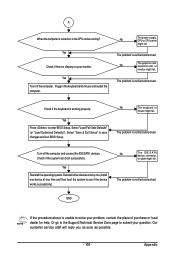
...When the computer is turned on your monitor. Plugg in the keyboard and mouse and restart the computer. The problem is verified and solved. The problem is verified and solved.... or monitor might fail. Reinstall other devices one by one (install one device at one time and then boot the system to save changes and exit BIOS Setup. END If the procedure above is verified and solved. Or... operating system. Yes Press to enter BIOS Setup. Check if the system can boot successfully. Appendix The problem is unable to submit your problem, contact the place of purchase or local dealer ...
...When the computer is turned on your monitor. Plugg in the keyboard and mouse and restart the computer. The problem is verified and solved. The problem is verified and solved.... or monitor might fail. Reinstall other devices one by one (install one device at one time and then boot the system to save changes and exit BIOS Setup. END If the procedure above is verified and solved. Or... operating system. Yes Press to enter BIOS Setup. Check if the system can boot successfully. Appendix The problem is unable to submit your problem, contact the place of purchase or local dealer ...


