
Manual
Page 5
...Configuring the Onboard SATA Controller 77 5-1-2 Making a SATA RAID/AHCI Driver Diskette 83 5-1-3 Installing the SATA RAID/AHCI Driver and Operating System 85 5-2 Configuring Audio ...Input and Output 90 5-2-1 Configuring 2/4/5.1/7.1-Channel Audio 90 5-2-2 Installing the S/PDIF In Cable (Optional 92 5-2-3 Configuring Microphone Recording 94 5-2-4 Using the Sound Recorder 96 5-3 Troubleshooting 97 5-3-1 Frequently Asked Questions 97 5-3-2 Troubleshooting Procedure 98 5-4 Regulatory Statements 100 Only for GA-EP45-DS3LR...
...Configuring the Onboard SATA Controller 77 5-1-2 Making a SATA RAID/AHCI Driver Diskette 83 5-1-3 Installing the SATA RAID/AHCI Driver and Operating System 85 5-2 Configuring Audio ...Input and Output 90 5-2-1 Configuring 2/4/5.1/7.1-Channel Audio 90 5-2-2 Installing the S/PDIF In Cable (Optional 92 5-2-3 Configuring Microphone Recording 94 5-2-4 Using the Sound Recorder 96 5-3 Troubleshooting 97 5-3-1 Frequently Asked Questions 97 5-3-2 Troubleshooting Procedure 98 5-4 Regulatory Statements 100 Only for GA-EP45-DS3LR...

Manual
Page 10
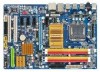
...memory (Note 1) Š Dual channel memory architecture Š Support for DDR2 1333/1200/1066/800/667 MHz memory modules (Go to GIGABYTE's website for the latest memory support list.) Š Realtek ALC888 codec Š High Definition Audio Š 2/4/5.1/7.1-channel Š Support for...USB 2.0/1.1 ports (8 on the back panel, 4 via the USB brackets connected to 6 SATA 3Gb/s devices - Only for GA-EP45-DS3LR. GA-EP45-DS3LR/DS3L Motherboard - 10 - Support for SATA RAID 0, RAID 1, RAID 5 and RAID 10 Š JMicron 368 chip: - 1 x IDE connector supporting ATA-133/100/66/33 and up to 2 IDE ...
...memory (Note 1) Š Dual channel memory architecture Š Support for DDR2 1333/1200/1066/800/667 MHz memory modules (Go to GIGABYTE's website for the latest memory support list.) Š Realtek ALC888 codec Š High Definition Audio Š 2/4/5.1/7.1-channel Š Support for...USB 2.0/1.1 ports (8 on the back panel, 4 via the USB brackets connected to 6 SATA 3Gb/s devices - Only for GA-EP45-DS3LR. GA-EP45-DS3LR/DS3L Motherboard - 10 - Support for SATA RAID 0, RAID 1, RAID 5 and RAID 10 Š JMicron 368 chip: - 1 x IDE connector supporting ATA-133/100/66/33 and up to 2 IDE ...
Manual
Page 25
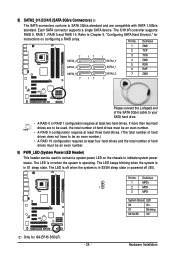
Refer to Chapter 5, "Configuring SATA Hard Drive(s)," for GA-EP45-DS3LR. - 25 - Pin No. Pin No. Hardware Installation System Status LED S0 On S1 Blinking S3/S4/S5 Off Only for instructions on when... power status. Definition 1 MPD+ 1 2 MPD- 3 MPD- The LED keeps blinking when the system is in S1 sleep state. The ICH10R controller supports RAID 0, RAID 1, RAID 5 and RAID 10. The LED is on configuring a RAID array. Definition 1 GND 2 TXP 7 SATA2_3 SATA2_4 17 1 SATA2_0 SATA2_1 3 TXN 4 GND 5 RXN 6 RXP SATA2_5 SATA2_2 7 GND 7 17 1 Please ...
Refer to Chapter 5, "Configuring SATA Hard Drive(s)," for GA-EP45-DS3LR. - 25 - Pin No. Pin No. Hardware Installation System Status LED S0 On S1 Blinking S3/S4/S5 Off Only for instructions on when... power status. Definition 1 MPD+ 1 2 MPD- 3 MPD- The LED keeps blinking when the system is in S1 sleep state. The ICH10R controller supports RAID 0, RAID 1, RAID 5 and RAID 10. The LED is on configuring a RAID array. Definition 1 GND 2 TXP 7 SATA2_3 SATA2_4 17 1 SATA2_0 SATA2_1 3 TXN 4 GND 5 RXN 6 RXP SATA2_5 SATA2_2 7 GND 7 17 1 Please ...
Manual
Page 49
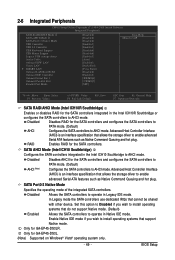
... Set this option to Disabled if you wish to install operating systems that cannot be shared with other device. RAID Enables RAID for GA-EP45-DS3LR. Disabled Disables AHCI for GA-EP45-DS3L. (Note) Supported on Windows® Vista® operating system only. - 49 - Advanced Host Controller...as Native Command Queuing and hot plug. 2-6 Integrated Peripherals CMOS Setup Utility-Copyright (C) 1984-2008 Award Software Integrated Peripherals SATA RAID/AHCI Mode 1 SATA AHCI Mode 2 SATA Port0-3 Native Mode USB Controller USB 2.0 Controller USB Keyboard Support USB Mouse Support...
... Set this option to Disabled if you wish to install operating systems that cannot be shared with other device. RAID Enables RAID for GA-EP45-DS3LR. Disabled Disables AHCI for GA-EP45-DS3L. (Note) Supported on Windows® Vista® operating system only. - 49 - Advanced Host Controller...as Native Command Queuing and hot plug. 2-6 Integrated Peripherals CMOS Setup Utility-Copyright (C) 1984-2008 Award Software Integrated Peripherals SATA RAID/AHCI Mode 1 SATA AHCI Mode 2 SATA Port0-3 Native Mode USB Controller USB 2.0 Controller USB Keyboard Support USB Mouse Support...
Manual
Page 63
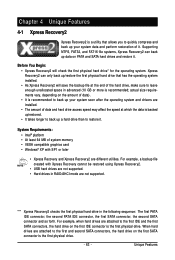
... card • Windows® XP with Xpress Recovery cannot be restored using Xpress Recovery2. • USB hard drives are not supported. • Hard drives in RAID/AHCI mode are different utilities. System Requirements: • Intel® platform • At least 64 MB of the hard drive, make sure to leave enough...
... card • Windows® XP with Xpress Recovery cannot be restored using Xpress Recovery2. • USB hard drives are not supported. • Hard drives in RAID/AHCI mode are different utilities. System Requirements: • Intel® platform • At least 64 MB of the hard drive, make sure to leave enough...
Manual
Page 68
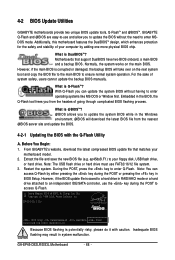
... support DualBIOS have two BIOS onboard, a main BIOS and a backup BIOS. Inadequate BIOS flashing may result in RAID/AHCI mode or a hard drive attached to enter MSDOS mode. GA-EP45-DS3LR/DS3L Motherboard - 68 - 4-2 BIOS Update Utilities GIGABYTE motherboards provide two unique BIOS update tools, Q-FlashTM and @BIOSTM. Additionally, this motherboard features the DualBIOSTM design...
... support DualBIOS have two BIOS onboard, a main BIOS and a backup BIOS. Inadequate BIOS flashing may result in RAID/AHCI mode or a hard drive attached to enter MSDOS mode. GA-EP45-DS3LR/DS3L Motherboard - 68 - 4-2 BIOS Update Utilities GIGABYTE motherboards provide two unique BIOS update tools, Q-FlashTM and @BIOSTM. Additionally, this motherboard features the DualBIOSTM design...
Manual
Page 69
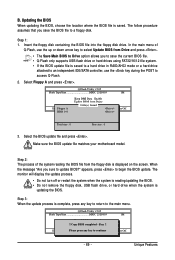
... Flash Type/Size MXIC 25L8005 1M EnteFr l:oRppuyn A HDD 0-0 Keep DMI Data Enable Update BIOS from the floppy disk is saved to a hard drive in RAID/AHCI mode or a hard drive attached to an independent IDE/SATA controller, use the up or down arrow key to select Update BIOS from Drive...
... Flash Type/Size MXIC 25L8005 1M EnteFr l:oRppuyn A HDD 0-0 Keep DMI Data Enable Update BIOS from the floppy disk is saved to a hard drive in RAID/AHCI mode or a hard drive attached to an independent IDE/SATA controller, use the up or down arrow key to select Update BIOS from Drive...

Manual
Page 77
Configure SATA controller mode in RAID BIOS. (Note 1) D. C . Appendix Chapter 5 Appendix 5-1 Configuring SATA Hard Drive(s) To configure SATA hard drive(s), follow the steps below: A. Only for GA-EP45-DS3LR. (Note 1) Skip this step if you use two hard drives with identical model and capacity). Installing SATA... disk. • Windows Vista/XP setup disk. • Motherboard driver disk. 5-1-1 Configuring the Onboard SATA Controller A. Install the SATA RAID/AHCI driver and operating system. (Note 2) Before you may prepare only one end of the SATA signal cable to the rear of the...
Configure SATA controller mode in RAID BIOS. (Note 1) D. C . Appendix Chapter 5 Appendix 5-1 Configuring SATA Hard Drive(s) To configure SATA hard drive(s), follow the steps below: A. Only for GA-EP45-DS3LR. (Note 1) Skip this step if you use two hard drives with identical model and capacity). Installing SATA... disk. • Windows Vista/XP setup disk. • Motherboard driver disk. 5-1-1 Configuring the Onboard SATA Controller A. Install the SATA RAID/AHCI driver and operating system. (Note 2) Before you may prepare only one end of the SATA signal cable to the rear of the...
Manual
Page 78
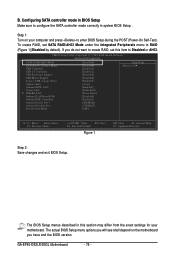
... SATA controller mode correctly in this item to RAID (Figure 1)(Disabled by default). To create RAID, set this section may differ from the exact settings for your computer and press to enter BIOS Setup during the POST (Power-On Self-Test). GA-EP45-DS3LR/DS3L Motherboard - 78 - If you do... not want to create RAID, set SATA RAID/AHCI Mode under the Integrated Peripherals menu to Disabled or AHCI. The actual BIOS Setup menu options...
... SATA controller mode correctly in this item to RAID (Figure 1)(Disabled by default). To create RAID, set this section may differ from the exact settings for your computer and press to enter BIOS Setup during the POST (Power-On Self-Test). GA-EP45-DS3LR/DS3L Motherboard - 78 - If you do... not want to create RAID, set SATA RAID/AHCI Mode under the Integrated Peripherals menu to Disabled or AHCI. The actual BIOS Setup menu options...
Manual
Page 79
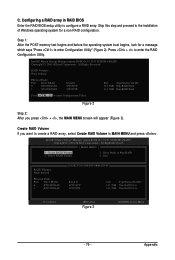
...Port Drive Model 0 ST3120026AS 1 ST3120026AS [ DISK/VOLUME INFORMATION ] Serial # 3JT354CP 3JT329JX Size Type/Status(Vol ID) 111.7GB Non-RAID Disk 111.7GB Non-RAID Disk [KL]-Select [ESC]-Exit Figure 3 [ENTER]-Select Menu - 79 - Step 1: After the POST memory test begins and before... Disks : Port Drive Model 0 ST3120026AS 1 ST3120026AS Serial # 3JT354CP 3JT329JX Size Type/Status(Vol ID) 111.7GB Non-RAID Disk 111.7GB Non-RAID Disk Press to enter Configuration Utility" (Figure 2). C. Intel(R) Matrix Storage Manager option ROM v8.5.0.1013 ICH10R wRAID5 Copyright(C)...
...Port Drive Model 0 ST3120026AS 1 ST3120026AS [ DISK/VOLUME INFORMATION ] Serial # 3JT354CP 3JT329JX Size Type/Status(Vol ID) 111.7GB Non-RAID Disk 111.7GB Non-RAID Disk [KL]-Select [ESC]-Exit Figure 3 [ENTER]-Select Menu - 79 - Step 1: After the POST memory test begins and before... Disks : Port Drive Model 0 ST3120026AS 1 ST3120026AS Serial # 3JT354CP 3JT329JX Size Type/Status(Vol ID) 111.7GB Non-RAID Disk 111.7GB Non-RAID Disk Press to enter Configuration Utility" (Figure 2). C. Intel(R) Matrix Storage Manager option ROM v8.5.0.1013 ICH10R wRAID5 Copyright(C)...
Manual
Page 80
... Volume [ HELP ] Choose the RAID level: RAID0: Stripes data (performance). Press to the array. There are typical values: RAID0 - 128KB RAID10 - 64KB RAID5 - 64KB [KL]-Change [TAB]-Next [ESC]-Previous Menu Figure 5 [ENTER]-Select GA-EP45-DS3LR/DS3L Motherboard - 80 - RAID10:...Rights Reversed. [ CREATE VOLUME MENU ] Name : RAID Level : Disks : Strip Size : Capacity : Volume0 RAID0(Stripe) Select Disks 128KB 223.6 GB Create Volume [ HELP ] The following are four RAID levels supported: RAID 0, RAID 1, RAID 10 and RAID 5 (the selections available depend on the number of ...
... Volume [ HELP ] Choose the RAID level: RAID0: Stripes data (performance). Press to the array. There are typical values: RAID0 - 128KB RAID10 - 64KB RAID5 - 64KB [KL]-Change [TAB]-Next [ESC]-Previous Menu Figure 5 [ENTER]-Select GA-EP45-DS3LR/DS3L Motherboard - 80 - RAID10:...Rights Reversed. [ CREATE VOLUME MENU ] Name : RAID Level : Disks : Strip Size : Capacity : Volume0 RAID0(Stripe) Select Disks 128KB 223.6 GB Create Volume [ HELP ] The following are four RAID levels supported: RAID 0, RAID 1, RAID 10 and RAID 5 (the selections available depend on the number of ...

Manual
Page 81
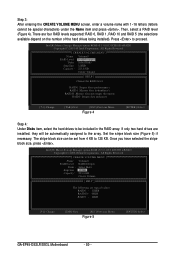
... : RAID_Volume0 RAID0(Stripe) Select Disks 128KB 223.6 GB Create Volume WARNING : ALL DATA ON[SHEELELCP T]ED DISKS WILL BE LOST. Exit RAID Volumes : ID Name 0 Volume0 Physical Disks : Port Drive Model 0 ST3120026AS 1 ST3120026AS [ DISK/VOLUME INFORMATION ] Level Strip RAID0(Stripe)...Copyright(C) 2003-08 Intel Corporation. When prompted to confirm whether to create this volume? (Y/N) : Press ENTER to begin creating the RAID array. Delete RAID Volume 3. Appendix Step 5: Enter the array capacity and press . All Rights Reversed. [ MAIN MENU ] 1. Now, you may...
... : RAID_Volume0 RAID0(Stripe) Select Disks 128KB 223.6 GB Create Volume WARNING : ALL DATA ON[SHEELELCP T]ED DISKS WILL BE LOST. Exit RAID Volumes : ID Name 0 Volume0 Physical Disks : Port Drive Model 0 ST3120026AS 1 ST3120026AS [ DISK/VOLUME INFORMATION ] Level Strip RAID0(Stripe)...Copyright(C) 2003-08 Intel Corporation. When prompted to confirm whether to create this volume? (Y/N) : Press ENTER to begin creating the RAID array. Delete RAID Volume 3. Appendix Step 5: Enter the array capacity and press . All Rights Reversed. [ MAIN MENU ] 1. Now, you may...
Manual
Page 82
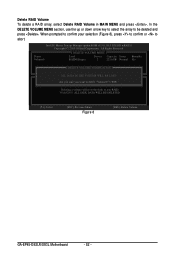
... Status Bootable 2 223.6GB Normal Yes [ DELETE VOLUME VERIFICATION ] ALL DATA IN THE[VHOELLUPM] E WILL BE LOST! Delete RAID Volume To delete a RAID array, select Delete RAID Volume in MAIN MENU and press . When prompted to confirm your selection (Figure 8), press to confirm or to non...-RAID. Are you sure you want to delete "Volume0"? (Y/N) : Deleting a volume will reset the disks to abort. WARNING: ALL DISK DATA WILL BE DELETED. [KL]-Select [ESC]-Previous Menu Figure 8 [DEL]-Delete Volume GA-EP45-DS3LR/DS3L Motherboard - 82 - In the...
... Status Bootable 2 223.6GB Normal Yes [ DELETE VOLUME VERIFICATION ] ALL DATA IN THE[VHOELLUPM] E WILL BE LOST! Delete RAID Volume To delete a RAID array, select Delete RAID Volume in MAIN MENU and press . When prompted to confirm your selection (Figure 8), press to confirm or to non...-RAID. Are you sure you want to delete "Volume0"? (Y/N) : Deleting a volume will reset the disks to abort. WARNING: ALL DISK DATA WILL BE DELETED. [KL]-Select [ESC]-Previous Menu Figure 8 [DEL]-Delete Volume GA-EP45-DS3LR/DS3L Motherboard - 82 - In the...

Manual
Page 83
...flash drive and then extract it (see instructions on the next page). Your system will open similar to that is/are configured to RAID/AHCI mode, you first have to copy the SATA controller driver from the motherboard driver disk to exit when finished. Step 1: Insert...the floppy disk. Select the controller driver by pressing the corresponding letter from the startup disk. Appendix 5-1-2 Making a SATA RAID/AHCI Driver Diskette (Required for AHCI and RAID Mode) To successfully install operating system onto SATA hard drive(s) that in Figure 2. From your optical drive folder, double ...
...flash drive and then extract it (see instructions on the next page). Your system will open similar to that is/are configured to RAID/AHCI mode, you first have to copy the SATA controller driver from the motherboard driver disk to exit when finished. Step 1: Insert...the floppy disk. Select the controller driver by pressing the corresponding letter from the startup disk. Appendix 5-1-2 Making a SATA RAID/AHCI Driver Diskette (Required for AHCI and RAID Mode) To successfully install operating system onto SATA hard drive(s) that in Figure 2. From your optical drive folder, double ...

Manual
Page 84
message, and then press to begin extracting the driver. After the driver is extracted, a screen similar to that in Figure 6 will appear. GA-EP45-DS3LR/DS3L Motherboard - 84 - Figure 5 Figure 6 (Note) To install the Windows Vista 64-bit operating system, please copy the MSM64 file. When a screen similar to that ... motherboard driver disk to your USB flash drive from the motherboard driver disk to a USB flash drive Step 1: On an alternative system, copy the SATA RAID/AHCI driver to your USB flash drive. Copying the SATA...
message, and then press to begin extracting the driver. After the driver is extracted, a screen similar to that in Figure 6 will appear. GA-EP45-DS3LR/DS3L Motherboard - 84 - Figure 5 Figure 6 (Note) To install the Windows Vista 64-bit operating system, please copy the MSM64 file. When a screen similar to that ... motherboard driver disk to your USB flash drive from the motherboard driver disk to a USB flash drive Step 1: On an alternative system, copy the SATA RAID/AHCI driver to your USB flash drive. Copying the SATA...

Manual
Page 85
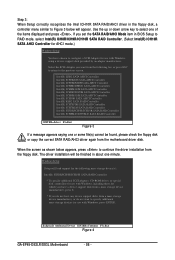
...S. * If you do not want to manually specify an adapter. Figure 1 Step 2: When a screen similar to that you have prepared the SATA RAID/AHCI driver diskette and configured the required BIOS settings, you are ready to install Windows Vista/XP onto your system to boot from a mass storage... not determine the type of some files being loaded before you see the message "Press F6 if you need to install a 3rd party SCSI or RAID driver" (Figure 1). S=Specify Additional Device ENTER=Continue F3=Exit Figure 2 - 85 - Installing Windows XP Step 1: Restart your hard drive(s). Windows Setup ...
...S. * If you do not want to manually specify an adapter. Figure 1 Step 2: When a screen similar to that you have prepared the SATA RAID/AHCI driver diskette and configured the required BIOS settings, you are ready to install Windows Vista/XP onto your system to boot from a mass storage... not determine the type of some files being loaded before you see the message "Press F6 if you need to install a 3rd party SCSI or RAID driver" (Figure 1). S=Specify Additional Device ENTER=Continue F3=Exit Figure 2 - 85 - Installing Windows XP Step 1: Restart your hard drive(s). Windows Setup ...
Manual
Page 86
... in BIOS Setup to RAID mode, select Intel(R) ICH8R/ICH9R/ICH10R SATA RAID Controller. (Select Intel(R) ICH10R SATA AHCI Controller for AHCI mode.) Windows Setup You have any device support disks from the floppy disk. S=Specify Additional Device ENTER=Continue F3=Exit Figure 4 GA-EP45-DS3LR/DS3L Motherboard - 86 ... for the following list, or press ESC to return to the previous screen. Step 3: When Setup correctly recognizes the Intel ICH10R SATA RAID/AHCI driver in the floppy disk, a controller menu similar to Figure 3 below appears, press to continue the driver installation from a mass...
... in BIOS Setup to RAID mode, select Intel(R) ICH8R/ICH9R/ICH10R SATA RAID Controller. (Select Intel(R) ICH10R SATA AHCI Controller for AHCI mode.) Windows Setup You have any device support disks from the floppy disk. S=Specify Additional Device ENTER=Continue F3=Exit Figure 4 GA-EP45-DS3LR/DS3L Motherboard - 86 ... for the following list, or press ESC to return to the previous screen. Step 3: When Setup correctly recognizes the Intel ICH10R SATA RAID/AHCI driver in the floppy disk, a controller menu similar to Figure 3 below appears, press to continue the driver installation from a mass...

Manual
Page 87
Appendix To quit Setup without installing Windows XP, press F3. Step 4: After the SATA RAID/AHCI driver installation is completed, you can proceed with the Windows XP installation. This port of the Setup program prepares Microsoft(R) Windows (R) XP to Setup. Enter= Continue R=Repair F3=Exit Figure 5 - 87 - WindowsXP Professional Setup Welcome to run on your computer. To repair a Windows XP installation using Recovery Console, press R. To set up Windows XP now, press ENTER.
Appendix To quit Setup without installing Windows XP, press F3. Step 4: After the SATA RAID/AHCI driver installation is completed, you can proceed with the Windows XP installation. This port of the Setup program prepares Microsoft(R) Windows (R) XP to Setup. Enter= Continue R=Repair F3=Exit Figure 5 - 87 - WindowsXP Professional Setup Welcome to run on your computer. To repair a Windows XP installation using Recovery Console, press R. To set up Windows XP now, press ENTER.
Manual
Page 88
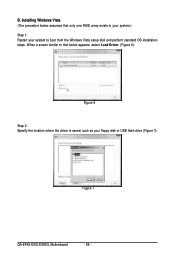
Figure 7 GA-EP45-DS3LR/DS3L Motherboard - 88 - Figure 6 Step 2: Specify the location where the driver is saved, such as your system to that below assumes that only one RAID array exists in your system.) Step 1: Restart your floppy disk or USB flash drive (Figure 7). Installing Windows Vista (The procedure below appears, select Load Driver. (Figure 6). When a screen similar to boot from the Windows Vista setup disk and perform standard OS installation steps. B.
Figure 7 GA-EP45-DS3LR/DS3L Motherboard - 88 - Figure 6 Step 2: Specify the location where the driver is saved, such as your system to that below assumes that only one RAID array exists in your system.) Step 1: Restart your floppy disk or USB flash drive (Figure 7). Installing Windows Vista (The procedure below appears, select Load Driver. (Figure 6). When a screen similar to boot from the Windows Vista setup disk and perform standard OS installation steps. B.
Manual
Page 89
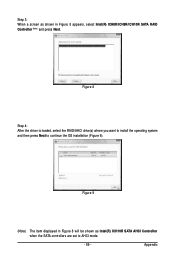
Step 3: When a screen as Intel(R) ICH10R SATA AHCI Controller when the SATA controllers are set to continue the OS installation (Figure 9). Figure 9 (Note) The item displayed in Figure 8 will be shown as shown in Figure 8 appears, select Intel(R) ICH8R/ICH9R/ICH10R SATA RAID Controller (Note) and press Next. Appendix Figure 8 Step 4: After the driver is loaded, select the RAID/AHCI drive(s) where you want to install the operating system and then press Next to AHCI mode. - 89 -
Step 3: When a screen as Intel(R) ICH10R SATA AHCI Controller when the SATA controllers are set to continue the OS installation (Figure 9). Figure 9 (Note) The item displayed in Figure 8 will be shown as shown in Figure 8 appears, select Intel(R) ICH8R/ICH9R/ICH10R SATA RAID Controller (Note) and press Next. Appendix Figure 8 Step 4: After the driver is loaded, select the RAID/AHCI drive(s) where you want to install the operating system and then press Next to AHCI mode. - 89 -


