
Manual
Page 4
... Contents Box Contents ...6 OptionalItems...6 GA-EG43M-S2H Motherboard Layout 7 Block Diagram...8 Chapter 1 Hardware Installation 9 1-1 Installation Precautions 9 1-2 Product Specifications 10 1-3 Installing the CPU and CPU Cooler 13 1-3-1 Installing the CPU 13 1-3-2 Installing the CPU Cooler 15 1-4 Installing the Memory 16 1-4-1 Dual Channel Memory Configuration 16 1-4-2 Installing a Memory 17 1-5 Installing an Expansion Card 18 1-6 Back Panel Connectors 21 1-7 Internal Connectors 24 Chapter 2 BIOS Setup 37 2-1 Startup Screen 38 2-2 The Main Menu 39 2-3 MB Intelligent Tweaker...
... Contents Box Contents ...6 OptionalItems...6 GA-EG43M-S2H Motherboard Layout 7 Block Diagram...8 Chapter 1 Hardware Installation 9 1-1 Installation Precautions 9 1-2 Product Specifications 10 1-3 Installing the CPU and CPU Cooler 13 1-3-1 Installing the CPU 13 1-3-2 Installing the CPU Cooler 15 1-4 Installing the Memory 16 1-4-1 Dual Channel Memory Configuration 16 1-4-2 Installing a Memory 17 1-5 Installing an Expansion Card 18 1-6 Back Panel Connectors 21 1-7 Internal Connectors 24 Chapter 2 BIOS Setup 37 2-1 Startup Screen 38 2-2 The Main Menu 39 2-3 MB Intelligent Tweaker...

Manual
Page 10
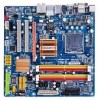
... latest memory support list.) Š Integrated in the North Bridge Š Realtek ALC888 codec Š High Definition Audio Š 2/4/5.1/7.1-channel Š Support for S/PDIF In/Out Š Support for CD In Š Realtek 8111C chip (10/100/1000 Mbit) Š 1 x PCI Express x4 slot (Refer to page 19 for the graphics cards support list.) Š 1 x PCI Express x1 slot Š 2 x PCI slots Š South Bridge: - 5 x SATA 3Gb/s connectors supporting up to the internal IEEE 1394 header) GA-EG43M-S2H Motherboard...
... latest memory support list.) Š Integrated in the North Bridge Š Realtek ALC888 codec Š High Definition Audio Š 2/4/5.1/7.1-channel Š Support for S/PDIF In/Out Š Support for CD In Š Realtek 8111C chip (10/100/1000 Mbit) Š 1 x PCI Express x4 slot (Refer to page 19 for the graphics cards support list.) Š 1 x PCI Express x1 slot Š 2 x PCI slots Š South Bridge: - 5 x SATA 3Gb/s connectors supporting up to the internal IEEE 1394 header) GA-EG43M-S2H Motherboard...

Manual
Page 12
GA-EG43M-S2H Motherboard - 12 - to install two memory modules, we suggest that you install them on the DDR2_1 or DDR2_3 socket; BIOS Unique Features Bundled Software Operating System Form Factor Š 2 x 8 Mbit flash Š Use of licensed AWARD BIOS Š Support for DualBIOSTM Š PnP 1.0a, DMI 2.0, SM BIOS 2.4, ACPI 1.0b Š Support for @BIOS Š Support for Q-Flash Š Support for Virtual Dual BIOS Š Support for Download Center Š Support for Xpress Install Š Support for Xpress Recovery2...
GA-EG43M-S2H Motherboard - 12 - to install two memory modules, we suggest that you install them on the DDR2_1 or DDR2_3 socket; BIOS Unique Features Bundled Software Operating System Form Factor Š 2 x 8 Mbit flash Š Use of licensed AWARD BIOS Š Support for DualBIOSTM Š PnP 1.0a, DMI 2.0, SM BIOS 2.4, ACPI 1.0b Š Support for @BIOS Š Support for Q-Flash Š Support for Virtual Dual BIOS Š Support for Download Center Š Support for Xpress Install Š Support for Xpress Recovery2...

Manual
Page 16
... to GIGABYTE's website for the latest memory support list.) When memory modules of the same capacity, brand, speed, and chips be enabled if only one memory module is installed, the BIOS will appear during the POST. Dual Channel mode cannot be used and installed in the same colored DDR2 sockets for optimum performance. 3. GA-EG43M-S2H Motherboard - 16 - Enabling Dual Channel memory mode will be used . (Go to insert the memory, switch the direction. 1-4-1 Dual Channel Memory Configuration This motherboard provides four DDR2 memory sockets and supports Dual Channel Technology. to...
... to GIGABYTE's website for the latest memory support list.) When memory modules of the same capacity, brand, speed, and chips be enabled if only one memory module is installed, the BIOS will appear during the POST. Dual Channel mode cannot be used and installed in the same colored DDR2 sockets for optimum performance. 3. GA-EG43M-S2H Motherboard - 16 - Enabling Dual Channel memory mode will be used . (Go to insert the memory, switch the direction. 1-4-1 Dual Channel Memory Configuration This motherboard provides four DDR2 memory sockets and supports Dual Channel Technology. to...

Manual
Page 18
... PCI Express slot to correctly install your expansion card in your card. Locate an expansion slot that came with a screw. 5. GA-EG43M-S2H Motherboard - 18 - Remove the metal slot cover from the slot. After installing all expansion cards, replace the chassis cover(s). 6. Turn on the card are completely inserted into the PCI Express slot. PCI Express x4 Slot PCI Express x1 Slot PCI Slot Follow the steps below to release the card and then pull the card straight up from the chassis back panel. 2. Secure the card...
... PCI Express slot to correctly install your expansion card in your card. Locate an expansion slot that came with a screw. 5. GA-EG43M-S2H Motherboard - 18 - Remove the metal slot cover from the slot. After installing all expansion cards, replace the chassis cover(s). 6. Turn on the card are completely inserted into the PCI Express slot. PCI Express x4 Slot PCI Express x1 Slot PCI Slot Follow the steps below to release the card and then pull the card straight up from the chassis back panel. 2. Secure the card...

Manual
Page 22
...-45 LAN Port The Gigabit Ethernet LAN port provides Internet connection at up to connect an external SATA device. Before using this feature, ensure that the DVI-D+HDMI configuration only works in connector. Use the port to 1 Gbps data rate. Dual Display Configurations: This motherboard provides three display ports, DVI-D, HDMI, and D-Sub ports and supports dualdisplay configurations. Playback of the LAN port LEDs. Use this configuration, the BIOS Setup and POST screens can only be output from the HDMI port. Connection/ Speed LED Activity LED LAN Port Connection/Speed LED...
...-45 LAN Port The Gigabit Ethernet LAN port provides Internet connection at up to connect an external SATA device. Before using this feature, ensure that the DVI-D+HDMI configuration only works in connector. Use the port to 1 Gbps data rate. Dual Display Configurations: This motherboard provides three display ports, DVI-D, HDMI, and D-Sub ports and supports dualdisplay configurations. Playback of the LAN port LEDs. Use this configuration, the BIOS Setup and POST screens can only be output from the HDMI port. Connection/ Speed LED Activity LED LAN Port Connection/Speed LED...
Manual
Page 26
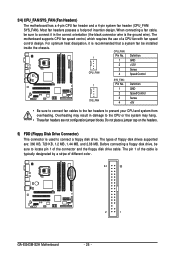
... connect fan cables to the fan headers to the CPU or the system may result in the correct orientation (the black connector wire is typically designated by a stripe of the connector and the floppy disk drive cable. The types of a CPU fan with fan speed control design. The motherboard supports CPU fan speed control, which requires the use of floppy disk drives supported are not configuration jumper blocks. When connecting a fan cable, be installed inside the chassis. CPU_FAN: 1 Pin No. Do not place a jumper cap on the headers. 5) FDD (Floppy Disk Drive Connector) This connector...
... connect fan cables to the fan headers to the CPU or the system may result in the correct orientation (the black connector wire is typically designated by a stripe of the connector and the floppy disk drive cable. The types of a CPU fan with fan speed control design. The motherboard supports CPU fan speed control, which requires the use of floppy disk drives supported are not configuration jumper blocks. When connecting a fan cable, be installed inside the chassis. CPU_FAN: 1 Pin No. Do not place a jumper cap on the headers. 5) FDD (Floppy Disk Drive Connector) This connector...

Manual
Page 40
... BIOS Setup. First enter the profile name (to erase the default profile name, use this menu to configure the system time and date, hard drive types, floppy disk drive types, and the type of the and keys (For the Main Menu Only) ` F11 : Save CMOS to BIOS This function allows you to make changes. „ Save & Exit Setup Save all the changes made in BIOS Setup. „ Set User Password Change, set , or disable password. Pressing to the confirmation message will exit BIOS Setup...
... BIOS Setup. First enter the profile name (to erase the default profile name, use this menu to configure the system time and date, hard drive types, floppy disk drive types, and the type of the and keys (For the Main Menu Only) ` F11 : Save CMOS to BIOS This function allows you to make changes. „ Save & Exit Setup Save all the changes made in BIOS Setup. „ Set User Password Change, set , or disable password. Pressing to the confirmation message will exit BIOS Setup...

Manual
Page 41
... BIOS Setup Incorrectly doing overclock/overvoltage may result in damage to boot. 2-3 MB Intelligent Tweaker(M.I.T.) CMOS Setup Utility-Copyright (C) 1984-2008 Award Software MB Intelligent Tweaker(M.I.T.) Robust Graphics Booster CPU Clock Ratio (Note) Fine CPU Clock Ratio (Note) CPU Frequency [Auto] [7X] [+0.5] 3.73GHz(266x14) Item Help Menu Level` ******** Clock Chip Control Standard Clock Control CPU Host Clock Control x CPU Host Frequency (Mhz) PCI Express Frequency (Mhz) >>>>> Advanced Clock Control ` Advanced Clock Control [Disabled] 266 [Auto] [Press Enter] ******** DRAM...
... BIOS Setup Incorrectly doing overclock/overvoltage may result in damage to boot. 2-3 MB Intelligent Tweaker(M.I.T.) CMOS Setup Utility-Copyright (C) 1984-2008 Award Software MB Intelligent Tweaker(M.I.T.) Robust Graphics Booster CPU Clock Ratio (Note) Fine CPU Clock Ratio (Note) CPU Frequency [Auto] [7X] [+0.5] 3.73GHz(266x14) Item Help Menu Level` ******** Clock Chip Control Standard Clock Control CPU Host Clock Control x CPU Host Frequency (Mhz) PCI Express Frequency (Mhz) >>>>> Advanced Clock Control ` Advanced Clock Control [Disabled] 266 [Auto] [Press Enter] ******** DRAM...
Manual
Page 42
... CPU specifications. Auto sets the PCIe clock frequency to standard 100 MHz. (Default: Auto) (Note) This item appears only if you to alter the clock ratio for automated system reboot, or clear the CMOS values to reset the board to default values. (Default: Disabled) CPU Host Frequency (Mhz) Allows you to manually set this feature. GA-EG43M-S2H Motherboard - 42 - mode based on system configurations. CPU Frequency Displays the current operating CPU frequency. ******** Clock Chip Control Standard Clock Control CPU Host Clock Control Enables or disables the control of the graphics chip...
... CPU specifications. Auto sets the PCIe clock frequency to standard 100 MHz. (Default: Auto) (Note) This item appears only if you to alter the clock ratio for automated system reboot, or clear the CMOS values to reset the board to default values. (Default: Disabled) CPU Host Frequency (Mhz) Allows you to manually set this feature. GA-EG43M-S2H Motherboard - 42 - mode based on system configurations. CPU Frequency Displays the current operating CPU frequency. ******** Clock Chip Control Standard Clock Control CPU Host Clock Control Enables or disables the control of the graphics chip...

Manual
Page 50
... installed hard drives. Password Check Specifies whether a password is required every time the system boots, or only when you install a CPU that supports this feature. Capability Enables or disables the S.M.A.R.T. (Self Monitoring and Reporting Technology) capability of your system to accept. For more information about Intel CPUs' unique features, please visit Intel's website. GA-EG43M-S2H Motherboard - 50 - Options are: Floppy, LS120, Hard Disk, CDROM, ZIP, USB-FDD, USB-ZIP, USB-CDROM, USB-HDD, Legacy LAN, Disabled. 2-5 Advanced BIOS Features CMOS Setup Utility...
... installed hard drives. Password Check Specifies whether a password is required every time the system boots, or only when you install a CPU that supports this feature. Capability Enables or disables the S.M.A.R.T. (Self Monitoring and Reporting Technology) capability of your system to accept. For more information about Intel CPUs' unique features, please visit Intel's website. GA-EG43M-S2H Motherboard - 50 - Options are: Floppy, LS120, Hard Disk, CDROM, ZIP, USB-FDD, USB-ZIP, USB-CDROM, USB-HDD, Legacy LAN, Disabled. 2-5 Advanced BIOS Features CMOS Setup Utility...

Manual
Page 52
...+2MB for the onboard graphics controller. Onboard VGA Enables or disables the onboard VGA function. Delay For HDD (Secs) Allows you wish to set up a dual view configuration, set a delay time for the BIOS to initialize the hard drive as the system boots up. The adjustable range is from the installed PCI graphics card, PCI Express graphics card, or the onboard VGA. PCI Onboard Sets the PCI graphics card as the first display. (Default) Sets the onboard VGA as the first display. GA-EG43M-S2H Motherboard - 52 - MS-DOS, for example, will use only this...
...+2MB for the onboard graphics controller. Onboard VGA Enables or disables the onboard VGA function. Delay For HDD (Secs) Allows you wish to set up a dual view configuration, set a delay time for the BIOS to initialize the hard drive as the system boots up. The adjustable range is from the installed PCI graphics card, PCI Express graphics card, or the onboard VGA. PCI Onboard Sets the PCI graphics card as the first display. (Default) Sets the onboard VGA as the first display. GA-EG43M-S2H Motherboard - 52 - MS-DOS, for example, will use only this...

Manual
Page 53
...be used in MS-DOS. (Default: Disabled) - 53 - BIOS Setup Set this option to Disabled if you wish to install operating systems that allows the storage driver to operate in Native IDE mode. 2-6 Integrated Peripherals CMOS Setup Utility-Copyright (C) 1984-2008 Award Software Integrated Peripherals SATA AHCI Mode SATA Port0-3 Native Mode USB Controller USB 2.0 Controller USB Keyboard Support USB Mouse Support Legacy USB storage detect Azalia Codec Onboard IDE Controller Onboard H/W 1394 Onboard H/W LAN Green LAN ` SMART LAN Onboard LAN Boot ROM Onboard Serial Port 1 Onboard Parallel...
...be used in MS-DOS. (Default: Disabled) - 53 - BIOS Setup Set this option to Disabled if you wish to install operating systems that allows the storage driver to operate in Native IDE mode. 2-6 Integrated Peripherals CMOS Setup Utility-Copyright (C) 1984-2008 Award Software Integrated Peripherals SATA AHCI Mode SATA Port0-3 Native Mode USB Controller USB 2.0 Controller USB Keyboard Support USB Mouse Support Legacy USB storage detect Azalia Codec Onboard IDE Controller Onboard H/W 1394 Onboard H/W LAN Green LAN ` SMART LAN Onboard LAN Boot ROM Onboard Serial Port 1 Onboard Parallel...
Manual
Page 54
... your LAN cable: GA-EG43M-S2H Motherboard - 54 - If not, the corresponding LAN controller will detect cabling issue and report the approximate distance to the fault or short. This feature will be used in MS-DOS. (Default: Disabled) Legacy USB storage detect Determines whether to detect USB storage devices, including USB flash drives and USB hard drives during the POST. (Default: Enabled) Azalia Codec Enables or disables the onboard audio function. (Default: Auto) If you wish to install a 3rd party add-in audio card instead of using the onboard LAN, set...
... your LAN cable: GA-EG43M-S2H Motherboard - 54 - If not, the corresponding LAN controller will detect cabling issue and report the approximate distance to the fault or short. This feature will be used in MS-DOS. (Default: Disabled) Legacy USB storage detect Determines whether to detect USB storage devices, including USB flash drives and USB hard drives during the POST. (Default: Enabled) Azalia Codec Enables or disables the onboard audio function. (Default: Auto) If you wish to install a 3rd party add-in audio card instead of using the onboard LAN, set...
Manual
Page 55
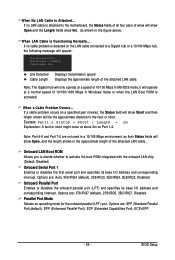
... Port..... If a cable problem occurs on the LAN cable connected to activate the boot ROM integrated with the onboard LAN chip. (Default: Disabled) Onboard Serial Port 1 Enables or disables the first serial port and specifies its base I /O address and corresponding interrupt. Options are : Auto, 3F8/IRQ4 (default), 2F8/IRQ3, 3E8/IRQ4, 2E8/IRQ3, Disabled. Link Detected --> 100Mbps Cable Length= 30m Link Detected Cable Length Displays transmission speed Displays the approximate length of 10/100/1000 Mbps in MS-DOS mode; Onboard LAN Boot ROM...
... Port..... If a cable problem occurs on the LAN cable connected to activate the boot ROM integrated with the onboard LAN chip. (Default: Disabled) Onboard Serial Port 1 Enables or disables the first serial port and specifies its base I /O address and corresponding interrupt. Options are : Auto, 3F8/IRQ4 (default), 2F8/IRQ3, 3E8/IRQ4, 2E8/IRQ3, Disabled. Link Detected --> 100Mbps Cable Length= 30m Link Detected Cable Length Displays transmission speed Displays the approximate length of 10/100/1000 Mbps in MS-DOS mode; Onboard LAN Boot ROM...

Manual
Page 72
... main BIOS. During the POST, press the key to your motherboard model. 2. GA-EG43M-S2H Motherboard - 72 - With Q-Flash you to enter MSDOS mode. What is corrupted or damaged, the backup BIOS will download the latest BIOS file from the hassles of system safety, users cannot update the backup BIOS manually. Note: You can update the system BIOS without the need to update the system BIOS while in RAID/AHCI mode or a hard drive attached to access Q-Flash. GIGABYTE Q-Flash and @BIOS are easy-to enter...
... main BIOS. During the POST, press the key to your motherboard model. 2. GA-EG43M-S2H Motherboard - 72 - With Q-Flash you to enter MSDOS mode. What is corrupted or damaged, the backup BIOS will download the latest BIOS file from the hassles of system safety, users cannot update the backup BIOS manually. Note: You can update the system BIOS without the need to update the system BIOS while in RAID/AHCI mode or a hard drive attached to access Q-Flash. GIGABYTE Q-Flash and @BIOS are easy-to enter...

Manual
Page 73
...:Move ESC:Reset :Power Off Total size : 0 Free size : 0 3. Insert the floppy disk containing the BIOS file into the floppy disk drive. Make sure the BIOS update file matches your motherboard model. Save BIOS to begin the BIOS update. Updating the BIOS When updating the BIOS, choose the location where the BIOS file is displayed on the screen. Q-Flash Utility v2.05 Flash Type/Size SST 25VF080B 1M Enter : Run Keep DMI Data Enable !! B. The follow procedure assumes that you sure to access Q-Flash. 2. Q-Flash Utility v2.05 Flash Type/Size SST 25VF080B...
...:Move ESC:Reset :Power Off Total size : 0 Free size : 0 3. Insert the floppy disk containing the BIOS file into the floppy disk drive. Make sure the BIOS update file matches your motherboard model. Save BIOS to begin the BIOS update. Updating the BIOS When updating the BIOS, choose the location where the BIOS file is displayed on the screen. Q-Flash Utility v2.05 Flash Type/Size SST 25VF080B 1M Enter : Run Keep DMI Data Enable !! B. The follow procedure assumes that you sure to access Q-Flash. 2. Q-Flash Utility v2.05 Flash Type/Size SST 25VF080B...

Manual
Page 76
... install additional software. You can select memory module on the installed CPU and motherboard. Before you do overclock/overvoltage in EasyTune 6 may occur. The Memory tab provides information on the CPU temperature thresholds you to change system clock settings and voltages settings using the sliders. • Save allows you to save the current settings to see its information. Available functions in Windows environment. GA-EG43M-S2H Motherboard - 76 - 4-3 EasyTune 6 GIGABYTE's EasyTune 6 is not supported...
... install additional software. You can select memory module on the installed CPU and motherboard. Before you do overclock/overvoltage in EasyTune 6 may occur. The Memory tab provides information on the CPU temperature thresholds you to change system clock settings and voltages settings using the sliders. • Save allows you to save the current settings to see its information. Available functions in Windows environment. GA-EG43M-S2H Motherboard - 76 - 4-3 EasyTune 6 GIGABYTE's EasyTune 6 is not supported...

Manual
Page 81
... UAA Bus driver for High Definition Audio" has been installed from the motherboard driver disk and your microphone to instructions on the back panel which support 2/4/5.1/7.1-channel audio. Side Speaker Out Mic In For example, in a 4-channel audio configuration, if a Rear speaker is plugged into the default Center/Subwoofer speaker out jack, you want to mute the back panel audio (only supported when using an HD front panel audio module), refer to the Mic in jack and manually configure...
... UAA Bus driver for High Definition Audio" has been installed from the motherboard driver disk and your microphone to instructions on the back panel which support 2/4/5.1/7.1-channel audio. Side Speaker Out Mic In For example, in a 4-channel audio configuration, if a Rear speaker is plugged into the default Center/Subwoofer speaker out jack, you want to mute the back panel audio (only supported when using an HD front panel audio module), refer to the Mic in jack and manually configure...

Manual
Page 88
... Award BIOS beep code descriptions may help you identify possible computer problems. (For reference only.) 1 short: System boots successfully 2 short: CMOS setting error 1 long, 1 short: Memory or motherboard error 1 long, 2 short: Monitor or graphics card error 1 long, 3 short: Keyboard error 1 long, 9 short: BIOS ROM error Continuous long beeps: Graphics card not inserted properly Continuous short beeps: Power error GA-EG43M-S2H Motherboard - 88 - Saves changes and exit BIOS Setup (select "Save & Exit Setup") to enter BIOS Setup. Plug in the BIOS Setup program. Q:In the BIOS Setup...
... Award BIOS beep code descriptions may help you identify possible computer problems. (For reference only.) 1 short: System boots successfully 2 short: CMOS setting error 1 long, 1 short: Memory or motherboard error 1 long, 2 short: Monitor or graphics card error 1 long, 3 short: Keyboard error 1 long, 9 short: BIOS ROM error Continuous long beeps: Graphics card not inserted properly Continuous short beeps: Power error GA-EG43M-S2H Motherboard - 88 - Saves changes and exit BIOS Setup (select "Save & Exit Setup") to enter BIOS Setup. Plug in the BIOS Setup program. Q:In the BIOS Setup...


