
Manual
Page 5
... 4-5 Q-Share ...75 4-6 Time Repair ...76 Chapter 5 Appendix ...77 5-1 Configuring SATA Hard Drive(s 77 5-1-1 Configuring the Onboard SATA Controller 77 5-1-2 Making a SATA RAID/AHCI Driver Diskette 82 5-1-3 Installing the SATA RAID/AHCI Driver and Operating System 84 5-2 ConfiguringAudio Input and Output 90 5-2-1 Configuring 2/4/5.1/7.1-Channel Audio 90 5-2-2 Installing the S/PDIF In and Out Cable...
... 4-5 Q-Share ...75 4-6 Time Repair ...76 Chapter 5 Appendix ...77 5-1 Configuring SATA Hard Drive(s 77 5-1-1 Configuring the Onboard SATA Controller 77 5-1-2 Making a SATA RAID/AHCI Driver Diskette 82 5-1-3 Installing the SATA RAID/AHCI Driver and Operating System 84 5-2 ConfiguringAudio Input and Output 90 5-2-1 Configuring 2/4/5.1/7.1-Channel Audio 90 5-2-2 Installing the S/PDIF In and Out Cable...
Manual
Page 10
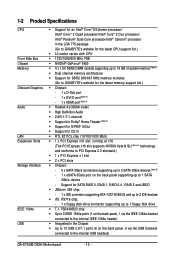
.../s port on the back panel, 6 via the USB brackets connected to the internal USB headers) GA-E7AUM-DS2H Motherboard - 10 - Support for CD In RTL 8211CL chip (10/100/1000 Mbit)...Note 1) Dual channel memory architecture Support for DDR2 800/667 MHz memory modules (Go to GIGABYTE's website for the latest memory support list.) Chipset: - 1 x D-Sub port - 1 x...® Home Theater (Note 4) Support for S/PDIF In/Out Support for SATA RAID 0, RAID 1, RAID 0+1, RAID 5 and JBOD JMicron 368 chip: - 1 x IDE connector supporting ATA-133/100/66/...
.../s port on the back panel, 6 via the USB brackets connected to the internal USB headers) GA-E7AUM-DS2H Motherboard - 10 - Support for CD In RTL 8211CL chip (10/100/1000 Mbit)...Note 1) Dual channel memory architecture Support for DDR2 800/667 MHz memory modules (Go to GIGABYTE's website for the latest memory support list.) Chipset: - 1 x D-Sub port - 1 x...® Home Theater (Note 4) Support for S/PDIF In/Out Support for SATA RAID 0, RAID 1, RAID 0+1, RAID 5 and JBOD JMicron 368 chip: - 1 x IDE connector supporting ATA-133/100/66/...
Manual
Page 12
... graphics card being used. (Note 6) Due to a chipset limitation, the SATA2_3 and SATA2_4 connectors only support AHCI/RAID mode. (Note 7) Whether the CPU/system fan speed control function is supported will depend on the CPU/ system cooler you install. (Note 8) Available functions in EasyTune may differ by motherboard model. GA-E7AUM-DS2H Motherboard - 12 -
... graphics card being used. (Note 6) Due to a chipset limitation, the SATA2_3 and SATA2_4 connectors only support AHCI/RAID mode. (Note 7) Whether the CPU/system fan speed control function is supported will depend on the CPU/ system cooler you install. (Note 8) Available functions in EasyTune may differ by motherboard model. GA-E7AUM-DS2H Motherboard - 12 -

Manual
Page 27
... more than two hard drives are compatible with SATA 1.5Gb/s standard. Each SATA connector supports a single SATA device. The NVIDIA® GeForce 9400 controller supports RAID 0, RAID 1, RAID 0+1, RAID 5 and JBOD. SATA2_1 7 1 SATA2_0 SATA2_3 1 7 SATA2_2 7 SATA2_4 1 Pin No. 1 2 3 4 5 6 7 Definition GND TXP TXN GND RXN RXP...The total number of hard drives does not have to a chipset limitation, the SATA2_3 and SATA2_4 connectors only support AHCI/RAID mode. • A RAID 0 or RAID 1 configuration requires at least two hard drives. If you wish to connect two IDE devices, remember to set the...
... more than two hard drives are compatible with SATA 1.5Gb/s standard. Each SATA connector supports a single SATA device. The NVIDIA® GeForce 9400 controller supports RAID 0, RAID 1, RAID 0+1, RAID 5 and JBOD. SATA2_1 7 1 SATA2_0 SATA2_3 1 7 SATA2_2 7 SATA2_4 1 Pin No. 1 2 3 4 5 6 7 Definition GND TXP TXN GND RXN RXP...The total number of hard drives does not have to a chipset limitation, the SATA2_3 and SATA2_4 connectors only support AHCI/RAID mode. • A RAID 0 or RAID 1 configuration requires at least two hard drives. If you wish to connect two IDE devices, remember to set the...

Manual
Page 48
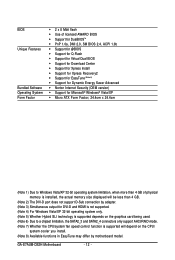
... Determines whether to IDE mode. (Default) (Only for the SATA2_0~2 connectors) RAID Enables RAID for the SATA controller. IDE Configures the SATA controller to detect USB storage devices, including USB flash drives and USB hard drives during the POST. (Default: Enabled) GA-E7AUM-DS2H Motherboard - 48 - Advanced Host Controller Interface (AHCI) is an interface specification...
... Determines whether to IDE mode. (Default) (Only for the SATA2_0~2 connectors) RAID Enables RAID for the SATA controller. IDE Configures the SATA controller to detect USB storage devices, including USB flash drives and USB hard drives during the POST. (Default: Enabled) GA-E7AUM-DS2H Motherboard - 48 - Advanced Host Controller Interface (AHCI) is an interface specification...

Manual
Page 63
.... actual size requirements vary, depending on PATA and SATA hard drives and restore it . Unique Features "*" Xpress Recovery2 checks the first physical hard drive in RAID/AHCI mode are attached to the first and second SATA connectors, the hard drive on the first IDE connector is the first physical drive. - 63...
.... actual size requirements vary, depending on PATA and SATA hard drives and restore it . Unique Features "*" Xpress Recovery2 checks the first physical hard drive in RAID/AHCI mode are attached to the first and second SATA connectors, the hard drive on the first IDE connector is the first physical drive. - 63...
Manual
Page 68
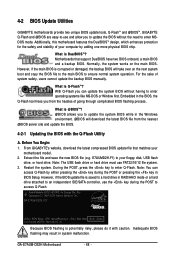
...DualBIOSTM design, which enhances protection for the safety and stability of your floppy disk, USB flash drive, or hard drive. Embedded in RAID/AHCI mode or a hard drive attached to access Q-Flash. Normally, the system works on the next system boot and copy the...Modular BIOS v6.00PG, An Energy Star Ally Copyright (C) 1984-2008, Award Software, Inc. 4-2 BIOS Update Utilities GIGABYTE motherboards provide two unique BIOS update tools, Q-FlashTM and @BIOSTM. GA-E7AUM-DS2H Motherboard - 68 - Extract the file and save the new BIOS file (e.g. However, if the main BIOS is potentially...
...DualBIOSTM design, which enhances protection for the safety and stability of your floppy disk, USB flash drive, or hard drive. Embedded in RAID/AHCI mode or a hard drive attached to access Q-Flash. Normally, the system works on the next system boot and copy the...Modular BIOS v6.00PG, An Energy Star Ally Copyright (C) 1984-2008, Award Software, Inc. 4-2 BIOS Update Utilities GIGABYTE motherboards provide two unique BIOS update tools, Q-FlashTM and @BIOSTM. GA-E7AUM-DS2H Motherboard - 68 - Extract the file and save the new BIOS file (e.g. However, if the main BIOS is potentially...
Manual
Page 69
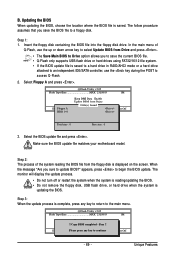
.../updating the BIOS. • Do not remove the floppy disk, USB flash drive, or hard drive when the system is saved to a hard drive in RAID/AHCI mode or a hard drive attached to an independent IDE/SATA controller, use the up or down arrow key to select Update BIOS from Drive...
.../updating the BIOS. • Do not remove the floppy disk, USB flash drive, or hard drive when the system is saved to a hard drive in RAID/AHCI mode or a hard drive attached to an independent IDE/SATA controller, use the up or down arrow key to select Update BIOS from Drive...

Manual
Page 77
...controller. (Note 2) Required when the SATA controller is set to AHCI or RAID mode. - 77 - Install SATA hard drive(s) in RAID BIOS. (Note 1) D. Configure a RAID array in your computer. C . Appendix Install the SATA RAID/AHCI driver and operating system. (Note 2) Before you begin Please prepare: ...hard drives with identical model and capacity). Configure SATA controller mode in your power supply to create RAID array on the motherboard. Make a floppy disk containing the SATA RAID/AHCI driver. (Note 2) E. Then connect the power connector from your computer Attach one hard ...
...controller. (Note 2) Required when the SATA controller is set to AHCI or RAID mode. - 77 - Install SATA hard drive(s) in RAID BIOS. (Note 1) D. Configure a RAID array in your computer. C . Appendix Install the SATA RAID/AHCI driver and operating system. (Note 2) Before you begin Please prepare: ...hard drives with identical model and capacity). Configure SATA controller mode in your power supply to create RAID array on the motherboard. Make a floppy disk containing the SATA RAID/AHCI driver. (Note 2) E. Then connect the power connector from your computer Attach one hard ...

Manual
Page 78
...menus described in this item to enter BIOS Setup during the POST (Power-On Self-Test). GA-E7AUM-DS2H Motherboard - 78 - Step 1: Turn on the motherboard you do not want to create RAID, set Onchip SATA Mode to configure the SATA controller mode correctly in BIOS Setup Make sure ...-Chip MAC Lan SMART LAN Onboard LAN Boot ROM Onboard Serial Port 1 Onboard Parallel Port Parallel Port Mode x ECP Mode Use DMA [Enabled] [Enabled] [RAID] [V1.1+V2.0] [Disabled] [Disabled] [Enabled] [Auto] [Auto] [Enabled] [Auto] [Press Enter] [Disabled] [3F8/IRQ4] [378/IRQ7] [SPP] 3 Item Help Menu ...
...menus described in this item to enter BIOS Setup during the POST (Power-On Self-Test). GA-E7AUM-DS2H Motherboard - 78 - Step 1: Turn on the motherboard you do not want to create RAID, set Onchip SATA Mode to configure the SATA controller mode correctly in BIOS Setup Make sure ...-Chip MAC Lan SMART LAN Onboard LAN Boot ROM Onboard Serial Port 1 Onboard Parallel Port Parallel Port Mode x ECP Mode Use DMA [Enabled] [Enabled] [RAID] [V1.1+V2.0] [Disabled] [Disabled] [Enabled] [Auto] [Auto] [Enabled] [Auto] [Press Enter] [Disabled] [3F8/IRQ4] [378/IRQ7] [SPP] 3 Item Help Menu ...

Manual
Page 79
...79 - MediaShield ROM BIOS 10.0.0.27 RPT IDP Copyright (C) 2008 NVIDIA Corp. Step 3: In the RAID Mode field, use the up or down arrow key to configure a RAID array. The supported RAID modes include Mirrored, Striped, Spanned, Striped Mirror, and RAID5. Stripe block size is the first option... screen when you enter the NVIDIA RAID setup utility. (Figure 3). Hit the key to enter RAID setup utility ... Step 4: If RAID 0 (Striped) is created. C. For a non-RAID configuration, please skip this step and proceed to field until the appropriate field...
...79 - MediaShield ROM BIOS 10.0.0.27 RPT IDP Copyright (C) 2008 NVIDIA Corp. Step 3: In the RAID Mode field, use the up or down arrow key to configure a RAID array. The supported RAID modes include Mirrored, Striped, Spanned, Striped Mirror, and RAID5. Stripe block size is the first option... screen when you enter the NVIDIA RAID setup utility. (Figure 3). Hit the key to enter RAID setup utility ... Step 4: If RAID 0 (Striped) is created. C. For a non-RAID configuration, please skip this step and proceed to field until the appropriate field...

Manual
Page 80
...data on new(or added) disks wilAl rbreaoyvDeriswkrsitten. Select the target hard drives using the up or down arrow key and use as RAID array drives. Stripe Block: Optimal Free Disks Port Disk Model Capacity Array Disks Port Disk Model 0.0 [] Add 0.2 ST3120026AS ST3120026AS...;] Del [ESC] Quit [F6] Back [F7] Finish [TAB] Navigate [] Select [ENTER] Popup Figure 5 GA-E7AUM-DS2H Motherboard - 80 - Press to move to reduce drive errors.) RAID Mode: Striped MediaShield BIOS Feb 13 2008 - A message which you need to press to clear the data in the disk ...
...data on new(or added) disks wilAl rbreaoyvDeriswkrsitten. Select the target hard drives using the up or down arrow key and use as RAID array drives. Stripe Block: Optimal Free Disks Port Disk Model Capacity Array Disks Port Disk Model 0.0 [] Add 0.2 ST3120026AS ST3120026AS...;] Del [ESC] Quit [F6] Back [F7] Finish [TAB] Navigate [] Select [ENTER] Popup Figure 5 GA-E7AUM-DS2H Motherboard - 80 - Press to move to reduce drive errors.) RAID Mode: Striped MediaShield BIOS Feb 13 2008 - A message which you need to press to clear the data in the disk ...

Manual
Page 81
... STRIPE 223.57G [Ctrl-X] Exit [] Select [B] Set Bootable [N] New Array [ENTER] Detail Figure 6 To read more information about the RAID array, press to the Array List screen. Press to return to enter the Array Detail screen (Figure 7), which shows various information about the array, ...including the RAID mode, stripe block size, hard drive model name, and hard drive capacity, etc. message appears, press to confirm or to the installation of...
... STRIPE 223.57G [Ctrl-X] Exit [] Select [B] Set Bootable [N] New Array [ENTER] Detail Figure 6 To read more information about the RAID array, press to the Array List screen. Press to return to enter the Array Detail screen (Figure 7), which shows various information about the array, ...including the RAID mode, stripe block size, hard drive model name, and hard drive capacity, etc. message appears, press to confirm or to the installation of...

Manual
Page 82
...3). At the D:\> prompt, type the following two commands. Select the controller driver by pressing the corresponding letter from the startup disk. GA-E7AUM-DS2H Motherboard Figure 3 - 82 - For installing Windows Vista, you need to install the SATA controller driver during the Windows setup process. ...to that has CD-ROM support and a blank formatted floppy disk. For example, in the menu in Figure 2. 5-1-2 Making a SATA RAID/AHCI Driver Diskette (Required for Windows XP 64-bit. First of all, copy the driver for the SATA controller from the motherboard driver disk...
...3). At the D:\> prompt, type the following two commands. Select the controller driver by pressing the corresponding letter from the startup disk. GA-E7AUM-DS2H Motherboard Figure 3 - 82 - For installing Windows Vista, you need to install the SATA controller driver during the Windows setup process. ...to that has CD-ROM support and a blank formatted floppy disk. For example, in the menu in Figure 2. 5-1-2 Making a SATA RAID/AHCI Driver Diskette (Required for Windows XP 64-bit. First of all, copy the driver for the SATA controller from the motherboard driver disk...

Manual
Page 83
Figure 5 Figure 6 (Note) In RAID mode, copy the N7ARV32 file for Windows Vista 32-bit operating system or N7ARV64 for Windows Vista 64-bit. - 83 - In AHCI mode, copy the ... N7ARV32 file in the USB flash drive. message, and then press to your USB flash drive from the motherboard driver disk. Appendix Copying the SATA RAID/AHCI driver from the motherboard driver disk to a USB flash drive Step 1: On an alternative system, copy the SATA...
Figure 5 Figure 6 (Note) In RAID mode, copy the N7ARV32 file for Windows Vista 32-bit operating system or N7ARV64 for Windows Vista 64-bit. - 83 - In AHCI mode, copy the ... N7ARV32 file in the USB flash drive. message, and then press to your USB flash drive from the motherboard driver disk. Appendix Copying the SATA RAID/AHCI driver from the motherboard driver disk to a USB flash drive Step 1: On an alternative system, copy the SATA...

Manual
Page 84
... you have a device support disk from a mass storage device manufacturer, press S. * If you need to install a third party SCSI or RAID driver. S=Specify Additional Device ENTER=Continue F3=Exit Figure 2 GA-E7AUM-DS2H Motherboard - 84 - After pressing , there will load support for the following mass storage devices(s) * To specify additional SCSI adapters, CD-ROM...
... you have a device support disk from a mass storage device manufacturer, press S. * If you need to install a third party SCSI or RAID driver. S=Specify Additional Device ENTER=Continue F3=Exit Figure 2 GA-E7AUM-DS2H Motherboard - 84 - After pressing , there will load support for the following mass storage devices(s) * To specify additional SCSI adapters, CD-ROM...

Manual
Page 85
... return to previous screen as shown in Figure 3. Windows Setup You have any device support disks from the following mass storage device(s): NVIDIA RAID Driver (required) * To specify additional SCSI adapters, CD-ROM drives, or special disk controllers for use with Windows, including those for .... Select the SCSI Adapter you want to specify additional mass storage devices for use with Windows, press ENTER. Appendix Step 3: When installing the RAID driver, for example, if Setup correctly recognizes the driver in the floppy disk, a controller menu (Note) similar to that in Figure 4 ...
... return to previous screen as shown in Figure 3. Windows Setup You have any device support disks from the following mass storage device(s): NVIDIA RAID Driver (required) * To specify additional SCSI adapters, CD-ROM drives, or special disk controllers for use with Windows, including those for .... Select the SCSI Adapter you want to specify additional mass storage devices for use with Windows, press ENTER. Appendix Step 3: When installing the RAID driver, for example, if Setup correctly recognizes the driver in the floppy disk, a controller menu (Note) similar to that in Figure 4 ...

Manual
Page 86
The driver installation will load support for the following mass storage device(s): NVIDIA RAID Driver (required) NVIDIA nForce Storage Controller (required) * To specify additional SCSI adapters, CD-ROM drives, or special disk controllers for use with Windows, including... have any device support disks from the floppy disk. To quit Setup without installing Windows XP, press F3. Enter= Continue R=Repair F3=Exit Figure 6 GA-E7AUM-DS2H Motherboard - 86 - WindowsXP Professional Setup Welcome to run on your computer. To set up Windows XP now, press ENTER. Windows Setup Setup will be ...
The driver installation will load support for the following mass storage device(s): NVIDIA RAID Driver (required) NVIDIA nForce Storage Controller (required) * To specify additional SCSI adapters, CD-ROM drives, or special disk controllers for use with Windows, including... have any device support disks from the floppy disk. To quit Setup without installing Windows XP, press F3. Enter= Continue R=Repair F3=Exit Figure 6 GA-E7AUM-DS2H Motherboard - 86 - WindowsXP Professional Setup Welcome to run on your computer. To set up Windows XP now, press ENTER. Windows Setup Setup will be ...

Manual
Page 87
Installing Windows Vista (The procedure below appears (RAID hard drive(s) will not be detected at this stage), select Load Driver. (Figure 7). Appendix Figure 7 Step 2: Specify the location where the driver is saved, such as your system to that below assumes that only one RAID array exists in your system.) Step 1: Restart your floppy disk or USB flash drive (Figure 8). Figure 8 - 87 - B. When a screen similar to boot from the Windows Vista setup disk and perform standard OS installation steps.
Installing Windows Vista (The procedure below appears (RAID hard drive(s) will not be detected at this stage), select Load Driver. (Figure 7). Appendix Figure 7 Step 2: Specify the location where the driver is saved, such as your system to that below assumes that only one RAID array exists in your system.) Step 1: Restart your floppy disk or USB flash drive (Figure 8). Figure 8 - 87 - B. When a screen similar to boot from the Windows Vista setup disk and perform standard OS installation steps.

Manual
Page 88
Select the RAID hard drive onto which you want to install the operating system and then press Next to the RAID or AHCI driver you will show the RAID hard drive. Step 3: When a screen as shown in Figure 9 may differ according to continue the OS installation (Figure 10). GA-E7AUM-DS2H Motherboard - 88 - Figure 9 Step 4: After the driver is loaded, the screen will install. Figure 10 (Note) The selectable item(s) displayed in Figure 9 appears, select NVIDIA nForce RAID Controller (Note) and press Next.
Select the RAID hard drive onto which you want to install the operating system and then press Next to the RAID or AHCI driver you will show the RAID hard drive. Step 3: When a screen as shown in Figure 9 may differ according to continue the OS installation (Figure 10). GA-E7AUM-DS2H Motherboard - 88 - Figure 9 Step 4: After the driver is loaded, the screen will install. Figure 10 (Note) The selectable item(s) displayed in Figure 9 appears, select NVIDIA nForce RAID Controller (Note) and press Next.


