User Manual
Page 2
GA-8IPXDR-E(C) Motherboard Table of Content Item Checklist 4 GA-8IPXDR-E Series Model List 4 WARNING 4 Chapter 1 Introduction 6 Features Summary 6 GA-8IPXDR-E(C) Motherboard Layout 8 Chapter 2 Hardware Installation Process 9 Step 1: Install the Central Processing Unit (CPU 10 Step 1-1: Installing Motherboard to the Chassis 10 Step 1-2: CPU Installation 11 Step 1-3: CPU Heat Sink Installation 13 Step 2: Install memory modules 15 Step 3: Install expansion cards...
GA-8IPXDR-E(C) Motherboard Table of Content Item Checklist 4 GA-8IPXDR-E Series Model List 4 WARNING 4 Chapter 1 Introduction 6 Features Summary 6 GA-8IPXDR-E(C) Motherboard Layout 8 Chapter 2 Hardware Installation Process 9 Step 1: Install the Central Processing Unit (CPU 10 Step 1-1: Installing Motherboard to the Chassis 10 Step 1-2: CPU Installation 11 Step 1-3: CPU Heat Sink Installation 13 Step 2: Install memory modules 15 Step 3: Install expansion cards...
User Manual
Page 4
... 1/ Floppy cable x 1 ; Use a grounded wrist strap before you work on the motherboard. 4 Computer motherboards and expansion cards contain very delicate Integrated Circuit (IC) chips. The GA-8IPXDR-E series motherboard ; Place components on a grounded antistatic pad or on the bag that the ATX power supply... is switched off before handling computer components. Driver CD for motherboard driver & utility ; Hold components by...
... 1/ Floppy cable x 1 ; Use a grounded wrist strap before you work on the motherboard. 4 Computer motherboards and expansion cards contain very delicate Integrated Circuit (IC) chips. The GA-8IPXDR-E series motherboard ; Place components on a grounded antistatic pad or on the bag that the ATX power supply... is switched off before handling computer components. Driver CD for motherboard driver & utility ; Hold components by...

User Manual
Page 5
... near the fixing hole, otherwise it may be careful of the spacers (the spacer may damage the board or cause board malfunctioning. 5 WARNING! If the motherboard has mounting holes, but they don't line up with the holes on the PCB that are no slots to attach the spacers, do not become... alarmed you can still attach the motherboard to cut the bottom portion of your hands). Sometimes you can still attach the spacers to the chassis... Be careful, don't let the screw contact...
... near the fixing hole, otherwise it may be careful of the spacers (the spacer may damage the board or cause board malfunctioning. 5 WARNING! If the motherboard has mounting holes, but they don't line up with the holes on the PCB that are no slots to attach the spacers, do not become... alarmed you can still attach the motherboard to cut the bottom portion of your hands). Sometimes you can still attach the spacers to the chassis... Be careful, don't let the screw contact...
User Manual
Page 6
.... y 1 Parallel port supports Normal/EPP/ECP mode y 2 COM ports (One at front, one at rear) y 2 LAN ports (LAN1 & LAN2) y 4 USB ports (Rear USB x 2, Front USB x 2) 6 GA-8IPXDR-E(C) Motherboard Chapter 1 Introduction Features Summary Form Factor CPU y 30.5cm x 33cm Extend ATX size form factor, 8 layers PCB.
.... y 1 Parallel port supports Normal/EPP/ECP mode y 2 COM ports (One at front, one at rear) y 2 LAN ports (LAN1 & LAN2) y 4 USB ports (Rear USB x 2, Front USB x 2) 6 GA-8IPXDR-E(C) Motherboard Chapter 1 Introduction Features Summary Form Factor CPU y 30.5cm x 33cm Extend ATX size form factor, 8 layers PCB.
User Manual
Page 8
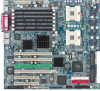
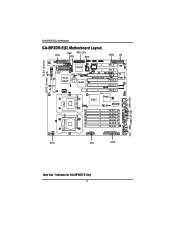
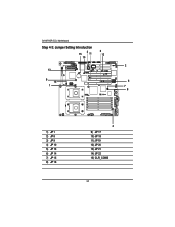
GA-8IPXDR-E(C) Motherboard GA-8IPXDR-E(C) Motherboard Layout FDD1 USB1 IPMI_CON IDE1 BIOS COM2 J20 *SCSI1 (Channel *SCSI2 (Channel B) A) ICH3-S IDE2 *SCSI 7902W CLR_COMS BT1 P64H2 SIO NS Wake on LAN PCI_6 PCI_5 PCI_4 ATI Rage XL PCI-X_3 PCI-X_2 PCI-X_1 CPU2 E7501 P64H2 82546EB J4 (B-1) J1 (A-1) J5 (B-2) J2 (A-2) J6 (B-3) J3 (A-3) 604 PIN Socket 604 PIN Socket CPU1 (Install First) ATX2 ATX1 ATX3 CN1 USB2 COM1LPT VGA LAN1 LAN2 Note that * indicates for GA-8IPXDR-E Only 8
GA-8IPXDR-E(C) Motherboard GA-8IPXDR-E(C) Motherboard Layout FDD1 USB1 IPMI_CON IDE1 BIOS COM2 J20 *SCSI1 (Channel *SCSI2 (Channel B) A) ICH3-S IDE2 *SCSI 7902W CLR_COMS BT1 P64H2 SIO NS Wake on LAN PCI_6 PCI_5 PCI_4 ATI Rage XL PCI-X_3 PCI-X_2 PCI-X_1 CPU2 E7501 P64H2 82546EB J4 (B-1) J1 (A-1) J5 (B-2) J2 (A-2) J6 (B-3) J3 (A-3) 604 PIN Socket 604 PIN Socket CPU1 (Install First) ATX2 ATX1 ATX3 CN1 USB2 COM1LPT VGA LAN1 LAN2 Note that * indicates for GA-8IPXDR-E Only 8
User Manual
Page 10
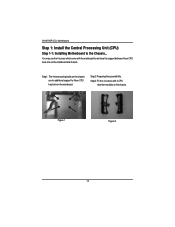
Step1: The 4 new mounting holes on the chassis are for additional support for Xeon CPU heat-sink on the mainboard and chassis. Figure 1 Figure 2 10 Step2: Preparing the assemblt kits. You may use the 4 screws which come with 2 CPU retention modules on the chassis. Step3: Fit the 4 screws with the mainboard to the Chassis... GA-8IPXDR-E(C) Motherboard Step 1: Install the Central Processing Unit (CPU) Step 1-1: Installing Motherboard to reinforce the support between Xeon CPU heat-sink on the mainboard.
Step1: The 4 new mounting holes on the chassis are for additional support for Xeon CPU heat-sink on the mainboard and chassis. Figure 1 Figure 2 10 Step2: Preparing the assemblt kits. You may use the 4 screws which come with 2 CPU retention modules on the chassis. Step3: Fit the 4 screws with the mainboard to the Chassis... GA-8IPXDR-E(C) Motherboard Step 1: Install the Central Processing Unit (CPU) Step 1-1: Installing Motherboard to reinforce the support between Xeon CPU heat-sink on the mainboard.
User Manual
Page 12
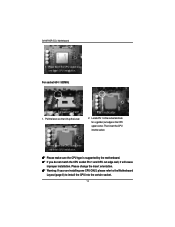
... 533MHz Socket Actuation Lever 1. Press down the CPU socket lever and finish CPU installation. 0 Please make sure the CPU type is supported by the motherboard. 0 If you do not match the CPU socket Pin 1 and CPU cut edge on the CPU upper corner. Pull the lever out, than lift...change the insert orientation. 0 Warning: If your are installing one CPU ONLY, please refer to the Motherboard Layout (page 8) to install the CPU into the socket. 3. Then insert the CPU into the certain socket. 12 GA-8IPXDR-E(C) Motherboard 3. Locate Pin 1 in the socket and look for a (golden) cut edge well, it ...
... 533MHz Socket Actuation Lever 1. Press down the CPU socket lever and finish CPU installation. 0 Please make sure the CPU type is supported by the motherboard. 0 If you do not match the CPU socket Pin 1 and CPU cut edge on the CPU upper corner. Pull the lever out, than lift...change the insert orientation. 0 Warning: If your are installing one CPU ONLY, please refer to the Motherboard Layout (page 8) to install the CPU into the socket. 3. Then insert the CPU into the certain socket. 12 GA-8IPXDR-E(C) Motherboard 3. Locate Pin 1 in the socket and look for a (golden) cut edge well, it ...
User Manual
Page 14
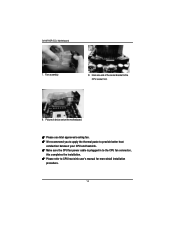
Picture of the cooler bracket to CPU heat sink user's manual for more detail installation procedure. 14 Hook one end of device set on the motherboard. 0 Please use Intel approved cooling fan. 0 We recommend you to apply the thermal paste to provide better heat conduction between your CPU and heatsink. 0 Make sure the CPU fan power cable is plugged in to the CPU fan connector, this completes the installation. 0 Please refer to the CPU socket first. 9. GA-8IPXDR-E(C) Motherboard 7. Fan assembly. 8.
Picture of the cooler bracket to CPU heat sink user's manual for more detail installation procedure. 14 Hook one end of device set on the motherboard. 0 Please use Intel approved cooling fan. 0 We recommend you to apply the thermal paste to provide better heat conduction between your CPU and heatsink. 0 Make sure the CPU fan power cable is plugged in to the CPU fan connector, this completes the installation. 0 Please refer to the CPU socket first. 9. GA-8IPXDR-E(C) Motherboard 7. Fan assembly. 8.

User Manual
Page 15
Hardware Installation Process Step 2: Install memory modules The motherboard has 6 dual inline memory module (DIMM) sockets, but it vertically into the DIMM Slot .The DIMM module can only fit in one direction due to the notch.Memory size can only support a maximum of 3 banks DDR memory. To install the memory module, just push it can vary between sockets. The BIOS will automatically detects memory type and size. DDR socket 1 uses 1 bank, DDR socket 2& 3 share the remaining 2 banks. Registered DDR Notch J4 (B-1) J1 (A-1) J5 (B-2) J2 (A-2) J6 (B-3) J3 (A-3) 15
Hardware Installation Process Step 2: Install memory modules The motherboard has 6 dual inline memory module (DIMM) sockets, but it vertically into the DIMM Slot .The DIMM module can only fit in one direction due to the notch.Memory size can only support a maximum of 3 banks DDR memory. To install the memory module, just push it can vary between sockets. The BIOS will automatically detects memory type and size. DDR socket 1 uses 1 bank, DDR socket 2& 3 share the remaining 2 banks. Registered DDR Notch J4 (B-1) J1 (A-1) J5 (B-2) J2 (A-2) J6 (B-3) J3 (A-3) 15
User Manual
Page 16
... width DDR DIMMs simultaneously, please populated x4 device width DIMMs at both edges of theDIMM slots to use DDR X4, X8 type of mixture installation. 7. GA-8IPXDR-E(C) Motherboard J4 (B-1) J1 (A-1) J5 (B-2) J2 (A-2) J6 (B-3) J3 (A-3) Installation Step: 1. The DIMM slot has a notch, so the DIMM memory module can only fit in J3/J6 slot...
... width DDR DIMMs simultaneously, please populated x4 device width DIMMs at both edges of theDIMM slots to use DDR X4, X8 type of mixture installation. 7. GA-8IPXDR-E(C) Motherboard J4 (B-1) J1 (A-1) J5 (B-2) J2 (A-2) J6 (B-3) J3 (A-3) Installation Step: 1. The DIMM slot has a notch, so the DIMM memory module can only fit in J3/J6 slot...
User Manual
Page 17
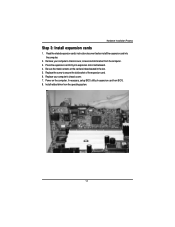
... the related expansion card's instruction document before install the expansion card into expansion slot in the slot. 5. Power on the card are indeed seated in motherboard. 4. Replace the screw to secure the slot bracket of expansion card from the operating system. 17 Press the expansion card firmly into the computer. 2. Replace...
... the related expansion card's instruction document before install the expansion card into expansion slot in the slot. 5. Power on the card are indeed seated in motherboard. 4. Replace the screw to secure the slot bracket of expansion card from the operating system. 17 Press the expansion card firmly into the computer. 2. Replace...
User Manual
Page 18
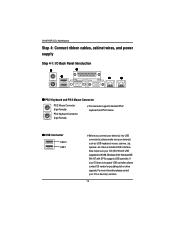
GA-8IPXDR-E(C) Motherboard Step 4: Connect ribbon cables, cabinet wires, and power supply Step 4-1: I/O Back Panel Introduction X Z Y [ \ X PS/2 Keyboard and PS/2 Mouse Connector PS/2 Mouse Connector (6 pin Female) PS/2 ...
GA-8IPXDR-E(C) Motherboard Step 4: Connect ribbon cables, cabinet wires, and power supply Step 4-1: I/O Back Panel Introduction X Z Y [ \ X PS/2 Keyboard and PS/2 Mouse Connector PS/2 Mouse Connector (6 pin Female) PS/2 ...
User Manual
Page 20
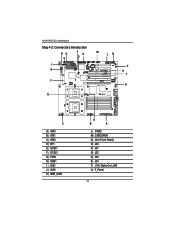
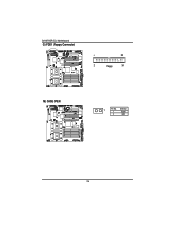
GA-8IPXDR-E(C) Motherboard Step 4-2: Connectors Introduction HG S J K D I E F Q M LN P U T R C A) ATX3 B) ATX1 C) ATX2 D) BT1 E) SCSI1 F) SCSI2 G) FDD1 H) USB1 I ) IDE1 J ) IDE2 K) IPMI_CON O B A L) COM2 M) CASEOPEN N) J20 (Front Panel) O) J30 P) J31 Q) J32 R) J33 S) J34 T) J18 ( Wake On LAN) U) F_Panel 20
GA-8IPXDR-E(C) Motherboard Step 4-2: Connectors Introduction HG S J K D I E F Q M LN P U T R C A) ATX3 B) ATX1 C) ATX2 D) BT1 E) SCSI1 F) SCSI2 G) FDD1 H) USB1 I ) IDE1 J ) IDE2 K) IPMI_CON O B A L) COM2 M) CASEOPEN N) J20 (Front Panel) O) J30 P) J31 Q) J32 R) J33 S) J34 T) J18 ( Wake On LAN) U) F_Panel 20
User Manual
Page 22
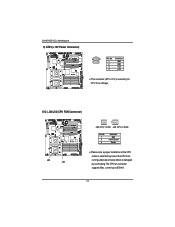
GA-8IPXDR-E(C) Motherboard C) ATX2 (+12V Power Connector) 43 21 Pin No. 1 2 3 4 Definition GND GND +12V +12V ¾This connector (ATX +12V) is essential to 600mA . 22 O/Q ) J30/J32 (CPU FAN Connector) J32 J30 1 1 J32:CPU1 FAN J30:CPU 0 FAN Pin No. 1 2 3 Definition GND +12v/Control Sense ¾Please note, a proper installation of the CPU cooler is used only for CPU Core Voltage. current up to prevent the CPU from running under abnormal condition or damaged by overheating.The CPU fan connector supports Max.
GA-8IPXDR-E(C) Motherboard C) ATX2 (+12V Power Connector) 43 21 Pin No. 1 2 3 4 Definition GND GND +12V +12V ¾This connector (ATX +12V) is essential to 600mA . 22 O/Q ) J30/J32 (CPU FAN Connector) J32 J30 1 1 J32:CPU1 FAN J30:CPU 0 FAN Pin No. 1 2 3 Definition GND +12v/Control Sense ¾Please note, a proper installation of the CPU cooler is used only for CPU Core Voltage. current up to prevent the CPU from running under abnormal condition or damaged by overheating.The CPU fan connector supports Max.

User Manual
Page 24
GA-8IPXDR-E(C) Motherboard T) J18 (Wake On LAN Connector) 1 Pin No. 1 2 3 Definition +5VSB GND Signal L) COM 2 Connector 1 Pin No. 1 2 3 4 5 6 7 8 9 10 Definition NDCDB NSINB NSOUTB NDTRB GND NDSRBNRTSBNCTSBNRIB- NC 24
GA-8IPXDR-E(C) Motherboard T) J18 (Wake On LAN Connector) 1 Pin No. 1 2 3 Definition +5VSB GND Signal L) COM 2 Connector 1 Pin No. 1 2 3 4 5 6 7 8 9 10 Definition NDCDB NSINB NSOUTB NDTRB GND NDSRBNRTSBNCTSBNRIB- NC 24
User Manual
Page 26
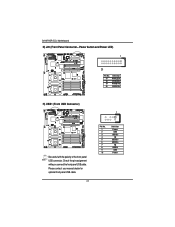
Definition 1 Signal 2 GND 26 GA-8IPXDR-E(C) Motherboard G) FDD1 (Floppy Connector) 1 33 2 Floppy 34 M) CASE OPEN 1 Pin No.
Definition 1 Signal 2 GND 26 GA-8IPXDR-E(C) Motherboard G) FDD1 (Floppy Connector) 1 33 2 Floppy 34 M) CASE OPEN 1 Pin No.
User Manual
Page 27
H) USB1 (Front USB Connector) 1 Be careful with the polarity of the front panel USB connector. Please contact your nearest dealer for optional front panel USB cable. 27 Pin No. 1 2 3 4 5 6 7 8 9 10 Definition Power GND USB D2NC USB D2+ USB D3+ NC USBD3GND Power GA-8IPXDR-E(C) Motherboard N) J20 (Front Panel Connector-- Power button and Power LED) 1 20 Pin No. 17 18 19 20 Definition PWR LED+ PWR LEDPWR BTN+ PWR BTN- Check the pin assignment while you connect the front panel USB cable.
H) USB1 (Front USB Connector) 1 Be careful with the polarity of the front panel USB connector. Please contact your nearest dealer for optional front panel USB cable. 27 Pin No. 1 2 3 4 5 6 7 8 9 10 Definition Power GND USB D2NC USB D2+ USB D3+ NC USBD3GND Power GA-8IPXDR-E(C) Motherboard N) J20 (Front Panel Connector-- Power button and Power LED) 1 20 Pin No. 17 18 19 20 Definition PWR LED+ PWR LEDPWR BTN+ PWR BTN- Check the pin assignment while you connect the front panel USB cable.
User Manual
Page 28
GA-8IPXDR-E(C) Motherboard K) IPMI_CON (IPMI Connector) ¾IPMI module is an optional device for customer to purchase. ¾For the IPMI connector pins definition, please refer to Appendix G. 2 70 1 69 D) BT1 (Battery) + CAUTION ™ Danger of explosion if battery is incorrectly replaced. ™ Replace only with the same or equivalent type recommended by the manufacturer. ™ Dispose of used batteries according to the manufacturer's instructions. 28
GA-8IPXDR-E(C) Motherboard K) IPMI_CON (IPMI Connector) ¾IPMI module is an optional device for customer to purchase. ¾For the IPMI connector pins definition, please refer to Appendix G. 2 70 1 69 D) BT1 (Battery) + CAUTION ™ Danger of explosion if battery is incorrectly replaced. ™ Replace only with the same or equivalent type recommended by the manufacturer. ™ Dispose of used batteries according to the manufacturer's instructions. 28
User Manual
Page 30
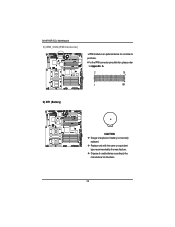
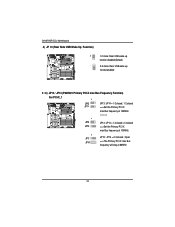
GA-8IPXDR-E(C) Motherboard Step 4-3: Jumper Setting Introduction 15 3 11 5 12 10 2 13 9 14 6 1 7 8 1) JP 1 2) JP 8 3) JP 9 4) JP 10 5) JP 13 6) JP 14 7) JP 15 8) JP 16 4 9) JP 17 10) JP 18 11) JP 19 12) JP 20 13) JP 21 14) JP 22 15) CLR_COMS 30
GA-8IPXDR-E(C) Motherboard Step 4-3: Jumper Setting Introduction 15 3 11 5 12 10 2 13 9 14 6 1 7 8 1) JP 1 2) JP 8 3) JP 9 4) JP 10 5) JP 13 6) JP 14 7) JP 15 8) JP 16 4 9) JP 17 10) JP 18 11) JP 19 12) JP 20 13) JP 21 14) JP 22 15) CLR_COMS 30
User Manual
Page 32
GA-8IPXDR-E(C) Motherboard 4) JP 10 (Rear Side USB Wake Up Function) 1 1-2 close: Rear USB wake up function disabled (Default) 1 2-3 close: Rear USB wake up function enabled 5 / 6) JP13 / JP14 (...
GA-8IPXDR-E(C) Motherboard 4) JP 10 (Rear Side USB Wake Up Function) 1 1-2 close: Rear USB wake up function disabled (Default) 1 2-3 close: Rear USB wake up function enabled 5 / 6) JP13 / JP14 (...


