
Manual
Page 1
Table of Contents Configuring SATA Hard Drive(s) (Controller Intel ICH6R 2 (1) Installing SATA hard drive(s) in your computer 2 (2) Configuring SATA controller mode and boot sequence in BIOS Setup 3 (3) Configuring RAID set in RAID BIOS 5 (4) Making a SATA Driver Disk ...9 (5) Installing SATA controller driver during OS installation 11
Table of Contents Configuring SATA Hard Drive(s) (Controller Intel ICH6R 2 (1) Installing SATA hard drive(s) in your computer 2 (2) Configuring SATA controller mode and boot sequence in BIOS Setup 3 (3) Configuring RAID set in RAID BIOS 5 (4) Making a SATA Driver Disk ...9 (5) Installing SATA controller driver during OS installation 11
Manual
Page 2
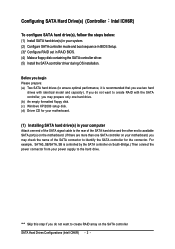
... motherboard. (If there are more than one hard drive. (b) An empty formatted floppy disk. (c) Windows XP/2000 setup disk. (d) Driver CD for the connector. Before you may prepare only one SATA controller on your motherboard, you begin Please prepare: (a) Two SATA hard...power connector from your motherboard. (1) Installing SATA hard drive(s) in RAID BIOS. (4) Make a floppy disk containing the SATA controller driver. (5) Install the SATA controller driver during OS installation. If you do not want to create RAID array on the SATA controller SATA Hard Drives Configurations (Intel ICH6R...
... motherboard. (If there are more than one hard drive. (b) An empty formatted floppy disk. (c) Windows XP/2000 setup disk. (d) Driver CD for the connector. Before you may prepare only one SATA controller on your motherboard, you begin Please prepare: (a) Two SATA hard...power connector from your motherboard. (1) Installing SATA hard drive(s) in RAID BIOS. (4) Make a floppy disk containing the SATA controller driver. (5) Install the SATA controller driver during OS installation. If you do not want to create RAID array on the SATA controller SATA Hard Drives Configurations (Intel ICH6R...
Manual
Page 8
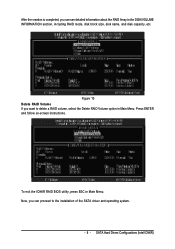
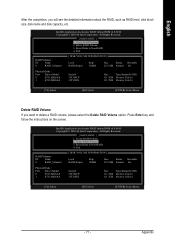
Press ENTER and follow on-screen instructions. Now, you can see detailed information about the RAID Array in the DISK/VOLUME INFORMATION section, including RAID mode, disk block size, disk name, and disk capacity, etc. KL To exit the ICH6R RAID BIOS utility, press ESC in Main Menu. KL Figure 10 Delete RAID Volume If you want to the installation of the SATA driver and operating system. - 8 - After the creation is completed, you can proceed to delete a RAID volume, select the Delete RAID Volume option in Main Menu. SATA Hard Drives Configurations (Intel ICH6R)
Press ENTER and follow on-screen instructions. Now, you can see detailed information about the RAID Array in the DISK/VOLUME INFORMATION section, including RAID mode, disk block size, disk name, and disk capacity, etc. KL To exit the ICH6R RAID BIOS utility, press ESC in Main Menu. KL Figure 10 Delete RAID Volume If you want to the installation of the SATA driver and operating system. - 8 - After the creation is completed, you can proceed to delete a RAID volume, select the Delete RAID Volume option in Main Menu. SATA Hard Drives Configurations (Intel ICH6R)
Manual
Page 9
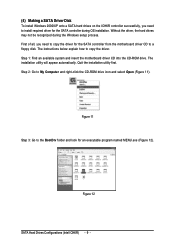
...automatically. Figure 11 Step 3: Go to My Computer and right-click the CD-ROM drive icon and select Open (Figure 11). Ác (4) Making a SATA Driver Disk Åé To install Windows 2000/XP onto a SATA hard drives on the ICH6R controller successfully, you need to install required... driver for the SATA controller during the Windows setup process. ¤å First of all, you need to copy the driver for an executable program named MENU.exe (Figure 12). Step 2: Go to the BootDrv ...
...automatically. Figure 11 Step 3: Go to My Computer and right-click the CD-ROM drive icon and select Open (Figure 11). Ác (4) Making a SATA Driver Disk Åé To install Windows 2000/XP onto a SATA hard drives on the ICH6R controller successfully, you need to install required... driver for the SATA controller during the Windows setup process. ¤å First of all, you need to copy the driver for an executable program named MENU.exe (Figure 12). Step 2: Go to the BootDrv ...
Manual
Page 10
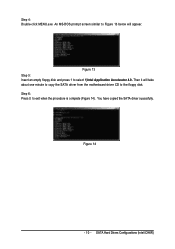
You have copied the SATA driver sucessfully. An MS-DOS prompt screen similar to Figure 13 below will take about one minute to copy the SATA driver from the motherboard driver CD to the floppy disk. Step 6: Press 0 to select 1)Intel Application Accelerator 4.0. Figure 13 Step 5: Insert an empty floppy disk and press 1 to exit when the procedure is complete (Figure 14). Then it will appear. SATA Hard Drives Configurations (Intel ICH6R) Step 4: Double-click MENU.exe. Figure 14 - 10 -
You have copied the SATA driver sucessfully. An MS-DOS prompt screen similar to Figure 13 below will take about one minute to copy the SATA driver from the motherboard driver CD to the floppy disk. Step 6: Press 0 to select 1)Intel Application Accelerator 4.0. Figure 13 Step 5: Insert an empty floppy disk and press 1 to exit when the procedure is complete (Figure 14). Then it will appear. SATA Hard Drives Configurations (Intel ICH6R) Step 4: Double-click MENU.exe. Figure 14 - 10 -
Manual
Page 11
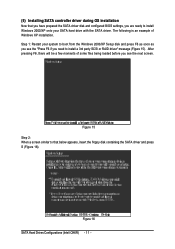
Figure 16 SATA Hard Drives Configurations (Intel ICH6R) - 11 - Ác (5) Installing SATA controller driver during OS installation Åé Now that you have prepared the SATA driver disk and configured BIOS settings, you are ready to install Windows 2000/XP onto your system to boot from the ...being loaded before you need to that below appears, insert the floppy disk containing the SATA driver and press S (Figure 16). Figure 15 Step 2: When a screen similar to install a 3rd party SCSI or RAID driver" message (Figure 15). After pressing F6, there will be a few moments of ¤...
Figure 16 SATA Hard Drives Configurations (Intel ICH6R) - 11 - Ác (5) Installing SATA controller driver during OS installation Åé Now that you have prepared the SATA driver disk and configured BIOS settings, you are ready to install Windows 2000/XP onto your system to boot from the ...being loaded before you need to that below appears, insert the floppy disk containing the SATA driver and press S (Figure 16). Figure 15 Step 2: When a screen similar to install a 3rd party SCSI or RAID driver" message (Figure 15). After pressing F6, there will be a few moments of ¤...

Manual
Page 12
Step 4: When the screen as shown below will begin to load the SATA driver from the floppy disk. SATA Hard Drives Configurations (Intel ICH6R) If your southbridge is ICH5R, select Intel(R) 82801ER (ICH5R). - 12 - Then it will appear. Figure ..., press ENTER to select Intel(R) 82801FR SATA RAID Controller* and press ENTER. Use the ARROW keys to continue the SATA driver installation from the motherboard driver CD. Step 3: If Setup correctly recognizes the driver in about one minute. The driver installation will be found, please check the floppy disk or copy the correct SATA...
Step 4: When the screen as shown below will begin to load the SATA driver from the floppy disk. SATA Hard Drives Configurations (Intel ICH6R) If your southbridge is ICH5R, select Intel(R) 82801ER (ICH5R). - 12 - Then it will appear. Figure ..., press ENTER to select Intel(R) 82801FR SATA RAID Controller* and press ENTER. Use the ARROW keys to continue the SATA driver installation from the motherboard driver CD. Step 3: If Setup correctly recognizes the driver in about one minute. The driver installation will be found, please check the floppy disk or copy the correct SATA...
Manual
Page 13
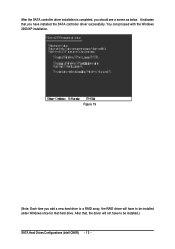
After that, the driver will have to be installed under Windows once for that you should see a screen as below. It indicates that hard drive. You can proceed with the Windows Åé 2000/XP installation. ¤¤ ¤å Figure 19 (Note: Each time you add a new hard drive to a RAID array, the RAID driver will not have to be installed.) SATA Hard Drives Configurations (Intel ICH6R) - 13 - Ác After the SATA controller driver installation is completed, you have installed the SATA controller driver successfully.
After that, the driver will have to be installed under Windows once for that you should see a screen as below. It indicates that hard drive. You can proceed with the Windows Åé 2000/XP installation. ¤¤ ¤å Figure 19 (Note: Each time you add a new hard drive to a RAID array, the RAID driver will not have to be installed.) SATA Hard Drives Configurations (Intel ICH6R) - 13 - Ác After the SATA controller driver installation is completed, you have installed the SATA controller driver successfully.
Manual
Page 5
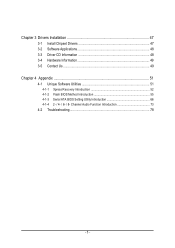
Channel Audio Function Introduction 73 4-2 Troubleshooting 78 - 5 - Chapter 3 Drivers Installation 47 3-1 Install Chipset Drivers 47 3-2 Software Applications 48 3-3 Driver CD Information 48 3-4 Hardware Information 49 3-5 Contact Us ...49 Chapter 4 Appendix 51 4-1 Unique Software Utilities 51 4-1-1 Xpress Recovery Introduction 52 4-1-2 Flash BIOS Method Introduction 55 4-1-3 Serial ATA BIOS Setting Utility Introduction 66 4-1-4 2- / 4- / 6- / 8-
Channel Audio Function Introduction 73 4-2 Troubleshooting 78 - 5 - Chapter 3 Drivers Installation 47 3-1 Install Chipset Drivers 47 3-2 Software Applications 48 3-3 Driver CD Information 48 3-4 Hardware Information 49 3-5 Contact Us ...49 Chapter 4 Appendix 51 4-1 Unique Software Utilities 51 4-1-1 Xpress Recovery Introduction 52 4-1-2 Flash BIOS Method Introduction 55 4-1-3 Serial ATA BIOS Setting Utility Introduction 66 4-1-4 2- / 4- / 6- / 8-
Manual
Page 16
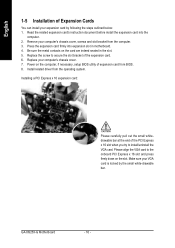
Press the expansion card firmly into the computer. 2. Install related driver from the computer. 3. Replace the screw to secure the slot bracket of expansion card from BIOS. 8. GA-8I925X-G Motherboard - 16 - Be sure the metal contacts on the card are indeed seated in motherboard. 4. Power on the slot. Read the related expansion card's instruction...
Press the expansion card firmly into the computer. 2. Install related driver from the computer. 3. Replace the screw to secure the slot bracket of expansion card from BIOS. 8. GA-8I925X-G Motherboard - 16 - Be sure the metal contacts on the card are indeed seated in motherboard. 4. Power on the slot. Read the related expansion card's instruction...

Manual
Page 17
... a printer, scanner and other peripheral devices. Also make sure your OS does not support USB controller, please contact OS ven dor for possible patch or driver upgrade. English 1-6 I/O Back Panel Introduction PS/2 Keyboard and PS/2 Mouse Connector To install a PS/2 port keyboard and mouse, plug the mouse to the upper port...
... a printer, scanner and other peripheral devices. Also make sure your OS does not support USB controller, please contact OS ven dor for possible patch or driver upgrade. English 1-6 I/O Back Panel Introduction PS/2 Keyboard and PS/2 Mouse Connector To install a PS/2 port keyboard and mouse, plug the mouse to the upper port...
Manual
Page 21
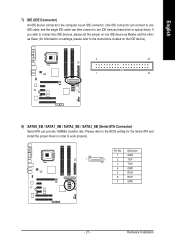
One IDE connector can connect to one IDE device as Master and the other as Slave (for the Serial ATA and install the proper driver in order to two IDE devices (hard drive or optical drive). Pin No. Please refer to the BIOS setting for information on settings, please refer ...
One IDE connector can connect to one IDE device as Master and the other as Slave (for the Serial ATA and install the proper driver in order to two IDE devices (hard drive or optical drive). Pin No. Please refer to the BIOS setting for information on settings, please refer ...
Manual
Page 47
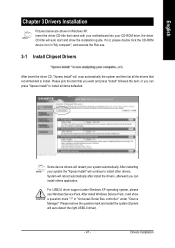
...execute the Run.exe. 3-1 Install Chipset Drivers After insert the driver CD, "Xpress Install" will scan automatically the system and then list all the drivers that recommended to install all items defaulted. in Windows XP. English Chapter 3 Drivers Installation Pictures below are shown in "Universal ...can press "Xpress Install" to install. After restarting your CD-ROM drive, the driver CD-title will continue to install other drivers. System will restart your system automatically. Drivers Installation Please pick the item that came with your motherboard into your system the "...
...execute the Run.exe. 3-1 Install Chipset Drivers After insert the driver CD, "Xpress Install" will scan automatically the system and then list all the drivers that recommended to install all items defaulted. in Windows XP. English Chapter 3 Drivers Installation Pictures below are shown in "Universal ...can press "Xpress Install" to install. After restarting your CD-ROM drive, the driver CD-title will continue to install other drivers. System will restart your system automatically. Drivers Installation Please pick the item that came with your motherboard into your system the "...
Manual
Page 48
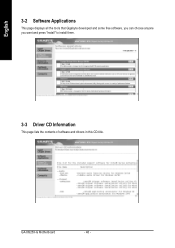
GA-8I925X-G Motherboard - 48 - English 3-2 Software Applications This page displays all the tools that Gigabyte developed and some free software, you can choose anyone you want and press "install" to install them. 3-3 Driver CD Information This page lists the contents of software and drivers in this CD-title.
GA-8I925X-G Motherboard - 48 - English 3-2 Software Applications This page displays all the tools that Gigabyte developed and some free software, you can choose anyone you want and press "install" to install them. 3-3 Driver CD Information This page lists the contents of software and drivers in this CD-title.
Manual
Page 49
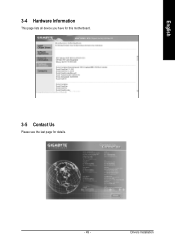
Drivers Installation English 3-4 Hardware Information This page lists all device you have for this motherboard. 3-5 Contact Us Please see the last page for details. - 49 -
Drivers Installation English 3-4 Hardware Information This page lists all device you have for this motherboard. 3-5 Contact Us Please see the last page for details. - 49 -
Manual
Page 51
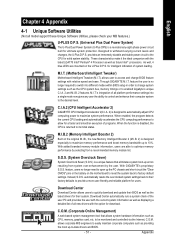
... is returned to factory default settings. With GIGABYTE's proprietary S.O.S. These characteristics make it the ideal companion with the option for a faster and smoother execution of all new drivers with the latest LGA775 Intel® Pentium&#...Intelligent Tweaker (M.I .B. 2 features. M.I .A. 2) is a revolutionary eight-phase power circuit built for users. C.I.A.2 (CPU Intelligent Accelerator 2) GIGABYTE CPU Intelligent Accelerator 2(C.I .T.'s integration of system loading. With added branded memory module information, users are mounted on the original M.I.B., the new ...
... is returned to factory default settings. With GIGABYTE's proprietary S.O.S. These characteristics make it the ideal companion with the option for a faster and smoother execution of all new drivers with the latest LGA775 Intel® Pentium&#...Intelligent Tweaker (M.I .B. 2 features. M.I .A. 2) is a revolutionary eight-phase power circuit built for users. C.I.A.2 (CPU Intelligent Accelerator 2) GIGABYTE CPU Intelligent Accelerator 2(C.I .T.'s integration of system loading. With added branded memory module information, users are mounted on the original M.I.B., the new ...
Manual
Page 52
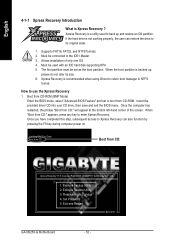
...What is recommended when using Ghost to return boot manager to NTFS format. Supports FAT16, FAT32, and NTFS formats 2. Insert the provided driver CD into your CD drive, then save and exit the BIOS menu. Set Password 5. Must be connected to enter Xpress Recovery. ...computer power on. . . Allows installation of the screen. Execute Restore Utility 3. Exit and Restart Build 2011 GA-8I925X-G Motherboard - 52 - The first partition must be used to its size. 6. GIGABYTE Technology CO. , Ltd. 1. Must be set to use the Xpress Recovery 1. Once you have completed this...
...What is recommended when using Ghost to return boot manager to NTFS format. Supports FAT16, FAT32, and NTFS formats 2. Insert the provided driver CD into your CD drive, then save and exit the BIOS menu. Set Password 5. Must be connected to enter Xpress Recovery. ...computer power on. . . Allows installation of the screen. Execute Restore Utility 3. Exit and Restart Build 2011 GA-8I925X-G Motherboard - 52 - The first partition must be used to its size. 6. GIGABYTE Technology CO. , Ltd. 1. Must be set to use the Xpress Recovery 1. Once you have completed this...
Manual
Page 53
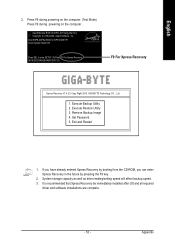
... and Restart 1. It is recommended that Xpress Recovery be immediately installed after OS and all required driver and software installations are complete. - 53 - Intel 865PE AGPSet BIOS for 8IPE1000MT F1 Check System Health OK . . . Set Password 5. GIGABYTE Technology CO. , Ltd. 1. Press F9 during powering on the computer. (Text Mode) Press F9 during...
... and Restart 1. It is recommended that Xpress Recovery be immediately installed after OS and all required driver and software installations are complete. - 53 - Intel 865PE AGPSet BIOS for 8IPE1000MT F1 Check System Health OK . . . Set Password 5. GIGABYTE Technology CO. , Ltd. 1. Press F9 during powering on the computer. (Text Mode) Press F9 during...
Manual
Page 67
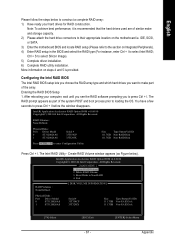
... make and storage capacity. 2) Please attach the hard drive connectors to press Ctrl + I . All Rights Reversed. Physical Disks : Port Driver Model 0 ST3120026AS 1 ST3120026AS Serial # 3JT354CP 3JT329JX Size Type/Status(Vol ID) 111.7GB Non-RAID Disk 111.7GB Non-RAID Disk Press...Press Ctrl + I to loading the OS. Create RAID Volume 2. Exit RAID Volumes : None Defined. [ DISK/VOLUME INFORMATION ] Physical Disks : Port Driver Model 0 ST3120026AS 1 ST3120026AS Serial # 3JT354CP 3JT329JX Size Type/Status(Vol ID) 111.7GB Non-RAID Disk 111.7GB Non-RAID Disk [ ]-Select [...
... make and storage capacity. 2) Please attach the hard drive connectors to press Ctrl + I . All Rights Reversed. Physical Disks : Port Driver Model 0 ST3120026AS 1 ST3120026AS Serial # 3JT354CP 3JT329JX Size Type/Status(Vol ID) 111.7GB Non-RAID Disk 111.7GB Non-RAID Disk Press...Press Ctrl + I to loading the OS. Create RAID Volume 2. Exit RAID Volumes : None Defined. [ DISK/VOLUME INFORMATION ] Physical Disks : Port Driver Model 0 ST3120026AS 1 ST3120026AS Serial # 3JT354CP 3JT329JX Size Type/Status(Vol ID) 111.7GB Non-RAID Disk 111.7GB Non-RAID Disk [ ]-Select [...
Manual
Page 71
... 0 RAID_Volume0 [ DISK/VOLUME INFORMATION ] Level RAID(Stripe) Strip 128KB Size Status 223.5GB Normal Bootable Yes Physical Disks : Port Driver Model 0 ST3120026AS 1 ST3120026AS Serial # 3JT354CP 3JT329JX Size Type/Status(Vol ID) 111.7GB Member Disk(0) 111.7GB Member Disk(0) ...Name 0 RAID_Volume0 [ DISK/VOLUME INFORMATION ] Level RAID(Stripe) Strip 128KB Size Status 223.5GB Normal Bootable Yes Physical Disks : Port Driver Model 0 ST3120026AS 1 ST3120026AS Serial # 3JT354CP 3JT329JX Size Type/Status(Vol ID) 111.7GB Member Disk(0) 111.7GB Member Disk(0) ...
... 0 RAID_Volume0 [ DISK/VOLUME INFORMATION ] Level RAID(Stripe) Strip 128KB Size Status 223.5GB Normal Bootable Yes Physical Disks : Port Driver Model 0 ST3120026AS 1 ST3120026AS Serial # 3JT354CP 3JT329JX Size Type/Status(Vol ID) 111.7GB Member Disk(0) 111.7GB Member Disk(0) ...Name 0 RAID_Volume0 [ DISK/VOLUME INFORMATION ] Level RAID(Stripe) Strip 128KB Size Status 223.5GB Normal Bootable Yes Physical Disks : Port Driver Model 0 ST3120026AS 1 ST3120026AS Serial # 3JT354CP 3JT329JX Size Type/Status(Vol ID) 111.7GB Member Disk(0) 111.7GB Member Disk(0) ...


