Manual
Page 2
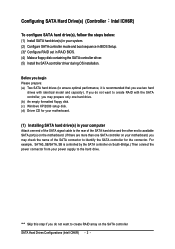
... drive and the other end to available SATA port(s) on the motherboard. (If there are more than one hard drive. (b) An empty formatted floppy disk. (c) Windows XP/2000 setup disk. (d) Driver CD for the connector. For example, SATA0_SB/SATA_SB is recommended that you use two hard drives with the SATA controller...
... drive and the other end to available SATA port(s) on the motherboard. (If there are more than one hard drive. (b) An empty formatted floppy disk. (c) Windows XP/2000 setup disk. (d) Driver CD for the connector. For example, SATA0_SB/SATA_SB is recommended that you use two hard drives with the SATA controller...
Manual
Page 4
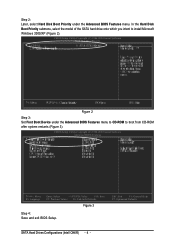
... exit BIOS Setup. Ác Step 2: Later, select Hard Disk Boot Priority under the Advanced BIOS Features menu to CD-ROM to install Microsoft ¤¤ Windows 2000/XP (Figure 2). CMOS Setup Utility-Copyright (C) 1984-2004 Award Software ¤å Hard Disk Boot Priority `` K L KL Figure 2 Step 3: Set First Boot Device under...
... exit BIOS Setup. Ác Step 2: Later, select Hard Disk Boot Priority under the Advanced BIOS Features menu to CD-ROM to install Microsoft ¤¤ Windows 2000/XP (Figure 2). CMOS Setup Utility-Copyright (C) 1984-2004 Award Software ¤å Hard Disk Boot Priority `` K L KL Figure 2 Step 3: Set First Boot Device under...
Manual
Page 9
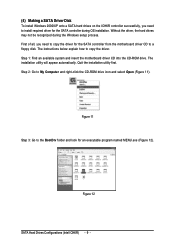
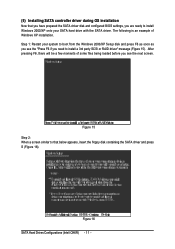
...to a floppy disk. Quit the installation utility first. Figure 11 Step 3: Go to copy the driver. Ác (4) Making a SATA Driver Disk Åé To install Windows 2000/XP onto a SATA hard drives on the ICH6R controller successfully, you need to install required driver for the SATA controller during the... Windows setup process. ¤å First of all, you need to copy the driver for an executable program named MENU.exe (Figure 12). Step 1: Find an...
...to a floppy disk. Quit the installation utility first. Figure 11 Step 3: Go to copy the driver. Ác (4) Making a SATA Driver Disk Åé To install Windows 2000/XP onto a SATA hard drives on the ICH6R controller successfully, you need to install required driver for the SATA controller during the... Windows setup process. ¤å First of all, you need to copy the driver for an executable program named MENU.exe (Figure 12). Step 1: Find an...
Manual
Page 11
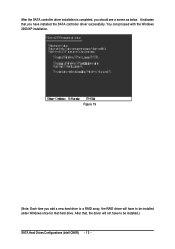
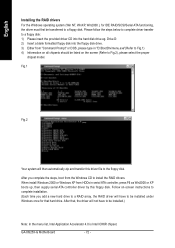
...a screen similar to that you have prepared the SATA driver disk and configured BIOS settings, you are ready to install Windows 2000/XP onto your system to boot from the Windows 2000/XP Setup disk and press F6 as soon as you need to install a 3rd party SCSI or RAID driver..." message (Figure 15). Figure 16 SATA Hard Drives Configurations (Intel ICH6R) - 11 - After pressing F6, there will be a few moments of ¤¤ Windows XP installation. ¤å Step 1: Restart your SATA hard drive with the SATA driver. The following is an example of some files being loaded before...
...a screen similar to that you have prepared the SATA driver disk and configured BIOS settings, you are ready to install Windows 2000/XP onto your system to boot from the Windows 2000/XP Setup disk and press F6 as soon as you need to install a 3rd party SCSI or RAID driver..." message (Figure 15). Figure 16 SATA Hard Drives Configurations (Intel ICH6R) - 11 - After pressing F6, there will be a few moments of ¤¤ Windows XP installation. ¤å Step 1: Restart your SATA hard drive with the SATA driver. The following is an example of some files being loaded before...
Manual
Page 13
Ác After the SATA controller driver installation is completed, you add a new hard drive to a RAID array, the RAID driver will not have to be installed.) SATA Hard Drives Configurations (Intel ICH6R) - 13 - It indicates that you have to be installed under Windows once for that , the driver will have installed the SATA controller driver successfully. You can proceed with the Windows Åé 2000/XP installation. ¤¤ ¤å Figure 19 (Note: Each time you should see a screen as below. After that hard drive.
Ác After the SATA controller driver installation is completed, you add a new hard drive to a RAID array, the RAID driver will not have to be installed.) SATA Hard Drives Configurations (Intel ICH6R) - 13 - It indicates that you have to be installed under Windows once for that , the driver will have installed the SATA controller driver successfully. You can proceed with the Windows Åé 2000/XP installation. ¤¤ ¤å Figure 19 (Note: Each time you should see a screen as below. After that hard drive.
Manual
Page 27
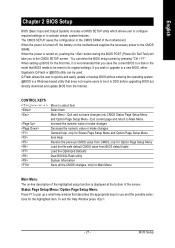
...you to a disk in the CMOS SRAM of the motherboard. CONTROL KEYS Enter> Move to activate certain system features. To exit the Help Window press . - 27 - Exit current page and return to Main Menu Increase the numeric value or make changes Decrease the numeric value or make...appropriate keys to use and the possible selections for Main Menu Main Menu The on the motherboard supplies the necessary power to a new BIOS, either Gigabyte's Q-Flash or @BIOS utility can enter the BIOS setup screen by pressing "Ctrl + F1". English Chapter 2 BIOS Setup BIOS (Basic Input and...
...you to a disk in the CMOS SRAM of the motherboard. CONTROL KEYS Enter> Move to activate certain system features. To exit the Help Window press . - 27 - Exit current page and return to Main Menu Increase the numeric value or make changes Decrease the numeric value or make...appropriate keys to use and the possible selections for Main Menu Main Menu The on the motherboard supplies the necessary power to a new BIOS, either Gigabyte's Q-Flash or @BIOS utility can enter the BIOS setup screen by pressing "Ctrl + F1". English Chapter 2 BIOS Setup BIOS (Basic Input and...
Manual
Page 33
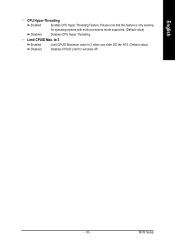
to 3 Enabled Disabled Limit CPUID Maximum value to 3 when use older OS like NT4. (Default value) Disables CPUID Limit for operating system with multi processors mode supported. (Default value) Disables CPU Hyper Threading. BIOS Setup Please note that this feature is only working Disabled for windows XP. - 33 - English CPU Hyper-Threading Enabled Enables CPU Hyper Threading Feature. Limit CPUID Max.
to 3 Enabled Disabled Limit CPUID Maximum value to 3 when use older OS like NT4. (Default value) Disables CPUID Limit for operating system with multi processors mode supported. (Default value) Disables CPU Hyper Threading. BIOS Setup Please note that this feature is only working Disabled for windows XP. - 33 - English CPU Hyper-Threading Enabled Enables CPU Hyper Threading Feature. Limit CPUID Max.
Manual
Page 47
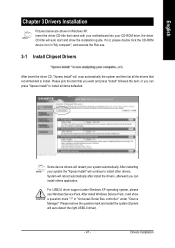
...). - 47 - After restarting your system the "Xpress Install" will continue to install. in "Universal Serial Bus controller" under Windows XP operating system, please use Windows Service Pack. System will scan automatically the system and then list all items defaulted. or you want and press "install" followed ...the item; If not, please double click the CD-ROM device icon in Windows XP. Insert the driver CD-title that you can install others application. Please remove the question mark and restart the system (System ...
...). - 47 - After restarting your system the "Xpress Install" will continue to install. in "Universal Serial Bus controller" under Windows XP operating system, please use Windows Service Pack. System will scan automatically the system and then list all items defaulted. or you want and press "install" followed ...the item; If not, please double click the CD-ROM device icon in Windows XP. Insert the driver CD-title that you can install others application. Please remove the question mark and restart the system (System ...
Manual
Page 57
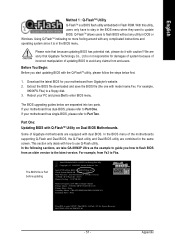
...08/07/2003-i875P-6A79BG03C-00 - 57 - For example, 8KNXPU.Fba) to the latest version. Some of Gigabyte motherboards are combined in DOS or Windows. In the following sections, we take GA-8KNXP Ultra as the example to guide you start updating BIOS with Q-FlashTM Utility on Dual BIOS Motherboards. Using...MHz in the BIOS menu. If your PC and press Del to Part One. This section only deals with model name.Fxx. Please note that Gigabyte Technology Co., Ltd is in Single Channel Primary Master : FUJITSU MPE3170AT ED-03-08 Primary Slave : None Secondary Master : CREATIVEDVD-RM DVD1242E ...
...08/07/2003-i875P-6A79BG03C-00 - 57 - For example, 8KNXPU.Fba) to the latest version. Some of Gigabyte motherboards are combined in DOS or Windows. In the following sections, we take GA-8KNXP Ultra as the example to guide you start updating BIOS with Q-FlashTM Utility on Dual BIOS Motherboards. Using...MHz in the BIOS menu. If your PC and press Del to Part One. This section only deals with model name.Fxx. Please note that Gigabyte Technology Co., Ltd is in Single Channel Primary Master : FUJITSU MPE3170AT ED-03-08 Primary Slave : None Secondary Master : CREATIVEDVD-RM DVD1242E ...
Manual
Page 64
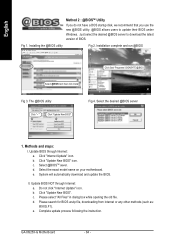
Installation complete and run @BIOS Click Sart/ Programs/ GIGABYTE/@BIOS Select @BIOS item than click Install Fig 3. Update BIOS through Internet: a. b. e. System will automatically download and update the BIOS. c. c. Select the ... BIOS". Just select the desired @BIOS server to update their BIOS under Windows. The @BIOS utility Click " " Click "Update New BIOS" Fig 4. d. Please select "All Files" in dialog box while opening the old file. Fig 1. Click "Internet Update" icon. GA-8I925X-G Motherboard - 64 - Installing the @BIOS utility Fig 2. Select the ...
Installation complete and run @BIOS Click Sart/ Programs/ GIGABYTE/@BIOS Select @BIOS item than click Install Fig 3. Update BIOS through Internet: a. b. e. System will automatically download and update the BIOS. c. c. Select the ... BIOS". Just select the desired @BIOS server to update their BIOS under Windows. The @BIOS utility Click " " Click "Update New BIOS" Fig 4. d. Please select "All Files" in dialog box while opening the old file. Fig 1. Click "Internet Update" icon. GA-8I925X-G Motherboard - 64 - Installing the @BIOS utility Fig 2. Select the ...
Manual
Page 67
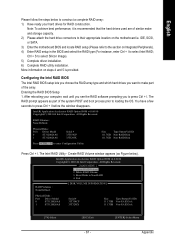
...(R) Application Accelerator RAID Option ROM v4.0.6180 Copyright(C) 2003-04 Intel Corporation. Reset Disks to press Ctrl + I before the window disappears. English Please follow the steps below ). More information on steps 4 and 5 is recommended that the hard drives used are... Ctrl + S to enter Configuration Utility Press Ctrl + I . Entering the RAID BIOS Setup 1. RAID Volumes : None Defined. Create RAID Volume window appears (as part of the array. Physical Disks : Port Driver Model 0 ST3120026AS 1 ST3120026AS Serial # 3JT354CP 3JT329JX Size Type/Status(Vol ID) ...
...(R) Application Accelerator RAID Option ROM v4.0.6180 Copyright(C) 2003-04 Intel Corporation. Reset Disks to press Ctrl + I before the window disappears. English Please follow the steps below ). More information on steps 4 and 5 is recommended that the hard drives used are... Ctrl + S to enter Configuration Utility Press Ctrl + I . Entering the RAID BIOS Setup 1. RAID Volumes : None Defined. Create RAID Volume window appears (as part of the array. Physical Disks : Port Driver Model 0 ST3120026AS 1 ST3120026AS Serial # 3JT354CP 3JT329JX Size Type/Status(Vol ID) ...
Manual
Page 72
... Win2000 or XP boots up, then supply serial ATA controller driver by this driver file to the floppy disk. GA-8I925X-G Motherboard - 72 - English Installing the RAID drivers For the Windows operating system (Win NT, WinXP, Win2000 ), for that , the driver will then automatically zip and transfer this... driver transfer to a floppy disk: 1) Please insert the provided driver CD into the floppy disk drive. 3) Either from the Windows CD to be installed under Windows once for IDE RAID/SCSI/Serial ATA functioning, the driver must first be installed.) Note: In the menu list, Intel Application ...
... Win2000 or XP boots up, then supply serial ATA controller driver by this driver file to the floppy disk. GA-8I925X-G Motherboard - 72 - English Installing the RAID drivers For the Windows operating system (Win NT, WinXP, Win2000 ), for that , the driver will then automatically zip and transfer this... driver transfer to a floppy disk: 1) Please insert the provided driver CD into the floppy disk drive. 3) Either from the Windows CD to be installed under Windows once for IDE RAID/SCSI/Serial ATA functioning, the driver must first be installed.) Note: In the menu list, Intel Application ...
Manual
Page 73
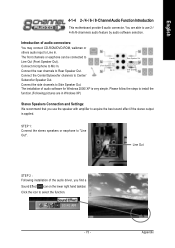
... Out Subwoofer Speaker Out. Connect the Center/Subwoofer channels to Line In. Line Out STEP 2 : Following installation of audio software for Windows 2000/ XP is applied. The front channels or earphone can be connected to use the speaker with amplifier to acquire the best sound...effect if the stereo output is very simple. Please follow the steps to Side Speaker Out. English 4-1-4 2- / 4- / 6- / 8- You are in Windows XP) Stereo Speakers Connection and Settings: We recommend that you find a Sound Effect icon on the lower right hand taskbar. STEP 1: Connect the stereo speakers...
... Out Subwoofer Speaker Out. Connect the Center/Subwoofer channels to Line In. Line Out STEP 2 : Following installation of audio software for Windows 2000/ XP is applied. The front channels or earphone can be connected to use the speaker with amplifier to acquire the best sound...effect if the stereo output is very simple. Please follow the steps to Side Speaker Out. English 4-1-4 2- / 4- / 6- / 8- You are in Windows XP) Stereo Speakers Connection and Settings: We recommend that you find a Sound Effect icon on the lower right hand taskbar. STEP 1: Connect the stereo speakers...

Manual
Page 77
... device and you can reconnect the device to choose the type of a list would indicate the correct jack for you installed. The correct icon for Windows 2000. English Jack-Sensing Introduction Jack-Sensing provides audio connectors error-detection function. Install Microsoft DirectX8.1 or later version before to enable Jack-Sensing support...
... device and you can reconnect the device to choose the type of a list would indicate the correct jack for you installed. The correct icon for Windows 2000. English Jack-Sensing Introduction Jack-Sensing provides audio connectors error-detection function. Install Microsoft DirectX8.1 or later version before to enable Jack-Sensing support...


