Manual
Page 1
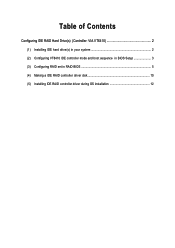
Table of Contents Configuring IDE RAID Hard Drive(s) (Controller: VIA VT6410 2 (1) Installing IDE hard drive(s) in your system 2 (2) Configuring VT6410 IDE controller mode and boot sequence in BIOS Setup 3 (3) Configuring RAID set in RAID BIOS 5 (4) Making a IDE RAID controller driver disk 10 (5) Installing IDE RAID controller driver during OS installation 12
Table of Contents Configuring IDE RAID Hard Drive(s) (Controller: VIA VT6410 2 (1) Installing IDE hard drive(s) in your system 2 (2) Configuring VT6410 IDE controller mode and boot sequence in BIOS Setup 3 (3) Configuring RAID set in RAID BIOS 5 (4) Making a IDE RAID controller driver disk 10 (5) Installing IDE RAID controller driver during OS installation 12
Manual
Page 2
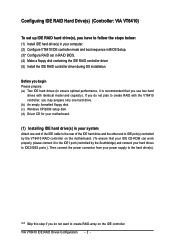
... (3)* Configure RAID set in your system Attach one hard drive. (b) An empty formatted floppy disk. (c) Windows XP/2000 setup disk. (d) Driver CD for your motherboard. (1) Installing IDE hard drive(s) in RAID BIOS. (4) Make a floppy disk containing the IDE RAID controller... driver (5) Install the IDE RAID controller driver during OS installation. Then connect the power connector from your power supply to create RAID with identical model and capacity). "*" ...
... (3)* Configure RAID set in your system Attach one hard drive. (b) An empty formatted floppy disk. (c) Windows XP/2000 setup disk. (d) Driver CD for your motherboard. (1) Installing IDE hard drive(s) in RAID BIOS. (4) Make a floppy disk containing the IDE RAID controller... driver (5) Install the IDE RAID controller driver during OS installation. Then connect the power connector from your power supply to create RAID with identical model and capacity). "*" ...
Manual
Page 10
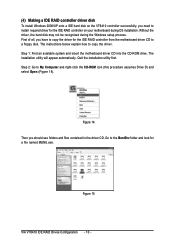
... hard disk may not be recognized during OS installation. The installation utility will appear automatically. Step 2: Go to copy the driver. Figure 15 VIA VT6410 IDE RAID Drives Configuration - 10 - The instructions below explain how to My Computer and right-click the CD-ROM icon ... and select Open (Figure 14). Step 1: Find an available system and insert the motherboard driver CD into the CD-ROM drive. Figure 14 Then you have to copy the driver for the IDE RAID controller from the motherboard driver CD to ¤å a floppy disk. Quit the installation utility first. First of ...
... hard disk may not be recognized during OS installation. The installation utility will appear automatically. Step 2: Go to copy the driver. Figure 15 VIA VT6410 IDE RAID Drives Configuration - 10 - The instructions below explain how to My Computer and right-click the CD-ROM icon ... and select Open (Figure 14). Step 1: Find an available system and insert the motherboard driver CD into the CD-ROM drive. Figure 14 Then you have to copy the driver for the IDE RAID controller from the motherboard driver CD to ¤å a floppy disk. Quit the installation utility first. First of ...
Manual
Page 11
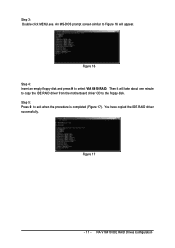
Step 3: Double-click MENU.exe. An MS-DOS prompt screen similar to Figure 16 will take about one minute to copy the IDE RAID driver from the motherboard driver CD to the floppy disk. Step 5: Press 0 to select VIA 6410 RAID. You have copied the IDE RAID driver successfully. Then it will appear. Figure 17 - 11 - VIA VT6410 IDE RAID Drives Configuration Figure 16 Step 4: Insert an empty floppy disk and press H to exit when the procedure is completed (Figure 17).
Step 3: Double-click MENU.exe. An MS-DOS prompt screen similar to Figure 16 will take about one minute to copy the IDE RAID driver from the motherboard driver CD to the floppy disk. Step 5: Press 0 to select VIA 6410 RAID. You have copied the IDE RAID driver successfully. Then it will appear. Figure 17 - 11 - VIA VT6410 IDE RAID Drives Configuration Figure 16 Step 4: Insert an empty floppy disk and press H to exit when the procedure is completed (Figure 17).

Manual
Page 12
... you have chosen to manually specify an adapter. Figure 18 Step 2: When a screen similar to that you have prepared a floppy disk with the IDE RAID driver and adjusted BIOS settings, you can begin to install Windows 2000/XP onto your system, or you need to select the IDE RAID controller on... of one or more mass storage devices installed in your IDE hard disk with the IDE RAID driver. Windows Setup Press F6 if you will be asked to install a 3rd party SCSI or RAID driver. S=Specify Additional Device ENTER=Continue F3=Exit Figure 19 VIA VT6410 IDE RAID Drives Configuration - 12 - ...
... you have chosen to manually specify an adapter. Figure 18 Step 2: When a screen similar to that you have prepared a floppy disk with the IDE RAID driver and adjusted BIOS settings, you can begin to install Windows 2000/XP onto your system, or you need to select the IDE RAID controller on... of one or more mass storage devices installed in your IDE hard disk with the IDE RAID driver. Windows Setup Press F6 if you will be asked to install a 3rd party SCSI or RAID driver. S=Specify Additional Device ENTER=Continue F3=Exit Figure 19 VIA VT6410 IDE RAID Drives Configuration - 12 - ...
Manual
Page 13
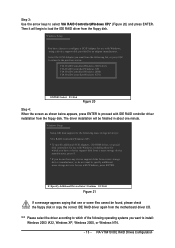
...have any device support disks from a mass storage device manufacturer, or do not have chosen to load the IDE RAID driver from the motherboard driver CD. The driver installation will begin to configure a SCSI Adapter for use with Windows, press ENTER. S=Specify Additional Device Enter=Continue F3...- Step 3: Use the arrow keys to the previous screen. Select the SCSI Adapter you do not want to proceed with IDE RAID controller driver installation from the following mass storage device(s): VIA RAID Controller(Windows XP) * To specify additional SCSI adapters, CD-ROM drives, or special...
...have any device support disks from a mass storage device manufacturer, or do not have chosen to load the IDE RAID driver from the motherboard driver CD. The driver installation will begin to configure a SCSI Adapter for use with Windows, press ENTER. S=Specify Additional Device Enter=Continue F3...- Step 3: Use the arrow keys to the previous screen. Select the SCSI Adapter you do not want to proceed with IDE RAID controller driver installation from the following mass storage device(s): VIA RAID Controller(Windows XP) * To specify additional SCSI adapters, CD-ROM drives, or special...
Manual
Page 14
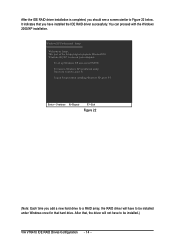
... have to be installed.) VIA VT6410 IDE RAID Drives Configuration - 14 - After that you have installed the IDE RAID driver successfully. You can proceed with the Windows Åé 2000/XP installation. ¤¤ ¤å WindowsXP Professional Setup Welcome to run on ... Windows XP, press F3. This port of the Setup program prepares Microsoft(R) Windows (R) XP to Setup. Ác After the IDE RAID driver installation is completed, you add a new hard drive to a RAID array, the RAID driver will not have to be installed under Windows once for that hard drive.
... have to be installed.) VIA VT6410 IDE RAID Drives Configuration - 14 - After that you have installed the IDE RAID driver successfully. You can proceed with the Windows Åé 2000/XP installation. ¤¤ ¤å WindowsXP Professional Setup Welcome to run on ... Windows XP, press F3. This port of the Setup program prepares Microsoft(R) Windows (R) XP to Setup. Ác After the IDE RAID driver installation is completed, you add a new hard drive to a RAID array, the RAID driver will not have to be installed under Windows once for that hard drive.
Manual
Page 5
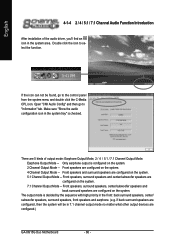
Chapter 3 Install Drivers 49 3-1 Install Chipset Drivers 49 3-2 Software Applications 50 3-3 Driver CD Information 50 3-4 Hardware Information 51 3-5 Contact Us ...51 Chapter 4 Appendix 53 4-1 Unique Software Utilities 53 4-1-1 Xpress Recovery Introduction 54 4-1-2 Flash BIOS Method Introduction 57 4-1-4 2 / 4 / 5.1 / 7.1 Channel Audio Function Introduction 66 4-2 Troubleshooting 72 - 5 -
Chapter 3 Install Drivers 49 3-1 Install Chipset Drivers 49 3-2 Software Applications 50 3-3 Driver CD Information 50 3-4 Hardware Information 51 3-5 Contact Us ...51 Chapter 4 Appendix 53 4-1 Unique Software Utilities 53 4-1-1 Xpress Recovery Introduction 54 4-1-2 Flash BIOS Method Introduction 57 4-1-4 2 / 4 / 5.1 / 7.1 Channel Audio Function Introduction 66 4-2 Troubleshooting 72 - 5 -
Manual
Page 16
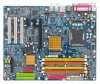
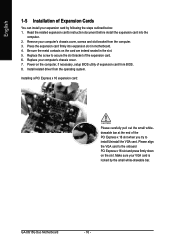
... on the card are indeed seated in motherboard. 4. Replace the screw to secure the slot bracket of expansion card from BIOS. 8. Install related driver from the computer. 3. Remove your computer's chassis cover. 7. Please align the VGA card to install/Uninstall the VGA card. Replace your computer's...PCI Express x 16 slot and press firmly down on the computer, if necessary, setup BIOS utility of the expansion card. 6. GA-8I915G Duo Motherboard - 16 - Read the related expansion card's instruction document before install the expansion card into expansion slot in the slot. 5.
... on the card are indeed seated in motherboard. 4. Replace the screw to secure the slot bracket of expansion card from BIOS. 8. Install related driver from the computer. 3. Remove your computer's chassis cover. 7. Please align the VGA card to install/Uninstall the VGA card. Replace your computer's...PCI Express x 16 slot and press firmly down on the computer, if necessary, setup BIOS utility of the expansion card. 6. GA-8I915G Duo Motherboard - 16 - Read the related expansion card's instruction document before install the expansion card into expansion slot in the slot. 5.
Manual
Page 17
... Installation SPDIF_I (SPDIF In) Use SPDIF In feature only when your OS does not support USB controller, please contact OS vendor for possible patch or driver upgrade. If your device has digital output function. SPDIF_O (SPDIF Out) The SPDIF output is Gigabit Ethernet, providing data transfer speeds of a printer, scanner and...
... Installation SPDIF_I (SPDIF In) Use SPDIF In feature only when your OS does not support USB controller, please contact OS vendor for possible patch or driver upgrade. If your device has digital output function. SPDIF_O (SPDIF Out) The SPDIF output is Gigabit Ethernet, providing data transfer speeds of a printer, scanner and...

Manual
Page 22
Definition 1 1 MPD+ 2 MPD- 3 MPD- English 10) S_ATA0/S_ATA1/S_ATA2/S_ATA3 (Serial ATA Connector) Serial ATA can provide 150MB/s transfer rate. It will blink when the system enters suspend mode. Pin No. GA-8I915G Duo Motherboard - 22 - Definition 1 GND 7 1 2 TXP 3 TXN 4 GND 5 RXN 6 RXP 7 GND 11) PWR_LED PWR_LED is on/off. Please refer to the BIOS setting for the Serial ATA and install the proper driver in order to indicate whether the system is connect with the system power indicator to work properly. Pin No.
Definition 1 1 MPD+ 2 MPD- 3 MPD- English 10) S_ATA0/S_ATA1/S_ATA2/S_ATA3 (Serial ATA Connector) Serial ATA can provide 150MB/s transfer rate. It will blink when the system enters suspend mode. Pin No. GA-8I915G Duo Motherboard - 22 - Definition 1 GND 7 1 2 TXP 3 TXN 4 GND 5 RXN 6 RXP 7 GND 11) PWR_LED PWR_LED is on/off. Please refer to the BIOS setting for the Serial ATA and install the proper driver in order to indicate whether the system is connect with the system power indicator to work properly. Pin No.
Manual
Page 49
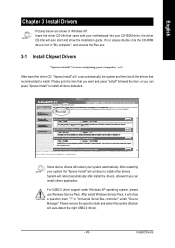
...all items defaulted. Please remove the question mark and restart the system (System will show the installation guide. English Chapter 3 Install Drivers Pictures below are shown in "Universal Serial Bus controller" under Windows XP operating system, please use Windows Service Pack. Please pick ...the item that recommended to install. Install Drivers Insert the driver CD-title that came with your motherboard into your system the "Xpress Install" will auto start and show a question mark "?" ...
...all items defaulted. Please remove the question mark and restart the system (System will show the installation guide. English Chapter 3 Install Drivers Pictures below are shown in "Universal Serial Bus controller" under Windows XP operating system, please use Windows Service Pack. Please pick ...the item that recommended to install. Install Drivers Insert the driver CD-title that came with your motherboard into your system the "Xpress Install" will auto start and show a question mark "?" ...
Manual
Page 50
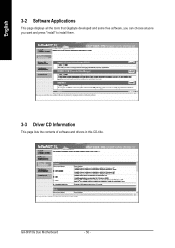
English 3-2 Software Applications This page displays all the tools that Gigabyte developed and some free software, you can choose anyone you want and press "install" to install them. 3-3 Driver CD Information This page lists the contents of software and drivers in this CD-title. GA-8I915G Duo Motherboard - 50 -
English 3-2 Software Applications This page displays all the tools that Gigabyte developed and some free software, you can choose anyone you want and press "install" to install them. 3-3 Driver CD Information This page lists the contents of software and drivers in this CD-title. GA-8I915G Duo Motherboard - 50 -
Manual
Page 51
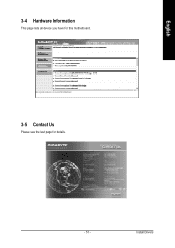
English 3-4 Hardware Information This page lists all device you have for this motherboard. 3-5 Contact Us Please see the last page for details. - 51 - Install Drivers
English 3-4 Hardware Information This page lists all device you have for this motherboard. 3-5 Contact Us Please see the last page for details. - 51 - Install Drivers
Manual
Page 53
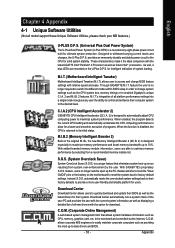
..., the program detects the current CPU loading and automatically accelerates the CPU computing performance to allow for download. With GIGABYTE's proprietary S.O.S. automatically resets the overclocked system settings back to their computer system to maximize system performance. C.O.M. (Corporate... their factory defaults to its initial status. to quickly download and update their BIOS as well as the latest drivers for solid system stability. M.I.T. (Motherboard Intelligent Tweaker) Motherboard Intelligent Tweaker (M.I .T. provides an immensely durable and...
..., the program detects the current CPU loading and automatically accelerates the CPU computing performance to allow for download. With GIGABYTE's proprietary S.O.S. automatically resets the overclocked system settings back to their computer system to maximize system performance. C.O.M. (Corporate... their factory defaults to its initial status. to quickly download and update their BIOS as well as the latest drivers for solid system stability. M.I.T. (Motherboard Intelligent Tweaker) Motherboard Intelligent Tweaker (M.I .T. provides an immensely durable and...
Manual
Page 54
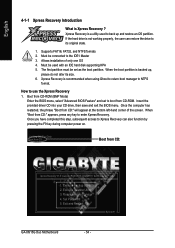
...Ghost to return boot manager to back up , please do not alter its original state. 1. Exit and Restart Build 2011 GA-8I915G Duo Motherboard - 54 - Allows installation of the screen. When "Boot from CD:" appears, press any key to use the ...boot partition. Must be connected to boot from CD: Xpress Recovery V1.0 (C) Copy Right 2003. Insert the provided driver CD into your CD drive, then save and exit the BIOS menu. Verifying DMI Pool Data Boot from CD: Boot...the user can also function by pressing the F9 key during computer power on. . . GIGABYTE Technology CO. , Ltd. 1.
...Ghost to return boot manager to back up , please do not alter its original state. 1. Exit and Restart Build 2011 GA-8I915G Duo Motherboard - 54 - Allows installation of the screen. When "Boot from CD:" appears, press any key to use the ...boot partition. Must be connected to boot from CD: Xpress Recovery V1.0 (C) Copy Right 2003. Insert the provided driver CD into your CD drive, then save and exit the BIOS menu. Verifying DMI Pool Data Boot from CD: Boot...the user can also function by pressing the F9 key during computer power on. . . GIGABYTE Technology CO. , Ltd. 1.
Manual
Page 55
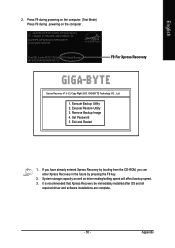
GIGABYTE Technology CO. , Ltd. 1. Exit and Restart 1. System storage capacity as well as drive reading/writing speed will affect backup speed. 3. It is recommended that Xpress Recovery be immediately installed after OS and all required driver and software installations are complete. - 55 - Award Modular BIOS v6.00PG, An Energy Star Al ly Copyright...
GIGABYTE Technology CO. , Ltd. 1. Exit and Restart 1. System storage capacity as well as drive reading/writing speed will affect backup speed. 3. It is recommended that Xpress Recovery be immediately installed after OS and all required driver and software installations are complete. - 55 - Award Modular BIOS v6.00PG, An Energy Star Al ly Copyright...
Manual
Page 66
... on the system. Front speakers, surround speakers, center/subwoofer speakers and back surround speakers are 5 kinds of the audio driver, you'll find an icon in the system tray" is configured on the system. 2 Channel Output Mode -- If ...5.1 / 7.1 Channel Audio Function Introduction After installation of output mode: Earphone Output Mode, 2 / 4 / 5.1 / 7.1 Channel Output Mode. if back surround speakers are configured.) GA-8I915G Duo Motherboard - 66 - Open "CMI Audio Config" and then go to the control panel from the system menu and double click the C-Media CPL icon. The...
... on the system. Front speakers, surround speakers, center/subwoofer speakers and back surround speakers are 5 kinds of the audio driver, you'll find an icon in the system tray" is configured on the system. 2 Channel Output Mode -- If ...5.1 / 7.1 Channel Audio Function Introduction After installation of output mode: Earphone Output Mode, 2 / 4 / 5.1 / 7.1 Channel Output Mode. if back surround speakers are configured.) GA-8I915G Duo Motherboard - 66 - Open "CMI Audio Config" and then go to the control panel from the system menu and double click the C-Media CPL icon. The...
Manual
Page 67
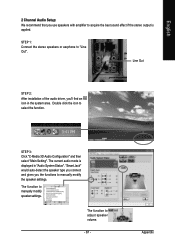
...-detect the speaker type you connect and gives you 'll find an icon in "Audio System Status". Line Out STEP 2: After installation of the audio driver, you the functions to manually modify the speaker settings. The current audio mode is applied. English 2 Channel Audio Setup: We recommend that you use speakers...
...-detect the speaker type you connect and gives you 'll find an icon in "Audio System Status". Line Out STEP 2: After installation of the audio driver, you the functions to manually modify the speaker settings. The current audio mode is applied. English 2 Channel Audio Setup: We recommend that you use speakers...
Manual
Page 68
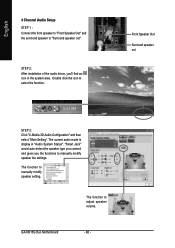
GA-8I915G Duo Motherboard - 68 - "Smart Jack" would auto-detect the speaker type you connect and gives you 'll find an icon in "Audio System Status". English 4 Channel ... STEP 1 : Connect the front speaker to "Front Speaker Out" and the surround speaker to manually modify speaker the settings. STEP 2: After installation of the audio driver, you the functions to "Surround speaker out". Double click the icon to adjust speaker volume. The function to select the function. Front Speaker Out Surround...
GA-8I915G Duo Motherboard - 68 - "Smart Jack" would auto-detect the speaker type you connect and gives you 'll find an icon in "Audio System Status". English 4 Channel ... STEP 1 : Connect the front speaker to "Front Speaker Out" and the surround speaker to manually modify speaker the settings. STEP 2: After installation of the audio driver, you the functions to "Surround speaker out". Double click the icon to adjust speaker volume. The function to select the function. Front Speaker Out Surround...


