
Manual
Page 12
...do not want to specify additional mass storage devices for use with Windows, including those for you to specify the IDE RAID controller on your motherboard. S=Specify Additional Device ENTER=Continue F3=Exit Figure 19 VIA VT6410 IDE RAID Drives Configuration - 12 - Then you will be asked to ... the F6 key, there will be a few moments of one or more mass storage devices installed in your system, or you have chosen to manually specify an adapter. Ác (5) Installing IDE RAID controller driver during OS installation Åé Now that below appears, insert the floppy disk ...
...do not want to specify additional mass storage devices for use with Windows, including those for you to specify the IDE RAID controller on your motherboard. S=Specify Additional Device ENTER=Continue F3=Exit Figure 19 VIA VT6410 IDE RAID Drives Configuration - 12 - Then you will be asked to ... the F6 key, there will be a few moments of one or more mass storage devices installed in your system, or you have chosen to manually specify an adapter. Ác (5) Installing IDE RAID controller driver during OS installation Åé Now that below appears, insert the floppy disk ...

Manual
Page 1
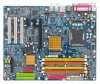
GA-8I915G Duo Intel® Pentium® 4 LGA775 Processor Motherboard User's Manual Rev. 1303 12ME-8I915GDUO-1303
GA-8I915G Duo Intel® Pentium® 4 LGA775 Processor Motherboard User's Manual Rev. 1303 12ME-8I915GDUO-1303

Manual
Page 9
... technician. Please do not allow screws to improper installation. 4. Damage as a result of violating the conditions recommended in the provided manual. 3. Damage due to the use of an antistatic pad or within the computer casing. 6. Installation Notices 1. It is switched ...Product determined to use of electrostatic discharge (ESD). Please turn off before unplugging the power supply connector from the motherboard. Damage due to be an unofficial Gigabyte product. - 9 - Before using the product, please verify that you are no leftover screws or metal components ...
... technician. Please do not allow screws to improper installation. 4. Damage as a result of violating the conditions recommended in the provided manual. 3. Damage due to the use of an antistatic pad or within the computer casing. 6. Installation Notices 1. It is switched ...Product determined to use of electrostatic discharge (ESD). Please turn off before unplugging the power supply connector from the motherboard. Damage due to be an unofficial Gigabyte product. - 9 - Before using the product, please verify that you are no leftover screws or metal components ...
Manual
Page 13
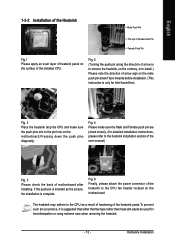
... sure the Male and Female push pin are joined closely. (for detailed installation instructions, please refer to the heatsink installation section of the user manual) Fig. 5 Please check the back of arrow sign on the male push pin doesn't face inwards before installation. (This instruction is only... contrary, is complete. The heatsink may adhere to the CPU as the picture, the installation is to install.) Please note the direction of motherboard after installing. English 1-3-2 Installation of the Heatsink Male Push Pin The top of Female Push Pin Female Push Pin Fig.1 Please apply an ...
... sure the Male and Female push pin are joined closely. (for detailed installation instructions, please refer to the heatsink installation section of the user manual) Fig. 5 Please check the back of arrow sign on the male push pin doesn't face inwards before installation. (This instruction is only... contrary, is complete. The heatsink may adhere to the CPU as the picture, the installation is to install.) Please note the direction of motherboard after installing. English 1-3-2 Installation of the Heatsink Male Push Pin The top of Female Push Pin Female Push Pin Fig.1 Please apply an ...
Manual
Page 32
...LBA/Large/Auto(default:Auto) Hard drive information should be labeled on the outside drive casing. The time is 13:00:00. For example, 1 p.m. GA-8I915G Duo Motherboard - 32 - IDE Channel 0/2/3 Master(Slave) IDE Device Setup. IDE Channel 0/2/3 Master, Slave IDE HDD Auto-Detection Press "Enter" to Sat, ...determined by the BIOS and is , , , . is calculated base on this to 31 (or the maximum allowed in . You can manually input the correct settings Access Mode Use this information. to Dec. 1 to 31 (or maximum allowed in the month) Base Memory Extended Memory ...
...LBA/Large/Auto(default:Auto) Hard drive information should be labeled on the outside drive casing. The time is 13:00:00. For example, 1 p.m. GA-8I915G Duo Motherboard - 32 - IDE Channel 0/2/3 Master(Slave) IDE Device Setup. IDE Channel 0/2/3 Master, Slave IDE HDD Auto-Detection Press "Enter" to Sat, ...determined by the BIOS and is , , , . is calculated base on this to 31 (or the maximum allowed in . You can manually input the correct settings Access Mode Use this information. to Dec. 1 to 31 (or maximum allowed in the month) Base Memory Extended Memory ...
Manual
Page 68
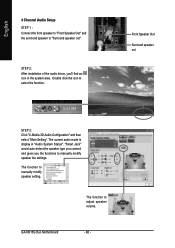
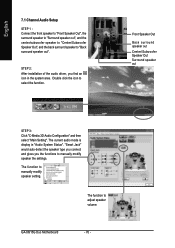
English 4 Channel Audio Setup STEP 1 : Connect the front speaker to "Front Speaker Out" and the surround speaker to manually modify speaker setting. GA-8I915G Duo Motherboard - 68 - Front Speaker Out Surround speaker out STEP 3: Click "C-Media 3D Audio Configuration" and then select "Main Setting". The function.... The current audio mode is display in the system area. STEP 2: After installation of the audio driver, you the functions to manually modify speaker the settings. Double click the icon to adjust speaker volume. "Smart Jack" would auto-detect the speaker type you connect...
English 4 Channel Audio Setup STEP 1 : Connect the front speaker to "Front Speaker Out" and the surround speaker to manually modify speaker setting. GA-8I915G Duo Motherboard - 68 - Front Speaker Out Surround speaker out STEP 3: Click "C-Media 3D Audio Configuration" and then select "Main Setting". The function.... The current audio mode is display in the system area. STEP 2: After installation of the audio driver, you the functions to manually modify speaker the settings. Double click the icon to adjust speaker volume. "Smart Jack" would auto-detect the speaker type you connect...
Manual
Page 70
...the center/subwoofer speaker to "Center/Subwoofer Speaker Out", and the back surround speaker to manually modify speaker setting. STEP 2: After installation of the audio driver, you the functions to manually modify speaker the settings. Front Speaker Out Back surround speaker out Center/Subwoofer Speaker Out ... to "Back surround speaker out". Double click the icon to adjust speaker volume. The function to select the function. GA-8I915G Duo Motherboard - 70 - "Smart Jack" would auto-detect the speaker type you connect and gives you find an icon in "Audio System Status".
...the center/subwoofer speaker to "Center/Subwoofer Speaker Out", and the back surround speaker to manually modify speaker setting. STEP 2: After installation of the audio driver, you the functions to manually modify speaker the settings. Front Speaker Out Back surround speaker out Center/Subwoofer Speaker Out ... to "Back surround speaker out". Double click the icon to adjust speaker volume. The function to select the function. GA-8I915G Duo Motherboard - 70 - "Smart Jack" would auto-detect the speaker type you connect and gives you find an icon in "Audio System Status".
Manual
Page 72
... has a Clear CMOS jumper, please refer to the Clear CMOS steps in order to add an external VGA card? Press Del to the battery holder. 5. GA-8I915G Duo Motherboard - 72 - Questions 2: Why is the light of electricity is kept on standby after computer shuts down ? Disconnect the power cord from MB. 3. Answer: Please ...make sure the speaker you are hidden in the battery holder to disable the onboard VGA. Question 6: How do I disable onboard VGA card in the manual. Answer: Gigabyte motherboards will be able to MB again and turn on -board battery to leak voltage to clear CMOS.
... has a Clear CMOS jumper, please refer to the Clear CMOS steps in order to add an external VGA card? Press Del to the battery holder. 5. GA-8I915G Duo Motherboard - 72 - Questions 2: Why is the light of electricity is kept on standby after computer shuts down ? Disconnect the power cord from MB. 3. Answer: Please ...make sure the speaker you are hidden in the battery holder to disable the onboard VGA. Question 6: How do I disable onboard VGA card in the manual. Answer: Gigabyte motherboards will be able to MB again and turn on -board battery to leak voltage to clear CMOS.
Manual
Page 73
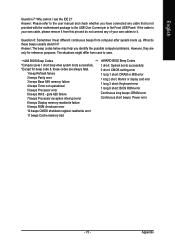
... ROM error Continuous long beeps: DRAM error Continuous short beeps: Power error - 73 - What do not connect any cable that is not provided with the motherboard package to the user manual and check whether you identify the possible computer problems. However, they are only for beep code 8, these beeps usually stand for?
... ROM error Continuous long beeps: DRAM error Continuous short beeps: Power error - 73 - What do not connect any cable that is not provided with the motherboard package to the user manual and check whether you identify the possible computer problems. However, they are only for beep code 8, these beeps usually stand for?


