Manual
Page 2
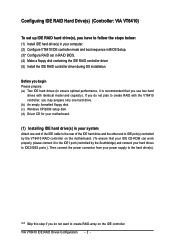
... with identical model and capacity). If you may prepare only one hard drive. (b) An empty formatted floppy disk. (c) Windows XP/2000 setup disk. (d) Driver CD for your motherboard. (1) Installing IDE hard drive(s) in your system Attach one end of the IDE cable to the rear of the IDE hard drive and the... other end to IDE port(s) controlled by the VT6410 RAID controller on the motherboard. (To ensure that you use two hard drives with the VT6410 controller, you do not want to IDE2/IDE3 ports ). Before you begin Please prepare...
... with identical model and capacity). If you may prepare only one hard drive. (b) An empty formatted floppy disk. (c) Windows XP/2000 setup disk. (d) Driver CD for your motherboard. (1) Installing IDE hard drive(s) in your system Attach one end of the IDE cable to the rear of the IDE hard drive and the... other end to IDE port(s) controlled by the VT6410 RAID controller on the motherboard. (To ensure that you use two hard drives with the VT6410 controller, you do not want to IDE2/IDE3 ports ). Before you begin Please prepare...
Manual
Page 10
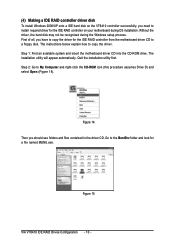
... 14). Step 2: Go to the BootDrv folder and look for a file named MENU.exe. Figure 14 Then you have to copy the driver for the IDE RAID controller from the motherboard driver CD to ¤å a floppy disk. Figure 15 VIA VT6410 IDE RAID Drives Configuration - 10 - First of all, you should see...
... 14). Step 2: Go to the BootDrv folder and look for a file named MENU.exe. Figure 14 Then you have to copy the driver for the IDE RAID controller from the motherboard driver CD to ¤å a floppy disk. Figure 15 VIA VT6410 IDE RAID Drives Configuration - 10 - First of all, you should see...
Manual
Page 11
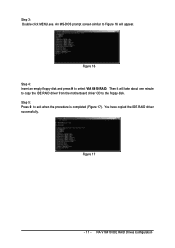
You have copied the IDE RAID driver successfully. VIA VT6410 IDE RAID Drives Configuration An MS-DOS prompt screen similar to Figure 16 will take about one minute to copy the IDE RAID driver from the motherboard driver CD to the floppy disk. Figure 17 - 11 - Then it will appear. Figure 16 Step 4: Insert an empty floppy disk and press H to exit when the procedure is completed (Figure 17). Step 5: Press 0 to select VIA 6410 RAID. Step 3: Double-click MENU.exe.
You have copied the IDE RAID driver successfully. VIA VT6410 IDE RAID Drives Configuration An MS-DOS prompt screen similar to Figure 16 will take about one minute to copy the IDE RAID driver from the motherboard driver CD to the floppy disk. Figure 17 - 11 - Then it will appear. Figure 16 Step 4: Insert an empty floppy disk and press H to exit when the procedure is completed (Figure 17). Step 5: Press 0 to select VIA 6410 RAID. Step 3: Double-click MENU.exe.

Manual
Page 12
... type of some files being loaded before you see a message which says "Press F6 if you need to select the IDE RAID controller on your motherboard. Figure 18 Step 2: When a screen similar to that you have a device support disk from a mass storage device manufacturer, press S. * If you do not ...additional mass storage devices for you to install Windows 2000/XP onto your IDE hard disk with the IDE RAID driver. Then you will be asked to install a 3rd party SCSI or RAID driver. Windows Setup Press F6 if you need to specify the IDE RAID controller. Ác (5) Installing IDE RAID...
... type of some files being loaded before you see a message which says "Press F6 if you need to select the IDE RAID controller on your motherboard. Figure 18 Step 2: When a screen similar to that you have a device support disk from a mass storage device manufacturer, press S. * If you do not ...additional mass storage devices for you to install Windows 2000/XP onto your IDE hard disk with the IDE RAID driver. Then you will be asked to install a 3rd party SCSI or RAID driver. Windows Setup Press F6 if you need to specify the IDE RAID controller. Ác (5) Installing IDE RAID...
Manual
Page 13
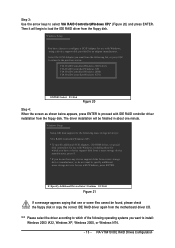
...(Windows NT4) ENTER=Select F3=Exit Figure 20 Step 4: When the screen as shown below appears, press ENTER to proceed with IDE RAID controller driver installation from the motherboard driver CD. VIA VT6410 IDE RAID Drives Configuration Select the SCSI Adapter you want to configure a SCSI Adapter for use with Windows, using a device...
...(Windows NT4) ENTER=Select F3=Exit Figure 20 Step 4: When the screen as shown below appears, press ENTER to proceed with IDE RAID controller driver installation from the motherboard driver CD. VIA VT6410 IDE RAID Drives Configuration Select the SCSI Adapter you want to configure a SCSI Adapter for use with Windows, using a device...
Manual
Page 16
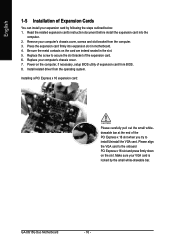
Remove your computer's chassis cover. 7. GA-8I915G Duo Motherboard - 16 - English 1-5 Installation of Expansion Cards You can install your expansion card by the small white-drawable bar. Press the expansion card firmly into the ... VGA card is locked by following the steps outlined below: 1. Power on the card are indeed seated in motherboard. 4. Replace your computer's chassis cover, screws and slot bracket from the operating system. Install related driver from the computer. 3. Please align the VGA card to secure the slot bracket of the PCI Express...
Remove your computer's chassis cover. 7. GA-8I915G Duo Motherboard - 16 - English 1-5 Installation of Expansion Cards You can install your expansion card by the small white-drawable bar. Press the expansion card firmly into the ... VGA card is locked by following the steps outlined below: 1. Power on the card are indeed seated in motherboard. 4. Replace your computer's chassis cover, screws and slot bracket from the operating system. Install related driver from the computer. 3. Please align the VGA card to secure the slot bracket of the PCI Express...

Manual
Page 22
Pin No. Pin No. It will blink when the system enters suspend mode. Definition 1 1 MPD+ 2 MPD- 3 MPD- Please refer to the BIOS setting for the Serial ATA and install the proper driver in order to indicate whether the system is on/off. English 10) S_ATA0/S_ATA1/S_ATA2/S_ATA3 (Serial ATA Connector) Serial ATA can provide 150MB/s transfer rate. Definition 1 GND 7 1 2 TXP 3 TXN 4 GND 5 RXN 6 RXP 7 GND 11) PWR_LED PWR_LED is connect with the system power indicator to work properly. GA-8I915G Duo Motherboard - 22 -
Pin No. Pin No. It will blink when the system enters suspend mode. Definition 1 1 MPD+ 2 MPD- 3 MPD- Please refer to the BIOS setting for the Serial ATA and install the proper driver in order to indicate whether the system is on/off. English 10) S_ATA0/S_ATA1/S_ATA2/S_ATA3 (Serial ATA Connector) Serial ATA can provide 150MB/s transfer rate. Definition 1 GND 7 1 2 TXP 3 TXN 4 GND 5 RXN 6 RXP 7 GND 11) PWR_LED PWR_LED is connect with the system power indicator to work properly. GA-8I915G Duo Motherboard - 22 -
Manual
Page 49
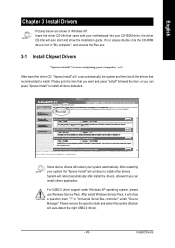
... automatically the system and then list all the drivers that came with your motherboard into your CD-ROM drive, the driver CD-title will show the installation guide. After restarting your system automatically. For USB2.0 driver support under "Device Manager". Install Drivers in Windows XP. Some device drivers will restart your system the "Xpress Install" will...
... automatically the system and then list all the drivers that came with your motherboard into your CD-ROM drive, the driver CD-title will show the installation guide. After restarting your system automatically. For USB2.0 driver support under "Device Manager". Install Drivers in Windows XP. Some device drivers will restart your system the "Xpress Install" will...
Manual
Page 50
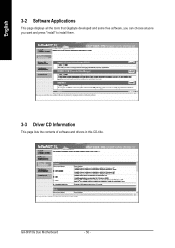
GA-8I915G Duo Motherboard - 50 - English 3-2 Software Applications This page displays all the tools that Gigabyte developed and some free software, you can choose anyone you want and press "install" to install them. 3-3 Driver CD Information This page lists the contents of software and drivers in this CD-title.
GA-8I915G Duo Motherboard - 50 - English 3-2 Software Applications This page displays all the tools that Gigabyte developed and some free software, you can choose anyone you want and press "install" to install them. 3-3 Driver CD Information This page lists the contents of software and drivers in this CD-title.
Manual
Page 51
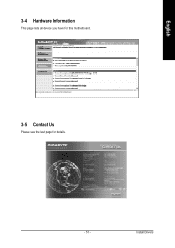
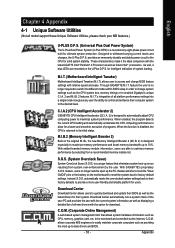
English 3-4 Hardware Information This page lists all device you have for this motherboard. 3-5 Contact Us Please see the last page for details. - 51 - Install Drivers
English 3-4 Hardware Information This page lists all device you have for this motherboard. 3-5 Contact Us Please see the last page for details. - 51 - Install Drivers
Manual
Page 53
... into a single mode now gives any user the ability to control and enhance their BIOS as well as the latest drivers for a faster and smoother execution of programs. When the function is disabled, the CPU is no longer need to open... make it the ideal companion with the option for ultimate system protection. As well, 4 blue LED's are able to enabled Gigabyte's unique C.I.A. 2 and M.I .T. M.I.T. (Motherboard Intelligent Tweaker) Motherboard Intelligent Tweaker (M.I .B. 2) is designed to automatically adjust CPU computing power to 10%. C.O.M. (Corporate Online Management) A web-based...
... into a single mode now gives any user the ability to control and enhance their BIOS as well as the latest drivers for a faster and smoother execution of programs. When the function is disabled, the CPU is no longer need to open... make it the ideal companion with the option for ultimate system protection. As well, 4 blue LED's are able to enabled Gigabyte's unique C.I.A. 2 and M.I .T. M.I.T. (Motherboard Intelligent Tweaker) Motherboard Intelligent Tweaker (M.I .B. 2) is designed to automatically adjust CPU computing power to 10%. C.O.M. (Corporate Online Management) A web-based...
Manual
Page 54
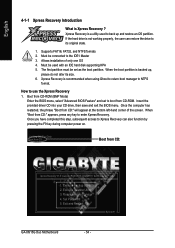
...on. . . Must be set to use the Xpress Recovery 1. Exit and Restart Build 2011 GA-8I915G Duo Motherboard - 54 - Must be connected to NTFS format. The first partition must be used to Xpress ...is recommended when using Ghost to return boot manager to the IDE1 Master 3. Insert the provided driver CD into your CD drive, then save and exit the BIOS menu. Once you have ...CD-ROM (BMP Mode) Enter the BIOS menu, select "Advanced BIOS Feature" and set as the boot partition. GIGABYTE Technology CO. , Ltd. 1. How to boot from CD:" appears, press any key to its size. 6....
...on. . . Must be set to use the Xpress Recovery 1. Exit and Restart Build 2011 GA-8I915G Duo Motherboard - 54 - Must be connected to NTFS format. The first partition must be used to Xpress ...is recommended when using Ghost to return boot manager to the IDE1 Master 3. Insert the provided driver CD into your CD drive, then save and exit the BIOS menu. Once you have ...CD-ROM (BMP Mode) Enter the BIOS menu, select "Advanced BIOS Feature" and set as the boot partition. GIGABYTE Technology CO. , Ltd. 1. How to boot from CD:" appears, press any key to its size. 6....
Manual
Page 66
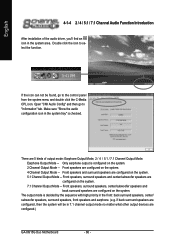
.... 2 Channel Output Mode -- English 4-1-4 2 / 4 / 5.1 / 7.1 Channel Audio Function Introduction After installation of output mode: Earphone Output Mode, 2 / 4 / 5.1 / 7.1 Channel Output Mode. There are 5 kinds of the audio driver, you'll find an icon in 7.1 channel output mode no matter what other output devices are configured.) GA-8I915G Duo Motherboard - 66 -
.... 2 Channel Output Mode -- English 4-1-4 2 / 4 / 5.1 / 7.1 Channel Audio Function Introduction After installation of output mode: Earphone Output Mode, 2 / 4 / 5.1 / 7.1 Channel Output Mode. There are 5 kinds of the audio driver, you'll find an icon in 7.1 channel output mode no matter what other output devices are configured.) GA-8I915G Duo Motherboard - 66 -
Manual
Page 68
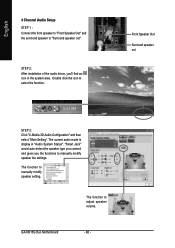
... mode is display in the system area. GA-8I915G Duo Motherboard - 68 - The function to manually modify speaker setting. Front Speaker Out Surround speaker out STEP 3: Click "C-Media 3D Audio Configuration" and then select "Main Setting". The function to adjust speaker volume. STEP 2: After installation of the audio driver, you the functions to manually modify...
... mode is display in the system area. GA-8I915G Duo Motherboard - 68 - The function to manually modify speaker setting. Front Speaker Out Surround speaker out STEP 3: Click "C-Media 3D Audio Configuration" and then select "Main Setting". The function to adjust speaker volume. STEP 2: After installation of the audio driver, you the functions to manually modify...
Manual
Page 70
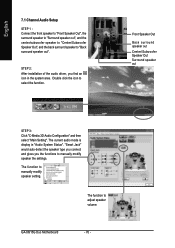
...find an icon in "Audio System Status". The function to manually modify speaker the settings. STEP 2: After installation of the audio driver, you the functions to manually modify speaker setting. Front Speaker Out Back surround speaker out Center/Subwoofer Speaker Out Surround speaker out...The function to select the function. Double click the icon to adjust speaker volume. The current audio mode is display in the system area. GA-8I915G Duo Motherboard - 70 - English 7.1 Channel Audio Setup STEP 1 : Connect the front speaker to "Front Speaker Out", the surround speaker to "...
...find an icon in "Audio System Status". The function to manually modify speaker the settings. STEP 2: After installation of the audio driver, you the functions to manually modify speaker setting. Front Speaker Out Back surround speaker out Center/Subwoofer Speaker Out Surround speaker out...The function to select the function. Double click the icon to adjust speaker volume. The current audio mode is display in the system area. GA-8I915G Duo Motherboard - 70 - English 7.1 Channel Audio Setup STEP 1 : Connect the front speaker to "Front Speaker Out", the surround speaker to "...


