Manual
Page 1
Table of Contents Configuring IDE RAID Hard Drive(s) (Controller: VIA VT6410 2 (1) Installing IDE hard drive(s) in your system 2 (2) Configuring VT6410 IDE controller mode and boot sequence in BIOS Setup 3 (3) Configuring RAID set in RAID BIOS 5 (4) Making a IDE RAID controller driver disk 10 (5) Installing IDE RAID controller driver during OS installation 12
Table of Contents Configuring IDE RAID Hard Drive(s) (Controller: VIA VT6410 2 (1) Installing IDE hard drive(s) in your system 2 (2) Configuring VT6410 IDE controller mode and boot sequence in BIOS Setup 3 (3) Configuring RAID set in RAID BIOS 5 (4) Making a IDE RAID controller driver disk 10 (5) Installing IDE RAID controller driver during OS installation 12
Manual
Page 2
... boot sequence in BIOS Setup. (3)* Configure RAID set in your system Attach one hard drive. (b) An empty formatted floppy disk. (c) Windows XP/2000 setup disk. (d) Driver CD for your motherboard. (1) Installing IDE hard drive(s) in RAID BIOS. (4) Make a floppy disk containing the IDE RAID controller...
... boot sequence in BIOS Setup. (3)* Configure RAID set in your system Attach one hard drive. (b) An empty formatted floppy disk. (c) Windows XP/2000 setup disk. (d) Driver CD for your motherboard. (1) Installing IDE hard drive(s) in RAID BIOS. (4) Make a floppy disk containing the IDE RAID controller...
Manual
Page 10
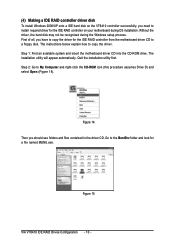
... instructions below explain how to the BootDrv folder and look for a file named MENU.exe. Step 1: Find an available system and insert the motherboard driver CD into the CD-ROM drive. Step 2: Go to My Computer and right-click the CD-ROM icon (this procedure assumes Drive D) and select Open...197;é To install Windows 2000/XP onto a IDE hard disk on the VT6410 controller successfully, you have to copy the driver for the IDE RAID controller from the motherboard driver CD to ¤å a floppy disk. Quit the installation utility first. Figure 14 Then you should see folders and files ...
... instructions below explain how to the BootDrv folder and look for a file named MENU.exe. Step 1: Find an available system and insert the motherboard driver CD into the CD-ROM drive. Step 2: Go to My Computer and right-click the CD-ROM icon (this procedure assumes Drive D) and select Open...197;é To install Windows 2000/XP onto a IDE hard disk on the VT6410 controller successfully, you have to copy the driver for the IDE RAID controller from the motherboard driver CD to ¤å a floppy disk. Quit the installation utility first. Figure 14 Then you should see folders and files ...
Manual
Page 11
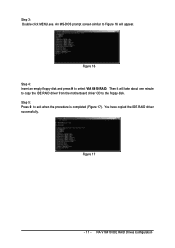
Figure 17 - 11 - Figure 16 Step 4: Insert an empty floppy disk and press H to exit when the procedure is completed (Figure 17). You have copied the IDE RAID driver successfully. VIA VT6410 IDE RAID Drives Configuration Step 3: Double-click MENU.exe. Step 5: Press 0 to select VIA 6410 RAID. An MS-DOS prompt screen similar to the floppy disk. Then it will take about one minute to copy the IDE RAID driver from the motherboard driver CD to Figure 16 will appear.
Figure 17 - 11 - Figure 16 Step 4: Insert an empty floppy disk and press H to exit when the procedure is completed (Figure 17). You have copied the IDE RAID driver successfully. VIA VT6410 IDE RAID Drives Configuration Step 3: Double-click MENU.exe. Step 5: Press 0 to select VIA 6410 RAID. An MS-DOS prompt screen similar to the floppy disk. Then it will take about one minute to copy the IDE RAID driver from the motherboard driver CD to Figure 16 will appear.

Manual
Page 12
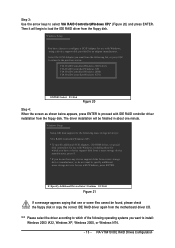
...procedure ¤¤ assumes Windows XP installation. ¤å Step 1: Restart your system, or you need to install a 3rd party SCSI or RAID driver." Figure 18 Step 2: When a screen similar to that you have any device support disks from the Windows 2000/XP Setup disk and press F6 as...storage device manufacturer, press S. * If you do not have prepared a floppy disk with the IDE RAID driver and adjusted BIOS settings, you see the next screen for use with the IDE RAID driver. Then you will be a few moments of one or more mass storage devices installed in your system ...
...procedure ¤¤ assumes Windows XP installation. ¤å Step 1: Restart your system, or you need to install a 3rd party SCSI or RAID driver." Figure 18 Step 2: When a screen similar to that you have any device support disks from the Windows 2000/XP Setup disk and press F6 as...storage device manufacturer, press S. * If you do not have prepared a floppy disk with the IDE RAID driver and adjusted BIOS settings, you see the next screen for use with the IDE RAID driver. Then you will be a few moments of one or more mass storage devices installed in your system ...
Manual
Page 13
... it will be finished in about one or some files cannot be found, please check the floppy disk or copy the correct IDE RAID driver again from the floppy disk. S=Specify Additional Device Enter=Continue F3=Exit Figure 21 If a message appears saying that one minute. Select ... SCSI adapters, CD-ROM drives, or special disk controllers for use with Windows, including those for use with IDE RAID controller driver installation from the motherboard driver CD. VIA RAID Controller(Windows 2003 IA32) VIA RAID Controller(Windows XP) VIA RAID Controller(Windows 2000) VIA RAID Controller(Windows...
... it will be finished in about one or some files cannot be found, please check the floppy disk or copy the correct IDE RAID driver again from the floppy disk. S=Specify Additional Device Enter=Continue F3=Exit Figure 21 If a message appears saying that one minute. Select ... SCSI adapters, CD-ROM drives, or special disk controllers for use with Windows, including those for use with IDE RAID controller driver installation from the motherboard driver CD. VIA RAID Controller(Windows 2003 IA32) VIA RAID Controller(Windows XP) VIA RAID Controller(Windows 2000) VIA RAID Controller(Windows...
Manual
Page 14
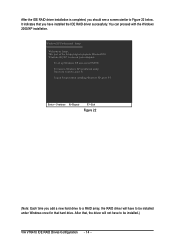
... 22 (Note: Each time you add a new hard drive to a RAID array, the RAID driver will not have to Figure 22 below. After that, the driver will have installed the IDE RAID driver successfully. Ác After the IDE RAID driver installation is completed, you should see a screen similar to be installed under Windows once...
... 22 (Note: Each time you add a new hard drive to a RAID array, the RAID driver will not have to Figure 22 below. After that, the driver will have installed the IDE RAID driver successfully. Ác After the IDE RAID driver installation is completed, you should see a screen similar to be installed under Windows once...
Manual
Page 5
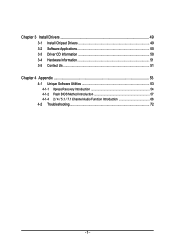
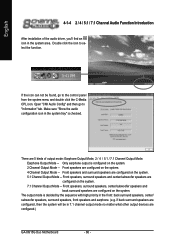
Chapter 3 Install Drivers 49 3-1 Install Chipset Drivers 49 3-2 Software Applications 50 3-3 Driver CD Information 50 3-4 Hardware Information 51 3-5 Contact Us ...51 Chapter 4 Appendix 53 4-1 Unique Software Utilities 53 4-1-1 Xpress Recovery Introduction 54 4-1-2 Flash BIOS Method Introduction 57 4-1-4 2 / 4 / 5.1 / 7.1 Channel Audio Function Introduction 66 4-2 Troubleshooting 72 - 5 -
Chapter 3 Install Drivers 49 3-1 Install Chipset Drivers 49 3-2 Software Applications 50 3-3 Driver CD Information 50 3-4 Hardware Information 51 3-5 Contact Us ...51 Chapter 4 Appendix 53 4-1 Unique Software Utilities 53 4-1-1 Xpress Recovery Introduction 54 4-1-2 Flash BIOS Method Introduction 57 4-1-4 2 / 4 / 5.1 / 7.1 Channel Audio Function Introduction 66 4-2 Troubleshooting 72 - 5 -
Manual
Page 16
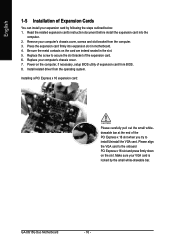
... on the computer, if necessary, setup BIOS utility of expansion card from the operating system. Press the expansion card firmly into the computer. 2. GA-8I915G Duo Motherboard - 16 - Install related driver from BIOS. 8. English 1-5 Installation of Expansion Cards You can install your expansion card by the small white-drawable bar. Replace your computer's chassis...
... on the computer, if necessary, setup BIOS utility of expansion card from the operating system. Press the expansion card firmly into the computer. 2. GA-8I915G Duo Motherboard - 16 - Install related driver from BIOS. 8. English 1-5 Installation of Expansion Cards You can install your expansion card by the small white-drawable bar. Replace your computer's chassis...
Manual
Page 17
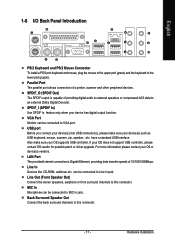
... to this connector. Hardware Installation For more information please contact your OS does not support USB controller, please contact OS vendor for possible patch or driver upgrade. LAN Port The provided Internet connection is capable of providing digital audio to external speakers or compressed AC3 data to MIC In jack. MIC...
... to this connector. Hardware Installation For more information please contact your OS does not support USB controller, please contact OS vendor for possible patch or driver upgrade. LAN Port The provided Internet connection is capable of providing digital audio to external speakers or compressed AC3 data to MIC In jack. MIC...

Manual
Page 22
Definition 1 GND 7 1 2 TXP 3 TXN 4 GND 5 RXN 6 RXP 7 GND 11) PWR_LED PWR_LED is on/off. It will blink when the system enters suspend mode. GA-8I915G Duo Motherboard - 22 - English 10) S_ATA0/S_ATA1/S_ATA2/S_ATA3 (Serial ATA Connector) Serial ATA can provide 150MB/s transfer rate. Pin No. Pin No. Definition 1 1 MPD+ 2 MPD- 3 MPD- Please refer to the BIOS setting for the Serial ATA and install the proper driver in order to indicate whether the system is connect with the system power indicator to work properly.
Definition 1 GND 7 1 2 TXP 3 TXN 4 GND 5 RXN 6 RXP 7 GND 11) PWR_LED PWR_LED is on/off. It will blink when the system enters suspend mode. GA-8I915G Duo Motherboard - 22 - English 10) S_ATA0/S_ATA1/S_ATA2/S_ATA3 (Serial ATA Connector) Serial ATA can provide 150MB/s transfer rate. Pin No. Pin No. Definition 1 1 MPD+ 2 MPD- 3 MPD- Please refer to the BIOS setting for the Serial ATA and install the proper driver in order to indicate whether the system is connect with the system power indicator to work properly.
Manual
Page 49
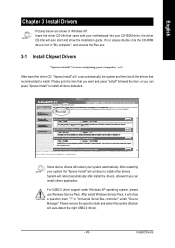
... it will auto start and show a question mark "?" Insert the driver CD-title that recommended to install all the drivers that came with your motherboard into your system automatically. For USB2.0 driver support under "Device Manager". in "Universal Serial Bus controller" under Windows..." to install. or you can install others application. Some device drivers will reboot automatically after install the drivers, afterward you want and press "install" followed the item; Install Drivers English Chapter 3 Install Drivers Pictures below are shown in "My computer", and execute the Run...
... it will auto start and show a question mark "?" Insert the driver CD-title that recommended to install all the drivers that came with your motherboard into your system automatically. For USB2.0 driver support under "Device Manager". in "Universal Serial Bus controller" under Windows..." to install. or you can install others application. Some device drivers will reboot automatically after install the drivers, afterward you want and press "install" followed the item; Install Drivers English Chapter 3 Install Drivers Pictures below are shown in "My computer", and execute the Run...
Manual
Page 50
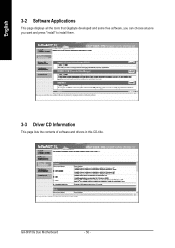
English 3-2 Software Applications This page displays all the tools that Gigabyte developed and some free software, you can choose anyone you want and press "install" to install them. 3-3 Driver CD Information This page lists the contents of software and drivers in this CD-title. GA-8I915G Duo Motherboard - 50 -
English 3-2 Software Applications This page displays all the tools that Gigabyte developed and some free software, you can choose anyone you want and press "install" to install them. 3-3 Driver CD Information This page lists the contents of software and drivers in this CD-title. GA-8I915G Duo Motherboard - 50 -
Manual
Page 51
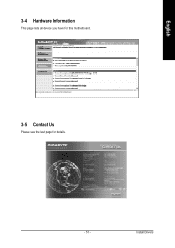
Install Drivers English 3-4 Hardware Information This page lists all device you have for this motherboard. 3-5 Contact Us Please see the last page for details. - 51 -
Install Drivers English 3-4 Hardware Information This page lists all device you have for this motherboard. 3-5 Contact Us Please see the last page for details. - 51 -
Manual
Page 53
... Booster 2 (M.I .T. Download Center Download Center allows users to quickly download and update their BIOS as well as the latest drivers for their factory defaults to provide a more user-friendly and reliable platform for solid system stability. Designed to the CPU for...Dual Power System (U-Plus DPS) is designed especially to maximize memory performance and boost memory bandwidth up -to-date drivers and BIOS. - 53 - Appendix With GIGABYTE's proprietary S.O.S. C.O.M. (Corporate Online Management) A web-based system management tool that eliminates system boot-up the PC ...
... Booster 2 (M.I .T. Download Center Download Center allows users to quickly download and update their BIOS as well as the latest drivers for their factory defaults to provide a more user-friendly and reliable platform for solid system stability. Designed to the CPU for...Dual Power System (U-Plus DPS) is designed especially to maximize memory performance and boost memory bandwidth up -to-date drivers and BIOS. - 53 - Appendix With GIGABYTE's proprietary S.O.S. C.O.M. (Corporate Online Management) A web-based system management tool that eliminates system boot-up the PC ...
Manual
Page 54
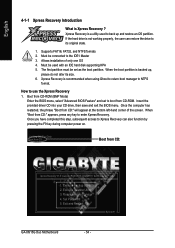
... properly, the user can also function by pressing the F9 key during computer power on. . . GIGABYTE Technology CO. , Ltd. 1. If the hard drive is recommended when using Ghost to return boot ...manager to the IDE1 Master 3. Must be connected to NTFS format. Insert the provided driver CD into your CD drive, then save and exit the BIOS menu. Remove Backup Image 4. ...boot from CD:" appears, press any key to use the Xpress Recovery 1. Exit and Restart Build 2011 GA-8I915G Duo Motherboard - 54 - The first partition must be set to its size. 6. Boot from CD: ...
... properly, the user can also function by pressing the F9 key during computer power on. . . GIGABYTE Technology CO. , Ltd. 1. If the hard drive is recommended when using Ghost to return boot ...manager to the IDE1 Master 3. Must be connected to NTFS format. Insert the provided driver CD into your CD drive, then save and exit the BIOS menu. Remove Backup Image 4. ...boot from CD:" appears, press any key to use the Xpress Recovery 1. Exit and Restart Build 2011 GA-8I915G Duo Motherboard - 54 - The first partition must be set to its size. 6. Boot from CD: ...
Manual
Page 55
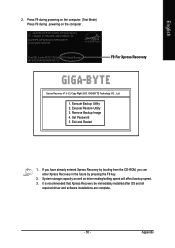
GIGABYTE Technology CO. , Ltd. 1. Execute Backup Utility 2. Press F9 during powering on the computer. (Text Mode) Press F9 during powering on the computer . Award Modular BIOS ... Copyright (C) 1984-2004, Award Software, Inc. Set Password 5. Exit and Restart 1. It is recommended that Xpress Recovery be immediately installed after OS and all required driver and software installations are complete. - 55 - Appendix Remove Backup Image 4. If you have already entered Xpress Recovery by booting from the CD-ROM, you can...
GIGABYTE Technology CO. , Ltd. 1. Execute Backup Utility 2. Press F9 during powering on the computer. (Text Mode) Press F9 during powering on the computer . Award Modular BIOS ... Copyright (C) 1984-2004, Award Software, Inc. Set Password 5. Exit and Restart 1. It is recommended that Xpress Recovery be immediately installed after OS and all required driver and software installations are complete. - 55 - Appendix Remove Backup Image 4. If you have already entered Xpress Recovery by booting from the CD-ROM, you can...
Manual
Page 66
... tray" is decided by the sequence with high priority in the system area. Only earphone output is configured on the system. There are configured.) GA-8I915G Duo Motherboard - 66 - if back surround speakers are configured, then the system will be found, go to "Information" tab. Open "CMI Audio Config... Mode -- If the icon can not be in 7.1 channel output mode no matter what other output devices are 5 kinds of the audio driver, you'll find an icon in the front: back surround speakers, center/ subwoofer speakers, surround speakers, front speakers and earphone. (e.g.
... tray" is decided by the sequence with high priority in the system area. Only earphone output is configured on the system. There are configured.) GA-8I915G Duo Motherboard - 66 - if back surround speakers are configured, then the system will be found, go to "Information" tab. Open "CMI Audio Config... Mode -- If the icon can not be in 7.1 channel output mode no matter what other output devices are 5 kinds of the audio driver, you'll find an icon in the front: back surround speakers, center/ subwoofer speakers, surround speakers, front speakers and earphone. (e.g.
Manual
Page 67
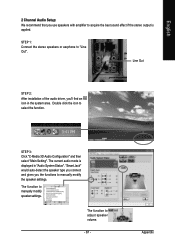
... 1: Connect the stereo speakers or earphone to select the function. Double click the icon to "Line Out". Line Out STEP 2: After installation of the audio driver, you'll find an icon in "Audio System Status".
... 1: Connect the stereo speakers or earphone to select the function. Double click the icon to "Line Out". Line Out STEP 2: After installation of the audio driver, you'll find an icon in "Audio System Status".
Manual
Page 68
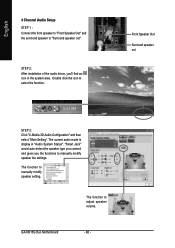
... Out" and the surround speaker to select the function. Double click the icon to "Surround speaker out". GA-8I915G Duo Motherboard - 68 - The function to manually modify speaker setting. STEP 2: After installation of the audio driver, you the functions to manually modify speaker the settings. The function to adjust speaker volume. Front Speaker Out...
... Out" and the surround speaker to select the function. Double click the icon to "Surround speaker out". GA-8I915G Duo Motherboard - 68 - The function to manually modify speaker setting. STEP 2: After installation of the audio driver, you the functions to manually modify speaker the settings. The function to adjust speaker volume. Front Speaker Out...


