Manual
Page 1
GA-890XA-UD3 AM3 socket motherboard for AMD Phenom™ II processor/AMD Athlon™ II processor User's Manual Rev. 1001 12ME-890XAD3-1001R
GA-890XA-UD3 AM3 socket motherboard for AMD Phenom™ II processor/AMD Athlon™ II processor User's Manual Rev. 1001 12ME-890XAD3-1001R
Manual
Page 7
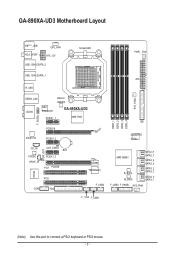
... KB(Note)_USB RCA_SPDIF CPU_FAN ATX_12V USB_1394_ESATA_2 Socket AM3 PWR__FAN USB_1394_ESATA_1 ATX R_USB USB30_LAN AUDIO NEC D720200F1 JMicron JMB362 GA-890XA-UD3 PCIEX1_1 AMD 790X F_AUDIO RTL8111D PCIEX16 PCIEX1_2 DDR3_1 DDR3_2 DDR3_3 DDR3_4 SYS_FAN2 IDE GIGABYTE SATA2 CD_IN CODEC SPDIF_IN SPDIF_OUT CLR_CMOS BAT PCIEX1_3 PCI1 PCIEX8 IT8720 PCI2 COM FDD TSB43AB23 F_USB2 AMD SB850 SATA2_6...
... KB(Note)_USB RCA_SPDIF CPU_FAN ATX_12V USB_1394_ESATA_2 Socket AM3 PWR__FAN USB_1394_ESATA_1 ATX R_USB USB30_LAN AUDIO NEC D720200F1 JMicron JMB362 GA-890XA-UD3 PCIEX1_1 AMD 790X F_AUDIO RTL8111D PCIEX16 PCIEX1_2 DDR3_1 DDR3_2 DDR3_3 DDR3_4 SYS_FAN2 IDE GIGABYTE SATA2 CD_IN CODEC SPDIF_IN SPDIF_OUT CLR_CMOS BAT PCIEX1_3 PCI1 PCIEX8 IT8720 PCI2 COM FDD TSB43AB23 F_USB2 AMD SB850 SATA2_6...
Manual
Page 8
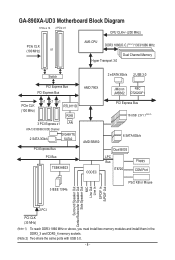
GA-890XA-UD3 Motherboard Block Diagram 1 PCIe x 16 2 PCIe x 8 CPU CLK+/- (200 MHz) PCIe CLK (100 MHz) or AM3 CPU DDR3 1866(O.C.)(Note 1)/... PCIe CLK (100 MHz) x1 x1 x1 RTL8111D RJ45 3 PCI Express x1 LAN ATA-133/100/66/33 IDE Channel 2 SATA 3Gb/s GIGABYTE SATA2 PCI Express Bus PCI Bus TSB43AB23 AMD 790X AMD SB850 CODEC JMicron NEC JMB362 D720200F1 PCI Express Bus 16 USB 2.0/1.1(Note 2) 6 SATA ...1) To reach DDR3 1866 MHz or above, you must install two memory modules and install them in the DDR3_3 and DDR3_4 memory sockets. (Note 2) Two share the same ports with USB 3.0. - 8 -
GA-890XA-UD3 Motherboard Block Diagram 1 PCIe x 16 2 PCIe x 8 CPU CLK+/- (200 MHz) PCIe CLK (100 MHz) or AM3 CPU DDR3 1866(O.C.)(Note 1)/... PCIe CLK (100 MHz) x1 x1 x1 RTL8111D RJ45 3 PCI Express x1 LAN ATA-133/100/66/33 IDE Channel 2 SATA 3Gb/s GIGABYTE SATA2 PCI Express Bus PCI Bus TSB43AB23 AMD 790X AMD SB850 CODEC JMicron NEC JMB362 D720200F1 PCI Express Bus 16 USB 2.0/1.1(Note 2) 6 SATA ...1) To reach DDR3 1866 MHz or above, you must install two memory modules and install them in the DDR3_3 and DDR3_4 memory sockets. (Note 2) Two share the same ports with USB 3.0. - 8 -
Manual
Page 10
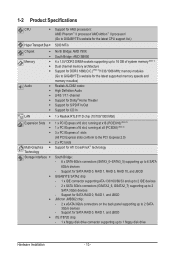
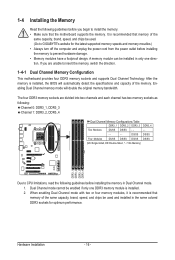
...devices - 1-2 Product Specifications CPU Support for AM3 processors: AMD Phenom™ II processor/ AMD Athlon™ II processor/ (Go to GIGABYTE's website for the latest CPU support list.) Hyper Transport Bus 5200 MT/s Chipset Memory Audio &#... North Bridge: AMD 790X South Bridge: AMD SB850 4 x 1.5V DDR3 DIMM sockets supporting up to 16 GB of system memory (Note 1) Dual channel memory architecture Support for DDR3 1866(O.C.)(Note 2)/1333/1066 MHz memory ...
...devices - 1-2 Product Specifications CPU Support for AM3 processors: AMD Phenom™ II processor/ AMD Athlon™ II processor/ (Go to GIGABYTE's website for the latest CPU support list.) Hyper Transport Bus 5200 MT/s Chipset Memory Audio &#... North Bridge: AMD 790X South Bridge: AMD SB850 4 x 1.5V DDR3 DIMM sockets supporting up to 16 GB of system memory (Note 1) Dual channel memory architecture Support for DDR3 1866(O.C.)(Note 2)/1333/1066 MHz memory ...
Manual
Page 12
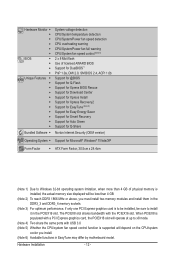
... than 4 GB. (Note 2) To reach DDR3 1866 MHz or above, you must install two memory modules and install them in the DDR3_3 and DDR3_4 memory sockets. (Note 3) For optimum performance, if only one PCI Express graphics card is supported will operate at up to x8 mode. (Note 4) Two share the same...
... than 4 GB. (Note 2) To reach DDR3 1866 MHz or above, you must install two memory modules and install them in the DDR3_3 and DDR3_4 memory sockets. (Note 3) For optimum performance, if only one PCI Express graphics card is supported will operate at up to x8 mode. (Note 4) Two share the same...
Manual
Page 13
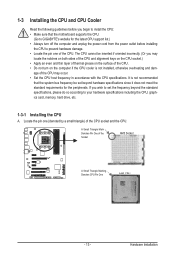
... beyond hardware specifications since it does not meet the standard requirements for the latest CPU support list.) • Always turn on the surface of the Socket AM3 Socket A Small Triangle Marking Denotes CPU Pin One AM3 CPU - 13 - Locate the pin one of the CPU. 1-3 Installing the CPU and CPU ... even and thin layer of thermal grease on the computer if the CPU cooler is not recommended that the motherboard supports the CPU. (Go to GIGABYTE's website for the peripherals. A Small Triangle Mark Denotes Pin One of the CPU. • Do not turn off the computer and unplug the ...
... beyond hardware specifications since it does not meet the standard requirements for the latest CPU support list.) • Always turn on the surface of the Socket AM3 Socket A Small Triangle Marking Denotes CPU Pin One AM3 CPU - 13 - Locate the pin one of the CPU. 1-3 Installing the CPU and CPU ... even and thin layer of thermal grease on the computer if the CPU cooler is not recommended that the motherboard supports the CPU. (Go to GIGABYTE's website for the peripherals. A Small Triangle Mark Denotes Pin One of the CPU. • Do not turn off the computer and unplug the ...
Manual
Page 14
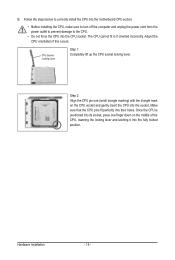
... CPU orientation if this occurs. Make sure that the CPU pins fit perfectly into the CPU socket. The CPU cannot fit in if oriented incorrectly. Step 2: Align the CPU pin one finger down on the CPU socket and gently insert the CPU into the fully locked position. Follow the steps below to... correctly install the CPU into the motherboard CPU socket. • Before installing the CPU, make sure to turn off the computer and unplug the power cord from the power outlet to prevent damage to ...
... CPU orientation if this occurs. Make sure that the CPU pins fit perfectly into the CPU socket. The CPU cannot fit in if oriented incorrectly. Step 2: Align the CPU pin one finger down on the CPU socket and gently insert the CPU into the fully locked position. Follow the steps below to... correctly install the CPU into the motherboard CPU socket. • Before installing the CPU, make sure to turn off the computer and unplug the power cord from the power outlet to prevent damage to ...
Manual
Page 16
...moudles.) • Always turn off the computer and unplug the power cord from the power outlet before installing the memory to GIGABYTE's website for optimum performance. Enabling Dual Channel memory mode will automatically detect the specifications and capacity of the same capacity, brand..., speed, and chips be installed in Dual Channel mode. 1. The four DDR3 memory sockets are unable to CPU limitations, read the following : Channel 0: DDR3_1, DDR3_3 Channel 1: DDR3_2, DDR3_4 Dual Channel Memory Configurations Table ...
...moudles.) • Always turn off the computer and unplug the power cord from the power outlet before installing the memory to GIGABYTE's website for optimum performance. Enabling Dual Channel memory mode will automatically detect the specifications and capacity of the same capacity, brand..., speed, and chips be installed in Dual Channel mode. 1. The four DDR3 memory sockets are unable to CPU limitations, read the following : Channel 0: DDR3_1, DDR3_3 Channel 1: DDR3_2, DDR3_4 Dual Channel Memory Configurations Table ...
Manual
Page 17
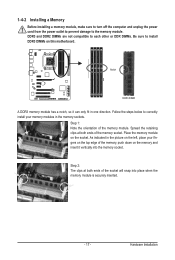
...one direction. Place the memory module on the memory and insert it can only fit in the memory sockets. Hardware Installation Step 1: Note the orientation of the socket will snap into the memory socket. DDR3 and DDR2 DIMMs are not compatible to each other or DDR DIMMs. Be sure to correctly ...install your fingers on the top edge of the memory socket. Spread the retaining clips at both ends of the memory, push down on the socket. 1-4-2 Installing a Memory Before installing a memory module, make sure to turn off the computer and unplug ...
...one direction. Place the memory module on the memory and insert it can only fit in the memory sockets. Hardware Installation Step 1: Note the orientation of the socket will snap into the memory socket. DDR3 and DDR2 DIMMs are not compatible to each other or DDR DIMMs. Be sure to correctly ...install your fingers on the top edge of the memory socket. Spread the retaining clips at both ends of the memory, push down on the socket. 1-4-2 Installing a Memory Before installing a memory module, make sure to turn off the computer and unplug ...

Manual
Page 105
... is attached to the CPU_FAN header properly? Appendix Secure the CPU cooler No on the memory slot. No Correctly insert the memory into the memory socket. Yes The problem is verified and solved. Insert the graphics card. A (Continued...) - 105 - No Check if the CPU cooler is installed properly on the CPU...
... is attached to the CPU_FAN header properly? Appendix Secure the CPU cooler No on the memory slot. No Correctly insert the memory into the memory socket. Yes The problem is verified and solved. Insert the graphics card. A (Continued...) - 105 - No Check if the CPU cooler is installed properly on the CPU...

Manual
Page 106
... you as soon as possible. The problem is verified and solved. Check if the system can boot successfully. No The power supply, CPU or CPU socket might fail. Yes Turn off the computer and connect the IDE/SATA devices. The problem is the CPU cooler running? A When the computer is turned...
... you as soon as possible. The problem is verified and solved. Check if the system can boot successfully. No The power supply, CPU or CPU socket might fail. Yes Turn off the computer and connect the IDE/SATA devices. The problem is the CPU cooler running? A When the computer is turned...

