User Manual
Page 3
.... Term. Object code. Limitation of nonconforming Software, contact GE Security Customer Service toll free at 888-GESECURity or online at www.gesecurity.com during the Media Warranty Period, with venue in Multnomah County, Oregon, to GE Security. General. Any hardware provided to You by and interpreted under normal use the software or documentation (or any hardware furnished with the software), even if GE Security has been advised...
.... Term. Object code. Limitation of nonconforming Software, contact GE Security Customer Service toll free at 888-GESECURity or online at www.gesecurity.com during the Media Warranty Period, with venue in Multnomah County, Oregon, to GE Security. General. Any hardware provided to You by and interpreted under normal use the software or documentation (or any hardware furnished with the software), even if GE Security has been advised...

User Manual
Page 4
... (c)(2) thereof; This equipment generates, uses, and can radiate radio frequency energy and, if not installed and used in a commercial environment. iv Digia II User Manual Intended use , modify, reproduce, release, perform, display, or disclose the Software also are restricted as provided by paragraphs (b)(2) and (b)(3) of the Rights in Noncommercial Technical Data and Computer Software-Small Business Innovative Research (SBIR) Program clause at DFARS 252...
... (c)(2) thereof; This equipment generates, uses, and can radiate radio frequency energy and, if not installed and used in a commercial environment. iv Digia II User Manual Intended use , modify, reproduce, release, perform, display, or disclose the Software also are restricted as provided by paragraphs (b)(2) and (b)(3) of the Rights in Noncommercial Technical Data and Computer Software-Small Business Innovative Research (SBIR) Program clause at DFARS 252...
User Manual
Page 5
..., support 31 Troubleshooting 32 Troubleshooting your Digia II 32 Contacting technical support 34 Online publication library 34 Appendix A. Introduction 1 Product overview 2 Features 2 Front panel 2 Back panel 3 Monitor display 4 Chapter 2. Defaults 35 Defaults 36 v Contents Preface vii Conventions used in on live video 28 Chapter 4. Setup 9 Main menu 10 Camera 11 Record 12 Schedule 13 Alarms 15 Network 16 Display 19 System 20 Information 22 Search 24 Export 26 Enter and directional buttons 27 Shuffle camera views...
..., support 31 Troubleshooting 32 Troubleshooting your Digia II 32 Contacting technical support 34 Online publication library 34 Appendix A. Introduction 1 Product overview 2 Features 2 Front panel 2 Back panel 3 Monitor display 4 Chapter 2. Defaults 35 Defaults 36 v Contents Preface vii Conventions used in on live video 28 Chapter 4. Setup 9 Main menu 10 Camera 11 Record 12 Schedule 13 Alarms 15 Network 16 Display 19 System 20 Information 22 Search 24 Export 26 Enter and directional buttons 27 Shuffle camera views...
User Manual
Page 7
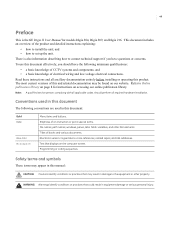
... service person, complying with all applicable codes, should have questions or concerns. Programming or coding sequences. Safety terms and symbols These terms may result in damage to contact technical support if you should perform all ancillary documentation entirely before installing or operating this document: Bold Italic Blue italic Monospace Menu items and buttons. There is the GE Digia II User Manual for instructions on accessing our online...
... service person, complying with all applicable codes, should have questions or concerns. Programming or coding sequences. Safety terms and symbols These terms may result in damage to contact technical support if you should perform all ancillary documentation entirely before installing or operating this document: Bold Italic Blue italic Monospace Menu items and buttons. There is the GE Digia II User Manual for instructions on accessing our online...

User Manual
Page 10
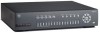
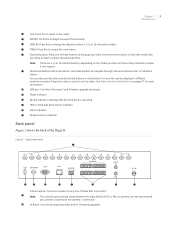
... motion . Press this to rewind video or start or increase forward slow motion. Digia II front panel g AB C D E F/REV R/PLAY PAUSE PLAY F/ADV FG H IJ SEARCH LIVE EXPORT DISPLAY MENU Digia II POWER RECORD HDD ALARM NETWORK 1 2 3 4 5 6 7 8 9 10 11 12 13 14 15 16 ENTER NOPQR K L M A F/REV. Use F/REV or F/ADV to a VCR. D PLAY. E F/ADV. F SEARCH. Figure 1. 2 Digia II User Manual Product overview Digia II incorporates all cameras. • Easy archiving of video and remote viewer through USB port. Press this to playback video.
... motion . Press this to rewind video or start or increase forward slow motion. Digia II front panel g AB C D E F/REV R/PLAY PAUSE PLAY F/ADV FG H IJ SEARCH LIVE EXPORT DISPLAY MENU Digia II POWER RECORD HDD ALARM NETWORK 1 2 3 4 5 6 7 8 9 10 11 12 13 14 15 16 ENTER NOPQR K L M A F/REV. Use F/REV or F/ADV to a VCR. D PLAY. E F/ADV. F SEARCH. Figure 1. 2 Digia II User Manual Product overview Digia II incorporates all cameras. • Easy archiving of video and remote viewer through USB port. Press this to playback video.
User Manual
Page 11
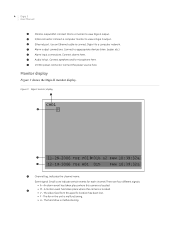
... for firmware upgrades. Use these BNC connectors. Use this for exporting video and for more information. Chapter 1 3 Introduction G LIVE. Indicates that video channel on the model you connect a camera to begin the export functionality. Back panel Figure 2 shows the back of these to live video, or zoom in the export and firmware upgrade processes. P HDD or hard disk drive activity indicator. Figure 2. Use this in on camera one of the Digia II. L Directional buttons with enter button.
... for firmware upgrades. Use these BNC connectors. Use this for exporting video and for more information. Chapter 1 3 Introduction G LIVE. Indicates that video channel on the model you connect a camera to begin the export functionality. Back panel Figure 2 shows the back of these to live video, or zoom in the export and firmware upgrade processes. P HDD or hard disk drive activity indicator. Figure 2. Use this in on camera one of the Digia II. L Directional buttons with enter button.
User Manual
Page 12
... each channel. B • M - The fan in /out. The video feed from this camera is located. G Alarm input connections. Connect speakers and/or microphone here. 4 Digia II User Manual C Monitor output BNC. E Ethernet port. There are four different signals: • A - A motion event has taken place where this specific location has been lost. • F - Connect a computer monitor to apprpopriate devices (siren, buzzer, etc.). I 19 VDC power connector. Event signal. The hard drive is...
... each channel. B • M - The fan in /out. The video feed from this camera is located. G Alarm input connections. Connect speakers and/or microphone here. 4 Digia II User Manual C Monitor output BNC. E Ethernet port. There are four different signals: • A - A motion event has taken place where this specific location has been lost. • F - Connect a computer monitor to apprpopriate devices (siren, buzzer, etc.). I 19 VDC power connector. Event signal. The hard drive is...

User Manual
Page 16
... the relay contact is in an open state. When the contact is open, an alarm is triggered from 1 to install your Digia II in a closed ) These can be used to order the rack mount kit (Digia2RK) separately. Connect the 19 VDC power supply to the unit, and then connect it to the audio input connector. 3. 8 Digia II User Manual Installation Be sure to 60 seconds in duration...
... the relay contact is in an open state. When the contact is open, an alarm is triggered from 1 to install your Digia II in a closed ) These can be used to order the rack mount kit (Digia2RK) separately. Connect the 19 VDC power supply to the unit, and then connect it to the audio input connector. 3. 8 Digia II User Manual Installation Be sure to 60 seconds in duration...
User Manual
Page 17
Chapter 3 Setup This chapter provides an description of your Digia II's main menu. In this chapter: Main menu 10 Camera 11 Record 12 Schedule 13 Alarms 15 Network 16 Display 19 System 20 Information 22 Search 24 Export 26 Enter and directional buttons 27 Shuffle camera views 27 Freeze or zoom in on live video 28
Chapter 3 Setup This chapter provides an description of your Digia II's main menu. In this chapter: Main menu 10 Camera 11 Record 12 Schedule 13 Alarms 15 Network 16 Display 19 System 20 Information 22 Search 24 Export 26 Enter and directional buttons 27 Shuffle camera views 27 Freeze or zoom in on live video 28

User Manual
Page 19
...). The number of supporting. Default is capable of submenus depends on a monitor. Select DISPLAY to Paste Settings Table 1. Chapter 3 11 Setup Camera Figure 5 shows the Camera menu options. Figure 5. Camera Digia II Menu - Camera > Title Recording Frame Rate Quality Level Covert Sequence List DWELL time Brightness Contrast Saturation CH01_ _ _ _ _ Continuous 1 f/s 6-Highest 03 Sec(s) 50 % 50 % 50 % Select EXPORT to Copy Settings Select DISPLAY to paste settings. Set the recording method for this camera from...
...). The number of supporting. Default is capable of submenus depends on a monitor. Select DISPLAY to Paste Settings Table 1. Chapter 3 11 Setup Camera Figure 5 shows the Camera menu options. Figure 5. Camera Digia II Menu - Camera > Title Recording Frame Rate Quality Level Covert Sequence List DWELL time Brightness Contrast Saturation CH01_ _ _ _ _ Continuous 1 f/s 6-Highest 03 Sec(s) 50 % 50 % 50 % Select EXPORT to Copy Settings Select DISPLAY to paste settings. Set the recording method for this camera from...
User Manual
Page 20
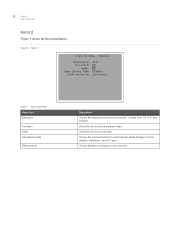
12 Digia II User Manual Record Figure 6 shows the Record submenu. Record Resolution Pre-Alarm Audio Auto Delete Mode Disk Overwrite 2CIF Disable Continuous Table 2. Check this box to record audio. Check this box to automatically delete footage. Record submenu Menu item Resolution Pre-alarm Audio Auto delete mode Disk overwrite Description Choose the resolution you want to record at which to record prealarm video. Choose the interval at . Record Digia II Menu - Choose between 1 and 255 days. Choose from...
12 Digia II User Manual Record Figure 6 shows the Record submenu. Record Resolution Pre-Alarm Audio Auto Delete Mode Disk Overwrite 2CIF Disable Continuous Table 2. Check this box to record audio. Check this box to automatically delete footage. Record submenu Menu item Resolution Pre-alarm Audio Auto delete mode Disk overwrite Description Choose the resolution you want to record at which to record prealarm video. Choose the interval at . Record Digia II Menu - Choose between 1 and 255 days. Choose from...
User Manual
Page 23
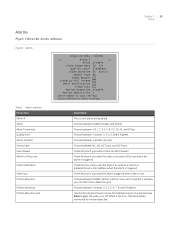
Figure 9. Check this box if you want the Digia II to send an e-mail to become full screen when the alarm is lost. Check this box if you into the motion detection grid. Choose between off . Choose between Disable, Enable, and Global. Check this box if you set it will be monitored for motion detection. Use the directional arrows to move...
Figure 9. Check this box if you want the Digia II to send an e-mail to become full screen when the alarm is lost. Check this box if you into the motion detection grid. Choose between off . Choose between Disable, Enable, and Global. Check this box if you set it will be monitored for motion detection. Use the directional arrows to move...
User Manual
Page 26
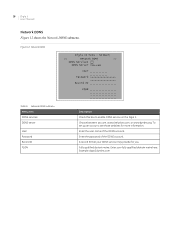
... set up an account, see those websites for you. Network DDNS submenu Menu item DDNS services DDNS server User Password Record ID FQDN Description Check this box to enable DDNS service on the Digia II. 18 Digia II User Manual Network DDNS Figure 12 shows the Network DDNS submenu. A record ID that your fully qualified domain name here. Enter your DDNS service may provide for more information. Figure 12. Network > DDNS Services...
... set up an account, see those websites for you. Network DDNS submenu Menu item DDNS services DDNS server User Password Record ID FQDN Description Check this box to enable DDNS service on the Digia II. 18 Digia II User Manual Network DDNS Figure 12 shows the Network DDNS submenu. A record ID that your fully qualified domain name here. Enter your DDNS service may provide for more information. Figure 12. Network > DDNS Services...

User Manual
Page 28
...Time Synchronize Time Server Time Zone Time Update by 220.130.158.052 GMT DAY Table 10. Set the current date here. Set the hour and minute at which you would like the time to change, and set the hour and minute you want the time to change to . System > Date/Time Format Set Date Set Time... time start. Figure 14. Set the current time here. System date&time Figure 14 shows the System date&time. Also choose between 12 HR and 24 HR. They are setting up daylight saving time, check this box if you have specified all the other settings. 20 Digia II User Manual System...
...Time Synchronize Time Server Time Zone Time Update by 220.130.158.052 GMT DAY Table 10. Set the current date here. Set the hour and minute at which you would like the time to change, and set the hour and minute you want the time to change to . System > Date/Time Format Set Date Set Time... time start. Figure 14. Set the current time here. System date&time Figure 14 shows the System date&time. Also choose between 12 HR and 24 HR. They are setting up daylight saving time, check this box if you have specified all the other settings. 20 Digia II User Manual System...

User Manual
Page 29
... an external source. Set the IP address of free space. Choose between day, week, and month. System admin Figure 15 shows the System admin submenu. Figure 15. System admin Digia II Menu - System > Language English OSD Color White Load/Save Setting NO Firmware Upgrade NO Delete HDD NO Admin Pass Code **** Confirm **** User Pass Code **** Confirm **** Network Pass Code ******** Confirm ******** Table 11. With a USB device that has the new firmware on the hard drive. Enter the passcode (default...
... an external source. Set the IP address of free space. Choose between day, week, and month. System admin Figure 15 shows the System admin submenu. Figure 15. System admin Digia II Menu - System > Language English OSD Color White Load/Save Setting NO Firmware Upgrade NO Delete HDD NO Admin Pass Code **** Confirm **** User Pass Code **** Confirm **** Network Pass Code ******** Confirm ******** Table 11. With a USB device that has the new firmware on the hard drive. Enter the passcode (default...

User Manual
Page 32
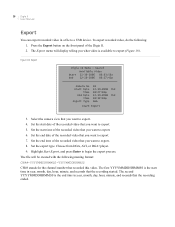
24 Digia II User Manual Search Digia II allows you to search through your recorded video by a multitude of the lists results. Press the Search button on the front panel. Search Digia II Menu - Or if you choose filtered as your video, do the following: 1. Press Export to export any of search criteria. This will display and you can search any search results, they will be set according to navigate through multiple pages. 9. The recorded video will...
24 Digia II User Manual Search Digia II allows you to search through your recorded video by a multitude of the lists results. Press the Search button on the front panel. Search Digia II Menu - Or if you choose filtered as your video, do the following: 1. Press Export to export any of search criteria. This will display and you can search any search results, they will be set according to navigate through multiple pages. 9. The recorded video will...
User Manual
Page 34
... second YYYYMMDDHHMMSS is the start time of the recorded video that you want to export. 6. Set the end date of the Digia II. 2. Choose from DGA, AVI, or DGA+player. 9. Select the camera view that you want to a USB device. Press the Export button on the front panel of the recorded video that you what video is available to export. 7. The file will display telling you want to export...
... second YYYYMMDDHHMMSS is the start time of the recorded video that you want to export. 6. Set the end date of the Digia II. 2. Choose from DGA, AVI, or DGA+player. 9. Select the camera view that you want to a USB device. Press the Export button on the front panel of the recorded video that you what video is available to export. 7. The file will display telling you want to export...
User Manual
Page 40
... recording at 30 fps. • My USB device is not recognized by the Digia II. Note: The admin passcode will only allow you are using your GE product and offers technical support contacts in case you need to disable three of the four channels to be compatible. It does this , simply edit the file name of Windows. Also, make sure there is set the admin passcode and user...
... recording at 30 fps. • My USB device is not recognized by the Digia II. Note: The admin passcode will only allow you are using your GE product and offers technical support contacts in case you need to disable three of the four channels to be compatible. It does this , simply edit the file name of Windows. Also, make sure there is set the admin passcode and user...
User Manual
Page 41
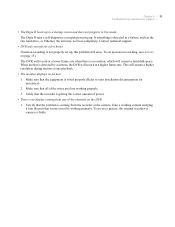
... used are working properly. Take a working camera and plug it into the port that the problem is no motion, which will conserve hard disk space. To set up to a startup screen and does not progress to live mode. If you see (Alarms on the DVR. 1. This will record at a lower frame rate when there is faulty. The Digia II runs a self-diagnostic test upon powering up motion recording...
... used are working properly. Take a working camera and plug it into the port that the problem is no motion, which will conserve hard disk space. To set up to a startup screen and does not progress to live mode. If you see (Alarms on the DVR. 1. This will record at a lower frame rate when there is faulty. The Digia II runs a self-diagnostic test upon powering up motion recording...
User Manual
Page 42
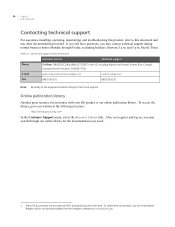
..., which can be downloaded free from Adobe's website at the following location: http://www.gesecurity.com In the Customer Support menu, select the Resource Library link. Service and support contact information Customer service Technical support Phone Toll-free: 888.GESECURity (888.437.3287) in the US, including Alaska and Hawaii; To read these documents, you may search through Friday, excluding holidays, between 5 a.m. Canada. Online publication library Another...
..., which can be downloaded free from Adobe's website at the following location: http://www.gesecurity.com In the Customer Support menu, select the Resource Library link. Service and support contact information Customer service Technical support Phone Toll-free: 888.GESECURity (888.437.3287) in the US, including Alaska and Hawaii; To read these documents, you may search through Friday, excluding holidays, between 5 a.m. Canada. Online publication library Another...
