Installation Instructions
Page 1
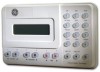
..., allowing the user to unit number 001. Built-in Table 2 between the touchpad and control panel. Touchpads automatically default to determine where an alarm, trouble, or open-sensor condition exists. Minimum current draw from the touchpad is 15 mA. B September 2000 Product Summary Installation Instructions Installation Guidelines The ITI® SuperBus 2000 2 x 20 LCD (liquid crystal display) Alphanumeric Touchpad gives you complete on-site system programming and operation control of a compatible security system (see Table 1. A two-line, 40-character display provides visual...
..., allowing the user to unit number 001. Built-in Table 2 between the touchpad and control panel. Touchpads automatically default to determine where an alarm, trouble, or open-sensor condition exists. Minimum current draw from the touchpad is 15 mA. B September 2000 Product Summary Installation Instructions Installation Guidelines The ITI® SuperBus 2000 2 x 20 LCD (liquid crystal display) Alphanumeric Touchpad gives you complete on-site system programming and operation control of a compatible security system (see Table 1. A two-line, 40-character display provides visual...
Installation Instructions
Page 2
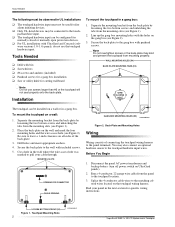
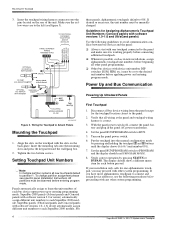
... the next section for specific wiring instructions. Separate the mounting bracket from the back-plate by loosening the two bottom screws and unlatching the tabs from the panel to the touchpad location. 3. Drill holes and insert appropriate anchors. 4. Disconnect the panel AC power transformer and backup battery (turn off power switch on a wall: 1. Secure the back-plate to the touchpad hardwire input. Place the back...
... the next section for specific wiring instructions. Separate the mounting bracket from the back-plate by loosening the two bottom screws and unlatching the tabs from the panel to the touchpad location. 3. Drill holes and insert appropriate anchors. 4. Disconnect the panel AC power transformer and backup battery (turn off power switch on a wall: 1. Secure the back-plate to the touchpad hardwire input. Place the back...
Installation Instructions
Page 3
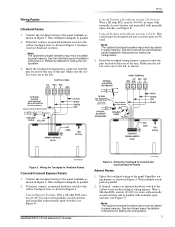
.... SuperBus® 2000 2 x 20 LCD Alphanumeric Touchpad 8557155B.DSF Figure 4. If desired, connect an optional hardwire switch to the left , as shown in Figure 4. Make sure the yellow wires are to the yellow wires on the rear of the unit. Wire multiple touchpads in parallel. 2. Wiring Wiring Panels UltraGard Panels 1. Make sure the yellow wires are to the panel terminals as shown in UltraGard systems). See the Concord/Concord Express panel Installation Instructions for setting the configuration. 3. Connect the touchpad wiring...
.... SuperBus® 2000 2 x 20 LCD Alphanumeric Touchpad 8557155B.DSF Figure 4. If desired, connect an optional hardwire switch to the left , as shown in Figure 4. Make sure the yellow wires are to the yellow wires on the rear of the unit. Wire multiple touchpads in parallel. 2. Wiring Wiring Panels UltraGard Panels 1. Make sure the yellow wires are to the panel terminals as shown in UltraGard systems). See the Concord/Concord Express panel Installation Instructions for setting the configuration. 3. Connect the touchpad wiring...
Installation Instructions
Page 4
...panel power switch off, connect the panel battery and plug in new installations, assign alphanumeric touchpad unit numbers before entering program mode. Set the panel RUN/PROGRAM switch to Advent Panels Mounting the Touchpad 1. Make sure the yellow wires are to each SuperBus 2000 module. SuperBus panels (UltraGard panels and Concord panels with software version 2.0 or newer) automatically assign different unit numbers to the left (see specific panel Installation Instructions. Disconnect all other system programming. 4 SuperBus® 2000 2 x 20 LCD Alphanumeric Touchpad Set...
...panel power switch off, connect the panel battery and plug in new installations, assign alphanumeric touchpad unit numbers before entering program mode. Set the panel RUN/PROGRAM switch to Advent Panels Mounting the Touchpad 1. Make sure the yellow wires are to each SuperBus 2000 module. SuperBus panels (UltraGard panels and Concord panels with software version 2.0 or newer) automatically assign different unit numbers to the left (see specific panel Installation Instructions. Disconnect all other system programming. 4 SuperBus® 2000 2 x 20 LCD Alphanumeric Touchpad Set...

Installation Instructions
Page 5
... number. 17. Existing (previously installed) touchpad(s) display PROGRAM MODE. Enter a unit number different from that all wiring between the panel and touchpad is correct. 2. Verify that all wiring between the panel and touchpad is correct. 2. SuperBus® 2000 2 x 20 LCD Alphanumeric Touchpad 5 After assigning unit numbers to all other new alphanumeric touchpads. Disconnect the panel AC power transformer, backup battery, and turn on other bus devices (ESM, HIM, etc.) and make note of all the new touchpads, connect each touchpad, verify correct operation...
... number. 17. Existing (previously installed) touchpad(s) display PROGRAM MODE. Enter a unit number different from that all wiring between the panel and touchpad is correct. 2. Verify that all wiring between the panel and touchpad is correct. 2. SuperBus® 2000 2 x 20 LCD Alphanumeric Touchpad 5 After assigning unit numbers to all other new alphanumeric touchpads. Disconnect the panel AC power transformer, backup battery, and turn on other bus devices (ESM, HIM, etc.) and make note of all the new touchpads, connect each touchpad, verify correct operation...
Installation Instructions
Page 6
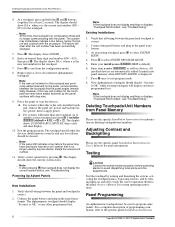
...Note If the touchpad does not display anything or displays, "Touchpad Not Enrolled," see "Troubleshooting." Existing Installations 1. At an existing touchpad, press 8 to add bus devices. Enter item number 48001 to select SYSTEM MENU. 4. Note If the touchpad does not display anything or displays, "Touchpad Not Enrolled," see "Troubleshooting." Testing CAUTION Contact the central monitoring station before activating alarms to program some panels. Test the touchpad by arming and disarming the system, activating the touchpad panics, bypassing sensors, and by turning lights on...
...Note If the touchpad does not display anything or displays, "Touchpad Not Enrolled," see "Troubleshooting." Existing Installations 1. At an existing touchpad, press 8 to add bus devices. Enter item number 48001 to select SYSTEM MENU. 4. Note If the touchpad does not display anything or displays, "Touchpad Not Enrolled," see "Troubleshooting." Testing CAUTION Contact the central monitoring station before activating alarms to program some panels. Test the touchpad by arming and disarming the system, activating the touchpad panics, bypassing sensors, and by turning lights on...
Installation Instructions
Page 7
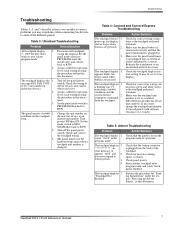
... by a switch. Table 3: UltraGard Troubleshooting Problem All touchpads display 1. 1 - Change the unit number on the touchpad loop. 2. 3. a flashing star [*], indicating a trouble condition, and the system doesn't 2. Perform the procedure for correct bus wiring connections (green and white wires) at the touchpad and panel terminals. The touchpad display 1. Make sure the touchpad unit number is not plugged into the back of the different panels. Check panel power. Turn power OFF then ON. The touchpad displays 1. Check the touchpad display contrast setting...
... by a switch. Table 3: UltraGard Troubleshooting Problem All touchpads display 1. 1 - Change the unit number on the touchpad loop. 2. 3. a flashing star [*], indicating a trouble condition, and the system doesn't 2. Perform the procedure for correct bus wiring connections (green and white wires) at the touchpad and panel terminals. The touchpad display 1. Make sure the touchpad unit number is not plugged into the back of the different panels. Check panel power. Turn power OFF then ON. The touchpad displays 1. Check the touchpad display contrast setting...
Installation Instructions
Page 8
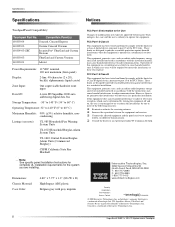
... Note See specific panel Installation Instructions for complete UL installation requirements for help. Compatible Panel(s) 60-803-04 Concord, Concord Express 60-809-03 Custom Concord Versions 60-809-03-SEC Security Pro® UltraGard and Custom Versions 60-803-03 UltraGard and Custom Versions 60-803-01 Advent Power Requirements: 12 VDC nominal 120 mA maximum (from panel) Display: 2-line, 40-character (2 x 20), backlit, alphanumeric liquid crystal Zone Input: One supervisable hardwire zone input Data I/O: 4-wire ITI SuperBus 2000 auto addressing digital data bus Storage...
... Note See specific panel Installation Instructions for complete UL installation requirements for help. Compatible Panel(s) 60-803-04 Concord, Concord Express 60-809-03 Custom Concord Versions 60-809-03-SEC Security Pro® UltraGard and Custom Versions 60-803-03 UltraGard and Custom Versions 60-803-01 Advent Power Requirements: 12 VDC nominal 120 mA maximum (from panel) Display: 2-line, 40-character (2 x 20), backlit, alphanumeric liquid crystal Zone Input: One supervisable hardwire zone input Data I/O: 4-wire ITI SuperBus 2000 auto addressing digital data bus Storage...


