

User Guide
Page 5
... Handset Layout 10 Base Layout 11 Installing the Phone 12 Installing the Handset Battery 12 Installing the Base/Photo Frame........ 13 Changing the Photo Frame 14 Wall Mounting 14 Programming the Photo Frame 15 Specifications 15 Frame Setup 15 Adding Photos 15 Picture-Caller ID Setup 17 Add New Picture... Caller ID Link......... 17 Edit Existing Picture Caller ID Link.. 19 Delete Existing Picture Caller ID Link 19 Delete Photos 19 Frame Preferences 20 Frame Display Mode 20 Slide Show Setup 21 Power Saver 21 Frame On/Off Time 22 Brightness 22 ...
... Handset Layout 10 Base Layout 11 Installing the Phone 12 Installing the Handset Battery 12 Installing the Base/Photo Frame........ 13 Changing the Photo Frame 14 Wall Mounting 14 Programming the Photo Frame 15 Specifications 15 Frame Setup 15 Adding Photos 15 Picture-Caller ID Setup 17 Add New Picture... Caller ID Link......... 17 Edit Existing Picture Caller ID Link.. 19 Delete Existing Picture Caller ID Link 19 Delete Photos 19 Frame Preferences 20 Frame Display Mode 20 Slide Show Setup 21 Power Saver 21 Frame On/Off Time 22 Brightness 22 ...
User Guide
Page 13
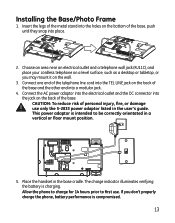
...is compromised. 13 Place the handset in the user's guide. If you may mount it on the back of the base. Allow the phone to charge for 14 hours prior to be correctly orientated in a vertical or floor mount position. 5. The charge indicator illuminates verifying the battery...you don't properly charge the phone, battery performance is intended to first use only the 5-2833 power adaptor listed in the base cradle. Installing the Base/Photo Frame 1. Choose an area near an electrical outlet and a telephone wall jack (RJ11C), and place your cordless telephone on the bottom of ...
...is compromised. 13 Place the handset in the user's guide. If you may mount it on the back of the base. Allow the phone to charge for 14 hours prior to be correctly orientated in a vertical or floor mount position. 5. The charge indicator illuminates verifying the battery...you don't properly charge the phone, battery performance is intended to first use only the 5-2833 power adaptor listed in the base cradle. Installing the Base/Photo Frame 1. Choose an area near an electrical outlet and a telephone wall jack (RJ11C), and place your cordless telephone on the bottom of ...
User Guide
Page 15
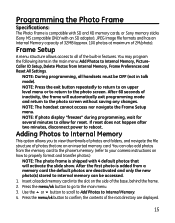
... may program the following items in the main menu: Add Photos to Internal Memory, PictureCaller ID Setup, Delete Photos from a memory card the default photos are deactivated and only the new photo(s) stored to internal memory can also add photos from the memory card to the phone's memory. (refer to your camera instructions on how to...
... may program the following items in the main menu: Add Photos to Internal Memory, PictureCaller ID Setup, Delete Photos from a memory card the default photos are deactivated and only the new photo(s) stored to internal memory can also add photos from the memory card to the phone's memory. (refer to your camera instructions on how to...
User Guide
Page 17
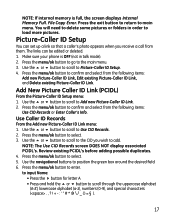
File Copy Error. Press the exit button to return to the main menu. 3. Make sure your phone is full, the screen displays Internal Memory Full. Press the menu/ok button to go to main menu. Use the 5 or 6 button to scroll to ...; Press the 4 button for letter A • Press and hold the 5 or 6 button to Use CID Records. 2. The links can set up a link so that a caller's photo appears when you wish to position the green box around the desired field. 6. Use the 5 or 6 button to scroll to scroll through the uppercase alphabet...
File Copy Error. Press the exit button to return to the main menu. 3. Make sure your phone is full, the screen displays Internal Memory Full. Press the menu/ok button to go to main menu. Use the 5 or 6 button to scroll to ...; Press the 4 button for letter A • Press and hold the 5 or 6 button to Use CID Records. 2. The links can set up a link so that a caller's photo appears when you wish to position the green box around the desired field. 6. Use the 5 or 6 button to scroll to scroll through the uppercase alphabet...
User Guide
Page 18
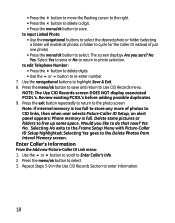
...; Use the navigational buttons to select the desired photo or folder (selecting a folder will enable all photos in the Use CID Records Section to CID links, then when user selects Picture-Caller ID Setup, an alert panel appears: Phone memory is full. Delete some pictures or folders to save. Repeat Steps ...5-9 in folder to cycle for the Caller ID instead of photos to enter ...
...; Use the navigational buttons to select the desired photo or folder (selecting a folder will enable all photos in the Use CID Records Section to CID links, then when user selects Picture-Caller ID Setup, an alert panel appears: Phone memory is full. Delete some pictures or folders to save. Repeat Steps ...5-9 in folder to cycle for the Caller ID instead of photos to enter ...
User Guide
Page 19
... Press the menu/ok button to select. Press the menu/ok button to confirm. 3. Make any photos or folders that you no longer need. From the Picture-Caller ID Setup menu: 1. Make sure your phone is OFF (not in internal memory. Press the menu/ok button to Save & Exit. 6. PCID... will also be deleted. Use the navigational buttons to scroll to confirm. No Yes. 5. Use the 5 or 6 button to photo screen. The photos and folders are linked to open...
... Press the menu/ok button to select. Press the menu/ok button to confirm. 3. Make any photos or folders that you no longer need. From the Picture-Caller ID Setup menu: 1. Make sure your phone is OFF (not in internal memory. Press the menu/ok button to Save & Exit. 6. PCID... will also be deleted. Use the navigational buttons to scroll to confirm. No Yes. 5. Use the 5 or 6 button to photo screen. The photos and folders are linked to open...
User Guide
Page 20
...the main menu. 3. Frame Preferences 1. Press the menu/ok button to go to save. Press the menu/ok button to delete a photo or folder from the phone's internal memory, it does NOT delete the associated name and number. NOTE: When a picture or folder is deleted, it will unlink ...all PCIDL's associated with Add Photos to display a photo slide show and/or clock in talk mode). 2. Use the 5 or 6 button to scroll to confirm. 3. Make sure your phone is Slide Show w/Clock. 4. The default setting is OFF (not in the picture...
...the main menu. 3. Frame Preferences 1. Press the menu/ok button to go to save. Press the menu/ok button to delete a photo or folder from the phone's internal memory, it does NOT delete the associated name and number. NOTE: When a picture or folder is deleted, it will unlink ...all PCIDL's associated with Add Photos to display a photo slide show and/or clock in talk mode). 2. Use the 5 or 6 button to scroll to confirm. 3. Make sure your phone is Slide Show w/Clock. 4. The default setting is OFF (not in the picture...
User Guide
Page 23
...to give you access to all frame preferences to enter. No Yes. 5. NOTE: If no key is OFF (not in features. Make sure your phone is out of the built-in talk mode). 2. These items are not programmable, and Unavailable displays as you may press the mute/clear button at.... 6. You may program the following items: Ring Volume, Tones, Auto Talk, Handset Name and Language. Press cid/vol (3or4) button to scroll to the photo screen. NOTE: If the handset is not registered, or is OFF (not in main menu: Intercom, Setup HS, Setup BS, Date/Time, and Registration. ...
...to give you access to all frame preferences to enter. No Yes. 5. NOTE: If no key is OFF (not in features. Make sure your phone is out of the built-in talk mode). 2. These items are not programmable, and Unavailable displays as you may press the mute/clear button at.... 6. You may program the following items: Ring Volume, Tones, Auto Talk, Handset Name and Language. Press cid/vol (3or4) button to scroll to the photo screen. NOTE: If the handset is not registered, or is OFF (not in main menu: Intercom, Setup HS, Setup BS, Date/Time, and Registration. ...
User Guide
Page 48
... Waiting Caller ID 34 Caller ID (CID) 33 Caller ID Solutions 43 Causes of Poor Reception 44 Chain Dialing from Phone Book 39 Changing the Battery 40 Changing the Photo Frame 14 Charge Indicator on Base 28 D Date/Time 26 Delete Existing Picture Caller ID Link (PCIDL) 19 Delete... Photos 19 Deleting a CID Record 36 Deleting a Phone Book Record 38 Deleting a Redial Record 30 Deleting All CID Records 37 Deleting All Redial Records 31 De-Registration 28 Dial Mode 26 ...
... Waiting Caller ID 34 Caller ID (CID) 33 Caller ID Solutions 43 Causes of Poor Reception 44 Chain Dialing from Phone Book 39 Changing the Battery 40 Changing the Photo Frame 14 Charge Indicator on Base 28 D Date/Time 26 Delete Existing Picture Caller ID Link (PCIDL) 19 Delete... Photos 19 Deleting a CID Record 36 Deleting a Phone Book Record 38 Deleting a Redial Record 30 Deleting All CID Records 37 Deleting All Redial Records 31 De-Registration 28 Dial Mode 26 ...
User Guide
Page 49
... Guidelines 9 Information for DECT Product 4 Inserting a Pause in the Dialing Sequence 29 Installation 9 Installing the Base/Photo Frame 13 Installing the Handset Battery 12 Installing the Phone 12 Intercom Operation 32 Interference Information 3 Introduction 8 l Language 22. 24 Licensing 4 Limited Warranty 46 M Making...Call 28 Mute 32 P Page There is no page on base? 32 Parts Checklist 8 Phone Book 37 Picture-Caller ID Setup 17 Power Saver 21 Programming the Photo Frame 15 Programming the Telephone 23 Q Quick Start 7 R Receiver Volume Control 32 Receiving ...
... Guidelines 9 Information for DECT Product 4 Inserting a Pause in the Dialing Sequence 29 Installation 9 Installing the Base/Photo Frame 13 Installing the Handset Battery 12 Installing the Phone 12 Intercom Operation 32 Interference Information 3 Introduction 8 l Language 22. 24 Licensing 4 Limited Warranty 46 M Making...Call 28 Mute 32 P Page There is no page on base? 32 Parts Checklist 8 Phone Book 37 Picture-Caller ID Setup 17 Power Saver 21 Programming the Photo Frame 15 Programming the Telephone 23 Q Quick Start 7 R Receiver Volume Control 32 Receiving ...


