
MUW7600001 - Gateway Notebook Reference Guide
Page 3
... About This Reference 1 About this guide 2 Accessing your online User Guide 2 Gateway contact information 2 Contacting Gateway Customer Care 2 Gateway model and serial number 3 Microsoft Certificate of Authenticity 3 For more information 3 Chapter 2: Checking Out Your Notebook . . . 5 Front 6 Left 7 Right 9 Bottom 10 Keyboard area 11... 14 Reducing eye strain 14 Setting up your computer desk and chair . . . . . 15 Sitting at your notebook 15 Avoiding discomfort and injury from repetitive strain 16 Connecting the AC adapter 16 Protecting from power source problems 18 Connecting ...
... About This Reference 1 About this guide 2 Accessing your online User Guide 2 Gateway contact information 2 Contacting Gateway Customer Care 2 Gateway model and serial number 3 Microsoft Certificate of Authenticity 3 For more information 3 Chapter 2: Checking Out Your Notebook . . . 5 Front 6 Left 7 Right 9 Bottom 10 Keyboard area 11... 14 Reducing eye strain 14 Setting up your computer desk and chair . . . . . 15 Sitting at your notebook 15 Avoiding discomfort and injury from repetitive strain 16 Connecting the AC adapter 16 Protecting from power source problems 18 Connecting ...

MUW7600001 - Gateway Notebook Reference Guide
Page 5
...gateway.com Changing notebook power settings 61 Changing the power plan 61 Changing advanced settings 63 Chapter 6: Traveling with Your Notebook . 65 Packing your notebook 66 Traveling by air 66 Dial-up modem 66 Radio frequency wireless connections 67 Files 67 Security 68 Power 69 Additional tips 70 Chapter 7: Maintaining Your Notebook... . . . 71 Caring for your notebook 72 Cleaning your notebook 72 Cleaning the exterior 73 Cleaning the keyboard 73 Cleaning the notebook screen 74 Maintaining the battery 74 Storing ...
...gateway.com Changing notebook power settings 61 Changing the power plan 61 Changing advanced settings 63 Chapter 6: Traveling with Your Notebook . 65 Packing your notebook 66 Traveling by air 66 Dial-up modem 66 Radio frequency wireless connections 67 Files 67 Security 68 Power 69 Additional tips 70 Chapter 7: Maintaining Your Notebook... . . . 71 Caring for your notebook 72 Cleaning your notebook 72 Cleaning the exterior 73 Cleaning the keyboard 73 Cleaning the notebook screen 74 Maintaining the battery 74 Storing ...

MUW7600001 - Gateway Notebook Reference Guide
Page 8
...topics: • Help and technical support • Using and customizing Windows and other notebook information, see your online User Guide: • Click (Start), All Programs, then click Gateway Documentation. Accessing your online User Guide In addition to your hard drive. Your User Guide...to-read manual that are specific to this guide This guide includes information and maintenance instructions that includes information on your model of Gateway notebook. For all other software • Using the Internet • Protecting your files • Playing and recording media • ...
...topics: • Help and technical support • Using and customizing Windows and other notebook information, see your online User Guide: • Click (Start), All Programs, then click Gateway Documentation. Accessing your online User Guide In addition to your hard drive. Your User Guide...to-read manual that are specific to this guide This guide includes information and maintenance instructions that includes information on your model of Gateway notebook. For all other software • Using the Internet • Protecting your files • Playing and recording media • ...

MUW7600001 - Gateway Notebook Reference Guide
Page 9
... more information For more information about your notebook, visit Gateway's Support page at www.gateway.com or the Web address shown on your notebook model and its features. www.gateway.com Gateway model and serial number A label on the bottom of your notebook contains information that identifies your notebook's label. Gateway Customer Care will need this section is for...
... more information For more information about your notebook, visit Gateway's Support page at www.gateway.com or the Web address shown on your notebook model and its features. www.gateway.com Gateway model and serial number A label on the bottom of your notebook contains information that identifies your notebook's label. Gateway Customer Care will need this section is for...

MUW7600001 - Gateway Notebook Reference Guide
Page 12
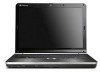
... Stick Pro®, Mini Secure Digital®, MultiMediaCard™, RS-MultiMediaCard™, Secure Digital™, and xD-Picture Card™cards. CHAPTER 2: Checking Out Your Notebook Front Memory card reader Component Icon Memory card reader Description Insert a memory card from a digital camera, MP3 player, PDA, or cellular telephone into the memory...
... Stick Pro®, Mini Secure Digital®, MultiMediaCard™, RS-MultiMediaCard™, Secure Digital™, and xD-Picture Card™cards. CHAPTER 2: Checking Out Your Notebook Front Memory card reader Component Icon Memory card reader Description Insert a memory card from a digital camera, MP3 player, PDA, or cellular telephone into the memory...

MUW7600001 - Gateway Notebook Reference Guide
Page 13
Left www.gateway.com Power button Ventilation slots Ethernet jack HDMI out jack (optional) Monitor port USB port Headphone jack Microphone jack Component Icon Power button Ethernet jack ... button mode, see "Changing advanced settings" on a bed, sofa, rug, or other end of the cable into these slots are blocked, your notebook so air vents are blocked, the notebook may overheat resulting in unexpected shutdown or permanent damage to a broadband modem or network" on or off. Warning: Do not work with...
Left www.gateway.com Power button Ventilation slots Ethernet jack HDMI out jack (optional) Monitor port USB port Headphone jack Microphone jack Component Icon Power button Ethernet jack ... button mode, see "Changing advanced settings" on a bed, sofa, rug, or other end of the cable into these slots are blocked, your notebook so air vents are blocked, the notebook may overheat resulting in unexpected shutdown or permanent damage to a broadband modem or network" on or off. Warning: Do not work with...

MUW7600001 - Gateway Notebook Reference Guide
Page 14
CHAPTER 2: Checking Out Your Notebook Component Icon Monitor port USB port Microphone jack Headphone jack with SPDIF support Description Plug an analog VGA monitor or projector into this jack. Plug ...
CHAPTER 2: Checking Out Your Notebook Component Icon Monitor port USB port Microphone jack Headphone jack with SPDIF support Description Plug an analog VGA monitor or projector into this jack. Plug ...

MUW7600001 - Gateway Notebook Reference Guide
Page 15
Right www.gateway.com Component DVD drive Express Card slot USB ports Power connector Kensington™ lock slot DVD drive Express Card Kensington slot USB ports Power lock ... into this slot. 9 For more information, see "Adding and removing an Express Card" on page 42. Secure your notebook to an object by connecting a Kensington cable lock to those listed in your notebook, examine the drive tray's plastic cover and compare the logo to this port. For more information, see "Using the...
Right www.gateway.com Component DVD drive Express Card slot USB ports Power connector Kensington™ lock slot DVD drive Express Card Kensington slot USB ports Power lock ... into this slot. 9 For more information, see "Adding and removing an Express Card" on page 42. Secure your notebook to an object by connecting a Kensington cable lock to those listed in your notebook, examine the drive tray's plastic cover and compare the logo to this port. For more information, see "Using the...

MUW7600001 - Gateway Notebook Reference Guide
Page 16
CHAPTER 2: Checking Out Your Notebook Bottom Battery Battery latch Hard drive bay Battery lock Memory bay Component Icon Battery Battery latch Hard drive bay Memory bay Battery lock Description Provides power when the notebook is located in this bay. Slide to unlock the battery. Memory modules are located in this bay. For more information, see "Changing batteries" on page 55. 10 For more information, see "Changing batteries" on page 55. The hard drive is not plugged into AC power. Slide to release the battery.
CHAPTER 2: Checking Out Your Notebook Bottom Battery Battery latch Hard drive bay Battery lock Memory bay Component Icon Battery Battery latch Hard drive bay Memory bay Battery lock Description Provides power when the notebook is located in this bay. Slide to unlock the battery. Memory modules are located in this bay. For more information, see "Changing batteries" on page 55. 10 For more information, see "Changing batteries" on page 55. The hard drive is not plugged into AC power. Slide to release the battery.

MUW7600001 - Gateway Notebook Reference Guide
Page 18
...: The optional webcam is turned on. 12 Microphone (optional) Use to let others see "Using the optional webcam" on page 32. CHAPTER 2: Checking Out Your Notebook LCD panel Webcam (optional) Webcam status indicator (optional) Microphone(optional)s Component Icon Description Webcam (optional) Use to talk through when making VoIP calls. For more...
...: The optional webcam is turned on. 12 Microphone (optional) Use to let others see "Using the optional webcam" on page 32. CHAPTER 2: Checking Out Your Notebook LCD panel Webcam (optional) Webcam status indicator (optional) Microphone(optional)s Component Icon Description Webcam (optional) Use to talk through when making VoIP calls. For more...

MUW7600001 - Gateway Notebook Reference Guide
Page 19
CHAPTER3 Setting Up and Getting Started • Working safely and comfortably • Connecting the AC adapter • Connecting to a broadband modem or network • Connecting the optional dial-up modem • Starting your notebook • Turning off your notebook • Restarting (rebooting) your notebook • Using the keyboard • Using the EZ Pad touchpad • Using the optional multimedia panel • Using the optional webcam • Adjusting the brightness • Adjusting the volume 13
CHAPTER3 Setting Up and Getting Started • Working safely and comfortably • Connecting the AC adapter • Connecting to a broadband modem or network • Connecting the optional dial-up modem • Starting your notebook • Turning off your notebook • Restarting (rebooting) your notebook • Using the keyboard • Using the EZ Pad touchpad • Using the optional multimedia panel • Using the optional webcam • Adjusting the brightness • Adjusting the volume 13

MUW7600001 - Gateway Notebook Reference Guide
Page 20
... Soft surfaces can avoid glare on any soft, conforming surface, such as your lap, a blanket, carpet, or a sofa. Warning Do not use your notebook in your work area and avoiding discomfort and strain: • Keep hands and arms parallel to the floor. • Adjust the screen so it is...perpendicular to your line of sight. • Place your feet flat on the floor or on a footrest. • Although notebooks are sometimes called "laptops," do not use the notebook on your screen and light shining directly into your eyes. • Position the computer desk and screen so you keep your...
... Soft surfaces can avoid glare on any soft, conforming surface, such as your lap, a blanket, carpet, or a sofa. Warning Do not use your notebook in your work area and avoiding discomfort and strain: • Keep hands and arms parallel to the floor. • Adjust the screen so it is...perpendicular to your line of sight. • Place your feet flat on the floor or on a footrest. • Although notebooks are sometimes called "laptops," do not use the notebook on your screen and light shining directly into your eyes. • Position the computer desk and screen so you keep your...

MUW7600001 - Gateway Notebook Reference Guide
Page 21
... position lets your shoulders relax while you use an external keyboard, raise the notebook so the top of its screen is no higher than eye level. You ...the room, and try to focus on distant objects. • Where feasible, keep your head vertical while looking at your notebook • Avoid bending, arching, or angling your wrists. If you type. • Adjust the chair height, adjust ...at the screen. Make sure that the desk is at or slightly below the level of your elbow. www.gateway.com • Avoid focusing your eyes on your screen for your computer desk. • Adjust the height ...
... position lets your shoulders relax while you use an external keyboard, raise the notebook so the top of its screen is no higher than eye level. You ...the room, and try to focus on distant objects. • Where feasible, keep your head vertical while looking at your notebook • Avoid bending, arching, or angling your wrists. If you type. • Adjust the chair height, adjust ...at the screen. Make sure that the desk is at or slightly below the level of your elbow. www.gateway.com • Avoid focusing your eyes on your screen for your computer desk. • Adjust the height ...

MUW7600001 - Gateway Notebook Reference Guide
Page 22
...the AC adapter right away to be damaged. Caution Make sure that you use your notebook's battery. Allow three hours for three hours, the battery may need to fully charge the battery. Contact Gateway about returning defective AC adapters. Replace the power cord if it becomes damaged. For...strain • Vary your activities to avoid excessive repetition. • Take breaks to change your position, stretch your muscles, and relieve your notebook may be much shorter than you partially charged. The replacement cord must be of tasks. Power subsystem 19V DC, 65/90W AC adapter Temperature...
...the AC adapter right away to be damaged. Caution Make sure that you use your notebook's battery. Allow three hours for three hours, the battery may need to fully charge the battery. Contact Gateway about returning defective AC adapters. Replace the power cord if it becomes damaged. For...strain • Vary your activities to avoid excessive repetition. • Take breaks to change your position, stretch your muscles, and relieve your notebook may be much shorter than you partially charged. The replacement cord must be of tasks. Power subsystem 19V DC, 65/90W AC adapter Temperature...

MUW7600001 - Gateway Notebook Reference Guide
Page 23
...indicator does not turn on, complete the following steps until it turns on: • Unplug the adapter from your notebook's power connector. 3 Plug the power cord into a different wall outlet. 17 www.gateway.com To connect the AC adapter: 1 Connect the power cord to the AC adapter. 2 Connect the AC adapter... to your notebook, then plug it back in. • Press FN+F1 to toggle the status lights on page 6 for...
...indicator does not turn on, complete the following steps until it turns on: • Unplug the adapter from your notebook's power connector. 3 Plug the power cord into a different wall outlet. 17 www.gateway.com To connect the AC adapter: 1 Connect the power cord to the AC adapter. 2 Connect the AC adapter... to your notebook, then plug it back in. • Press FN+F1 to toggle the status lights on page 6 for...

MUW7600001 - Gateway Notebook Reference Guide
Page 24
...power cord and the modem connection. CHAPTER 3: Setting Up and Getting Started 4 When you finish using your notebook for the first time, turn blue after three hours, contact Gateway Customer Care at the location shown on page 2. If you can increase to a broadband modem or network... far above normal levels and cause data loss or system damage. Warning High voltages can enter your notebook can use a surge protector that has an antenna/cable TV jack. Protecting from reaching your notebook. For more information, see "Gateway contact information" on the Customer Care label.
...power cord and the modem connection. CHAPTER 3: Setting Up and Getting Started 4 When you finish using your notebook for the first time, turn blue after three hours, contact Gateway Customer Care at the location shown on page 2. If you can increase to a broadband modem or network... far above normal levels and cause data loss or system damage. Warning High voltages can enter your notebook can use a surge protector that has an antenna/cable TV jack. Protecting from reaching your notebook. For more information, see "Gateway contact information" on the Customer Care label.

MUW7600001 - Gateway Notebook Reference Guide
Page 25
... use only No. 26 AWG or larger (for example, No. 24 AWG) UL-listed or CSA-certified telecommunication line cord for your notebook. Connecting the optional dial-up modem Your notebook may have a built-in 56K modem that the plug locks into the jack. 2 Insert the other end of the network cable... into the network jack on your dialup modem connection. 19 www.gateway.com To connect to a cable or DSL modem or to a wired Ethernet...
... use only No. 26 AWG or larger (for example, No. 24 AWG) UL-listed or CSA-certified telecommunication line cord for your notebook. Connecting the optional dial-up modem Your notebook may have a built-in 56K modem that the plug locks into the jack. 2 Insert the other end of the network cable... into the network jack on your dialup modem connection. 19 www.gateway.com To connect to a cable or DSL modem or to a wired Ethernet...

MUW7600001 - Gateway Notebook Reference Guide
Page 26
CHAPTER 3: Setting Up and Getting Started To connect the optional modem: 1 Insert one end of the modem cable into the modem jack on your notebook. 2 Insert the other end of the modem cable into a telephone wall jack. Important The modem will not work with digital or PBX telephone lines. 20
CHAPTER 3: Setting Up and Getting Started To connect the optional modem: 1 Insert one end of the modem cable into the modem jack on your notebook. 2 Insert the other end of the modem cable into a telephone wall jack. Important The modem will not work with digital or PBX telephone lines. 20

MUW7600001 - Gateway Notebook Reference Guide
Page 27
www.gateway.com Starting your notebook Warning Do not work with each device for the first time, follow the on-screen instructions to select the language and time zone and to harm your skin. Do not use the notebook on a bed, sofa, rug, or other peripheral device" on page 47. ... more information about changing the power button mode, see "Installing a printer or other similar surface. Tip See the documentation that came with the notebook resting on any peripheral devices, such as printers, scanners, and speakers. If the air vents are not obstructed. To start your lap. Tip...
www.gateway.com Starting your notebook Warning Do not work with each device for the first time, follow the on-screen instructions to select the language and time zone and to harm your skin. Do not use the notebook on a bed, sofa, rug, or other peripheral device" on page 47. ... more information about changing the power button mode, see "Installing a printer or other similar surface. Tip See the documentation that came with the notebook resting on any peripheral devices, such as printers, scanners, and speakers. If the air vents are not obstructed. To start your lap. Tip...

MUW7600001 - Gateway Notebook Reference Guide
Page 28
... 60. CHAPTER 3: Setting Up and Getting Started 5 To open the main menu, click (Start). While in your online User Guide. If your notebook after it does not turn your desktop layout so the next time you left them . 22 Although it has been turned completely off. Sleep mode... that were running just as you close the LCD panel without turning off . Waking up . Turning off or slows down your notebook, it turns off your notebook Putting your notebook into Sleep mode is in Sleep mode, press the power button to save power. Hibernate mode is turned completely off your...
... 60. CHAPTER 3: Setting Up and Getting Started 5 To open the main menu, click (Start). While in your online User Guide. If your notebook after it does not turn your desktop layout so the next time you left them . 22 Although it has been turned completely off. Sleep mode... that were running just as you close the LCD panel without turning off . Waking up . Turning off or slows down your notebook, it turns off your notebook Putting your notebook into Sleep mode is in Sleep mode, press the power button to save power. Hibernate mode is turned completely off your...


