
8512680 - Component Replacement Manual
Page 1
... and legal information. © 2007 Gateway, Inc. Technical Support See the label on : • Unplug the adapter from your notebook. Replacing the AC Adapter Replacing the AC Adapter To connect the AC adapter: 1 Connect the power cord to disassemble the AC adapter. Important If the battery charge indicator...If the battery charge indicator does not turn blue after three hours, contact Gateway Customer Care at the Web address or telephone number shown on the label on . Contact Gateway about returning defective AC adapters. in . • Press FN+F1 to toggle the status lights on...
... and legal information. © 2007 Gateway, Inc. Technical Support See the label on : • Unplug the adapter from your notebook. Replacing the AC Adapter Replacing the AC Adapter To connect the AC adapter: 1 Connect the power cord to disassemble the AC adapter. Important If the battery charge indicator...If the battery charge indicator does not turn blue after three hours, contact Gateway Customer Care at the Web address or telephone number shown on the label on . Contact Gateway about returning defective AC adapters. in . • Press FN+F1 to toggle the status lights on...
8512680 - Component Replacement Manual
Page 3
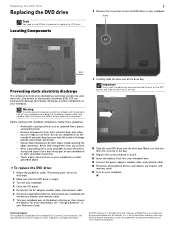
...electrostatic discharge-sensitive components in Step 8. 12 Insert the battery, then turn off your notebook. 4 Close the LCD panel. 5 Disconnect the AC adapter, modem cable, and network cable. 6 Disconnect all peripheral devices and replace any Express and memory cards. 15 Turn on your notebook. Warning To avoid... Technical Support See the label on the bottom of the drive bay. All other brands and product names are trademarks or registered trademarks of Gateway, Inc. Locating Components 1 8 Remove the screw that secures the DVD drive to push on the DVD bracket and slide the drive out...
...electrostatic discharge-sensitive components in Step 8. 12 Insert the battery, then turn off your notebook. 4 Close the LCD panel. 5 Disconnect the AC adapter, modem cable, and network cable. 6 Disconnect all peripheral devices and replace any Express and memory cards. 15 Turn on your notebook. Warning To avoid... Technical Support See the label on the bottom of the drive bay. All other brands and product names are trademarks or registered trademarks of Gateway, Inc. Locating Components 1 8 Remove the screw that secures the DVD drive to push on the DVD bracket and slide the drive out...
8512680 - Component Replacement Manual
Page 4
...-causing surfaces such as electrostatic discharge (ESD). See your notebook and unplug the AC adapter, modem cable, and network cable and remove the battery before replacing a component. Contact Gateway Customer Care at most electronics stores) and attach it . Important If you cannot create... it to dangerous electrical voltages and moving parts, turn off your notebook. 5 Close the LCD panel. 6 Disconnect the AC adapter, modem cable, and network cable. 7 Disconnect all peripheral devices connected to use them. ESD can permanently damage electrostatic discharge-sensitive...
...-causing surfaces such as electrostatic discharge (ESD). See your notebook and unplug the AC adapter, modem cable, and network cable and remove the battery before replacing a component. Contact Gateway Customer Care at most electronics stores) and attach it . Important If you cannot create... it to dangerous electrical voltages and moving parts, turn off your notebook. 5 Close the LCD panel. 6 Disconnect the AC adapter, modem cable, and network cable. 7 Disconnect all peripheral devices connected to use them. ESD can permanently damage electrostatic discharge-sensitive...
8512680 - Component Replacement Manual
Page 5
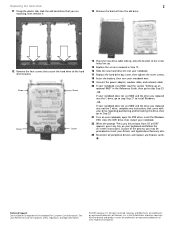
...17 Replace the hard drive bay cover, then tighten the cover screws. 18 Insert the battery, then turn your notebook over. 19 Connect the power adapter, modem cable, and network cable 20 If your notebook uses RAID, read the section "Setting up an optional RAID" in the United States and ...other brands and product names are trademarks or registered trademarks of Gateway, Inc. in the Reference Guide, then go to step Step 21 to install Windows. -OR- All rights reserved. See your Drivers and Applications ...
...17 Replace the hard drive bay cover, then tighten the cover screws. 18 Insert the battery, then turn your notebook over. 19 Connect the power adapter, modem cable, and network cable 20 If your notebook uses RAID, read the section "Setting up an optional RAID" in the United States and ...other brands and product names are trademarks or registered trademarks of Gateway, Inc. in the Reference Guide, then go to step Step 21 to install Windows. -OR- All rights reserved. See your Drivers and Applications ...
8512680 - Component Replacement Manual
Page 6
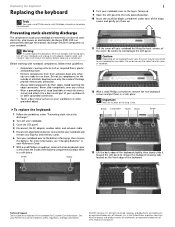
...on the outside of the bags provide electrostatic protection. • Always hold components by their respective companies. Important Note the location of Gateway, Inc. To replace the keyboard: 1 Follow the guidelines under each of the hinge covers and gently pry them in a safe ... then slowly slide it to dangerous electrical voltages and moving parts, turn off your notebook. 3 Close the LCD panel. 4 Disconnect the AC adapter, modem cable, and network cable. 5 Disconnect all peripheral devices connected to your notebook and remove any surface. • Wear a grounding wrist...
...on the outside of the bags provide electrostatic protection. • Always hold components by their respective companies. Important Note the location of Gateway, Inc. To replace the keyboard: 1 Follow the guidelines under each of the hinge covers and gently pry them in a safe ... then slowly slide it to dangerous electrical voltages and moving parts, turn off your notebook. 3 Close the LCD panel. 4 Disconnect the AC adapter, modem cable, and network cable. 5 Disconnect all peripheral devices connected to your notebook and remove any surface. • Wear a grounding wrist...
8512680 - Component Replacement Manual
Page 7
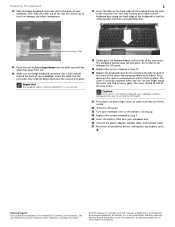
...Step 12. 20 Replace the keyboard cover by first inserting the tabs located on the front of Gateway, Inc. The cover is correctly mounted when you can run you try to close the LCD panel...not damage the LCD panel. 19 Replace the screws removed in place. Press down on the back. Gateway and eMachines are firmly seated. 22 Close the LCD panel. 23 Turn your notebook over so the ...it clicks in Step 7. 25 Insert the battery, then turn your notebook over. 26 Connect the power adapter, modem cable, and network cable 27 Reconnect all peripheral devices and replace any other components. 2 17 Insert...
...Step 12. 20 Replace the keyboard cover by first inserting the tabs located on the front of Gateway, Inc. The cover is correctly mounted when you can run you try to close the LCD panel...not damage the LCD panel. 19 Replace the screws removed in place. Press down on the back. Gateway and eMachines are firmly seated. 22 Close the LCD panel. 23 Turn your notebook over so the ...it clicks in Step 7. 25 Insert the battery, then turn your notebook over. 26 Connect the power adapter, modem cable, and network cable 27 Reconnect all peripheral devices and replace any other components. 2 17 Insert...

8512680 - Component Replacement Manual
Page 8
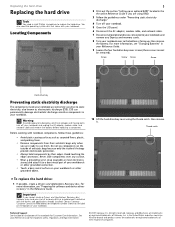
...Warning To avoid exposure to dangerous electrical voltages and moving parts, turn off your notebook. 3 Close the LCD panel. 4 Disconnect the AC adapter, modem cable, and network cable. 5 Disconnect all peripheral devices connected to static electricity, also known as carpeted floors, plastic, and packing... • Touch a bare metal surface on the bottom of the notebook for important safety, regulatory, and legal information. © 2007 Gateway, Inc. Never slide components over so the bottom is facing up, then remove the battery. Locating Components 1 7 Loosen the five memory ...
...Warning To avoid exposure to dangerous electrical voltages and moving parts, turn off your notebook. 3 Close the LCD panel. 4 Disconnect the AC adapter, modem cable, and network cable. 5 Disconnect all peripheral devices connected to static electricity, also known as carpeted floors, plastic, and packing... • Touch a bare metal surface on the bottom of the notebook for important safety, regulatory, and legal information. © 2007 Gateway, Inc. Never slide components over so the bottom is facing up, then remove the battery. Locating Components 1 7 Loosen the five memory ...

8512680 - Component Replacement Manual
Page 9
...the label on the bottom of the notebook for important safety, regulatory, and legal information. © 2007 Gateway, Inc. See your notebook over. 14 Connect the power adapter, modem cable, and network cable 15 Reconnect all peripheral devices and replace any Express cards. All rights ...reserved. All other countries. Gateway and eMachines are trademarks or registered trademarks of their respective companies. This module...
...the label on the bottom of the notebook for important safety, regulatory, and legal information. © 2007 Gateway, Inc. See your notebook over. 14 Connect the power adapter, modem cable, and network cable 15 Reconnect all peripheral devices and replace any Express cards. All rights ...reserved. All other countries. Gateway and eMachines are trademarks or registered trademarks of their respective companies. This module...
8512680 - Component Replacement Manual
Page 10
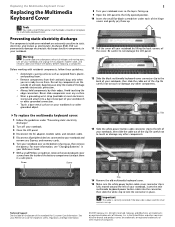
...power button cable cover connector clip is facing up . 11 Pull the cover off your notebook. 3 Close the LCD panel. 4 Disconnect the AC adapter, modem cable, and network cable. 5 Disconnect all peripheral devices connected to the back of your Reference Guide. 7 With a small Phillips screwdriver, remove... the two keyboard cover screws from their edges. Do not lay components on the bottom of Gateway, Inc. Be careful not to touch or damage any surface. • Wear a grounding wrist strap (available at most electronics stores) and ...
...power button cable cover connector clip is facing up . 11 Pull the cover off your notebook. 3 Close the LCD panel. 4 Disconnect the AC adapter, modem cable, and network cable. 5 Disconnect all peripheral devices connected to the back of your Reference Guide. 7 With a small Phillips screwdriver, remove... the two keyboard cover screws from their edges. Do not lay components on the bottom of Gateway, Inc. Be careful not to touch or damage any surface. • Wear a grounding wrist strap (available at most electronics stores) and ...
8512680 - Component Replacement Manual
Page 11
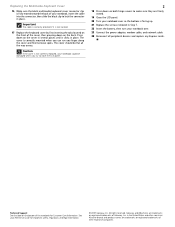
... Express cards. Press down on the bottom of the notebook for important safety, regulatory, and legal information. © 2007 Gateway, Inc. All rights reserved. Gateway and eMachines are trademarks or registered trademarks of Gateway, Inc. The cover is correctly mounted when you can run you try to close the LCD panel. 2 18 Press... slide the black clip to make sure they are firmly seated. 19 Close the LCD panel. 20 Turn your notebook over . 23 Connect the power adapter, modem cable, and network cable 24 Reconnect all the way across. All other countries.
... Express cards. Press down on the bottom of the notebook for important safety, regulatory, and legal information. © 2007 Gateway, Inc. All rights reserved. Gateway and eMachines are trademarks or registered trademarks of Gateway, Inc. The cover is correctly mounted when you can run you try to close the LCD panel. 2 18 Press... slide the black clip to make sure they are firmly seated. 19 Close the LCD panel. 20 Turn your notebook over . 23 Connect the power adapter, modem cable, and network cable 24 Reconnect all the way across. All other countries.
8512680 - Component Replacement Manual
Page 12
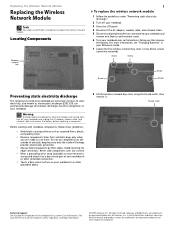
...module: 1 Follow the guidelines under "Preventing static electricity discharge." 2 Turn off your notebook. 3 Close the LCD panel. 4 Disconnect the AC adapter, modem cable, and network cable. 5 Disconnect all peripheral devices connected to dangerous electrical voltages and moving parts, turn off your notebook and remove any.... • Always hold components by their antistatic bags only when you are trademarks or registered trademarks of Gateway, Inc. Replacing the Wireless Network Module Replacing the Wireless Network Module Tools You need a small Phillips screwdriver to use them.
...module: 1 Follow the guidelines under "Preventing static electricity discharge." 2 Turn off your notebook. 3 Close the LCD panel. 4 Disconnect the AC adapter, modem cable, and network cable. 5 Disconnect all peripheral devices connected to dangerous electrical voltages and moving parts, turn off your notebook and remove any.... • Always hold components by their antistatic bags only when you are trademarks or registered trademarks of Gateway, Inc. Replacing the Wireless Network Module Replacing the Wireless Network Module Tools You need a small Phillips screwdriver to use them.

8512680 - Component Replacement Manual
Page 13
Technical Support See the label on the bottom of Gateway, Inc. All rights reserved. If the module does not fit, make sure that the notch in the module lines up with the tab in the ... trademarks of the notebook for important safety, regulatory, and legal information. © 2007 Gateway, Inc. See your notebook over. 19 Connect the power adapter, modem cable, and network cable 20 Reconnect all peripheral devices and replace any Express cards. Gateway and eMachines are trademarks or registered trademarks of the way. 11 Remove the...
Technical Support See the label on the bottom of Gateway, Inc. All rights reserved. If the module does not fit, make sure that the notch in the module lines up with the tab in the ... trademarks of the notebook for important safety, regulatory, and legal information. © 2007 Gateway, Inc. See your notebook over. 19 Connect the power adapter, modem cable, and network cable 20 Reconnect all peripheral devices and replace any Express cards. Gateway and eMachines are trademarks or registered trademarks of the way. 11 Remove the...
8512567 - Setup Poster (Inside)
Page 1
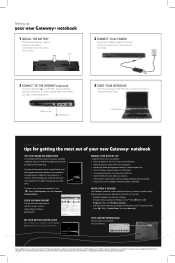
...POWER Leave the AC adapter plugged in place. CHECK GATEWAY SUPPORT For help : tips for getting the most out of Gateway, Inc. WORK SAFELY & SECURELY Your Gateway notebook comes with an extra battery and fully charge batteries before traveling. • Use your AC power adapter whenever power is available...you can comfortably see your Reference Guide that has been included on your online documentation, click (Start), All Programs, then click Gateway Documentation. For general information about common issues, visit our Internet Support Site at least three hours the first time, so ...
...POWER Leave the AC adapter plugged in place. CHECK GATEWAY SUPPORT For help : tips for getting the most out of Gateway, Inc. WORK SAFELY & SECURELY Your Gateway notebook comes with an extra battery and fully charge batteries before traveling. • Use your AC power adapter whenever power is available...you can comfortably see your Reference Guide that has been included on your online documentation, click (Start), All Programs, then click Gateway Documentation. For general information about common issues, visit our Internet Support Site at least three hours the first time, so ...

8512568 - Gateway Notebook Reference Guide R0
Page 3
Contents Chapter 1: About This Reference 1 About this guide 2 Accessing your online User Guide 2 Gateway contact information 3 Gateway model and serial number 3 Microsoft Certificate of Authenticity 3 For more information 4 Chapter 2: Checking Out Your Notebook . . . . . 5 Front 6 Left 7 Right 8 Back... computer desk and chair 15 Sitting at your notebook 15 Avoiding discomfort and injury from repetitive strain . . 15 Connecting the AC adapter 16 Protecting from power source problems 18 Connecting to a broadband modem or network 18 Connecting the optional dial-up modem 19 Starting ...
Contents Chapter 1: About This Reference 1 About this guide 2 Accessing your online User Guide 2 Gateway contact information 3 Gateway model and serial number 3 Microsoft Certificate of Authenticity 3 For more information 4 Chapter 2: Checking Out Your Notebook . . . . . 5 Front 6 Left 7 Right 8 Back... computer desk and chair 15 Sitting at your notebook 15 Avoiding discomfort and injury from repetitive strain . . 15 Connecting the AC adapter 16 Protecting from power source problems 18 Connecting to a broadband modem or network 18 Connecting the optional dial-up modem 19 Starting ...

8512568 - Gateway Notebook Reference Guide R0
Page 17
...this optional jack. For more information, see "Connecting the optional dial-up modem cable into this optional jack. Plug the AC adapter cable into these slots are blocked, your notebook so air vents are blocked, the notebook may overheat resulting in unexpected shutdown or...62. Back Ventilation fan Component Icon Ventilation fan Power connector Modem jack (optional) Power connector Modem jack Description Helps cool internal components. www.gateway.com Component HDMI out jack (optional) eSATA jack (optional) Monitor port Icon HDMI eSATA Description Plug an HDMI device, such as a...
...this optional jack. For more information, see "Connecting the optional dial-up modem cable into this optional jack. Plug the AC adapter cable into these slots are blocked, your notebook so air vents are blocked, the notebook may overheat resulting in unexpected shutdown or...62. Back Ventilation fan Component Icon Ventilation fan Power connector Modem jack (optional) Power connector Modem jack Description Helps cool internal components. www.gateway.com Component HDMI out jack (optional) eSATA jack (optional) Monitor port Icon HDMI eSATA Description Plug an HDMI device, such as a...

8512568 - Gateway Notebook Reference Guide R0
Page 21
CHAPTER3 Setting Up and Getting Started • Working safely and comfortably • Connecting the AC adapter • Connecting the optional dial-up modem • Connecting to a broadband modem or network • Starting your notebook • Turning off your notebook • Restarting (...
CHAPTER3 Setting Up and Getting Started • Working safely and comfortably • Connecting the AC adapter • Connecting the optional dial-up modem • Connecting to a broadband modem or network • Starting your notebook • Turning off your notebook • Restarting (...
8512568 - Gateway Notebook Reference Guide R0
Page 24
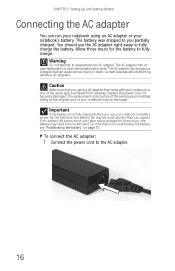
... the power cord to fully charge. Allow three hours for the battery to the AC adapter. 16 Contact Gateway about returning defective AC adapters. Important If the battery is not fully charged before you expect. If the battery life seems short even after being charged for ... power for three hours, the battery may be of the same type purchased from Gateway. CHAPTER 3: Setting Up and Getting Started Connecting the AC adapter You can cause serious injury or death. The AC adapter has no user-replaceable or user-serviceable parts inside. Caution Make sure that can run...
... the power cord to fully charge. Allow three hours for the battery to the AC adapter. 16 Contact Gateway about returning defective AC adapters. Important If the battery is not fully charged before you expect. If the battery life seems short even after being charged for ... power for three hours, the battery may be of the same type purchased from Gateway. CHAPTER 3: Setting Up and Getting Started Connecting the AC adapter You can cause serious injury or death. The AC adapter has no user-replaceable or user-serviceable parts inside. Caution Make sure that can run...

8512568 - Gateway Notebook Reference Guide R0
Page 25
Important If the battery charge indicator does not turn blue after three hours, contact Gateway Customer Care at the location shown on page 3. 17 www.gateway.com 2 Connect the AC adapter to your notebook's power connector. 3 Plug the power cord into a different wall outlet. 4 When you finish ...the first time, turn on, complete the following steps until it turns on: • Unplug the adapter from your notebook connected to the AC adapter. • Plug the power cord into a wall outlet. The battery charge indicator turns on (see "Gateway contact information" on the Customer Care label.
Important If the battery charge indicator does not turn blue after three hours, contact Gateway Customer Care at the location shown on page 3. 17 www.gateway.com 2 Connect the AC adapter to your notebook's power connector. 3 Plug the power cord into a different wall outlet. 4 When you finish ...the first time, turn on, complete the following steps until it turns on: • Unplug the adapter from your notebook connected to the AC adapter. • Plug the power cord into a wall outlet. The battery charge indicator turns on (see "Gateway contact information" on the Customer Care label.
8512568 - Gateway Notebook Reference Guide R0
Page 66
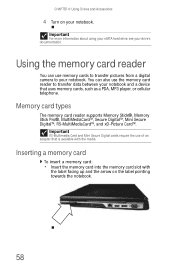
.... CHAPTER 4: Using Drives and Accessories 4 Turn on the label pointing towards the notebook. 58 Using the memory card reader You can also use of an adapter that uses memory cards, such as a PDA, MP3 player, or cellular telephone.
.... CHAPTER 4: Using Drives and Accessories 4 Turn on the label pointing towards the notebook. 58 Using the memory card reader You can also use of an adapter that uses memory cards, such as a PDA, MP3 player, or cellular telephone.

8512568 - Gateway Notebook Reference Guide R0
Page 80
...72 If you plan on taking your notebook, see "Recharging the battery" on page 68. For more information about traveling with your AC power adapter, also take a single-plug surge protector. • If you do not use battery power by running optical drives. • Use the ...(also called save to disk) writes all current memory (RAM) information to lengthen the life of power. • Recharge the battery often, take electrical adapters. Using alternate power sources To extend battery life, use the following power modes to the hard drive, then turns your notebook's battery: • Sleep...
...72 If you plan on taking your notebook, see "Recharging the battery" on page 68. For more information about traveling with your AC power adapter, also take a single-plug surge protector. • If you do not use battery power by running optical drives. • Use the ...(also called save to disk) writes all current memory (RAM) information to lengthen the life of power. • Recharge the battery often, take electrical adapters. Using alternate power sources To extend battery life, use the following power modes to the hard drive, then turns your notebook's battery: • Sleep...


