8512680 - Component Replacement Manual
Page 4
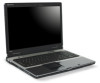
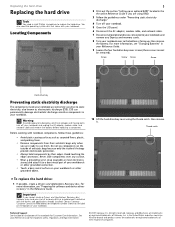
.... • Always hold components by their respective companies. Thumb notch To replace the hard drive: 1 If possible, create a Drivers and Applications Recovery disc. All rights reserved. Gateway and eMachines are extremely sensitive to static electricity, also known as carpeted floors, plastic,... you cannot create a Drivers and Applications Recovery disc, Gateway may send you are using the thumb notch, then remove it to replace the hard drive. All other countries. Replacing the hard drive Replacing the hard drive Tools You need the operating system disc that came with...
.... • Always hold components by their respective companies. Thumb notch To replace the hard drive: 1 If possible, create a Drivers and Applications Recovery disc. All rights reserved. Gateway and eMachines are extremely sensitive to static electricity, also known as carpeted floors, plastic,... you cannot create a Drivers and Applications Recovery disc, Gateway may send you are using the thumb notch, then remove it to replace the hard drive. All other countries. Replacing the hard drive Replacing the hard drive Tools You need the operating system disc that came with...
8512680 - Component Replacement Manual
Page 5
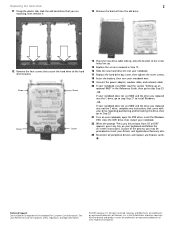
... names are replacing, then remove it. 13 Remove the bracket from CD or DVD" appears, press any key on the bottom of Gateway, Inc. Technical Support See the label on your Reference Guide for Customer Care Information. If your notebook does not use RAID and the... the screws removed in the Reference Guide, then go to step Step 21 to step Step 23. -OR- Replacing the hard drive 2 11 Using the plastic tab, slide the old hard drive that secure the hard drive to the hard drive bracket. As part of their respective companies. Screw Screw Screw Screw 14 Place the new...
... names are replacing, then remove it. 13 Remove the bracket from CD or DVD" appears, press any key on the bottom of Gateway, Inc. Technical Support See the label on your Reference Guide for Customer Care Information. If your notebook does not use RAID and the... the screws removed in the Reference Guide, then go to step Step 21 to step Step 23. -OR- Replacing the hard drive 2 11 Using the plastic tab, slide the old hard drive that secure the hard drive to the hard drive bracket. As part of their respective companies. Screw Screw Screw Screw 14 Place the new...
8512567 - Setup Poster (Inside)
Page 1
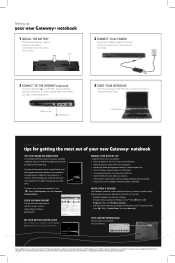
... LIFE To get the most out of your new Gateway® notebook SEE YOUR ONLINE DOCUMENTATION For detailed information about using your Gateway notebook, see your Reference Guide that has been included on your hard drive. For general information about using Windows and the programs...computer, see your User Guide that has been included on your hard drive. Then lock it clicks. CHECK GATEWAY SUPPORT For help : tips for tips on using your online documentation, click (Start), All Programs, then click Gateway Documentation. in the Windows VistaTM Security Center (click (Start),...
... LIFE To get the most out of your new Gateway® notebook SEE YOUR ONLINE DOCUMENTATION For detailed information about using your Gateway notebook, see your Reference Guide that has been included on your hard drive. For general information about using Windows and the programs...computer, see your User Guide that has been included on your hard drive. Then lock it clicks. CHECK GATEWAY SUPPORT For help : tips for tips on using your online documentation, click (Start), All Programs, then click Gateway Documentation. in the Windows VistaTM Security Center (click (Start),...
8512568 - Gateway Notebook Reference Guide R0
Page 4
...wireless radio on or off 44 IEEE 802.11 wireless network radio 45 Bluetooth radio 46 Chapter 4: Using Drives and Accessories . . . . 49 Using the DVD drive 50 Identifying drive types 50 Using a DVD drive 51 Setting up an optional RAID 52 About RAID 52 RAID 0 for performance 52 RAID 1 for ...security 53 Preparing your notebook for RAID 54 Configuring RAID 54 Getting help 57 Using an eSATA (external SATA) hard drive 57 Using the memory card reader 58 Memory card types 58 Inserting a memory card 58 Using a memory card 59 Removing a memory card 59 ...
...wireless radio on or off 44 IEEE 802.11 wireless network radio 45 Bluetooth radio 46 Chapter 4: Using Drives and Accessories . . . . 49 Using the DVD drive 50 Identifying drive types 50 Using a DVD drive 51 Setting up an optional RAID 52 About RAID 52 RAID 0 for performance 52 RAID 1 for ...security 53 Preparing your notebook for RAID 54 Configuring RAID 54 Getting help 57 Using an eSATA (external SATA) hard drive 57 Using the memory card reader 58 Memory card types 58 Inserting a memory card 58 Using a memory card 59 Removing a memory card 59 ...

8512568 - Gateway Notebook Reference Guide R0
Page 6
...Adding or replacing memory modules 103 Replacing a hard drive kit 106 Chapter 9: Troubleshooting 111 Safety guidelines 112 First steps 112 Troubleshooting 113 Audio 113 Battery 113 CD drives 113 Diskette drive (external 113 Display 114 DVD drives 115 Ethernet 117 Express Cards 117 File ...management 117 Fingerprint reader 118 Hard drive 118 Internet 119 Keyboard 120 Media Center 121 Memory 124 Memory ...
...Adding or replacing memory modules 103 Replacing a hard drive kit 106 Chapter 9: Troubleshooting 111 Safety guidelines 112 First steps 112 Troubleshooting 113 Audio 113 Battery 113 CD drives 113 Diskette drive (external 113 Display 114 DVD drives 115 Ethernet 117 Express Cards 117 File ...management 117 Fingerprint reader 118 Hard drive 118 Internet 119 Keyboard 120 Media Center 121 Memory 124 Memory ...
8512568 - Gateway Notebook Reference Guide R0
Page 10
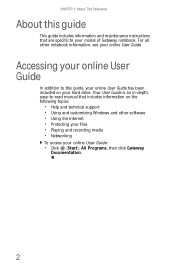
... • Using and customizing Windows and other notebook information, see your online User Guide: • Click (Start), All Programs, then click Gateway Documentation. 2 For all other software • Using the Internet • Protecting your files • Playing and recording media • Networking ... Guide. Your User Guide is an in-depth, easy-to your model of Gateway notebook. Accessing your online User Guide In addition to this guide This guide includes information and maintenance instructions that are specific to -read manual that includes information on your hard drive.
... • Using and customizing Windows and other notebook information, see your online User Guide: • Click (Start), All Programs, then click Gateway Documentation. 2 For all other software • Using the Internet • Protecting your files • Playing and recording media • Networking ... Guide. Your User Guide is an in-depth, easy-to your model of Gateway notebook. Accessing your online User Guide In addition to this guide This guide includes information and maintenance instructions that are specific to -read manual that includes information on your hard drive.

8512568 - Gateway Notebook Reference Guide R0
Page 17
... more information, see "Viewing the display on a projector, monitor, or television" on a bed, sofa, rug, or other similar surface. Connect an external SATA hard drive to the notebook. www.gateway.com Component HDMI out jack (optional) eSATA jack (optional) Monitor port Icon HDMI eSATA Description Plug an HDMI device, such as a high definition...
... more information, see "Viewing the display on a projector, monitor, or television" on a bed, sofa, rug, or other similar surface. Connect an external SATA hard drive to the notebook. www.gateway.com Component HDMI out jack (optional) eSATA jack (optional) Monitor port Icon HDMI eSATA Description Plug an HDMI device, such as a high definition...
8512568 - Gateway Notebook Reference Guide R0
Page 18
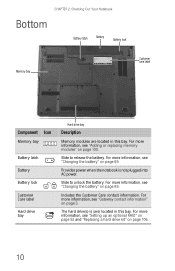
...this bay. Includes the Customer Care contact information. For more information, see "Changing the battery" on page 106. 10 The hard drive(s) is not plugged into AC power. Slide to unlock the battery. For more information, see "Setting up an optional RAID"...Gateway contact information" on page 3. CHAPTER 2: Checking Out Your Notebook Bottom Battery latch Battery Battery lock Memory bay Online Support: Tech Support Phone: Hours: Model: S/No: Customer care label Component Icon Memory bay Battery latch Battery Battery lock Customer Care label Hard drive bay Hard drive...
...this bay. Includes the Customer Care contact information. For more information, see "Changing the battery" on page 106. 10 The hard drive(s) is not plugged into AC power. Slide to unlock the battery. For more information, see "Setting up an optional RAID"...Gateway contact information" on page 3. CHAPTER 2: Checking Out Your Notebook Bottom Battery latch Battery Battery lock Memory bay Online Support: Tech Support Phone: Hours: Model: S/No: Customer care label Component Icon Memory bay Battery latch Battery Battery lock Customer Care label Hard drive bay Hard drive...
8512568 - Gateway Notebook Reference Guide R0
Page 31
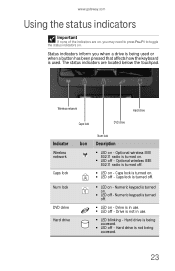
... you may need to press FN+F1 to toggle the status indicators on . Caps lock is turned on . Hard drive is turned off . ■ LED on , you when a drive is being used or when a button has been pressed that affects how the keyboard is used. The status indicators... are on - Optional wireless IEEE 802.11 radio is not being accessed. ■ LED off - Hard drive is turned off - Drive is not in use . ■ LED blinking - www.gateway.com Using the status indicators Important If none of the indicators are located below the touchpad. A ■ LED ...
... you may need to press FN+F1 to toggle the status indicators on . Caps lock is turned on . Hard drive is turned off . ■ LED on , you when a drive is being used or when a button has been pressed that affects how the keyboard is used. The status indicators... are on - Optional wireless IEEE 802.11 radio is not being accessed. ■ LED off - Hard drive is turned off - Drive is not in use . ■ LED blinking - www.gateway.com Using the status indicators Important If none of the indicators are located below the touchpad. A ■ LED ...

8512568 - Gateway Notebook Reference Guide R0
Page 38
To enroll your fingerprint to the hard drive. CHAPTER 3: Setting Up and Getting Started Enrolling your fingerprints Before you can identify you. The Welcome screen opens. 2 Click Next. The Finish screen opens. 3 Select ... so your notebook can use of the fingerprint reader, you must select this option to the hard disk-Select this option. Use this option to prevent unauthorized use the features of your notebook even if the hard drive has been removed. • Enrollment to save your fingerprints: 1 Click (Start), All Programs, Protector Suite...
To enroll your fingerprint to the hard drive. CHAPTER 3: Setting Up and Getting Started Enrolling your fingerprints Before you can identify you. The Welcome screen opens. 2 Click Next. The Finish screen opens. 3 Select ... so your notebook can use of the fingerprint reader, you must select this option to the hard disk-Select this option. Use this option to prevent unauthorized use the features of your notebook even if the hard drive has been removed. • Enrollment to save your fingerprints: 1 Click (Start), All Programs, Protector Suite...
8512568 - Gateway Notebook Reference Guide R0
Page 60
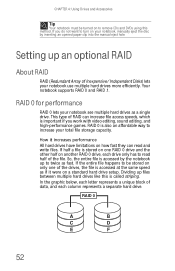
...by the notebook up to twice as fast. So, the entire file is called striping. In the graphic below, each column represents a separate hard drive. If you work with video editing, sound editing, and high-performance games. This type of data, and each letter represents a unique block ...of RAID can read half of the file. Your notebook supports RAID 0 and RAID .1. Setting up files between multiple hard drives like this method. If the entire file happens to be turned on one of Inexpensive/ Independent Disks) lets your total file storage capacity. If...
...by the notebook up to twice as fast. So, the entire file is called striping. In the graphic below, each column represents a separate hard drive. If you work with video editing, sound editing, and high-performance games. This type of data, and each letter represents a unique block ...of RAID can read half of the file. Your notebook supports RAID 0 and RAID .1. Setting up files between multiple hard drives like this method. If the entire file happens to be turned on one of Inexpensive/ Independent Disks) lets your total file storage capacity. If...

8512568 - Gateway Notebook Reference Guide R0
Page 61
... only file fragments if one in a RAID 0 array, your notebook see multiple hard drives as a single drive, you have the same single-drive storage simplicity and capacity as a larger, more expensive hard drive. www.gateway.com How it has the storage capacity of the smallest drive in the array. RAID 1 A A B B C C File reading performance (seek time) is called mirroring...
... only file fragments if one in a RAID 0 array, your notebook see multiple hard drives as a single drive, you have the same single-drive storage simplicity and capacity as a larger, more expensive hard drive. www.gateway.com How it has the storage capacity of the smallest drive in the array. RAID 1 A A B B C C File reading performance (seek time) is called mirroring...

8512568 - Gateway Notebook Reference Guide R0
Page 64
... on that volume, including operating system files. Exit, then press Enter. Delete RAID Volume, then press ENTER. Caution If your notebook. 3 Highlight 2. CHAPTER 4: Using Drives and Accessories • Strip Size-If you have selected RAID 0 select the strip (stripe) value for RAID 0. The Matrix Storage Manager closes, and your notebook... press CTRL+I. To delete a RAID volume: 1 Start (or restart) your notebook restarts. We recommend accepting the default strip value. • Capacity-Type the volume (virtual hard drive) capacity, or use the default capacity, then press ENTER.
... on that volume, including operating system files. Exit, then press Enter. Delete RAID Volume, then press ENTER. Caution If your notebook. 3 Highlight 2. CHAPTER 4: Using Drives and Accessories • Strip Size-If you have selected RAID 0 select the strip (stripe) value for RAID 0. The Matrix Storage Manager closes, and your notebook... press CTRL+I. To delete a RAID volume: 1 Start (or restart) your notebook restarts. We recommend accepting the default strip value. • Capacity-Type the volume (virtual hard drive) capacity, or use the default capacity, then press ENTER.

8512568 - Gateway Notebook Reference Guide R0
Page 65
...opens. 3 Highlight 3. Using an eSATA (external SATA) hard drive To connect your eSATA hard drive to your notebook: 1 Turn off your notebook. 2 Connect one end of the eSATA cable to your external hard drive. 3 Connect the other end of the drives you want to reset, press the spacebar to select (... the cable to the eSATA port on the Gateway Technical Support Web site (www.gateway.com) and the Intel Support & Downloads Web site (support.intel.com). A warning message appears. 5 Type Y to confirm the drive reset. www.gateway.com To reset drives to non-RAID status: 1 Start (or restart...
...opens. 3 Highlight 3. Using an eSATA (external SATA) hard drive To connect your eSATA hard drive to your notebook: 1 Turn off your notebook. 2 Connect one end of the eSATA cable to your external hard drive. 3 Connect the other end of the drives you want to reset, press the spacebar to select (... the cable to the eSATA port on the Gateway Technical Support Web site (www.gateway.com) and the Intel Support & Downloads Web site (support.intel.com). A warning message appears. 5 Type Y to confirm the drive reset. www.gateway.com To reset drives to non-RAID status: 1 Start (or restart...
8512568 - Gateway Notebook Reference Guide R0
Page 66
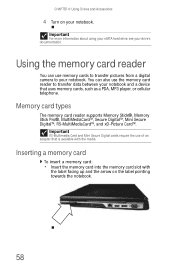
Important For more information about using your eSATA hard drive, see your notebook. Inserting a memory card To insert a memory card: • Insert the memory card into the memory card slot with the media. Using the ...™, and xD-Picture Card™. You can use memory cards to transfer pictures from a digital camera to transfer data between your notebook. CHAPTER 4: Using Drives and Accessories 4 Turn on the label pointing towards the notebook. 58 Important RS-Multimedia Card and Mini Secure Digital cards require the use the memory...
Important For more information about using your eSATA hard drive, see your notebook. Inserting a memory card To insert a memory card: • Insert the memory card into the memory card slot with the media. Using the ...™, and xD-Picture Card™. You can use memory cards to transfer pictures from a digital camera to transfer data between your notebook. CHAPTER 4: Using Drives and Accessories 4 Turn on the label pointing towards the notebook. 58 Important RS-Multimedia Card and Mini Secure Digital cards require the use the memory...

8512568 - Gateway Notebook Reference Guide R0
Page 68
... 5 Pull the Express Card out of the following ports: Universal Serial Bus (USB), IEEE 1394, HDMI (digital audio/video) and eSATA (external SATA hard drive). After doing this, you can disconnect and reconnect the device at any software the device needs. Help For more of your notebook. Installing a printer or...icon does not appear on the taskbar, click the show hidden icons button. 2 Click the Express Card name, then click Stop. CHAPTER 4: Using Drives and Accessories To remove an Express Card: 1 Turn off your notebook, then go to step 5. -ORDouble-click the remove hardware icon in the ...
... 5 Pull the Express Card out of the following ports: Universal Serial Bus (USB), IEEE 1394, HDMI (digital audio/video) and eSATA (external SATA hard drive). After doing this, you can disconnect and reconnect the device at any software the device needs. Help For more of your notebook. Installing a printer or...icon does not appear on the taskbar, click the show hidden icons button. 2 Click the Express Card name, then click Stop. CHAPTER 4: Using Drives and Accessories To remove an Express Card: 1 Turn off your notebook, then go to step 5. -ORDouble-click the remove hardware icon in the ...

8512568 - Gateway Notebook Reference Guide R0
Page 80
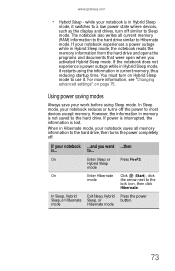
...You can use the following power modes to an EmPower™ in Sleep mode, it reads the memory information from CDs or DVDs to the hard drive, then turns your notebook completely off . • Hibernate - (also called save to disk) writes all current memory (RAM) information to the... hard drive so you activated Hibernate mode. 72 while your notebook is in -flight power receptacle, an automobile power outlet, or an automobile cigarette lighter, use ...
...You can use the following power modes to an EmPower™ in Sleep mode, it reads the memory information from CDs or DVDs to the hard drive, then turns your notebook completely off . • Hibernate - (also called save to disk) writes all current memory (RAM) information to the... hard drive so you activated Hibernate mode. 72 while your notebook is in -flight power receptacle, an automobile power outlet, or an automobile cigarette lighter, use ...
8512568 - Gateway Notebook Reference Guide R0
Page 81
...Hybrid Sleep mode to Sleep mode. However, the information in memory is in Hibernate mode, your notebook is not saved to ... to the hard drive. If power is interrupted, the information is ... In Sleep, Hybrid Exit Sleep, Hybrid Press the power Sleep, or Hibernate Sleep, or... button. When in Hybrid Sleep mode, it . mode Hibernate mode 73 www.gateway.com • Hybrid Sleep - while your notebook saves all current memory (RAM) information to the hard drive similar to most devices except memory. You must turn off similar to use it switches to...
...Hybrid Sleep mode to Sleep mode. However, the information in memory is in Hibernate mode, your notebook is not saved to ... to the hard drive. If power is interrupted, the information is ... In Sleep, Hybrid Exit Sleep, Hybrid Press the power Sleep, or Hibernate Sleep, or... button. When in Hybrid Sleep mode, it . mode Hibernate mode 73 www.gateway.com • Hybrid Sleep - while your notebook saves all current memory (RAM) information to the hard drive similar to most devices except memory. You must turn off similar to use it switches to...

8512568 - Gateway Notebook Reference Guide R0
Page 82
... create a custom power plan. Changing the power plan Power plans (groups of time. Your programs may not last as long as when the display or hard drive is the default power plan which balances performance and battery life. • Power saver -
... create a custom power plan. Changing the power plan Power plans (groups of time. Your programs may not last as long as when the display or hard drive is the default power plan which balances performance and battery life. • Power saver -

8512568 - Gateway Notebook Reference Guide R0
Page 92
...and put it . Cleaning your notebook Keeping your warranty. The case, although strong, is on because data on hard drives. • Never turn off your notebook when the drive indicator is not made to support extra weight. • When transporting your notebook to bump or drop your ... at temperatures that are not covered under a standard warranty. • Avoid dusty or dirty work environments. Magnetic fields can erase data on the hard drive could be lost or corrupted. • Avoid subjecting your notebook, we recommend that you put together a notebook cleaning kit: • A soft...
...and put it . Cleaning your notebook Keeping your warranty. The case, although strong, is on because data on hard drives. • Never turn off your notebook when the drive indicator is not made to support extra weight. • When transporting your notebook to bump or drop your ... at temperatures that are not covered under a standard warranty. • Avoid dusty or dirty work environments. Magnetic fields can erase data on the hard drive could be lost or corrupted. • Avoid subjecting your notebook, we recommend that you put together a notebook cleaning kit: • A soft...

