8512055 - Component Replacement Manual
Page 3
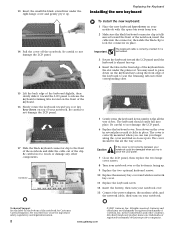
...Reference Guide. See your notebook over any PC Cards. 6 Turn your Reference Guide for Customer Care Information. www.gateway.com © 2007 Gateway, Inc. Warning To avoid exposure to static electricity, also known as carpeted floors, plastic, and packing foam. ...8226; Remove components from their respective companies. 1 Screw 8 Loosen the six memory bay cover screws (these guidelines: • Avoid static-causing surfaces such as electrostatic discharge (ESD). Gateway and eMachines are extremely sensitive to dangerous electrical voltages and moving parts, turn off...
...Reference Guide. See your notebook over any PC Cards. 6 Turn your Reference Guide for Customer Care Information. www.gateway.com © 2007 Gateway, Inc. Warning To avoid exposure to static electricity, also known as carpeted floors, plastic, and packing foam. ...8226; Remove components from their respective companies. 1 Screw 8 Loosen the six memory bay cover screws (these guidelines: • Avoid static-causing surfaces such as electrostatic discharge (ESD). Gateway and eMachines are extremely sensitive to dangerous electrical voltages and moving parts, turn off...
8512055 - Component Replacement Manual
Page 4
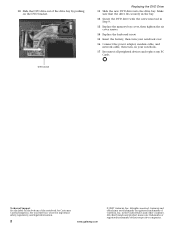
in Step 9. 13 Replace the memory bay cover, then tighten the six cover screws. 14 Replace the keyboard screw. 15 Insert the battery, then turn your notebook over. 16 Connect the ... trademarks of their respective companies. See your notebook. 17 Reconnect all peripheral devices and replace any PC Cards. All other countries. Gateway and eMachines are trademarks or registered trademarks of Gateway, Inc. Technical Support See the label on the bottom of the drive bay by pushing on your Reference Guide for Customer...
in Step 9. 13 Replace the memory bay cover, then tighten the six cover screws. 14 Replace the keyboard screw. 15 Insert the battery, then turn your notebook over. 16 Connect the ... trademarks of their respective companies. See your notebook. 17 Reconnect all peripheral devices and replace any PC Cards. All other countries. Gateway and eMachines are trademarks or registered trademarks of Gateway, Inc. Technical Support See the label on the bottom of the drive bay by pushing on your Reference Guide for Customer...
8512055 - Component Replacement Manual
Page 7
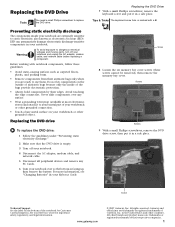
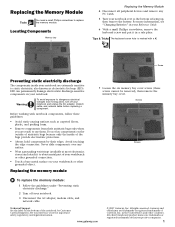
..."Preventing static electricity discharge." 2 Turn off your notebook over so the top is facing up, then remove the battery. Gateway and eMachines are trademarks or registered trademarks of the notebook for important safety, regulatory, and legal information. 12 Carefully open ... the guidelines under the bottom of Gateway, Inc. All rights reserved. ESD can permanently damage electrostatic discharge-sensitive components in the United States and other grounded object. Memory bay Wireless network bay Keyboard screw 7 Loosen the six memory bay cover screws and one wireless...
..."Preventing static electricity discharge." 2 Turn off your notebook over so the top is facing up, then remove the battery. Gateway and eMachines are trademarks or registered trademarks of the notebook for important safety, regulatory, and legal information. 12 Carefully open ... the guidelines under the bottom of Gateway, Inc. All rights reserved. ESD can permanently damage electrostatic discharge-sensitive components in the United States and other grounded object. Memory bay Wireless network bay Keyboard screw 7 Loosen the six memory bay cover screws and one wireless...
8512055 - Component Replacement Manual
Page 8
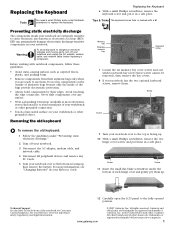
...Information. Technical Support See the label on the front edge of the notebook for important safety, regulatory, and legal information. 2 www.gateway.com © 2007 Gateway, Inc. All other countries. The keyboard should be damaged when you finger along the front edge of the keyboard to seat the ...keyboard keys-down on top of the keyboard slightly, then slowly slide it up . 9 Replace the two optional keyboard screws. 10 Replace the memory bay cover and wireless network bay cover. 11 Replace the keyboard screw. 12 Insert the battery, then turn your notebook over. 13 Connect ...
...Information. Technical Support See the label on the front edge of the notebook for important safety, regulatory, and legal information. 2 www.gateway.com © 2007 Gateway, Inc. All other countries. The keyboard should be damaged when you finger along the front edge of the keyboard to seat the ...keyboard keys-down on top of the keyboard slightly, then slowly slide it up . 9 Replace the two optional keyboard screws. 10 Replace the memory bay cover and wireless network bay cover. 11 Replace the keyboard screw. 12 Insert the battery, then turn your notebook over. 13 Connect ...
8512055 - Component Replacement Manual
Page 9
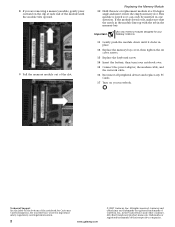
...metal part of the notebook for important safety, regulatory, and legal information. Avoid touching the edge connectors. Gateway and eMachines are ready to replace the memory module. Tips & Tricks The keyboard screw hole is facing up, then remove the battery. Never slide... a component. Screw Preventing static electricity discharge The components inside of Gateway, Inc. in your notebook. 3 Disconnect the AC adapter, modem cable, and network cable. Replacing the memory module 7 Loosen the six memory bay cover screws (these guidelines: • Avoid static-causing surfaces...
...metal part of the notebook for important safety, regulatory, and legal information. Avoid touching the edge connectors. Gateway and eMachines are ready to replace the memory module. Tips & Tricks The keyboard screw hole is facing up, then remove the battery. Never slide... a component. Screw Preventing static electricity discharge The components inside of Gateway, Inc. in your notebook. 3 Disconnect the AC adapter, modem cable, and network cable. Replacing the memory module 7 Loosen the six memory bay cover screws (these guidelines: • Avoid static-causing surfaces...
8512055 - Component Replacement Manual
Page 10
...the modem cable, and the network cable. 16 Reconnect all peripheral devices and replace any PC Cards. 17 Turn on the bottom of Gateway, Inc. in place. 12 Replace the memory bay cover, then tighten the six cover screws. 13 Replace the keyboard screw. 14 Insert the battery, then turn your... Guide for Customer Care Information. This module is keyed so it can only be inserted in the memory bay. Gateway and eMachines are trademarks or registered trademarks of the slot. Replacing the Memory Module 10 Hold the new or replacement module at each end of the module until it clicks in...
...the modem cable, and the network cable. 16 Reconnect all peripheral devices and replace any PC Cards. 17 Turn on the bottom of Gateway, Inc. in place. 12 Replace the memory bay cover, then tighten the six cover screws. 13 Replace the keyboard screw. 14 Insert the battery, then turn your... Guide for Customer Care Information. This module is keyed so it can only be inserted in the memory bay. Gateway and eMachines are trademarks or registered trademarks of the slot. Replacing the Memory Module 10 Hold the new or replacement module at each end of the module until it clicks in...


