
8511418 - Component Replacement Manual
Page 5
... Applications Recovery discs" in your online hardware guide. 7 Remove the two hard drive bay cover screws, slide the hard drive bay cover, then remove it to static electricity, also known as carpeted floors, plastic, and packing foam. • Remove components from their respective companies. 1 www.gateway.com © 2006 Gateway, Inc. ESD can permanently damage electrostatic discharge-sensitive components...
... Applications Recovery discs" in your online hardware guide. 7 Remove the two hard drive bay cover screws, slide the hard drive bay cover, then remove it to static electricity, also known as carpeted floors, plastic, and packing foam. • Remove components from their respective companies. 1 www.gateway.com © 2006 Gateway, Inc. ESD can permanently damage electrostatic discharge-sensitive components...

8511418 - Component Replacement Manual
Page 6
... safety, regulatory, and legal information. 2 www.gateway.com © 2006 Gateway, Inc. See your notebook. 17 If the hard drive was sent to you from the old drive. All other countries. Replacing the Hard Drive Kit 10 Place the new drive, label side up, onto the cover so the...network cable. 15 Reconnect all peripheral devices and replace any PC Cards. 16 Turn on the bottom of Gateway, Inc. All rights reserved. Gateway and eMachines are trademarks or registered trademarks of their respective companies. 8 Remove the four screws that secure the cover to the hard drive cover.
... safety, regulatory, and legal information. 2 www.gateway.com © 2006 Gateway, Inc. See your notebook. 17 If the hard drive was sent to you from the old drive. All other countries. Replacing the Hard Drive Kit 10 Place the new drive, label side up, onto the cover so the...network cable. 15 Reconnect all peripheral devices and replace any PC Cards. 16 Turn on the bottom of Gateway, Inc. All rights reserved. Gateway and eMachines are trademarks or registered trademarks of their respective companies. 8 Remove the four screws that secure the cover to the hard drive cover.
8511369 - Gateway Notebook Hardware Reference
Page 4
Contents www.gateway.com Chapter 3: Maintaining and Upgrading Your Notebook 31 Preventing static electricity discharge 32 Adding or replacing memory 32 Replacing the DVD drive 35 Replacing the hard drive kit 38 Replacing the keyboard 40 Removing the keyboard 40 Installing the keyboard 45 Appendix A: Safety, Regulatory, and Legal Information 47 Index 59 ii
Contents www.gateway.com Chapter 3: Maintaining and Upgrading Your Notebook 31 Preventing static electricity discharge 32 Adding or replacing memory 32 Replacing the DVD drive 35 Replacing the hard drive kit 38 Replacing the keyboard 40 Removing the keyboard 40 Installing the keyboard 45 Appendix A: Safety, Regulatory, and Legal Information 47 Index 59 ii
8511369 - Gateway Notebook Hardware Reference
Page 42
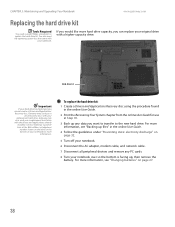
...under "Preventing static electricity discharge" on page 27. 38 To replace the hard drive kit: 1 Create a Drivers and Applications Recovery disc using the procedure found in Step 18. 3 Back up , then remove the battery. For more information, see "Changing batteries" on page 32... hard drive capacity, you want to transfer to replace the hard drive kit. You also need a small Phillips screwdriver to the new hard drive. Gateway may send you a set of your replacement hard drive. CHAPTER 3: Maintaining and Upgrading Your Notebook www.gateway.com Replacing the hard drive ...
...under "Preventing static electricity discharge" on page 27. 38 To replace the hard drive kit: 1 Create a Drivers and Applications Recovery disc using the procedure found in Step 18. 3 Back up , then remove the battery. For more information, see "Changing batteries" on page 32... hard drive capacity, you want to transfer to replace the hard drive kit. You also need a small Phillips screwdriver to the new hard drive. Gateway may send you a set of your replacement hard drive. CHAPTER 3: Maintaining and Upgrading Your Notebook www.gateway.com Replacing the hard drive ...
8511369 - Gateway Notebook Hardware Reference
Page 43
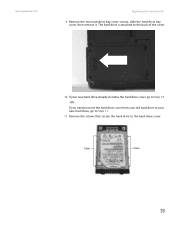
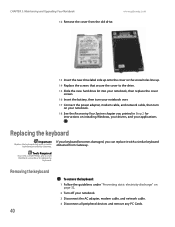
Screws Screws 39 If you need to move the hard drive cover from your old hard drive to your new hard drive already includes the hard drive cover, go to Step 11. 11 Remove the screws that secure the hard drive to Step 15. -OR- www.gateway.com Replacing the hard drive kit 9 Remove the two hard drive bay cover screws, slide the hard drive bay cover, then remove it. The hard drive is attached to the back of the cover. 10 If your new hard drive, go to the hard drive cover.
Screws Screws 39 If you need to move the hard drive cover from your old hard drive to your new hard drive already includes the hard drive cover, go to Step 11. 11 Remove the screws that secure the hard drive to Step 15. -OR- www.gateway.com Replacing the hard drive kit 9 Remove the two hard drive bay cover screws, slide the hard drive bay cover, then remove it. The hard drive is attached to the back of the cover. 10 If your new hard drive, go to the hard drive cover.
8511369 - Gateway Notebook Hardware Reference
Page 44
..., modem cable, and network cable. 4 Disconnect all peripheral devices and remove any PC Cards. Tools Required You need a small Phillips and a small flat-blade screwdriver to the drive. 15 Slide the new hard drive kit into your notebook, then replace the cover screws. 16 Insert the... notebook. 18 See the Recovering Your System chapter you can replace it with a similar keyboard provided by Gateway. CHAPTER 3: Maintaining and Upgrading Your Notebook 12 Remove the cover from Gateway. Replacing the keyboard Important Replace the keyboard only with a similar keyboard obtained from the old...
..., modem cable, and network cable. 4 Disconnect all peripheral devices and remove any PC Cards. Tools Required You need a small Phillips and a small flat-blade screwdriver to the drive. 15 Slide the new hard drive kit into your notebook, then replace the cover screws. 16 Insert the... notebook. 18 See the Recovering Your System chapter you can replace it with a similar keyboard provided by Gateway. CHAPTER 3: Maintaining and Upgrading Your Notebook 12 Remove the cover from Gateway. Replacing the keyboard Important Replace the keyboard only with a similar keyboard obtained from the old...
8511369 - Gateway Notebook Hardware Reference
Page 63
...charge indicator 6 charging 12 installing 27 latch 10 locating 10 purchasing 29 recalibrating 29 recharging 12 release latch 10 replacing 27 bays battery 27 hard drive 10 memory 10, 32 BIOS Setup utility 29 Bluetooth 19 brightness adjusting 20 brightness keys 20 C cable lock 7 cable modem 14 Caps Lock...25 inserting PC Card 26 memory card slot 8 PC Card slot 8 removing memory card 25 removing PC Card 26 slots 25, 26 types of memory cards supported 25 carrying case 29 CD inserting 25 CD drive See DVD drive cellular phone memory cards 25 Certificate of Authenticity 3 clicking 22 closing ...
...charge indicator 6 charging 12 installing 27 latch 10 locating 10 purchasing 29 recalibrating 29 recharging 12 release latch 10 replacing 27 bays battery 27 hard drive 10 memory 10, 32 BIOS Setup utility 29 Bluetooth 19 brightness adjusting 20 brightness keys 20 C cable lock 7 cable modem 14 Caps Lock...25 inserting PC Card 26 memory card slot 8 PC Card slot 8 removing memory card 25 removing PC Card 26 slots 25, 26 types of memory cards supported 25 carrying case 29 CD inserting 25 CD drive See DVD drive cellular phone memory cards 25 Certificate of Authenticity 3 clicking 22 closing ...

8511369 - Gateway Notebook Hardware Reference
Page 64
Index opening 22 finding specifications 3 Firewire port 8 Fn key 19 folders opening 22 function keys 18 G Gateway model number 2, 10 serial number 2, 3 Support 3 H hard drive bay 10 indicator 17 installing 38 replacing 38 headphone jack 6 hot-swapping 26 I i.Link port 8 IEEE 1394 port 8 ...6 LCD panel release latch 6 switching display 19 LCD/CRT system key 19 lock Kensington cable 7 M memory bay 10 installing 32 purchasing 29 removing 32 replacing 32 memory card reader locating 8 memory card types supported 25 using 25 microphone jack 6 Microsoft Certificate of Authenticity 3 model number ...
Index opening 22 finding specifications 3 Firewire port 8 Fn key 19 folders opening 22 function keys 18 G Gateway model number 2, 10 serial number 2, 3 Support 3 H hard drive bay 10 indicator 17 installing 38 replacing 38 headphone jack 6 hot-swapping 26 I i.Link port 8 IEEE 1394 port 8 ...6 LCD panel release latch 6 switching display 19 LCD/CRT system key 19 lock Kensington cable 7 M memory bay 10 installing 32 purchasing 29 removing 32 replacing 32 memory card reader locating 8 memory card types supported 25 using 25 microphone jack 6 Microsoft Certificate of Authenticity 3 model number ...
8511264 - User Guide Gateway Notebook
Page 38
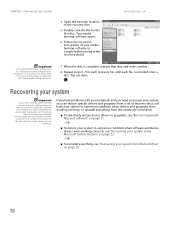
...more help . For a fee, Customer Care may be able to provide a set of recovery discs, roll back your system from the hard drive, contact Gateway Customer Care for the first disc. OR - ■ To restore your system to a previous condition when software and device drivers were ... on. 7 When the disc is complete, remove that disc and insert another. 8 Repeat steps 5-7 for each recovery file until each disc from the notebook's hard drive. ■ To selectively restore device drivers or programs, see "Recovering your notebook. www.gateway.com Important Use a permanent marker to label ...
...more help . For a fee, Customer Care may be able to provide a set of recovery discs, roll back your system from the hard drive, contact Gateway Customer Care for the first disc. OR - ■ To restore your system to a previous condition when software and device drivers were ... on. 7 When the disc is complete, remove that disc and insert another. 8 Repeat steps 5-7 for each recovery file until each disc from the notebook's hard drive. ■ To selectively restore device drivers or programs, see "Recovering your notebook. www.gateway.com Important Use a permanent marker to label ...
8511264 - User Guide Gateway Notebook
Page 94
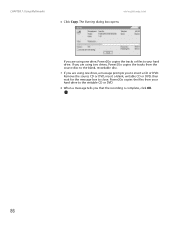
If you are using two drives, Power2Go copies the tracks from your hard drive. Remove the source CD or DVD, insert a blank, writable CD or DVD, then wait for the message box to insert a CD or DVD. The Burning dialog ..., recordable disc. 7 If you are using one drive, Power2Go copies the tracks or files to your hard drive to the writable CD or DVD. 8 When a message tells you to close. If you are using one drive, a message prompts you that the recording is complete, click OK. 86 CHAPTER 7: Using Multimedia www.gateway.com 6 Click Copy.
If you are using two drives, Power2Go copies the tracks from your hard drive. Remove the source CD or DVD, insert a blank, writable CD or DVD, then wait for the message box to insert a CD or DVD. The Burning dialog ..., recordable disc. 7 If you are using one drive, Power2Go copies the tracks or files to your hard drive to the writable CD or DVD. 8 When a message tells you to close. If you are using one drive, a message prompts you that the recording is complete, click OK. 86 CHAPTER 7: Using Multimedia www.gateway.com 6 Click Copy.
8511264 - User Guide Gateway Notebook
Page 140
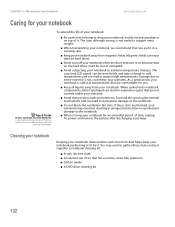
...gateway.com Caring for an extended period of it in a carrying case. ■ Keep your notebook away from magnetic fields. Magnetic fields can of air that are not covered under your notebook is not made to either extreme is partially discharged. When spilled onto notebook components, almost any objects on the hard drive... soft, lint-free cloth ■ An aerosol can erase data on hard drives. ■ Never turn off your notebook when the drive indicator is on because data on top of time, unplug AC power and remove the battery after it is not covered by your notebook to bump or...
...gateway.com Caring for an extended period of it in a carrying case. ■ Keep your notebook away from magnetic fields. Magnetic fields can of air that are not covered under your notebook is not made to either extreme is partially discharged. When spilled onto notebook components, almost any objects on the hard drive... soft, lint-free cloth ■ An aerosol can erase data on hard drives. ■ Never turn off your notebook when the drive indicator is on because data on top of time, unplug AC power and remove the battery after it is not covered by your notebook to bump or...
8511264 - User Guide Gateway Notebook
Page 146
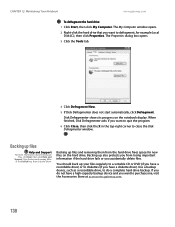
...Help and Support For more information about backing up files and removing them from losing important information if the hard drive fails or you accidentally delete files. CHAPTER 12: Maintaining Your Notebook www.gateway.com To defragment the hard drive: 1 Click Start, then click My Computer. Backing up...finished, Disk Defragmenter asks if you want to purchase one, visit the Accessories Store at accessories.gateway.com. 138 The My Computer window opens. 2 Right-click the hard drive that you want to defragment, for new files on the notebook display. Backing up files, ...
...Help and Support For more information about backing up files and removing them from losing important information if the hard drive fails or you accidentally delete files. CHAPTER 12: Maintaining Your Notebook www.gateway.com To defragment the hard drive: 1 Click Start, then click My Computer. Backing up...finished, Disk Defragmenter asks if you want to purchase one, visit the Accessories Store at accessories.gateway.com. 138 The My Computer window opens. 2 Right-click the hard drive that you want to defragment, for new files on the notebook display. Backing up files, ...
8511264 - User Guide Gateway Notebook
Page 156
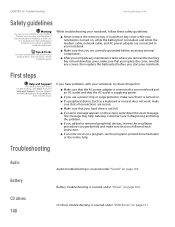
..., make sure that your hard drive is not full. ■ If an error message appears on the screen, write down the exact message. The message may help Gateway Customer Care in diagnosing and fixing the problem. ■ If you added or removed peripheral devices, review the installation... the keyword troubleshooting in a program, see the hardware guide. CHAPTER 14: Troubleshooting www.gateway.com Safety guidelines Warning Do not try these safety guidelines: ■ Never remove the memory bay or hard drive bay cover while your notebook is turned on, while the battery(ies) is installed, ...
..., make sure that your hard drive is not full. ■ If an error message appears on the screen, write down the exact message. The message may help Gateway Customer Care in diagnosing and fixing the problem. ■ If you added or removed peripheral devices, review the installation... the keyword troubleshooting in a program, see the hardware guide. CHAPTER 14: Troubleshooting www.gateway.com Safety guidelines Warning Do not try these safety guidelines: ■ Never remove the memory bay or hard drive bay cover while your notebook is turned on, while the battery(ies) is installed, ...

8511264 - User Guide Gateway Notebook
Page 158
...Checking the hard drive for errors" on , try using the diskette again. The screen is not correct ■ Change the screen resolution from sources of pixels affected. The display has pixels that the diskette you feel these to an external monitor or projector. Gateway's inspection standards...system keys. ■ Make sure the notebook is lit continuously ■ Remove the diskette from the diskette drive, then press ENTER. ■ Make sure that are using is IBM-compatible. The modular drive status indicator is not in active-matrix LCD screens. Display Tips & ...
...Checking the hard drive for errors" on , try using the diskette again. The screen is not correct ■ Change the screen resolution from sources of pixels affected. The display has pixels that the diskette you feel these to an external monitor or projector. Gateway's inspection standards...system keys. ■ Make sure the notebook is lit continuously ■ Remove the diskette from the diskette drive, then press ENTER. ■ Make sure that are using is IBM-compatible. The modular drive status indicator is not in active-matrix LCD screens. Display Tips & ...
8511264 - User Guide Gateway Notebook
Page 161
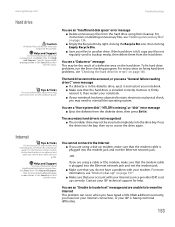
...9632; Make sure that your account with your modem. www.gateway.com Troubleshooting Hard drive Caution All deleted files will be accessed, or you see a "General failure reading drive C" error message ■ If a diskette is in the diskette drive, eject it , then restart your notebook. ■ If... system. Help and Support For more information, see "Modem (dial-up correctly. You see "Checking the hard drive for help. For more information about removing your hard drive, see the hardware guide. Type the keyword file management in the Search box, then click the arrow....
...9632; Make sure that your account with your modem. www.gateway.com Troubleshooting Hard drive Caution All deleted files will be accessed, or you see a "General failure reading drive C" error message ■ If a diskette is in the diskette drive, eject it , then restart your notebook. ■ If... system. Help and Support For more information, see "Modem (dial-up correctly. You see "Checking the hard drive for help. For more information about removing your hard drive, see the hardware guide. Type the keyword file management in the Search box, then click the arrow....
8511264 - User Guide Gateway Notebook
Page 185
...139 video to computer 73 travel tips 143 troubleshooting audio 165 automated system 167 device installation 149 diskette drive 149 display 150 DVD drive 151 faxes 158 files 152 general guidelines 148 hard drive 153 Internet connection 153, 158 IRQ conflict 149 keyboard 154 LCD panel 150 Media Center 155 memory ... protecting against 44, 129, 133 removing 44, 133 voice recognition 11 volume adjusting 62 adjusting modem 159 controls 62 muting 62 troubleshooting 165 W WAV file 65 Web browser 36, 37 Web page 37 Web site 37 connecting to 38 downloading files 39 Gateway 2 window 10 close button 10 ...
...139 video to computer 73 travel tips 143 troubleshooting audio 165 automated system 167 device installation 149 diskette drive 149 display 150 DVD drive 151 faxes 158 files 152 general guidelines 148 hard drive 153 Internet connection 153, 158 IRQ conflict 149 keyboard 154 LCD panel 150 Media Center 155 memory ... protecting against 44, 129, 133 removing 44, 133 voice recognition 11 volume adjusting 62 adjusting modem 159 controls 62 muting 62 troubleshooting 165 W WAV file 65 Web browser 36, 37 Web page 37 Web site 37 connecting to 38 downloading files 39 Gateway 2 window 10 close button 10 ...


